

VTiger & Auth.net Integration seamlessly connects the 2 applications with very little effort. It supports customer and payment profiles, which is all you would possibly need for such integration. The extensions is designed so it does not require VTiger to be PCI compliant, meaning that all the sensitive information/payment profiles are stored on Authorize.net servers.
The integration supports web payments (send an invoice via email with payment options), manual payments (save credit card information and charge it at any time), scheduled/recurring payments (utilizing Recurring Invoice feature, you can schedule monthly/quarterly/yearly payments).
Extension is compatible with VTiger 6.x and 7.x. (We did not include screenshots for 6.x since the functionality is the same as on 7.x).
Requirements
You will need Authorize.net account as well as the following VTiger extensions installed:
Authorize.Net Integration (Integration Add-on)– Installed through the extension pack. Used to create customer/payment profiles and communicate with authorize.net. Click here for more details on the Integration Add-on requirement.
Payments – Included in the extension pack (required).
Document Designer – Included in the extension pack (optional). Used to send invoices via email/url where the customer can pay online.
Configuration
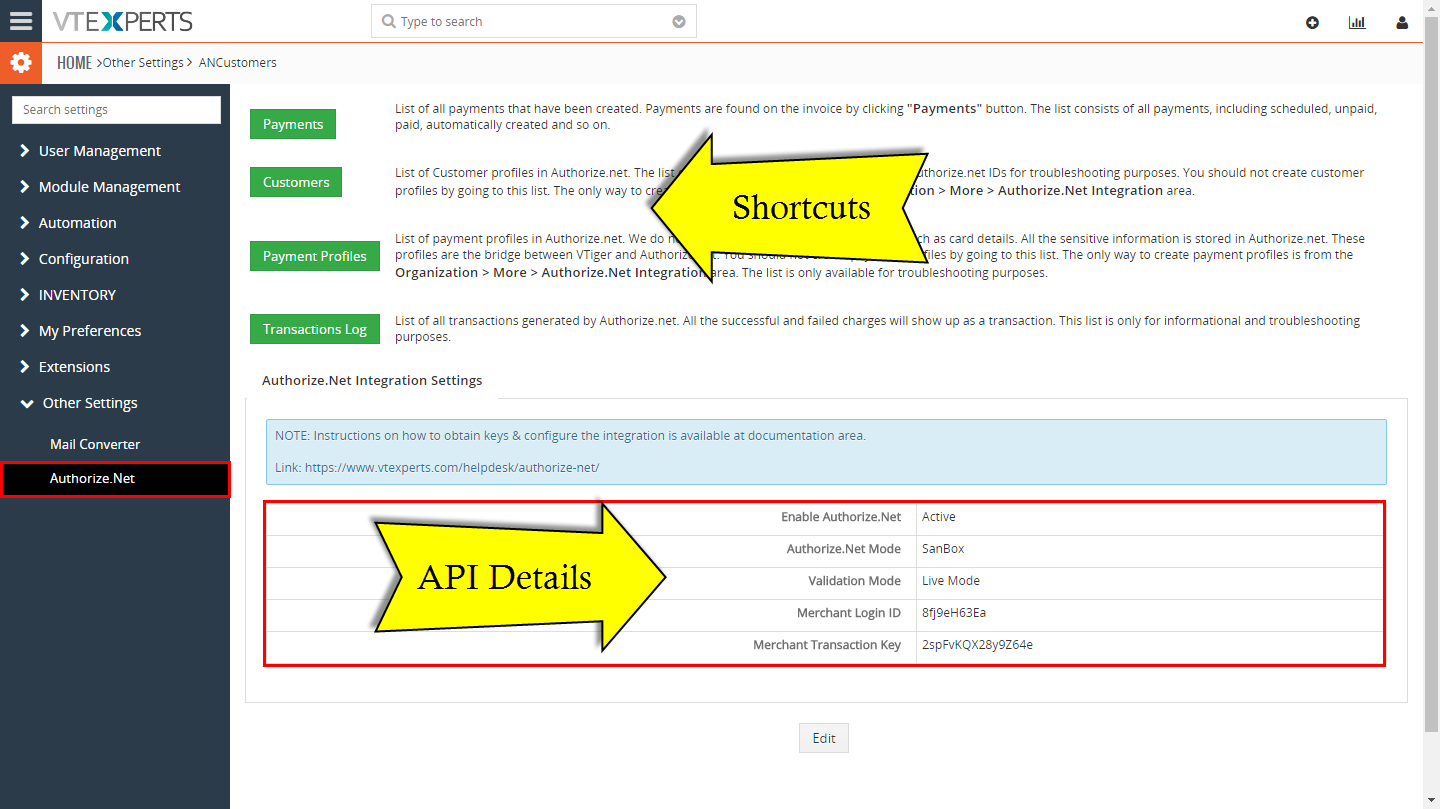
To access configuration area, go to Menu > CRM Settings > VTiger Premium > Authorize.Net
Payments – List of all payments that have been created. Payments are found on the invoice by clicking “Payments” button. The list consists of all payments, including scheduled, unpaid, paid, automatically created and so on.
Customers – List of Customer profiles in Authorize.net. The list only includes very basic information and authorize.net IDs for troubleshooting purposes. You should not create customer profiles by going to this list. The only way to create customer profiles is from the Organization > More > Authorize.Net Integration area.
Payment Profiles – List of payment profiles in Authorize.net. We do not keep any of the sensitive information such as card details. All the sensitive information is stored in Authorize.net. These profiles are the bridge between VTiger and Authorize.net. You should not create payment profiles by going to this list. The only way to create payment profiles is from the Organization > More > Authorize.Net Integration area. The list is only available for troubleshooting purposes.
Transactions Log – List of all transactions generated by Authorize.net. All the successful and failed charges will show up as a transaction. This list is only for informational and troubleshooting purposes.
Integration Settings
Enable Authorize.Net – Enable or disable the integration
Authorize.Net Mode – Select Sandbox or Production.
Validation Mode – For testing purposes use “Test Mode”, for production “Live Mode”. For more information on how the validation works, please click here and search for “hostedProfileValidationMode”.
Merchant Login ID – To obtain the ID, click here for instructions.
Merchant Transaction Key – To obtain the key, click here for instructions. (in the article it’s called “Transaction Key”).
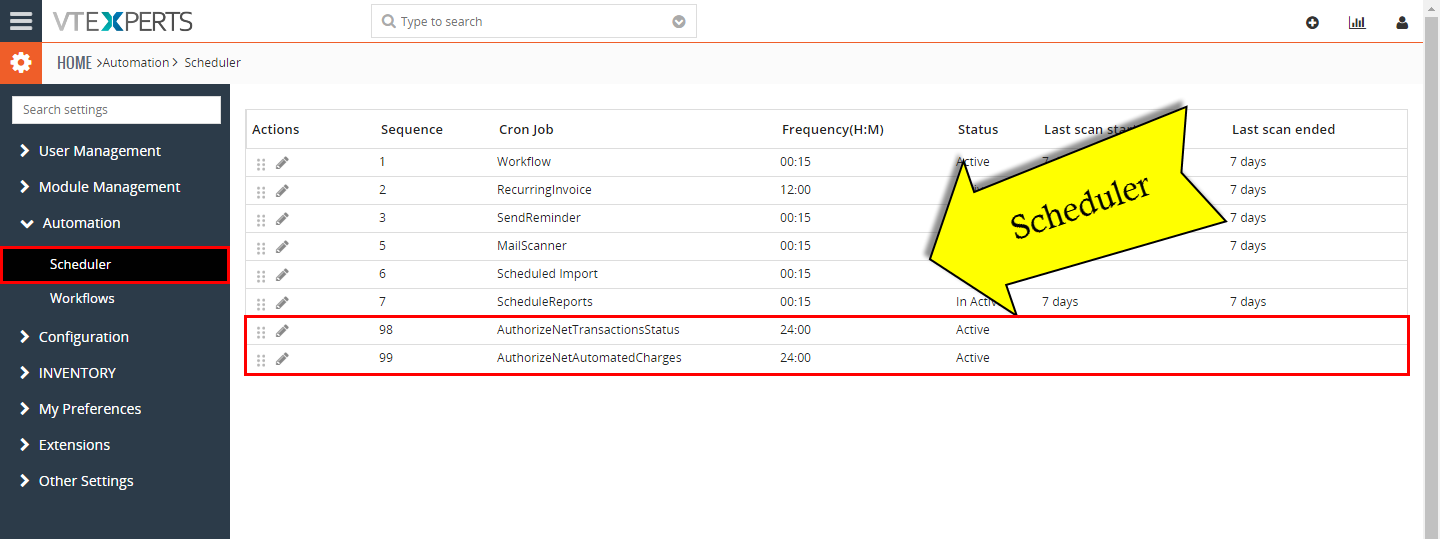
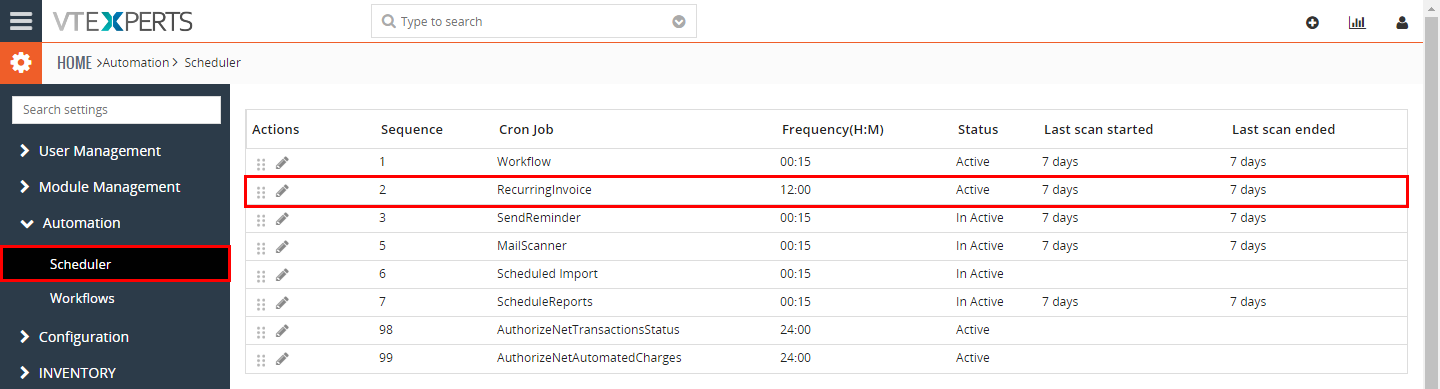
Scheduler
You are required to have scheduler (workflow) setup in order for transactions to settle and scheduled (automated) payments to process.
AuthorizeNetTrsnactionsStatus – is used to settle transactions. Every payment made has to be settled in order for funds to be transferred and transaction closed. We recommend to run it every 24 hours.
AuthorizeNetAutomatedCharges – is used to automatically charge any payments that have been scheduled for the current day. We recommend to run it at the end of the day as it only charges payments scheduled for CURRENT DAY. If you are not scheduling/automating payments – you should then set it to “In Active”.
Paying Invoices Online (Customers)
Authorize.net Integration is compatible with Document Designer, meaning that you can send invoices via email or direct link and the recipient(customer) will be able to view the invoice and pay with credit card or ACH.
To enable paying invoices online, you will need to install Document Designer and create invoice template (or pick one from our library). For instructions on how to do so, please go to the link below.
Click Here for Document Designer Documentation
Next, you will need to enable Authorize.Net widget on that template. For instructions – go to the link above (Document Designer Documentation) and scroll down to “Auth.Net Integration”.
We recorded a 5 minute video on how to quickly edit invoice template, enable the widget and explained how it works.
Customer & Payment Profiles
This plugin allows users to create payment profiles for each customer and then charge at any given time. The user will be able to put in customer details such as name, address, phone as well as create multiple payment profiles (credit cards/bank accounts).
To access Customer Profiles & Payment Profiles, go to Organization record and click “More > Authorize.net Integration“
*Customer Profiles can ONLY be created for Organizations. (You can contact us for any customization around this functionality).
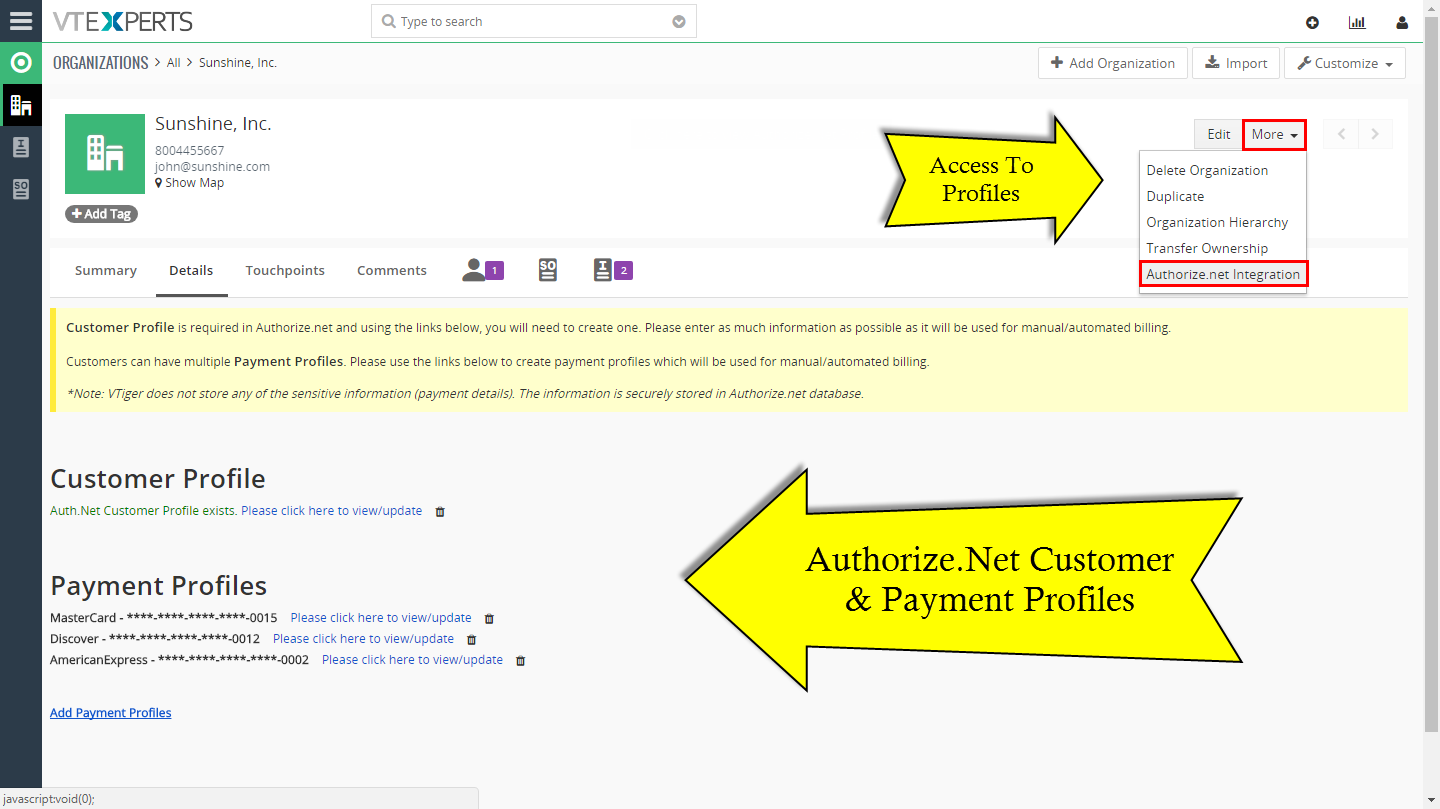
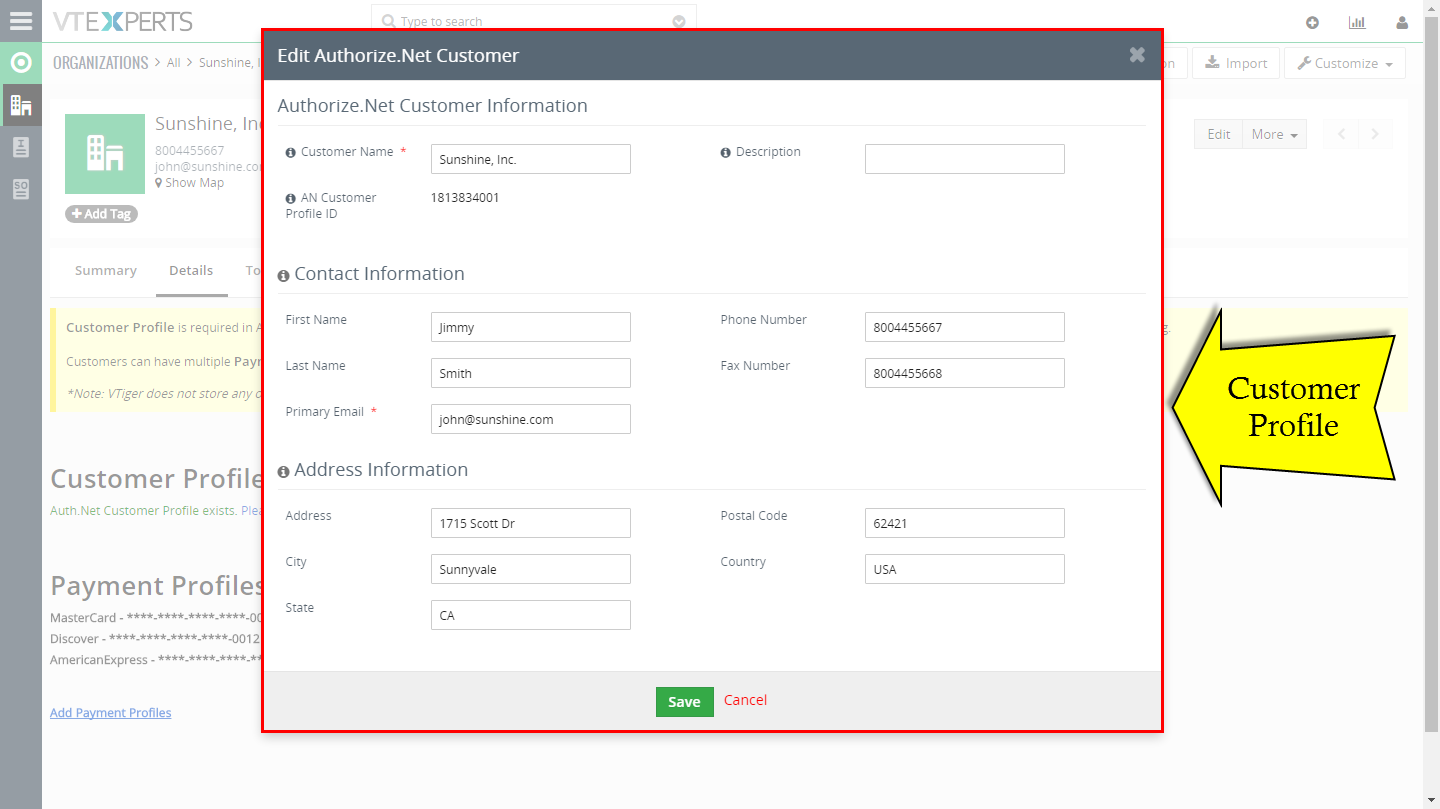
Customer Profile
Customer Profile is required in Authorize.net, it stores basic customer information that will be used for payment profiles. To create customer profile, click “Click here to create Customer profile“.
Next, enter as much information as possible.
*Information such as company. address, phone numbers are automatically prefilled from Organization, however you can change that.
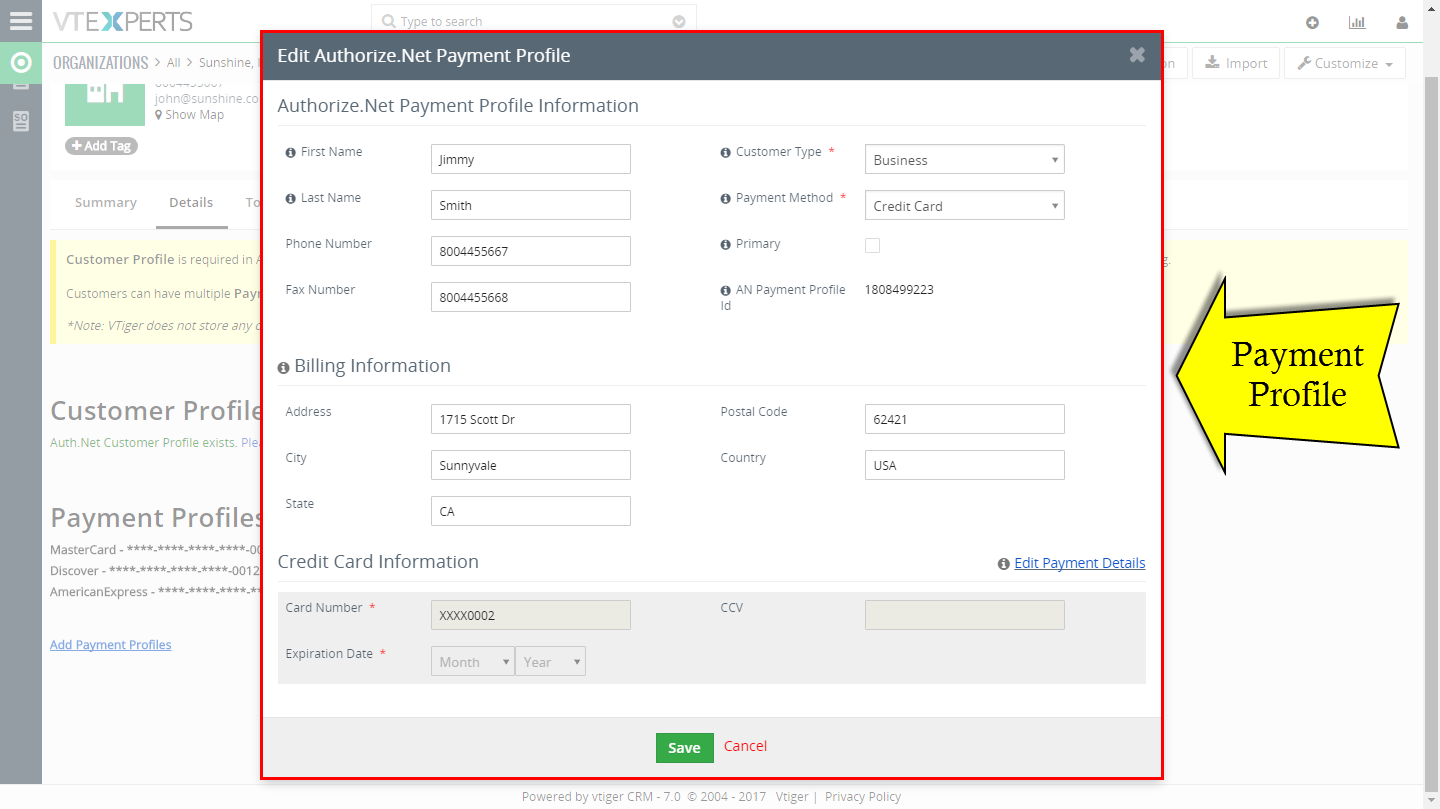
Payment Profiles
Customers can have multiple payment profiles. To create new payment profile – click “Add Payment Profiles“.
*Information such as company. address, phone numbers are automatically prefilled from Organization, however you can change that.
Customer Details: Enter card holder first and last name as well as phone/fax/email (if known).
Customer Type: Business or Individual
Payment Method: Credit Card or Bank. (based on selection, the last block adjust to accept bank or credit card information). *Bank requires e-Check.net to be enabled on your Authorize.net account.
Primary: This is used for automated billing. If payment is scheduled and there are multiple payment profiles available, the “Primary” payment profile will be used. You can only have one primary payment profile.
AN Payment Profile ID: ID generated by Authorize.net. It can be used to locate payment profile in Authorize.net panel
Billing Information: Address is used to process transactions. The more accurate the address, the more likely transaction will get approved.
Charging Invoices (Manually)
In order to apply charge to the invoice, you will need to have created Customer Profile and at least one Payment Profile for the customer(organization).
*Note, currently, you can not charge invoice without customer/payment profiles. (If you need charge invoices with just credit card details (without creating profiles) – please contact us).
Payments
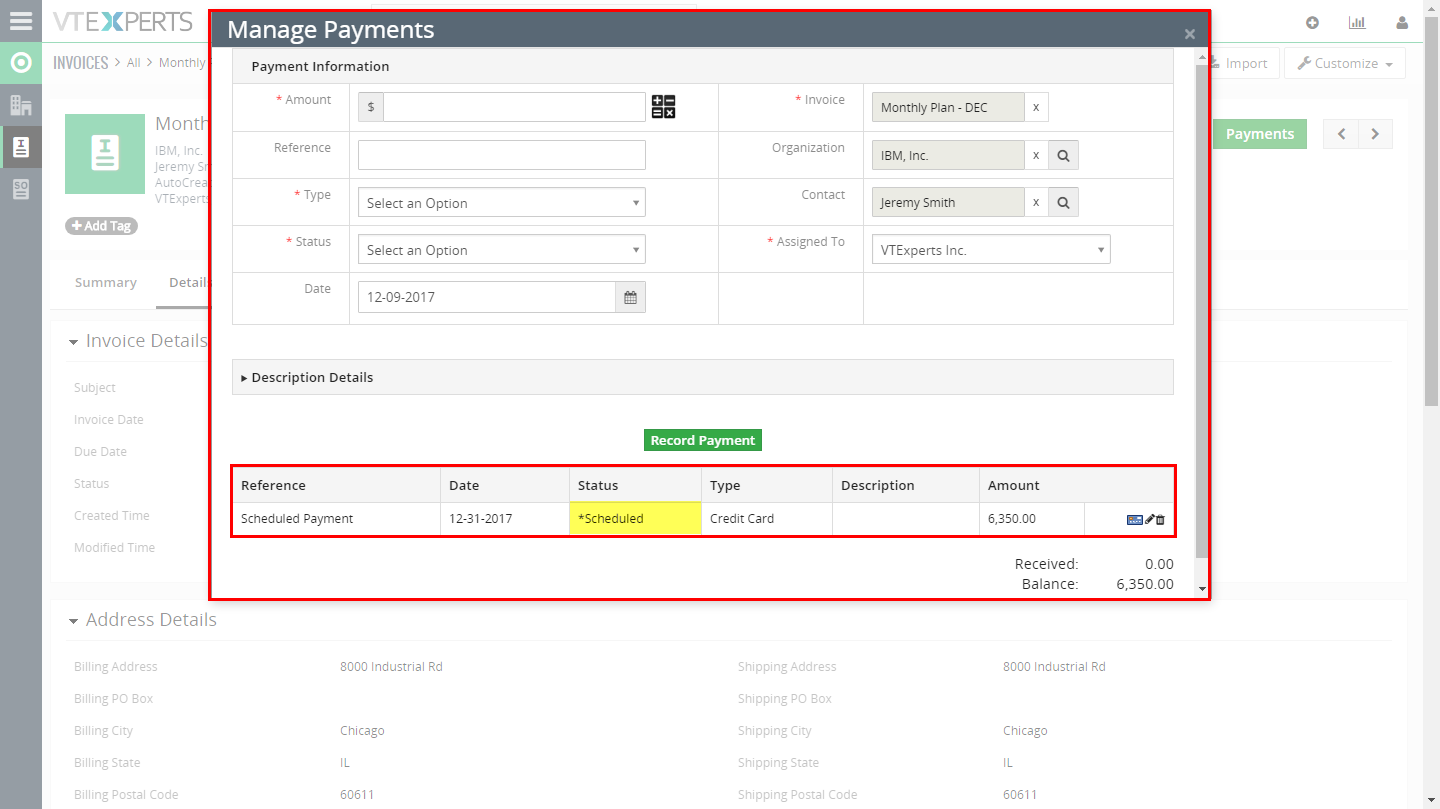
To apply the charge, please open an existing invoice and click “Payments”.
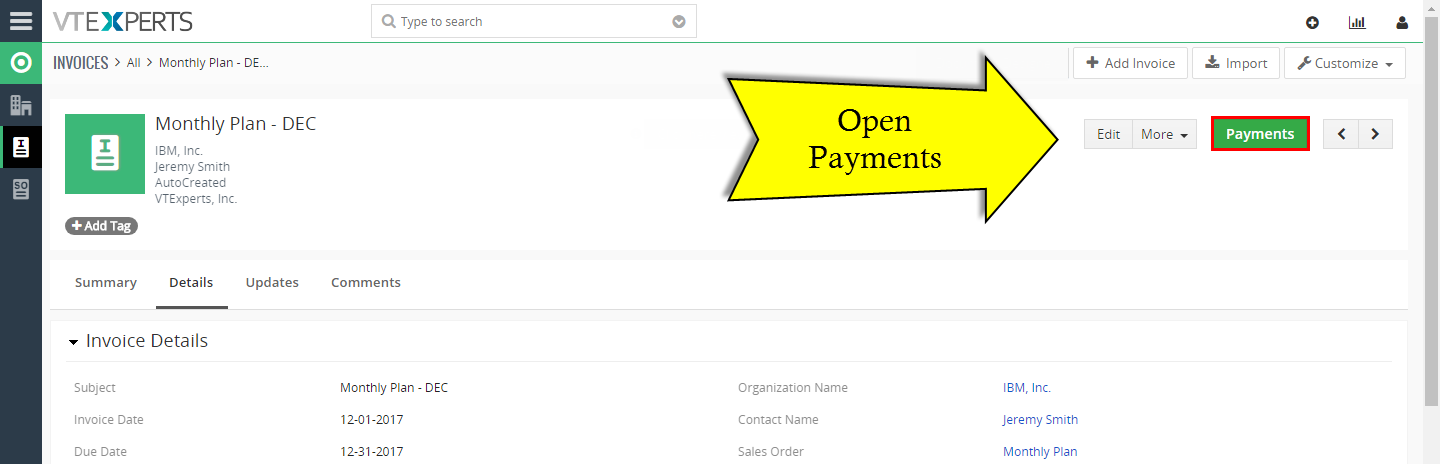
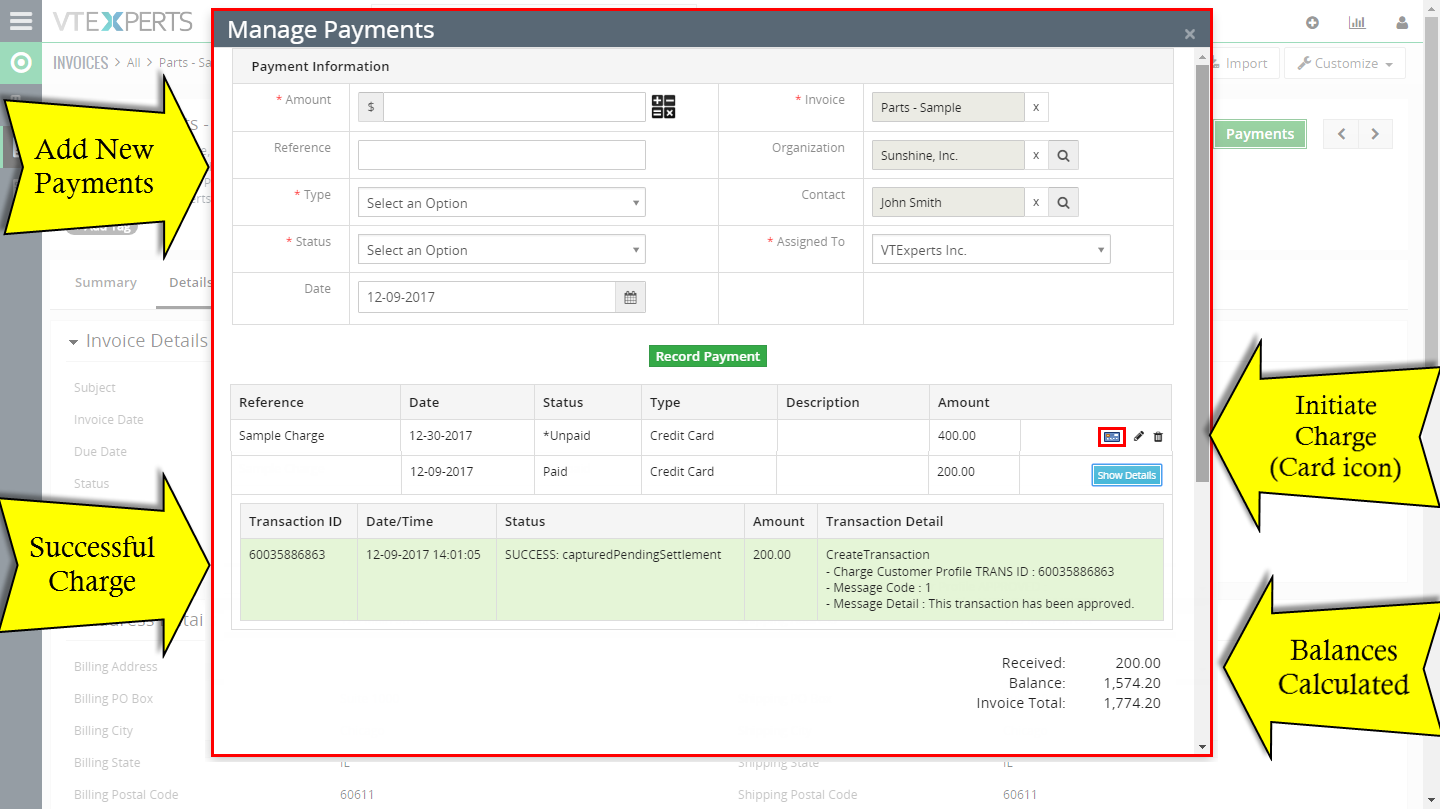
Next, “Manage Payments” window opens up and that’s where you will:
Add new payments
Update existing payments (amount, date, status, type)
View Successful payments + details
Initiate Charge on existing payments (by clicking blue credit card icon)
View received, balance and total amounts. (Amounts are calculated automatically based on payment statuses)
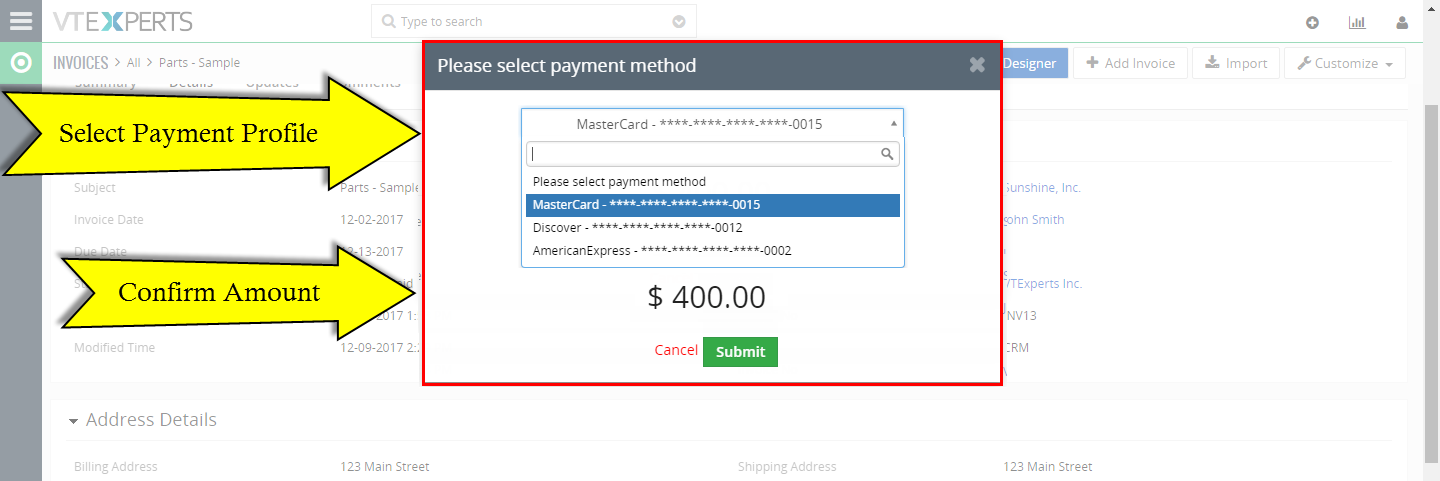
Applying Charge
To apply charge, click blue credit card icon, which will then present you with a popup to confirm the amount and select payment profile.
*Note, icon will only show up if the payment status starts with * (star). This is we identify “paid” payments(no star) versus “not paid” (star) payments.
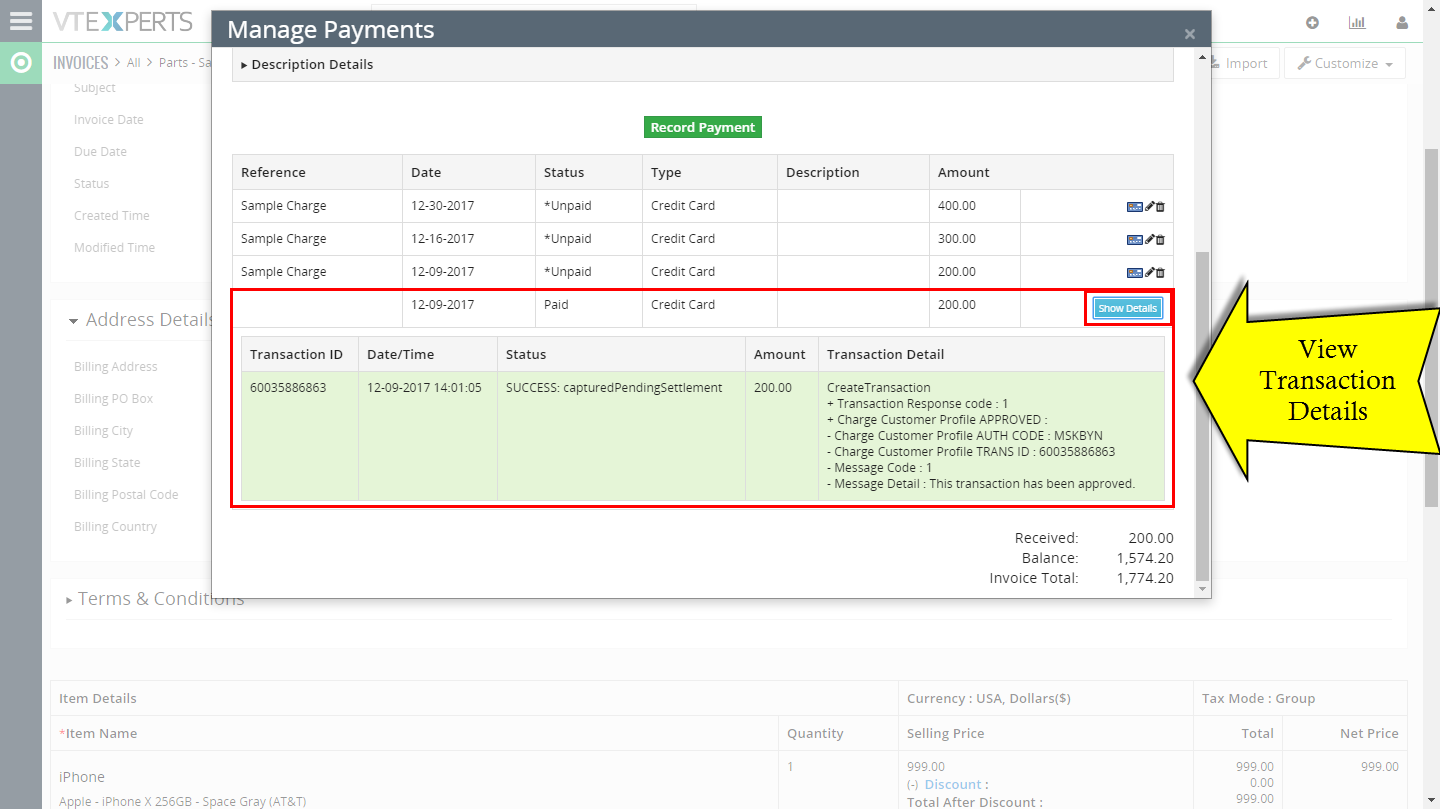
Successful/Failed Charges
Once the charge is successful, it will update payment record with transaction details as well as show a notification. To view transaction details, click “Show Details“.
*Note, if the payment fails, you will then see “Failed Notification” and the status will update to “Failed” + you can use “Show Details” button to see why it failed.
Built-in Automation & Restrictions (MUST READ)
Extension comes with few built-in custom functions, which get executed automatically to maintain invoice statuses and transaction integrity. Please read it very carefully, otherwise you will not know why certain changes occur in the CRM as they might not be obvious.
Blue credit card icon (used to initiate charge) will only show up if payment status starts with * (star).
–
Payments that have a transaction record (failed or successful) can not be deleted or modified in any way. You can only view details by clicking “Show Details“.
–
Payments with status “*Scheduled” and date “Today” will be automatically charged assuming the scheduler and customer/payment profiles have been setup.
–
Received & Balance fields are automatically updated based on added payments. Any payment with status that does not have a * (star), will count towards “Received”. Balance is calculated “Balance=Invoice_Total – Received”.
–
Invoice Status will automatically update to “Partially Paid”, if at least one of the payments have been set to Paid (manually/charging the card/web payment)
–
Invoice Status will automatically update to “Paid”, if Balance is = 0 (see how balance is calculated above)
–
If you are using this for Web Payments only, you don’t need to create Customer/Payment Profiles or Payment records(payments get automatically created once transaction occurs)
Automated/Scheduled Payments
Scheduling payments is very simple. Assuming, you already read and understand how to manually apply a charge to the invoice, then it’s just a matter of changing payment status and the date.
*Scheduler has to be setup in order for scheduled/automated payments to work. (see above).
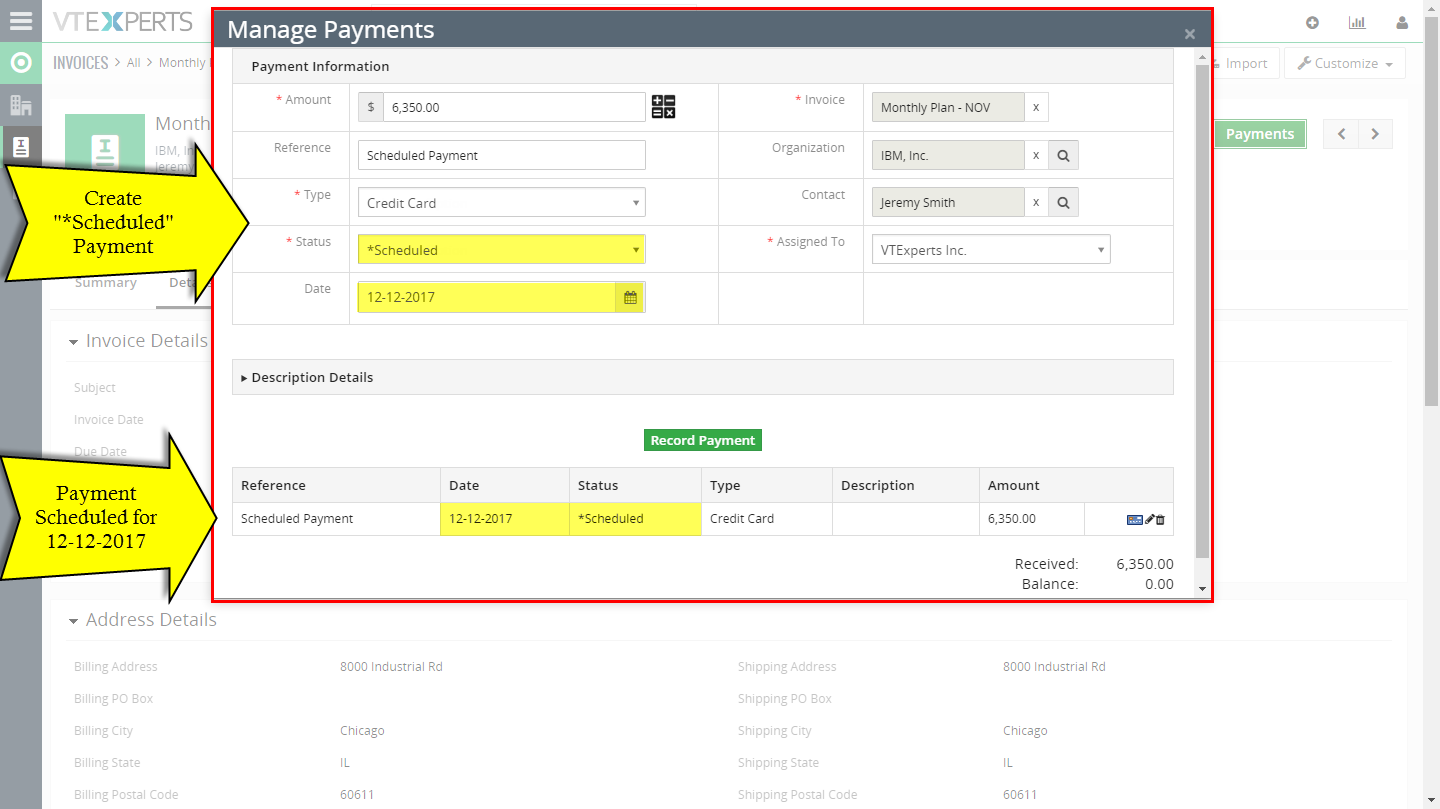
Assuming, you have created an invoice and want to schedule payment for 12-12-2017, you would have to:
Open the Invoice
Click Payments (to open Manage Payments popup)
Create new payment (or update existing one) and set status “*Scheduled” and Date “12-12-2017“.
Once that is done, when the scheduler runs on that date (12-12-2017), it will locate all payments that are “*Scheduled” and date is “TODAY”(in this case 12-12-2017) and will attempt to charge the amount specified in the payment record.
Recurring Invoices/Payments
Utilizing standard VTiger functionality (Sales Orders) and VTExperts Authorize.Net + Payments extensions, you can easily setup recurring invoice functionality. Our extension does not create invoices, however we can use Sales Orders and it’s “Recurring invoice Information” block to automatically create invoices every X days, monthly, quarterly or yearly, which will then be automatically charged using VTExperts Authorize.Net extension.
Requirements
Sales Order module (It’s standard VTiger module).
Customer & Payment Profiles setup for the customer (organization). (Please refer to Customer & Payment Profiles)
Scheduler has to be setup. (required to automatically create invoices + charge payments)
Workflow To Schedule Payments
Workflow to schedule payments for Invoice created using “Recurring Invoice Information” block on Sales Orders. The way it works in standard VTiger – recurring invoices are automatically created using Scheduler. Those invoices do not have any payments records (that’s what it currently does), however in our case – we need to create those “*Scheduled” payments for all the invoice created automatically.
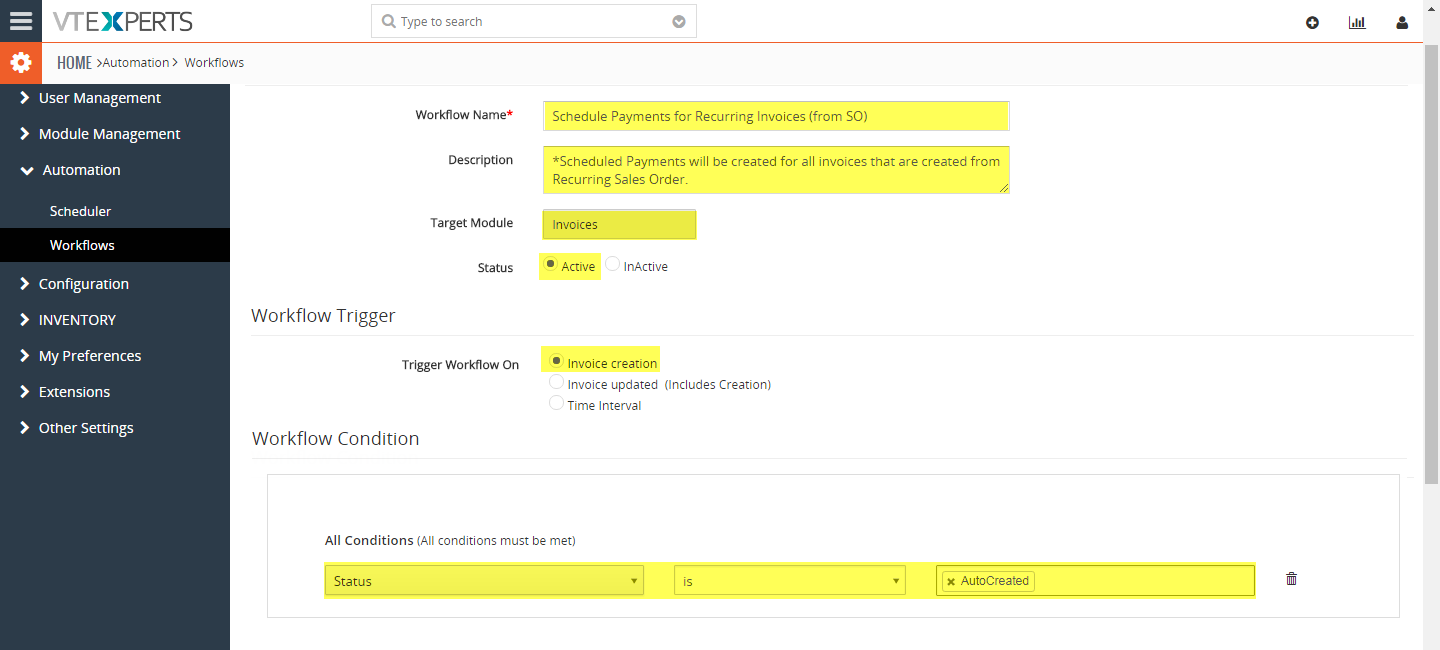
To do so, we will create a workflow. Go to “Automation > Workflow” and hit “+New Workflow”
*In the screenshot below, I’ve already create that workflow, however I will walk you through the process of creating it from scratch.
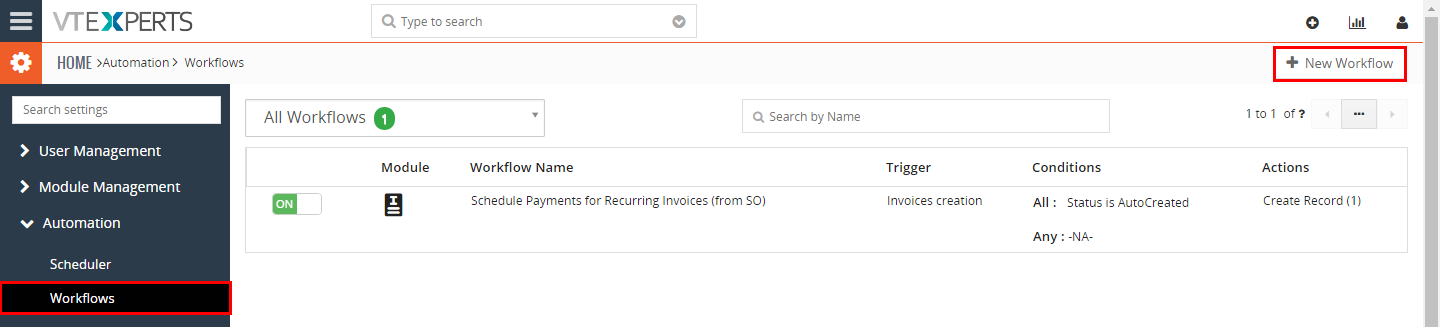
Next, fill in the details:
Workflow Name: your desired name e.g “Schedule Payments for Recurring Invoices (from SO)”
Description: optional, but recommended to describe what’s it for.
Status: Active
Trigger Workflow On: (o) Invoice Creation
Workflow Condition: Status – is – AutoCreated
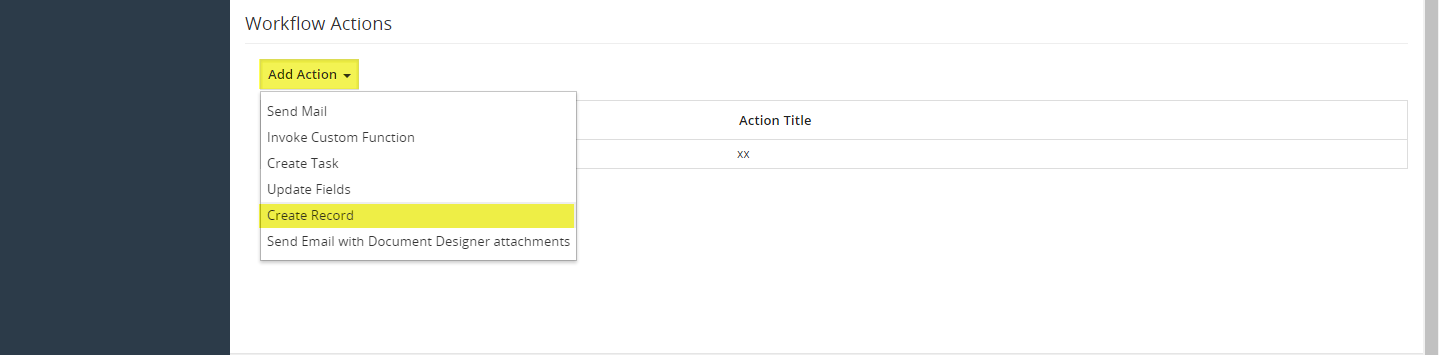
Next, click “Add Action” > “Create Record”.
Next, fill in the details for the Scheduled payment
Action Title: anything
Create a record in: VTEPayments (we are creating payment record)
Payment No: put in x, otherwise you will not be able to save it (vtiger bug)
Amount: Click on the field, then select “Field” (from first picklist) and “Total” (from second picklist)
Type: Other
Status: *Scheduled (important!)
Assigned To: any user
Organization: Click on the field, then select “Field” (from first picklist) and “Organization Name” (from second picklist)
Contact: Click on the field, then select “Field” (from first picklist) and “Contact Name” (from second picklist)
Date: Click on the field, then select “Expression” (from first picklist) and “today” (from third picklist(Use Function)). (important!)
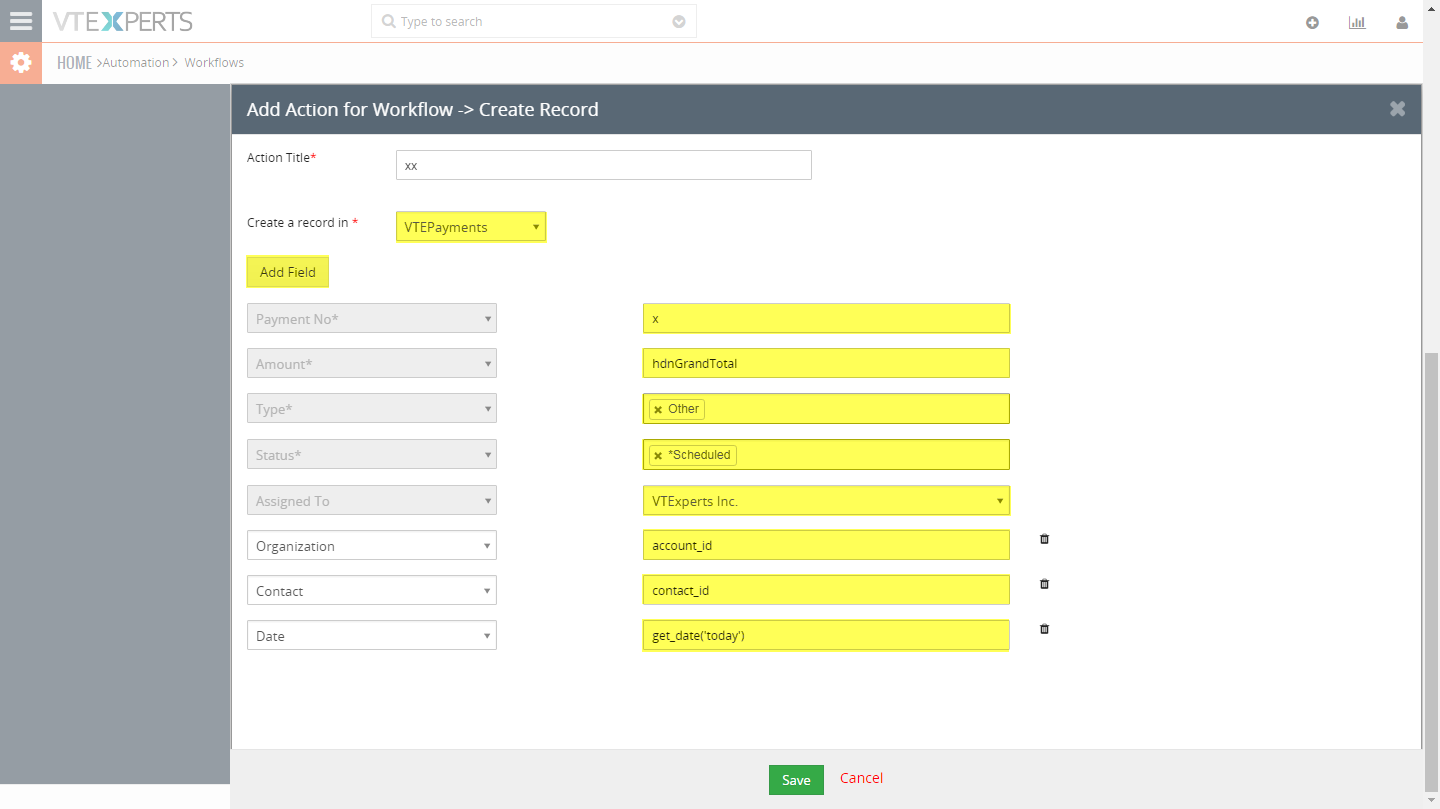
Lastly, save the workflow and we should be done with the workflow part.
Tip: To test if this workflow was configured properly, you can manually create a new invoice with Invoice Status = “AutoCreated”, then click on “Payments” button and check to see if there’s a *Scheduled Payment record.
Recurring Invoice walk-through
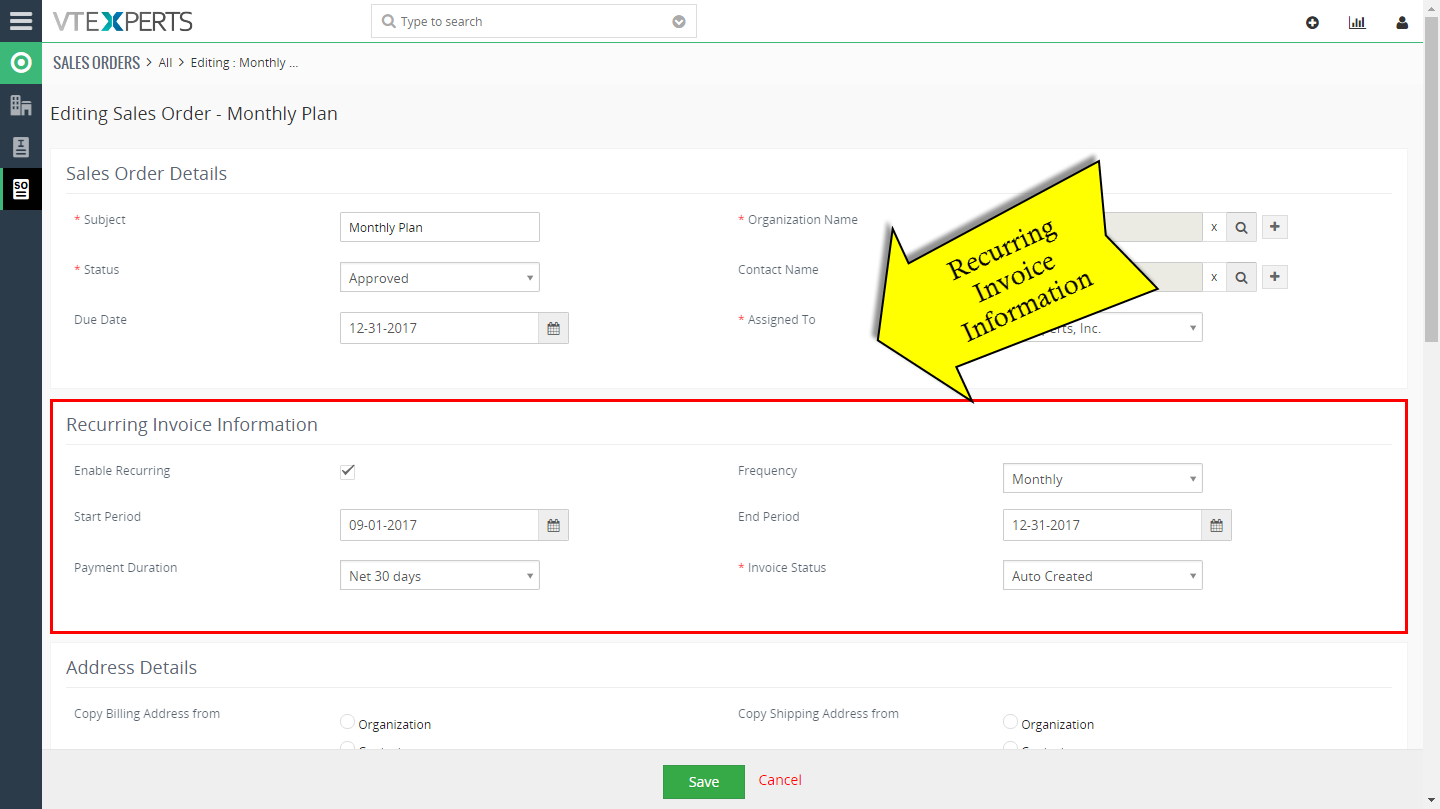
First, create new Sales Order and fill out the “Recurring Invoice Information” block.
Enable Recurring – Enable the check-box to initiate generating invoices periodically
Start Period – Specify or select a date on which your first invoice should be generated
Payment Duration – Select the number of days within which your customer is supposed to make payment. Also, in the invoice record, Due Date is calculated as Invoice generated date + Payment Duration. (This does not affect automated charges, it’s essentially a field on the invoice.)
Frequency – Invoice generating cycle depends on frequency you set. For instance, if you select Monthly, invoice is generated once in every month after Start Date
End Period – Specify or select a date on which you want your invoice to stop generating
Invoice Status – The newly created invoice record will have this(selected) status set. (This will be used in the workflow to schedule payment. In our example we used “AutoCreated”).
Next, manually run scheduler OR wait for it to automatically run and the first recurring invoice will get created.
Here are few tips to quickly test it:
Set “Start Period” to be the current day.
In the Scheduler, click to edit(click pencil icon) ‘Recurring invoice” row and change “Frequency to “15” “Minutes”.
Wait for Scheduler/Cronjob to run.
Assuming you did everything right (and scheduler/cron has been setup properly), new invoice will get created with scheduled payment.
To view automatically created invoices, go to Sales Order and click on (i) invoice related list.
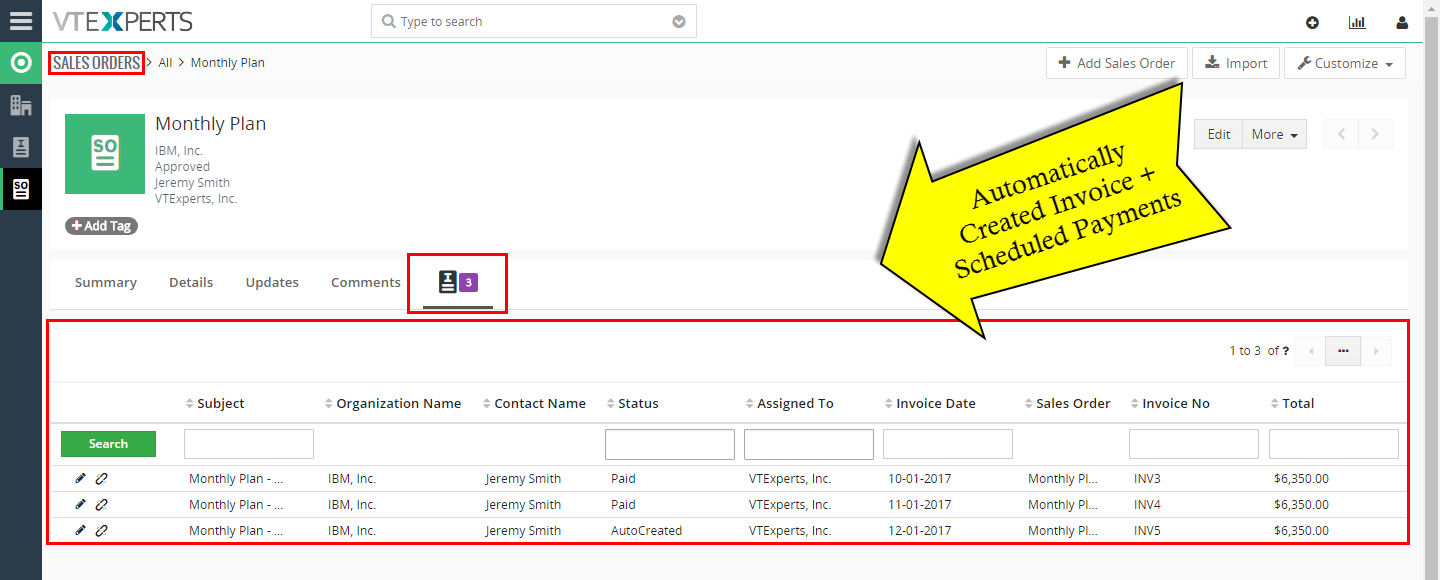
Next, if you open one of the invoices and go to Payments, you will see scheduled payment.
Assuming payment has been scheduled, it will then get automatically charged by Authorize.net and feedback the transaction details, which will show up on the same payments popup. For more information on how the *Scheduled payment is charged, see “Automated/Scheduled Charge” section.