

Extension that will transform VTiger into sophisticated email marketing/campaign tool. It will include a step by step wizard, easy to use “marketing list” (to load contacts/leads/organizations), review & send + confirmation/summary view that shows exactly what and when is going to be sent. In addition, it supports batch sending, meaning that you can schedule emails to go out over 15, 30, 60min instead of sending them all at once.
We also integrated Mosaico template builder with our campaign/marketing tool. Mosaico is an open source template builder which allows users to create amazing email templates, the functionality is very similar to mailchimp, constant contact or any other email marketing platform.
Configuration
Once the extension is installed, it appears as a new module under Main Menu > Marketing > Email Marketing. The Email Marketing module has its own set of blocks, fields, options, and related modules as any other. So, once inside the Email Marketing module, you will see the similar screen of list view as any other module:
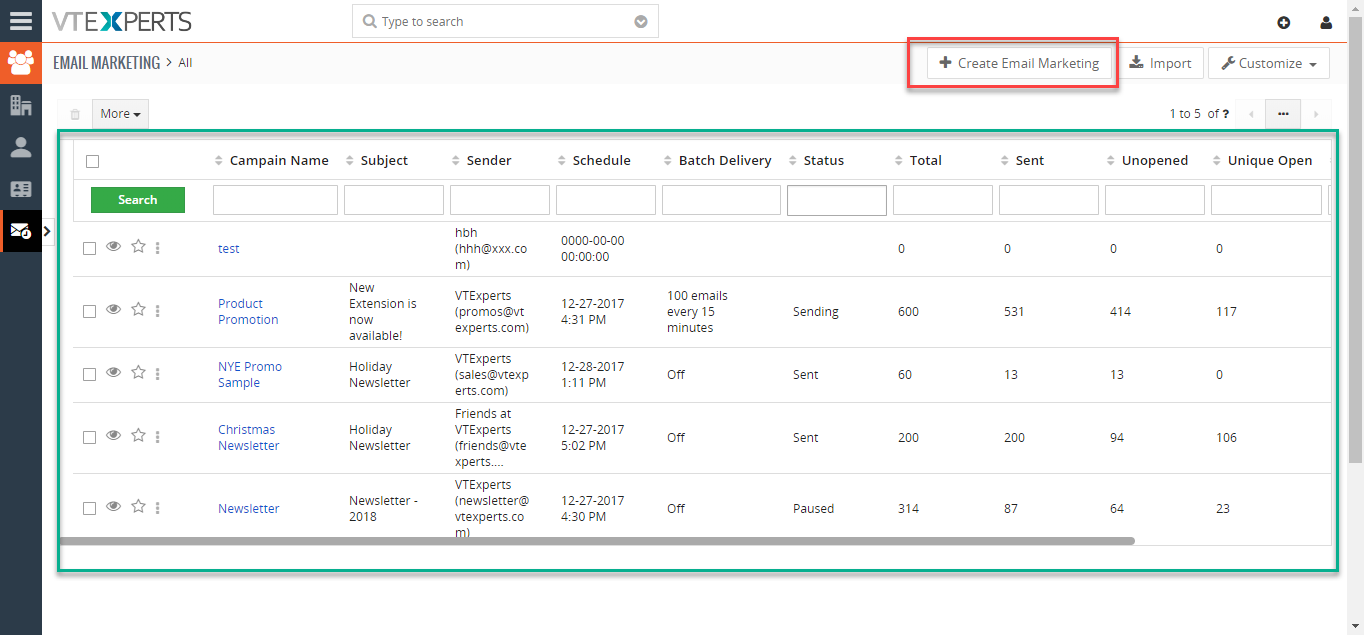
There are 2 important sections here:
1. Create Email Marketing Button
2. List view of all the email campaigns until now
Let’s start reviewing those.
+Create Email Marketing
This is the section where we will create a new email campaign. Creating a campaign consists of 4 steps:
1. Campaign Details:
First step is to enter the campaign details:
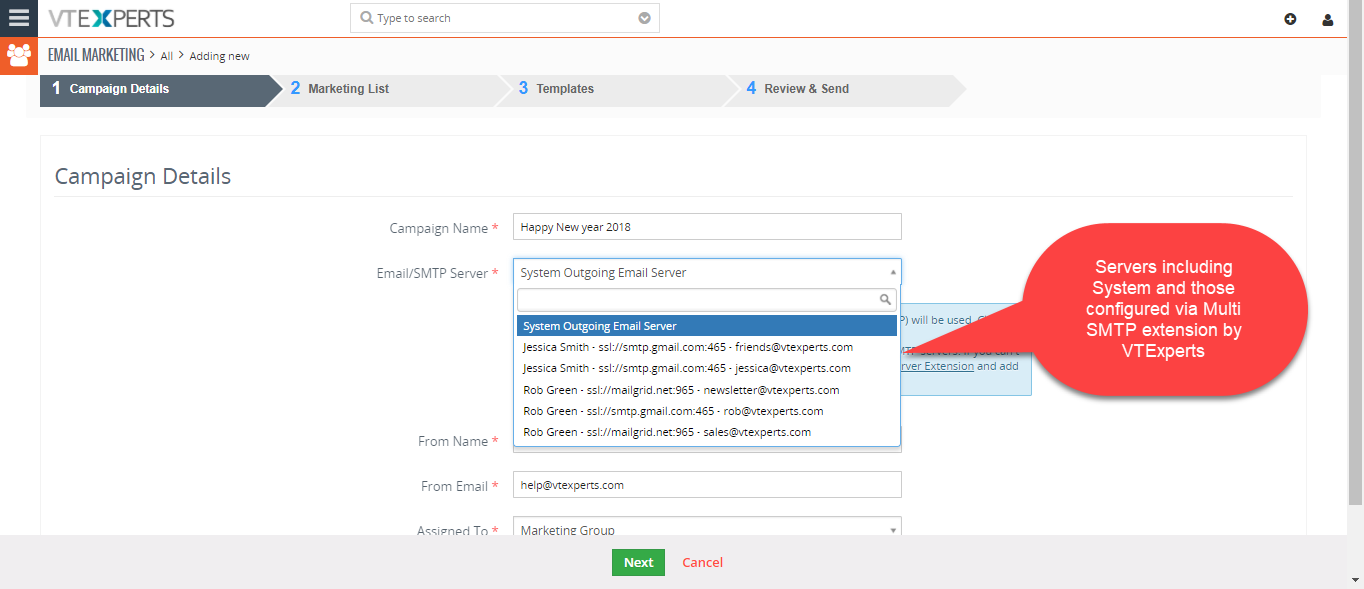
Campaign Name: specify a name for your new campaign e.g. “Happy New Year 2018”
Email/SMTP Server: a picklist, where you can select the outgoing server through which the emails will be sent out. As the extension is compatible with VTE Individual Outgoing Email Server / Multiple SMTP extension, all the outgoing servers configured for each user via the extension, will show up here to be selected.
From Name: the sender’s name you want to use
From Email: the sender’s email you are going to use
Assigned to: the user to who you want to assign the campaign
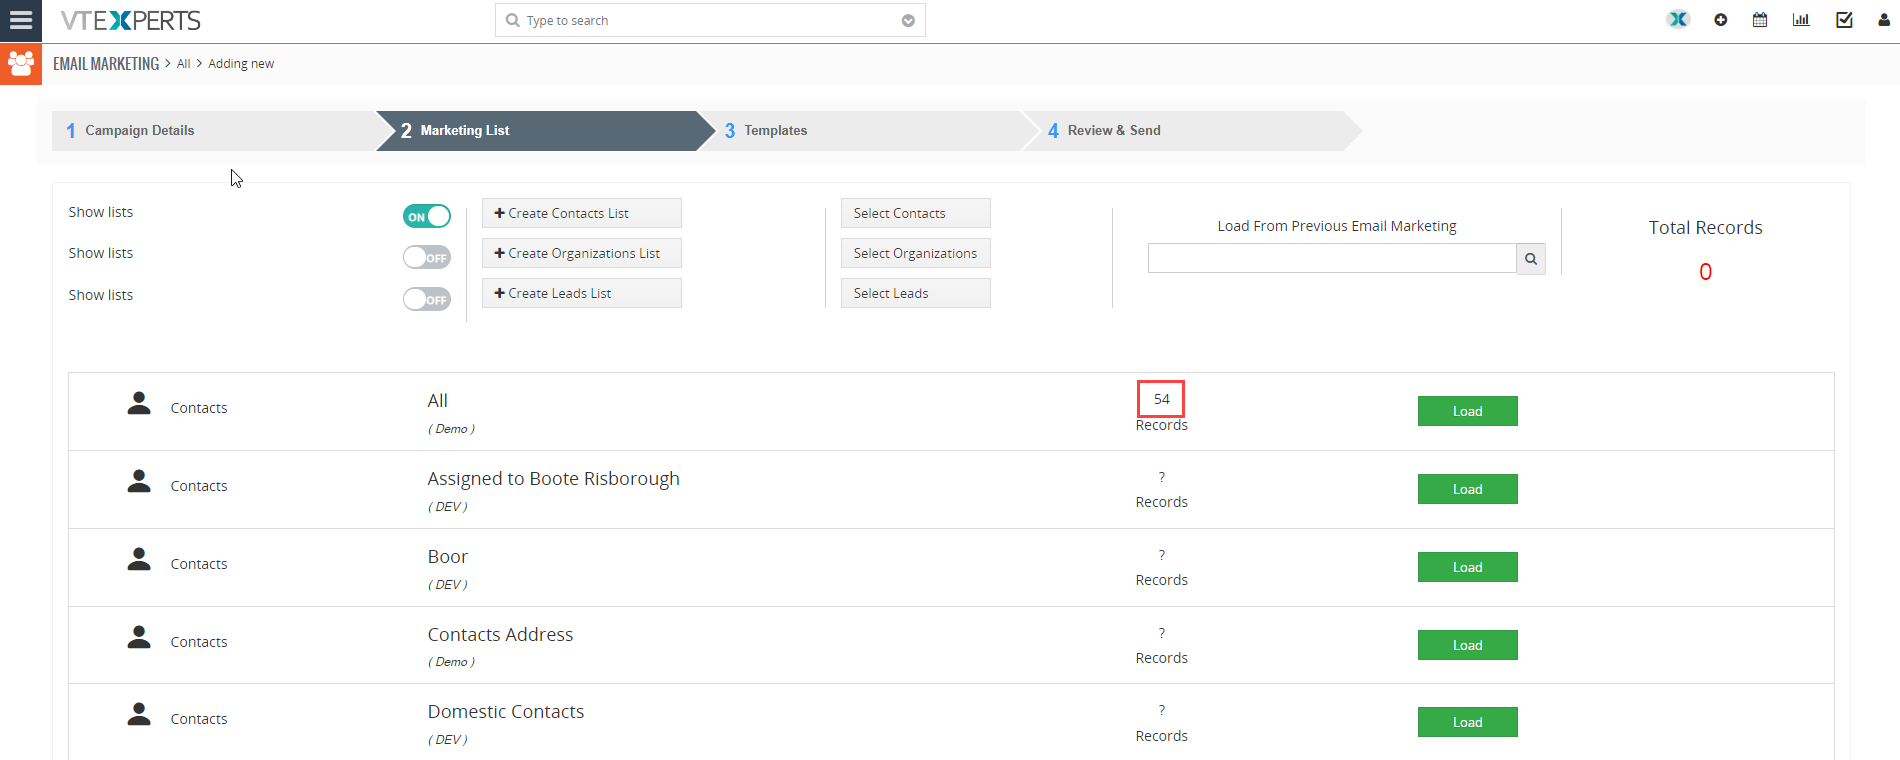
2. Marketing List:
In the 2nd step, we will select the customers or leads to which we are planning to send the email campaign. It allows selecting filtered groups as well as individual Contacts, Leads, and Organizations.
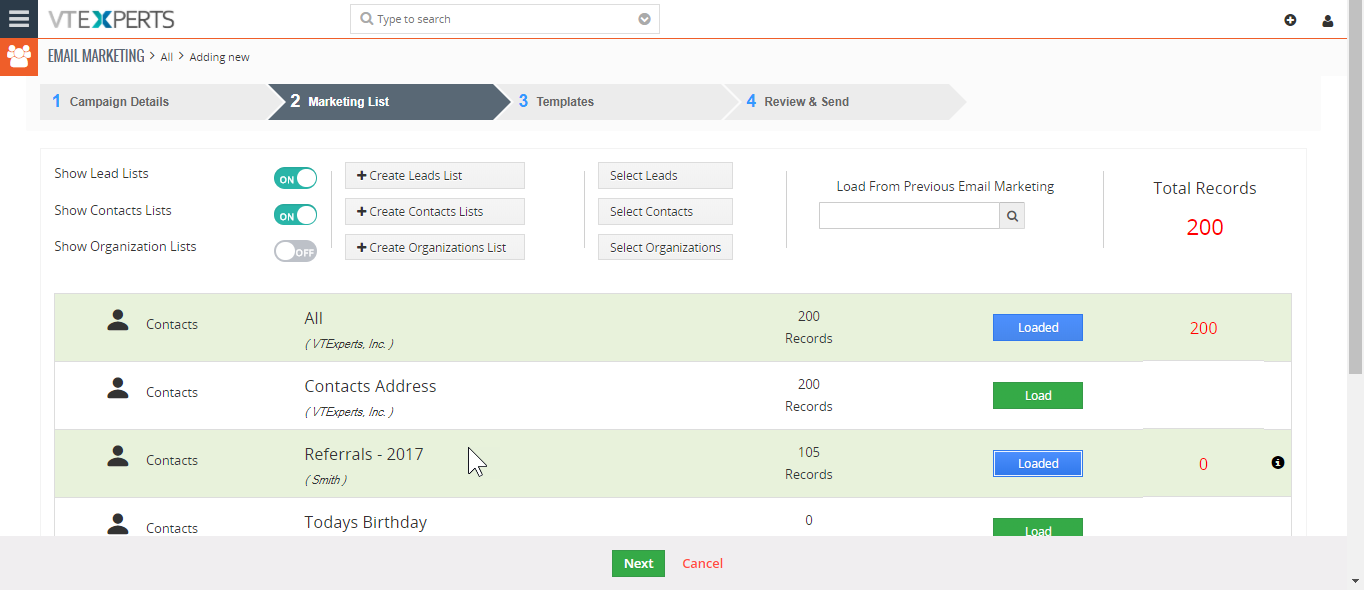
Show Lead/Contacts/Organization Lists: there’s the on/off switch in front of “Show Lead Lists”, “Show Contacts Lists”, and “Show Organization Lists”. Once you turn a switch on, the lists are shown below for the respective module to be selected.
Load: a green “Load” button in front of every list will be available. Click on the button of corresponding list which you want to load to the receivers’ list. Blue “Loaded” button shows the lists already loaded
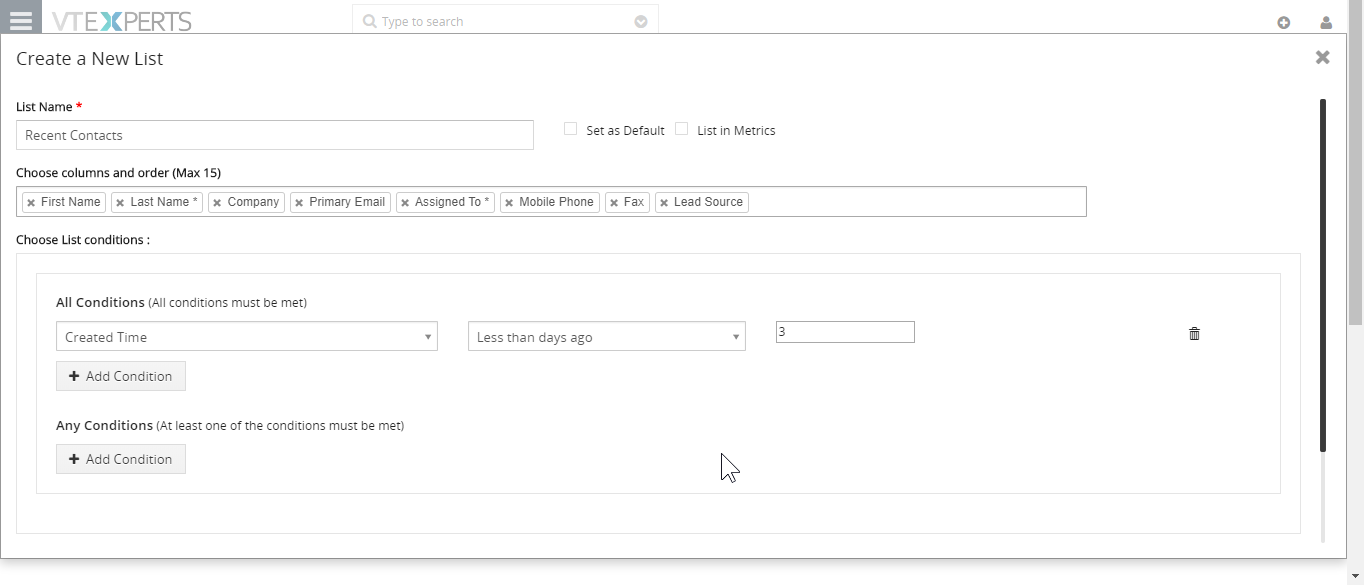
+Create Leads/Contacts/Organizations Lists: you can create a new list or filter for any of the three modules by using the respective buttons “+Create Leads List”, “Create Contacts Lists”, and “Create Organizations List”.
Creating new list is pretty simple. Once you clicked the new list button, populate the “List Name”, “Choose columns and order” from the fields, and “Add Conditions” on the basis of which the list of receivers will be filtered.
Select Leads/Contacts/Organizations: you can select an individual record as a receiver of the campaign by using the “Select Leads”, “Select Contacts”, and “Select Organization” buttons.
Load From Previous Email Marketing: a search bar which allows you to use the lists from any previous campaigns. You can search or directly hit the search button to select the lists manually.
Total Records: this is the total number of contacts, leads, and organizations that have been added to the list and going to receive the campaign.
New Feature: Faster Email Marketing List Loading
VTExperts made a significant improvement to our email marketing extension to speed it up. Previously, during the configuration process of the email campaign, the email marketing extension would automatically load all the lists of records for the module selected. This could take up to 2 to 5 minutes, depending on the number of record lists created for the module. Now, email campaigns will not automatically count records in all the record lists as in the past. The email marketing campaign extension will only load the contacts from the list that the user selects. This feature speeds up the process of configuring email marketing campaigns and makes it more convenient for users.
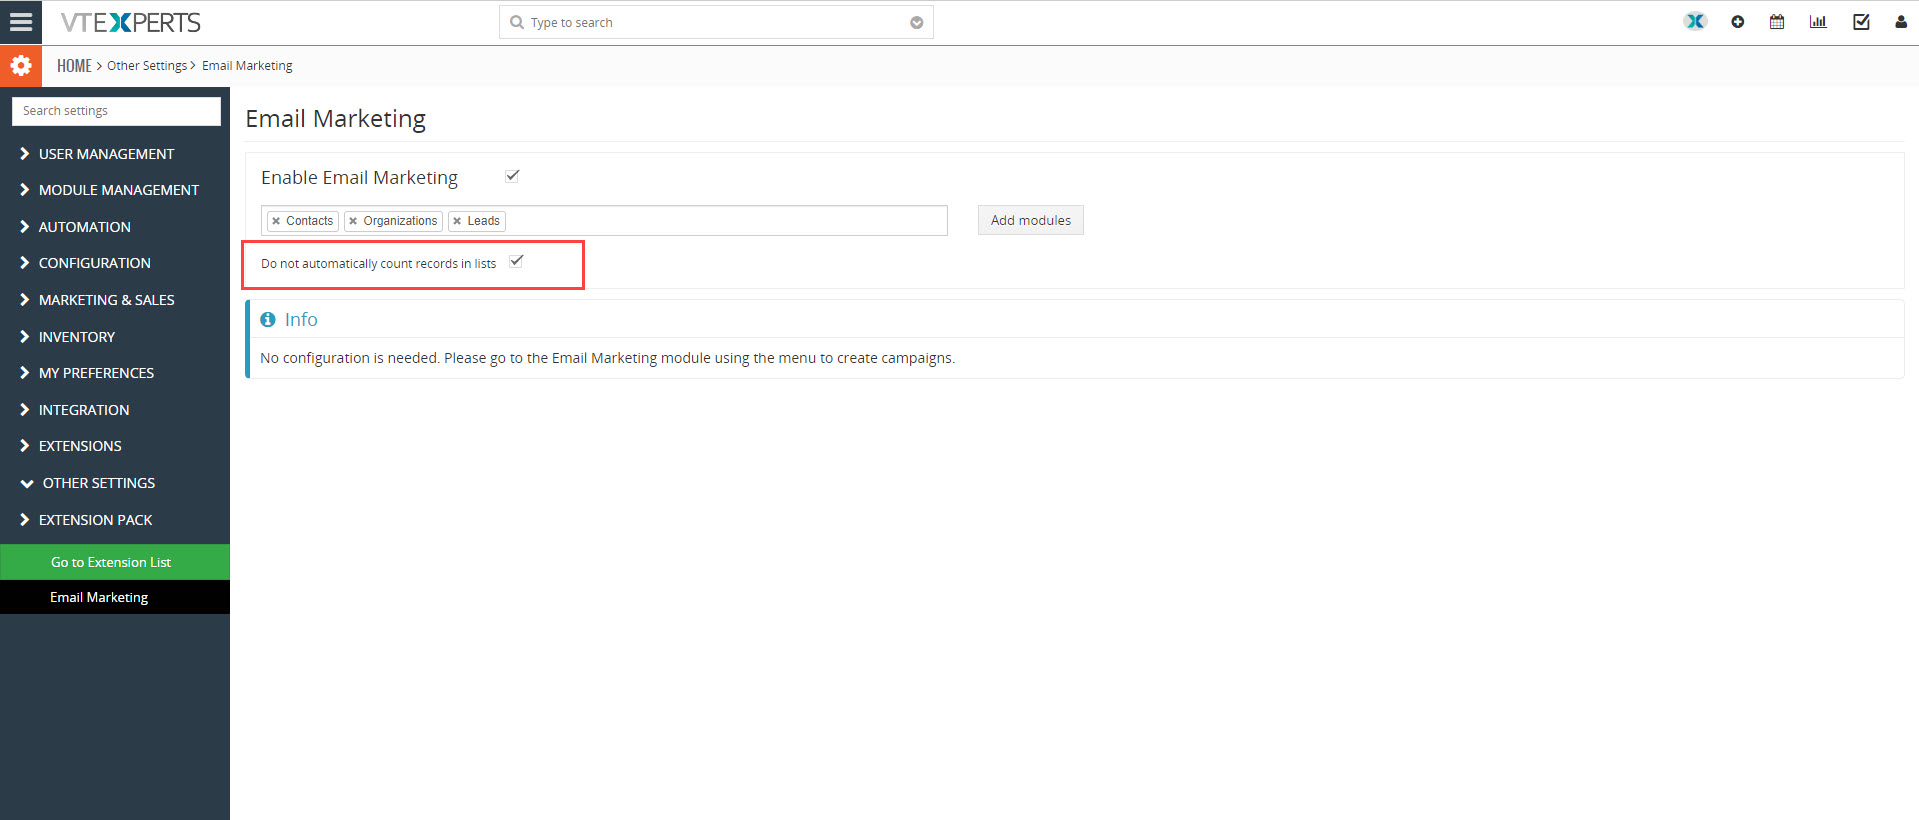
Enable the “Do not automatically count records in lists” feature
To activate this feature first you need to enable it from the extension configuration
Make sure that the “Do not automatically count records in lists” is checked
How “Do not automatically count records in lists” works
In the second step of configuring the email marketing campaign titles as “Marketing Lists”. The number of records is not shown initially. Instead, it shows “?” sign.
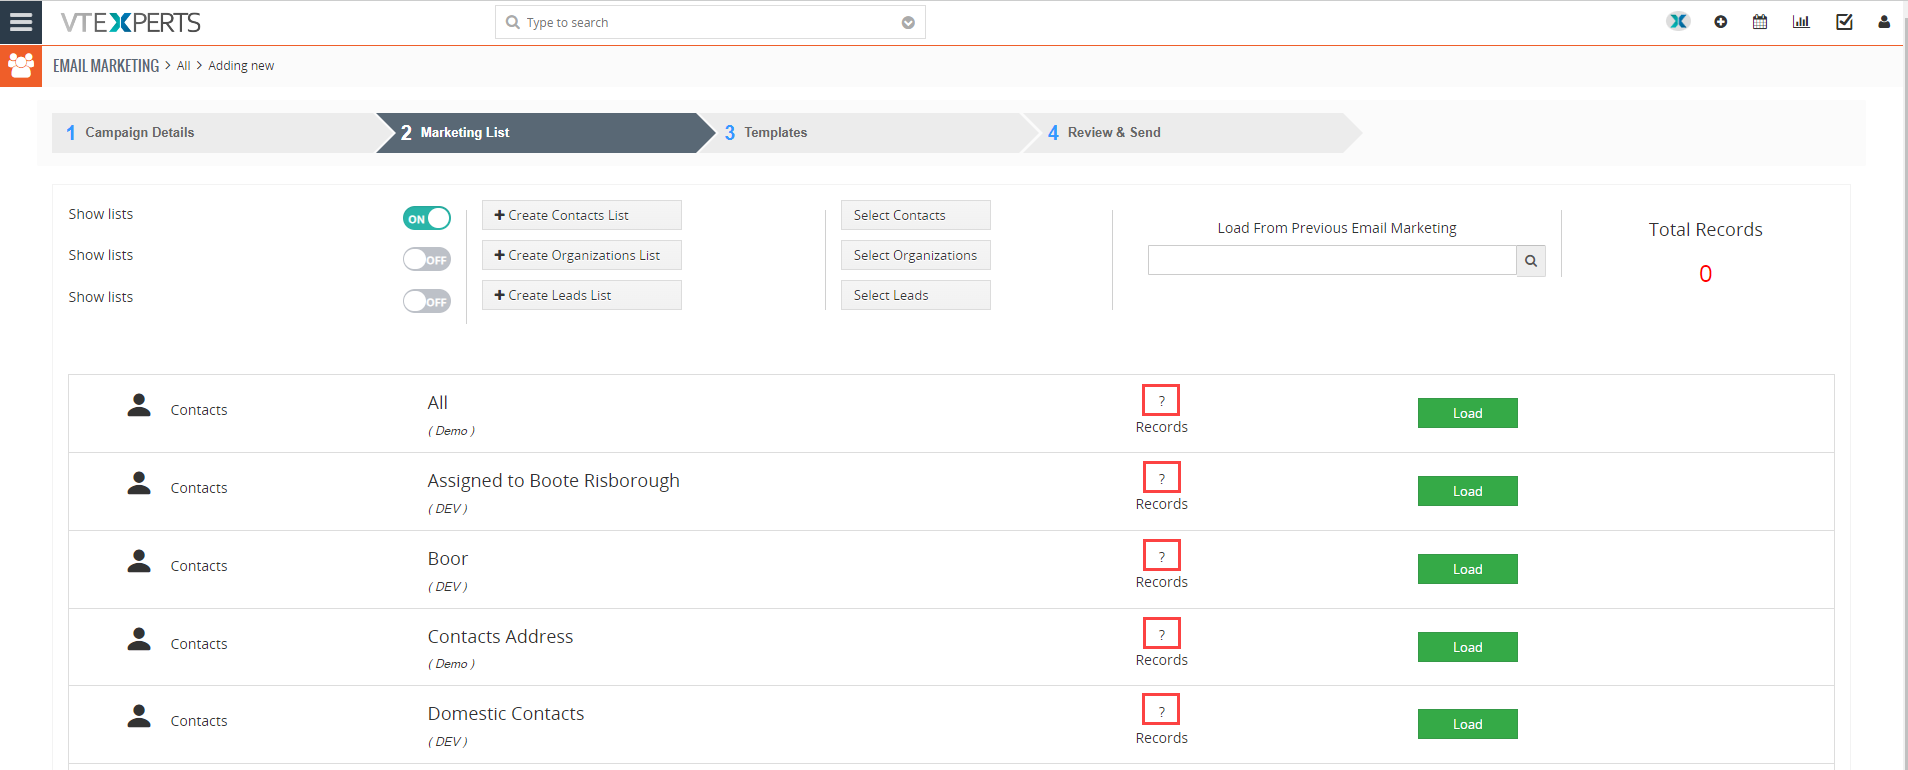
When the user moves the cursor to “?” sign, it is changed to “”. Once pressed, it will start showing the number of records for that particular list.
This feature greatly cuts down the loading time of email marketing lists, making the whole process of creating and sending out email campaigns much faster. By removing the automatic counting of records in all lists during email marketing configuration, users enjoy quicker loading times, allowing them to move swiftly through configuring and launching email campaigns
3. Templates:
In this step, you will create a new or select an existing email template that you need to send out for the campaign.
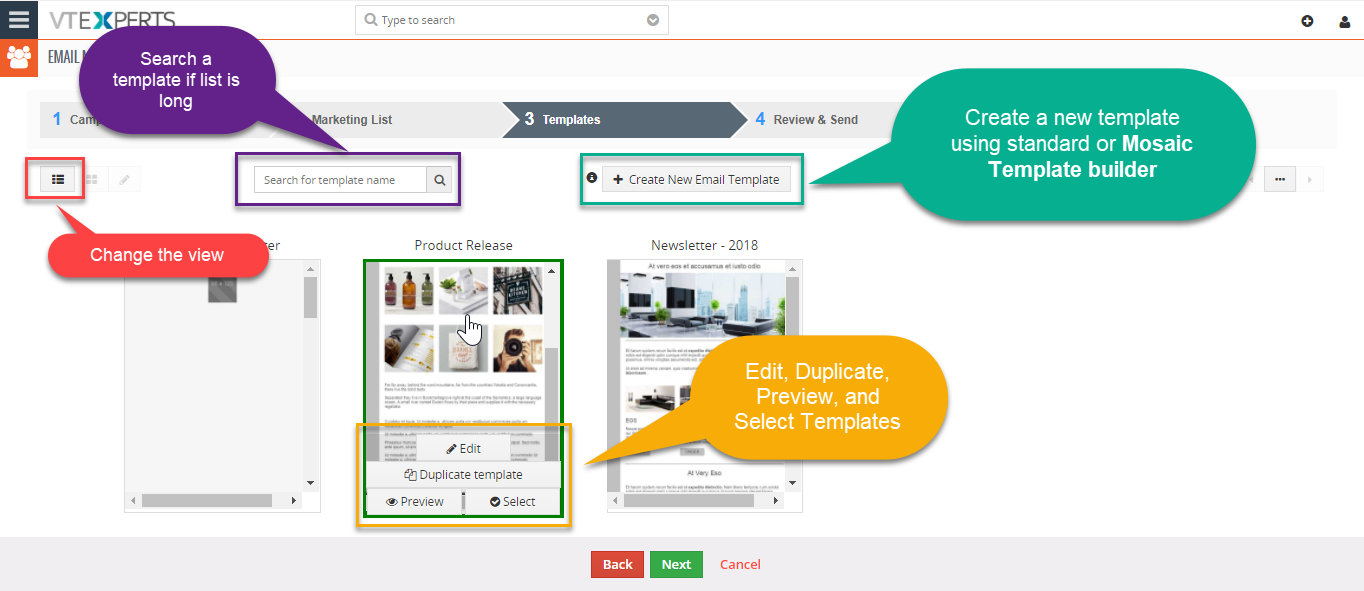
+ Create New Email Template: hit this button to start creating a new email template.
- Template name– give your new email template a name
- Description– a brief info about the template e.g. new year 2018
- Subject– that should be the subject of the outgoing email
- Rich Text Content Editor – this block is to create a simple email template with basic word editor options
- Switch to Mosaico Email Template builder– a more intuitive, advanced, and upto-latest-standard email builder with which you can design your email template according to modern requirements. To learn more and instructions how to use it – please visit mosaico official website. (You can also contact us with any questions!)
You can also Preview, Select, Edit, and Duplicate an existing template from the list. Simply hover your mouse over a template to see the options.
The default view of the templates list is “Thumbnail View”. If you want to switch to the “List View”, use the button at the top left part of this block. Thumbnail view shows more visual info but less templates in the list, which List view is used to get more number of templates in the current list at a time.
4. Review & Send:
The final step is to review the campaign you created and send it out according to your requirements. A couple of “Preview Buttons” are pretty handy in front of “List” and “Subject” to quickly review your settings. Following, you can see these 4 options:
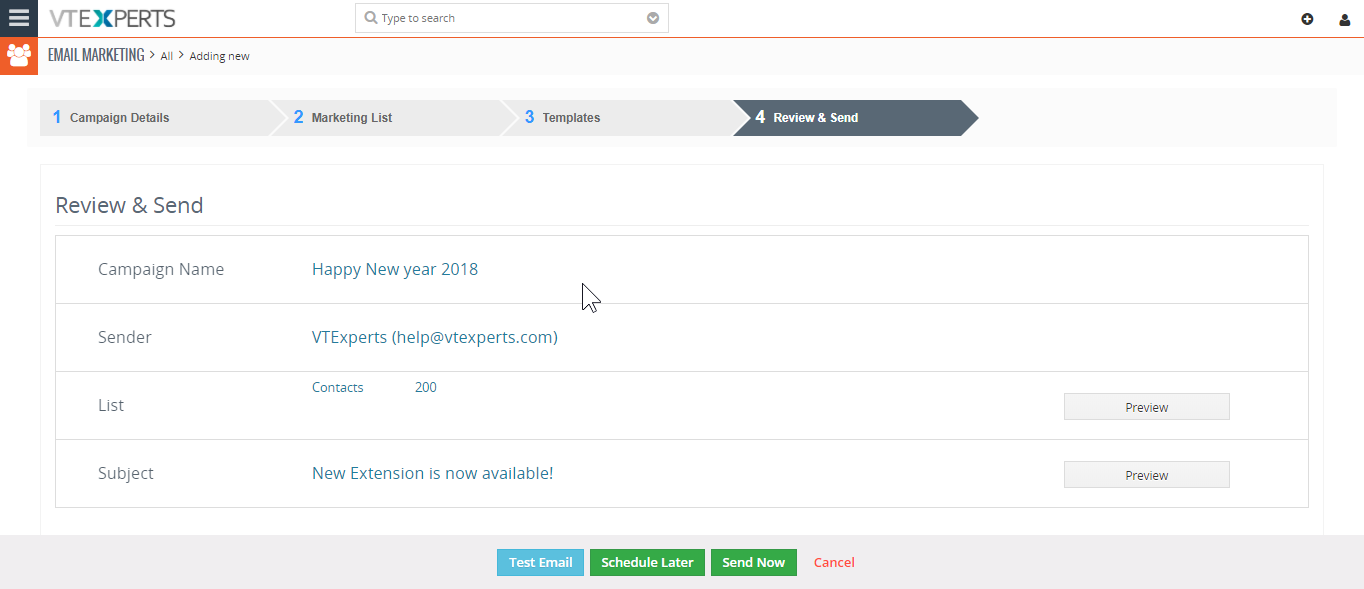
Test Email : send a test email before sending out the campaign to see how the email will look like
Schedule Later : this will allow you to schedule the campaign to be sent out on an upcoming date and time.
Send Now : proceed to send the emails right now if you are ready to trigger the campaign. This works as a smart sender and spreads the sending emails over a wide span of time to avoid them being marked as spam
Cancel : use this button just in case you do not want to proceed.
Reviewing a Campaign’s Progress
Once you have sent a campaign, you can see its progress by going to the list view of the “Email Marketing” and opening the campaign.
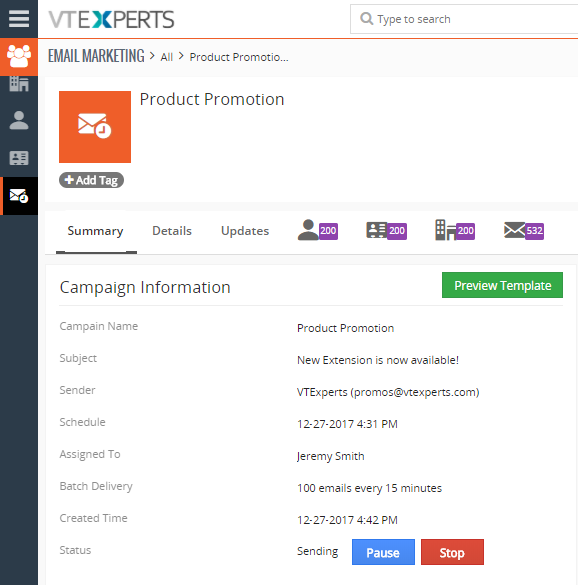
Summary View
Campaign Information:
In Summary view, the “Campaign Information” section has the information of the ongoing or completed campaign. In addition to sender, scheduled timing, and batch information, it also allows you to “Pause”, “Stop” or “Retry Failed” this campaign.
Pause: You can temporarely pause the campaign and “Resume” it at any time. Paused campaigns will not send any emails.
Stop: Once stopped, you can no restart the campaign. It marks all unsent emails as “Failed” and displays that in the chart.
Retry Failed: If any emails fail to go out due to email server problem, server issue or any other reason – you can attempt to send emails that failed. Once clicked, it will queue failed emails to be sent out next time the scheduler runs.
You can also see the “Status” of the campaign in this block (either is it being sent or completed). Moreover, “Preview Template” option allows you to view the template that was used for this campaign.
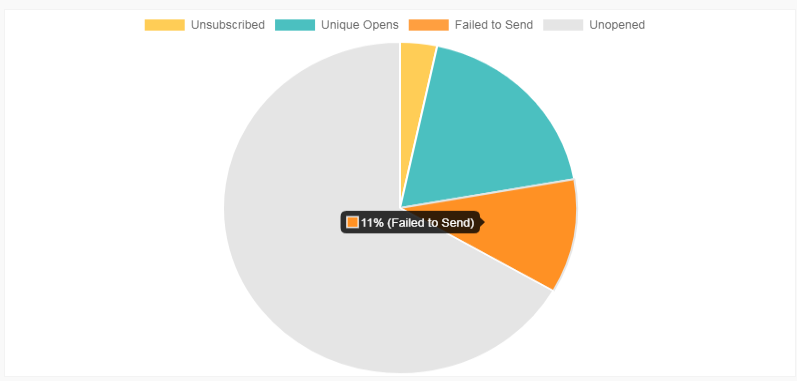
Graph:
Next to the “Campaign Information” is the pie chart that quickly gives you the idea of the progress and performance of the campaign (either its in progress or completed). You can see the percentages for each of the “Unique Opens”, “Unopened”, “Failed to Send”, and “Unsubscribed” categories.
Real-time Stats:
Following “Campaign” Information” and Graph and percentage, you can see the performance in exact numbers. For example Total, Queued, Sent, Unique Opens etc. These stats are real time and update as the campaign continues until it is completed.

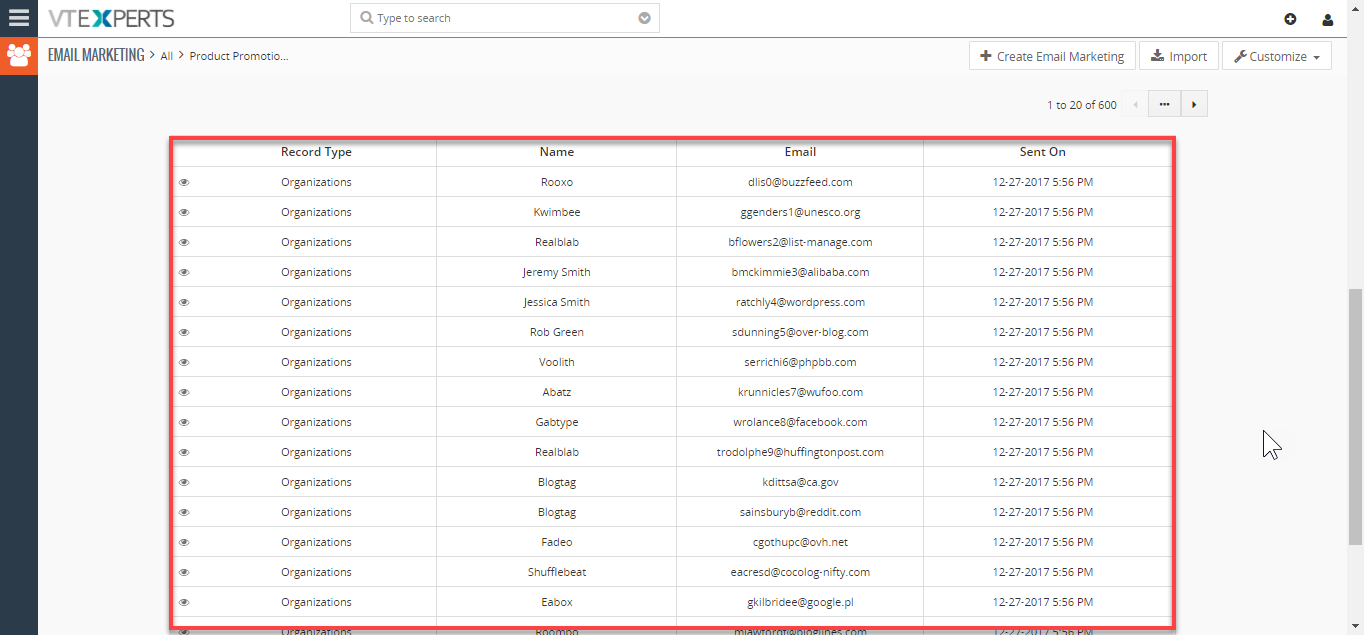
List of Receivers:
Finally, there’s the list of the contacts, leads, and organizations, to whom the email has been sent. This shows the details of the record as well as the time and date at which the email was sent to it. You can use the quick peek view to open the popup of a specific record to quickly take a look.
Contacts, Leads, Organizations
In the campaign, you can also visit the Contacts, Leads, and Organizations as related modules. In those lists, only the records to which the campaign is being sent or already sent, will be shown. You can “unlink” a record from the campaign in the list view.

Emails
In the “Emails” tab, you can see the following information about the email and campaign’s relation:

* Sender’s name (will always be same)
* Subject of the email (will always be same)
* Parent Record – the record to which the email is linked
* Date Sent / Time Sent
* Assigned To
* Click Count – shows how many times the sent email was clicked by the specific user
* Access Count – How many times email was opened
* Origin – then current status of the email for specific record
Unsubscribe Functionality
Extension come with built in unsubscribe functionality, meaning that each email that you send will have a footer with ability to “click to unsubscribe”. At the moment, the footer cannot be changed.

Once a person unsubscribes, the flag will be stored in one of the vtiger tables. At the moment, the user does not have an option to remove unsubscribed person from that list. (We are planning to add subscriber manager in the year future).
No emails (using this extension) will be sent to a person who already unsubscribed. It will tag the email as failed with a reason “Unsubscribed”.
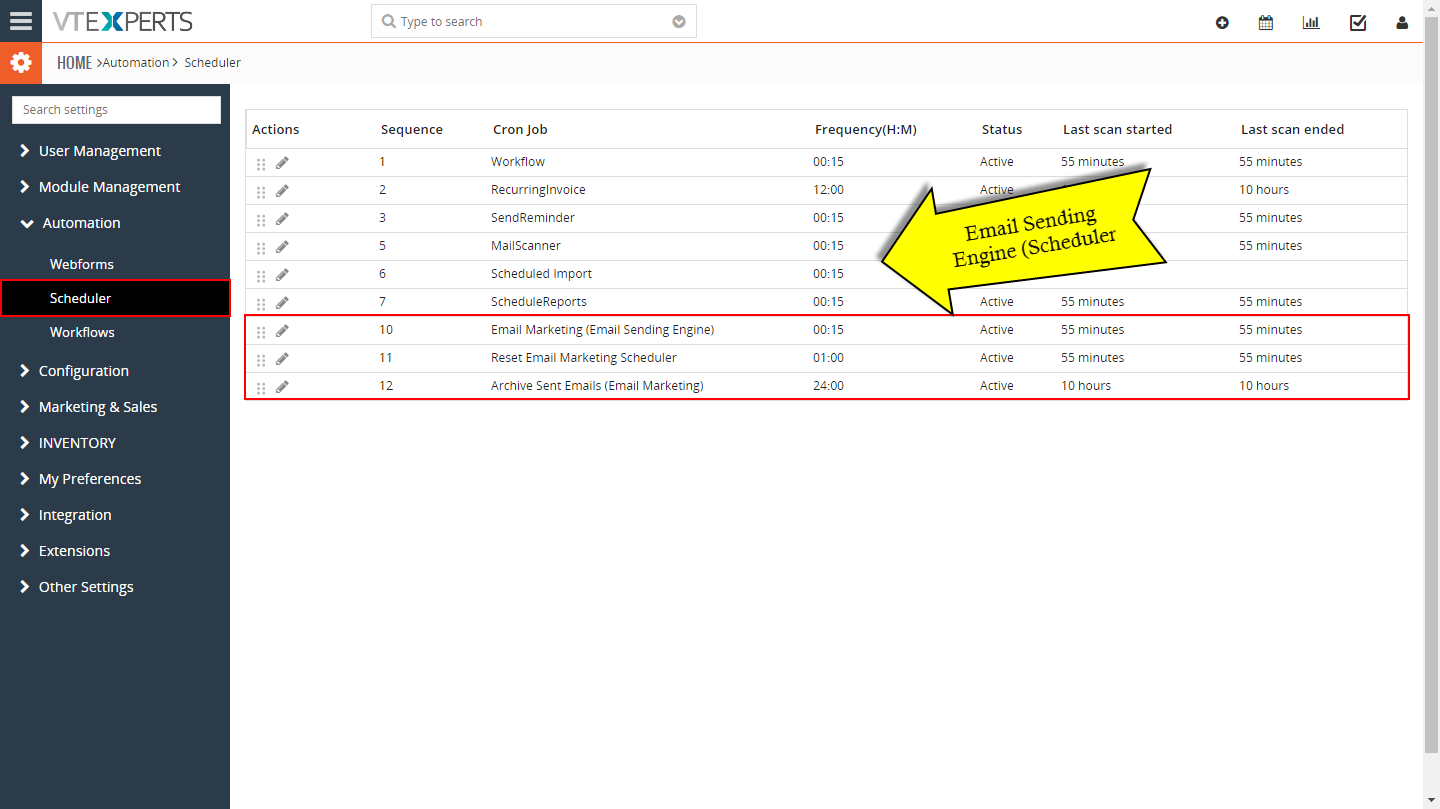
Scheduler
You are required to have vtigercron job running in order to send emails. Here’s what each scheduler does for this extension.
Email Marketing (Email Sending Engine): Sends scheduled and “Send now” emails. All emails from this extension are sent using this scheduler.
Reset Email Marketing Scheduler: If for whatever reason the first scheduler fails (times out, gets stuck in “Running” state), this schedule will reset it so it can send emails next time it runs.
Archive Sent Emails (Email Marketing): If you are planning to send a lot of emails, that means those emails will be stored in your VTiger database and that will cause your database to grow significantly. This scheduler finds all the emails (older than 30 days) and clears the email content, by replacing it with a snapshot image of the original email message. You are not losing any email information, it’s just the way we are archiving emails to maintain database size.
For more resources related to this Email Marketing Automation, please visit the Link