VTiger Item Details Customizer (Advanced) is an enhanced version of our standard “VTiger Item Details Customizer” which allows users to customize Item Details (Product/Services) for Quotes, Invoices, Sales & Purchase Orders. Users can also specify new formulas for each column as well as customize formulas for Totals.
It is completely flexible and allows multiple layouts of item details section for Quotes, Invoices, Sales & Purchase Orders. Compatible with PDF Maker and Document Designer.
If you had this extension installed on VTiger 6.x – please follow special upgrade instructions to 7.0 for Item Details Customizer (Advanced).
Link: https://www.vtexperts.com/vtiger-item-details-customizer-advanced-upgrading-vtiger-7/
Configuration
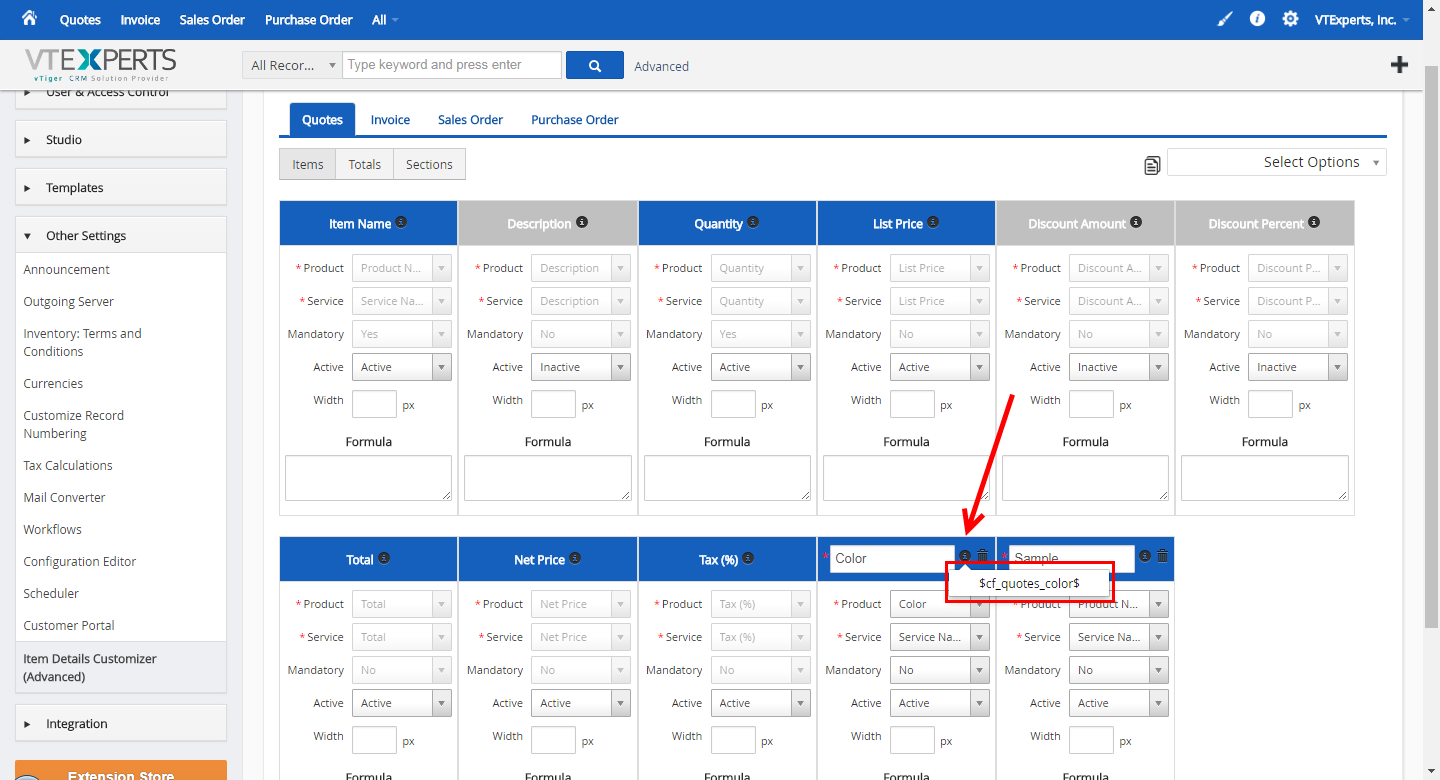
The Invoices, Quotes, Sales Orders, and Purchase Orders’ Item details can be modified by going to CRM Settings > Other Settings > Item Details Customizer (Advanced). There available are the columns which show up in the modules by default. Columns/Totals for each module can be customized meaning, that you can have different item details columns/totals for Invoices, Quotes, Sales Orders, and Purchase Orders.
This is how the Configuration Panel looks like in VTiger 6.x and 7.
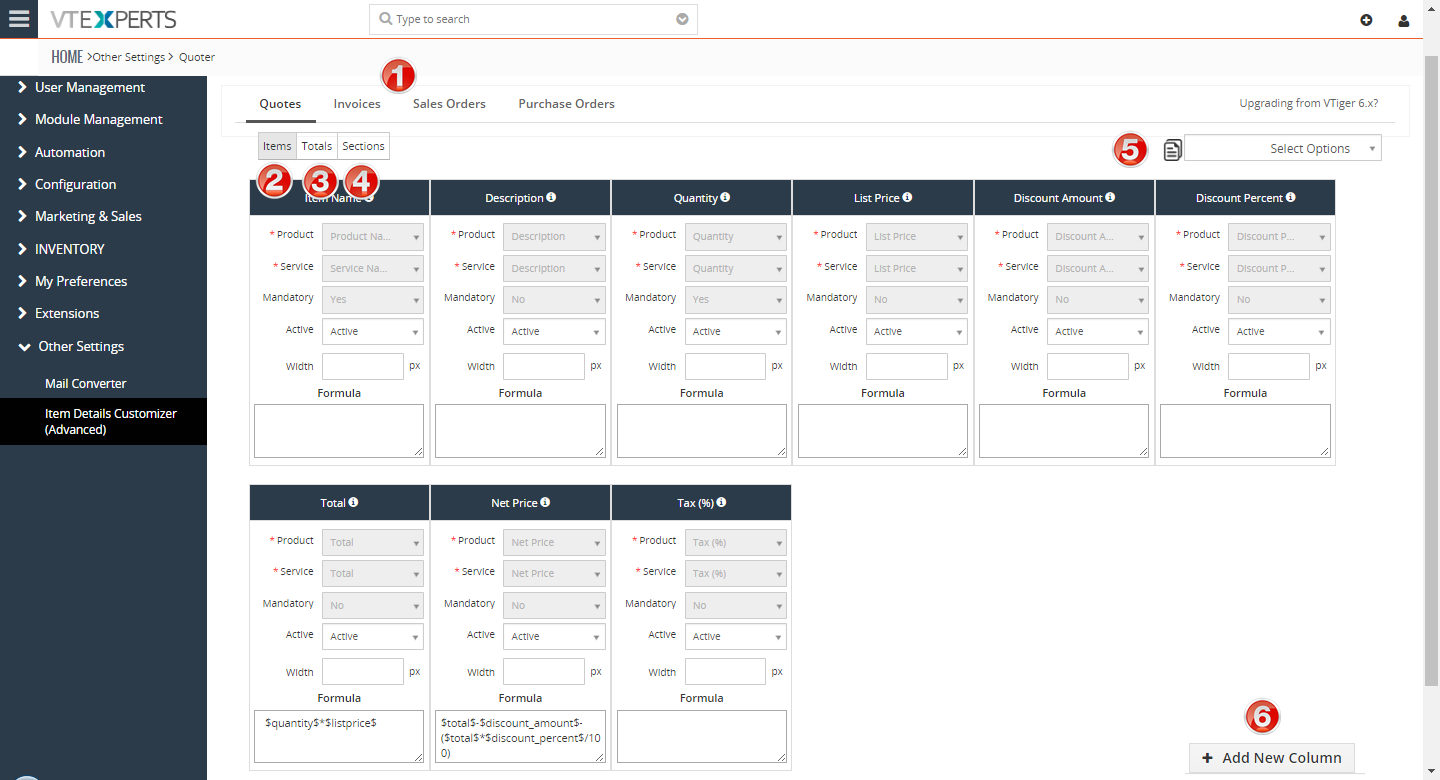
1. Modules tabs: all the modules that can be customized can be found as tabs on the top of the page. You should see Quotes, Invoice, Sales Order, Purchase Order
2. Items: area to add/remove/modify item details columns.
3. Total: area to add/remove/modify total section.
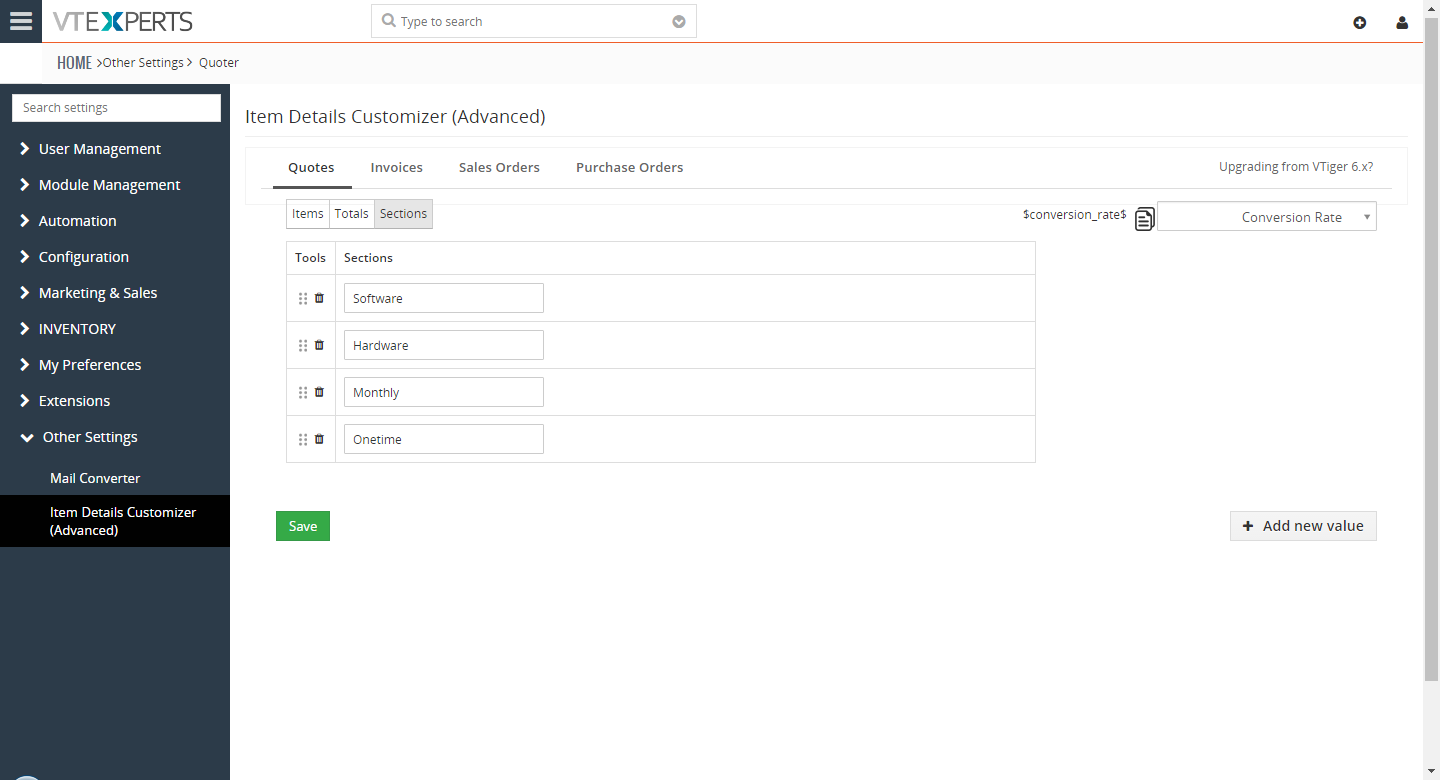
4. Sections: area to create sections that will be used when creating record.
5. Select Options: picklist of existing fields for the selected module(tab). These custom/standard fields can be used in formulas for totals/columns.
6. +Add New Column: to create a new box which turns into column at Frontend in the module – can be found at the bottom right of the page
Save: to apply the configured settings – can be found on the bottom left of the page
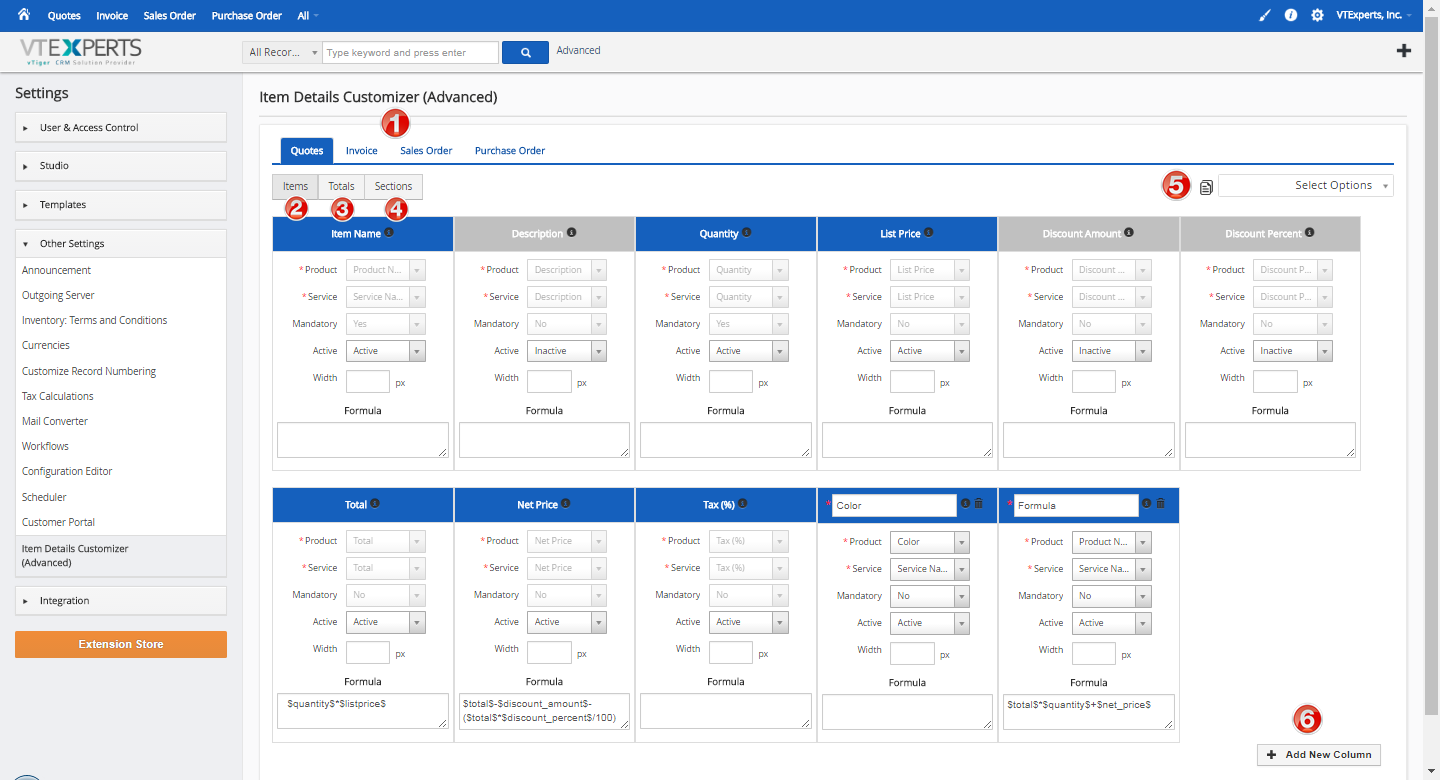
Modifying Existing & Adding New Columns
In the Items area, you can activate/deactivate default columns, add new ones, set width, formulas and move them around. Each box represents a column field in Item Details section.

Overview – Existing Columns
Existing Columns: When the extension is first installed, it pre-configures the system to have default columns. Default columns are identical to what standard vtiger has (product/service, description, quantity, price, etc..). Few things to keep in mind:
- Existing columns can not be deleted. You can set them as “Inactive” and the column will not show up. You will also see that the header of the column becomes gray – meaning that it’s no longer active.
- You can only update the “Active”, “Width” or “Formula” for existing columns.
Basically, if you don’t like existing column – e.g Description – just set it as inactive and create new custom column and configure to your liking.
Existing Column Formulas: As part of initial setup, all the standard formulas will be predefined using standard vtiger logic. You will be able to adjust those formulas.
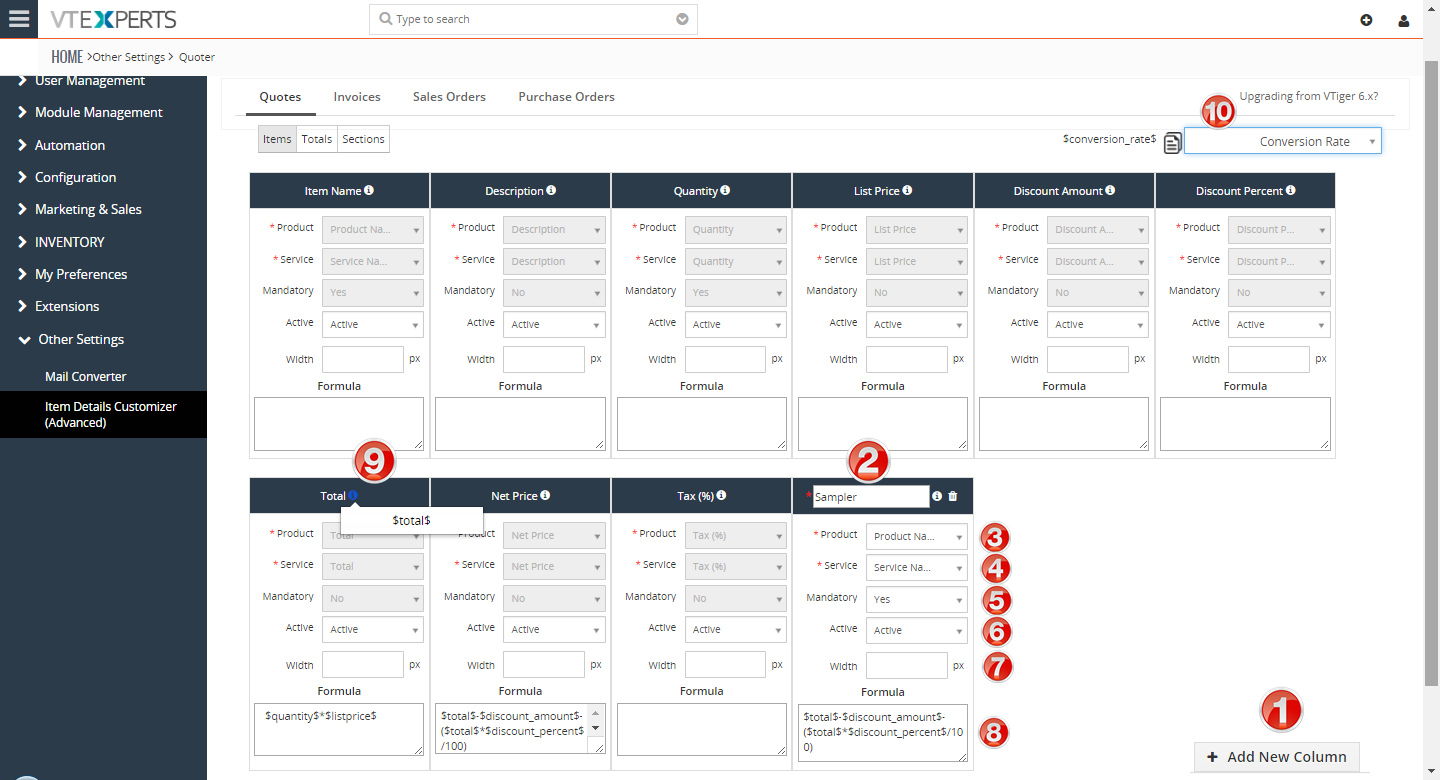
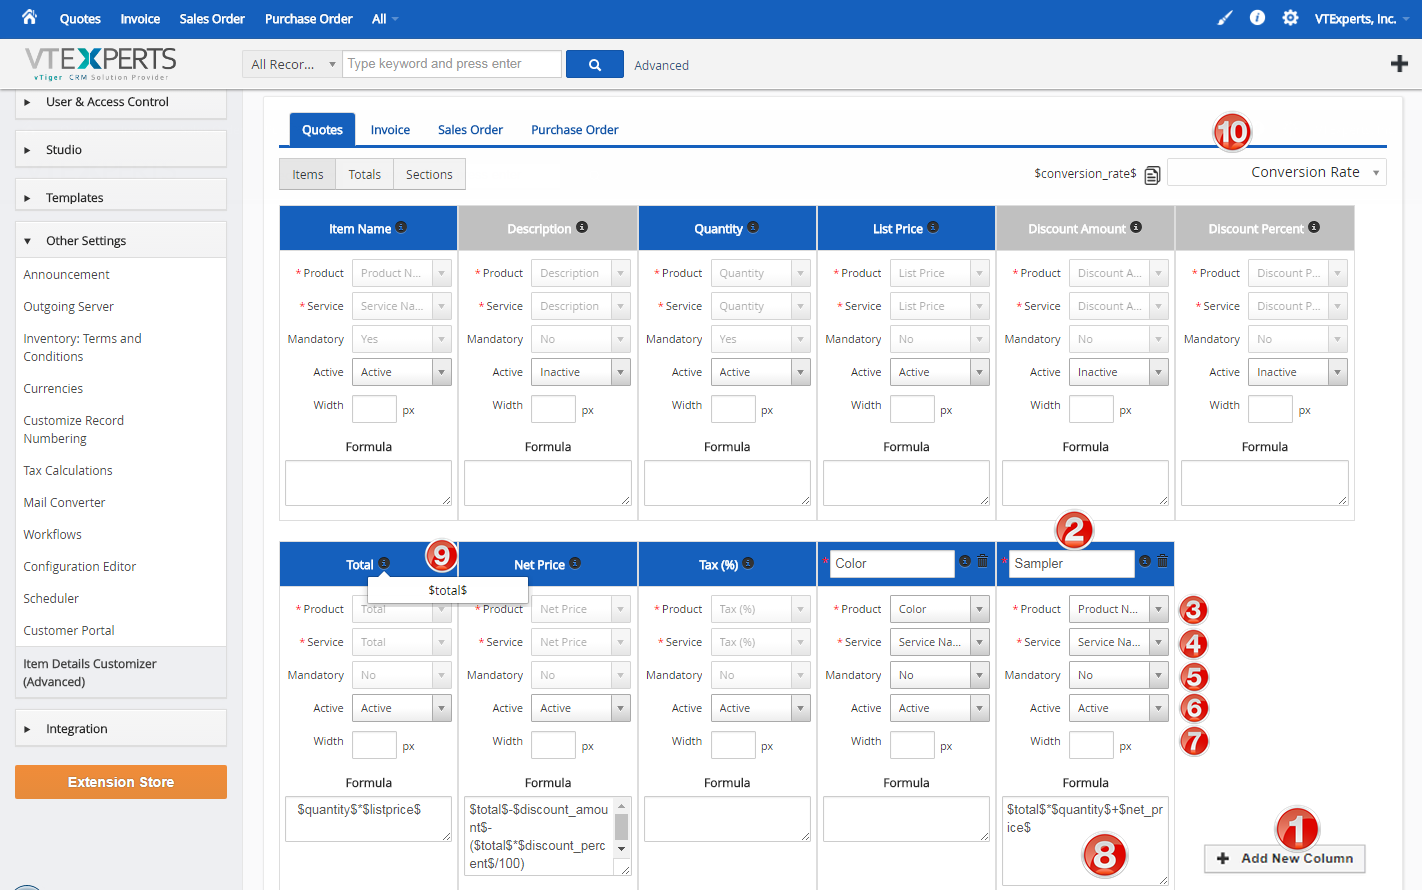
Overview – New Columns
1. +Add New Column: to add new column/box. Once added, the following configuration options are available:
2. Name: You will need to specify the name of the column. Name can be changed later on.
3. Product: You are required to map a field from a product. This will auto-fill the column value when you are creating a new record (e.g price gets autofilled when adding product to the record, same with this).
- If you don’t want the field to be prefilled, the workaround is to create a custom field on products and name it e.g “Placeholder” and map the column to this field. As long as you “Placeholder” field is empty on your products – the workaround will work.
4. Service: You are required to map a field from a service. This will auto-fill the column value when you are creating a new record (e.g price gets autofilled when adding service to the record, same with this).
- If you don’t want the field to be prefilled, the workaround is to create a custom field on services and name it e.g “Placeholder” and map the column to this field. As long as you “Placeholder” field is empty on your services – the workaround will work.
5. Mandatory: column can be set as mandatory when creating Quote/Invoice/SO/PO
6. Active: choose from the options active/inactive to hide/show the column on Quote/Invoice/SO/PO
7. Width: change the width of the column to accommodate the data.
- You can use pixels e.g: 50px
- You can also use % e.g: 15%
8. Formula: define the formula that will be used to calculate field values. This is the most value feature.
Supported mathematical methods:
Addition: +
Subtraction: –
Division: /
Multiply: *
Parentheses: ( and )
Numbers: 1-9999 (You can use any number in the formula)
Supported field variables:
Existing & Custom Columns: any column value can be included in the formula. If you click (i) on the column (See #9) you will be provided a variable to use the formula. Example “Total” – $total$.
Standard & Custom fields on Quote/Invoice/PO/SO: you can utilize fields from the record, meaning if you create a field on Quote and name it “Mark up” – you can include the markup value as part of the column calculations. (See #10- this is where the list of all the available fields are that you can include in the formula).
Column Formula Examples:
You can already see formulas automatically generated based on VTiger standard functionality, for example:
“Total” = $quantity$*$listprice$
“Net Price” = $total$-$discount_amount$-($total$*$discount_percent$/100)
There are no limitations as to what formulas can be, it really depends on your business process.
Modifying Existing & Adding New Totals
In the Totals area, you can delete default columns, add new ones, set formulas and move them around. Each row represents a total in field in Item Details – totals section.

Overview – Existing Totals
Existing Totals: When the extension is first installed, it pre-configures the system to have default columns. Default columns are identical to what standard vtiger has (Total, Grand Total, Adjustment, Pre Tax Total, etc…). Few things to keep in mind:
- Existing Totals can be deleted. If you delete the total – there’s no way to restore it. You would need to create a new one.
- You can update formulas, convert to data entry and set them to be running subtotals (see below).
Existing Total Formulas: As part of initial setup, all the standard formulas will be predefined using standard vtiger logic. You will be able to adjust those formulas.
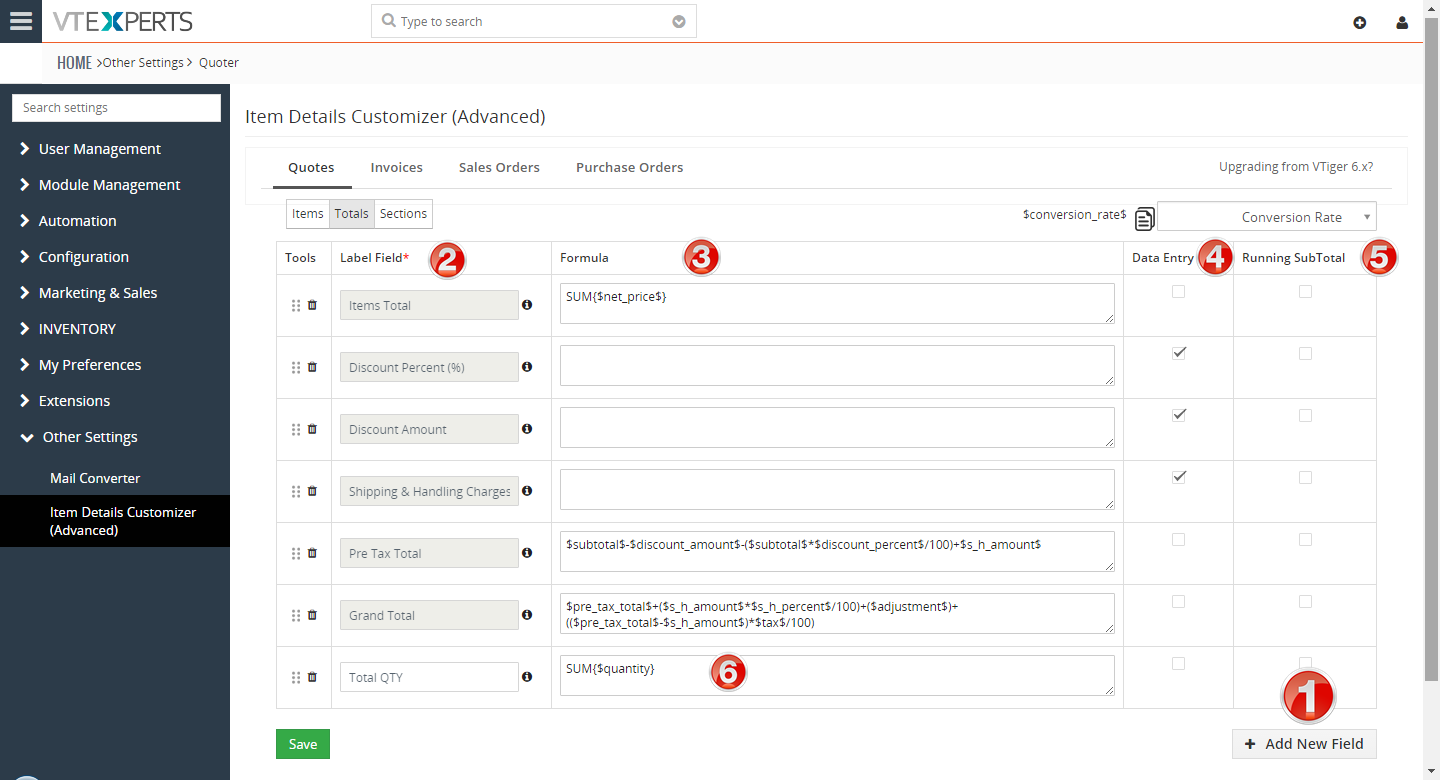
Overview – New Totals
1. +Add New Field: Ta add new total. Once added, the following configuration options are available:
2. Name: You will need to specify the name of the total. Name can be changed later on.
3. Formulas: formulas are optional for totals. The same logic (from Column Formulas) applies to totals as well. It supports addition, subtraction, division, multiplication, paraphrases and number. Please refer to Column Formulas to learn more.
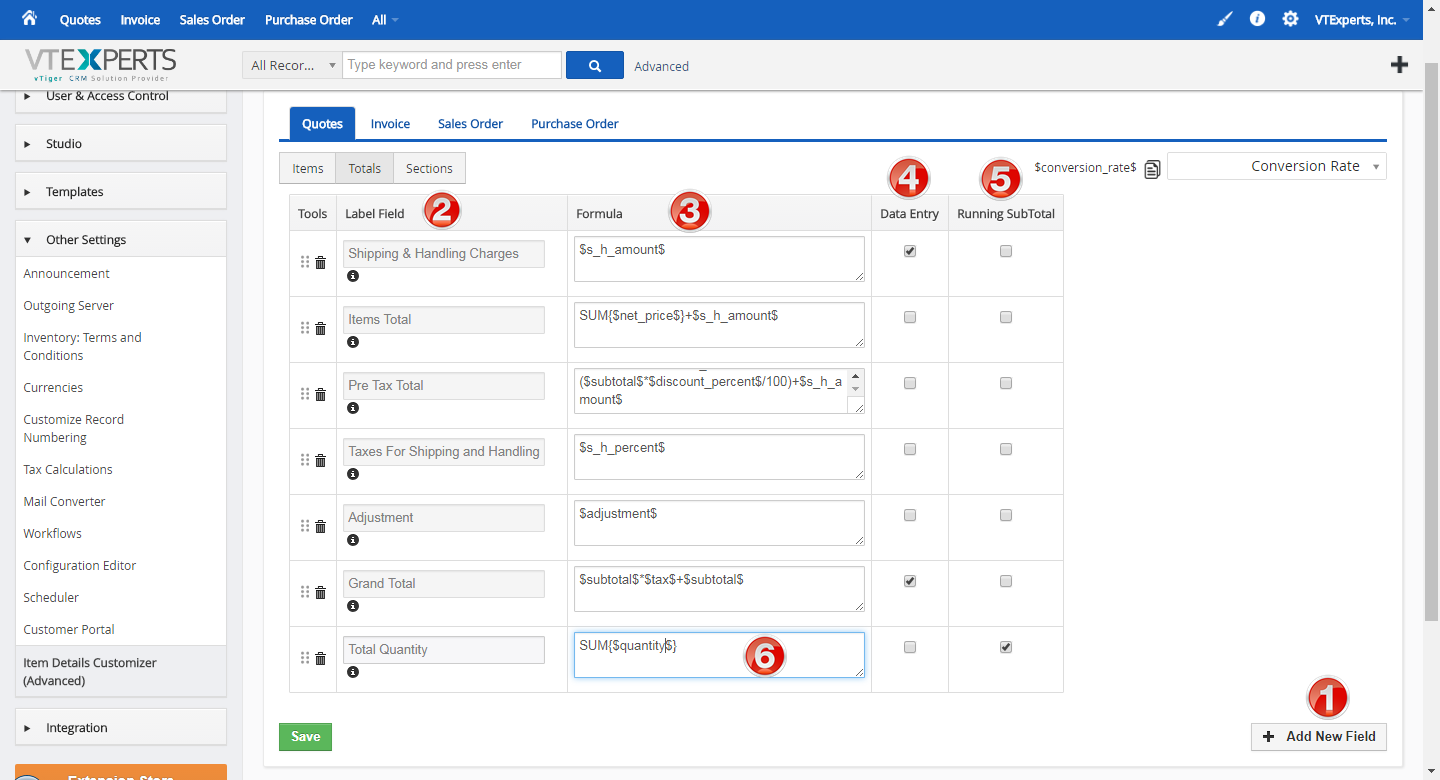
There are few unique features on Totals formulas:
Total formulas support SUM{}, meaning that you can SUM{} the values from columns. For example, for Items Total – we have formula “SUM{$net_price$}+$s_h_amount$” which means that it will take all the items on the Quote/Invoice/PO/SO and will SUM(Add) the field $net_price$ to calculate proper total. SUM{} can be applied to any column field.
Note: syntax is: SUM{$field_goes_here}. You must use these brackets { }.
Another easy to understand example would be, say you want to know total quantity of products ordered, so you could create new total e.g “Total QTY” and use formula “SUM{$quantity$}” and you get total qty ordered as one of the totals. (See #6)
4. Data Entry: Total field can be set as data entry, meaning that instead of calculating the field using formulas – you can manually input value into the total. This is very similar to VTiger standard “Adjustment” or “Shipping & Handling Fees” – you can basically input value.
Note: Totals marked for “Data Entry” can still be used in formulas.
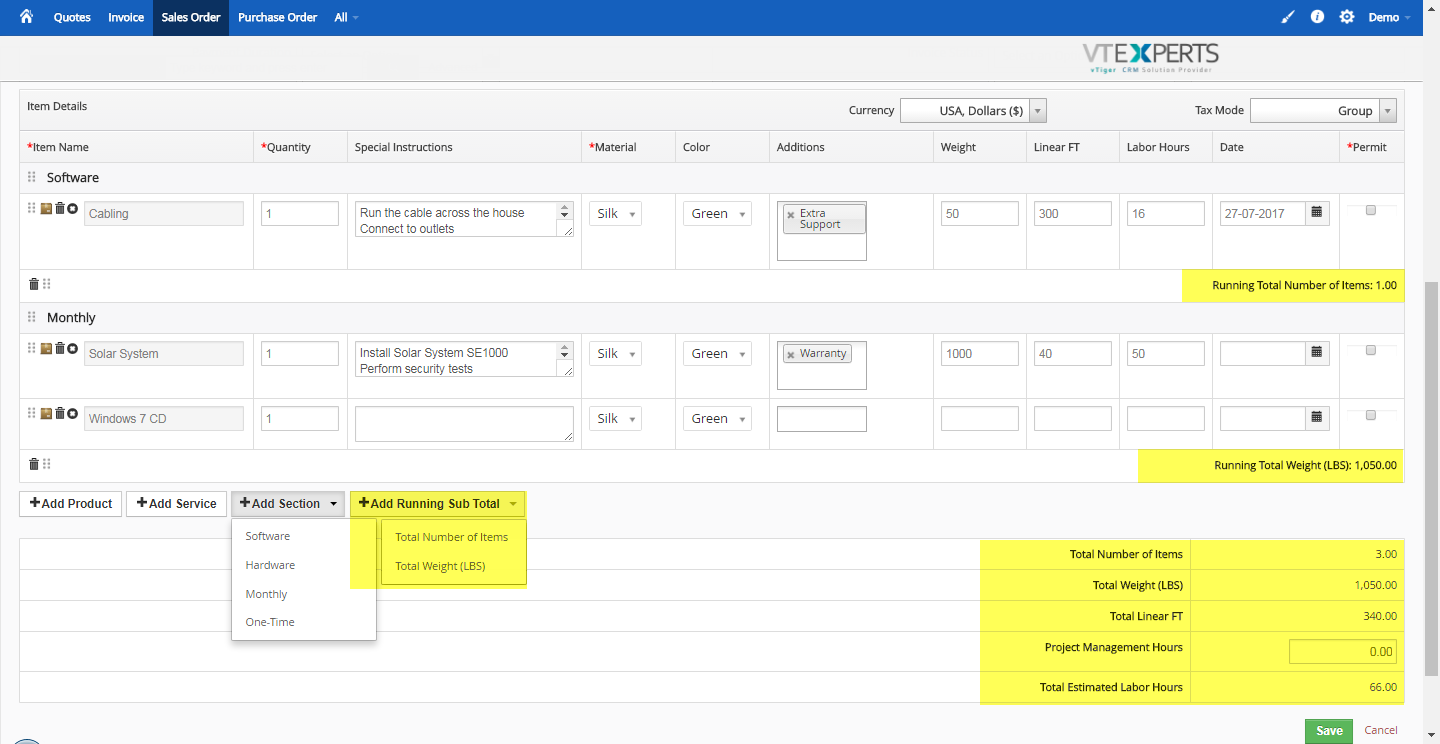
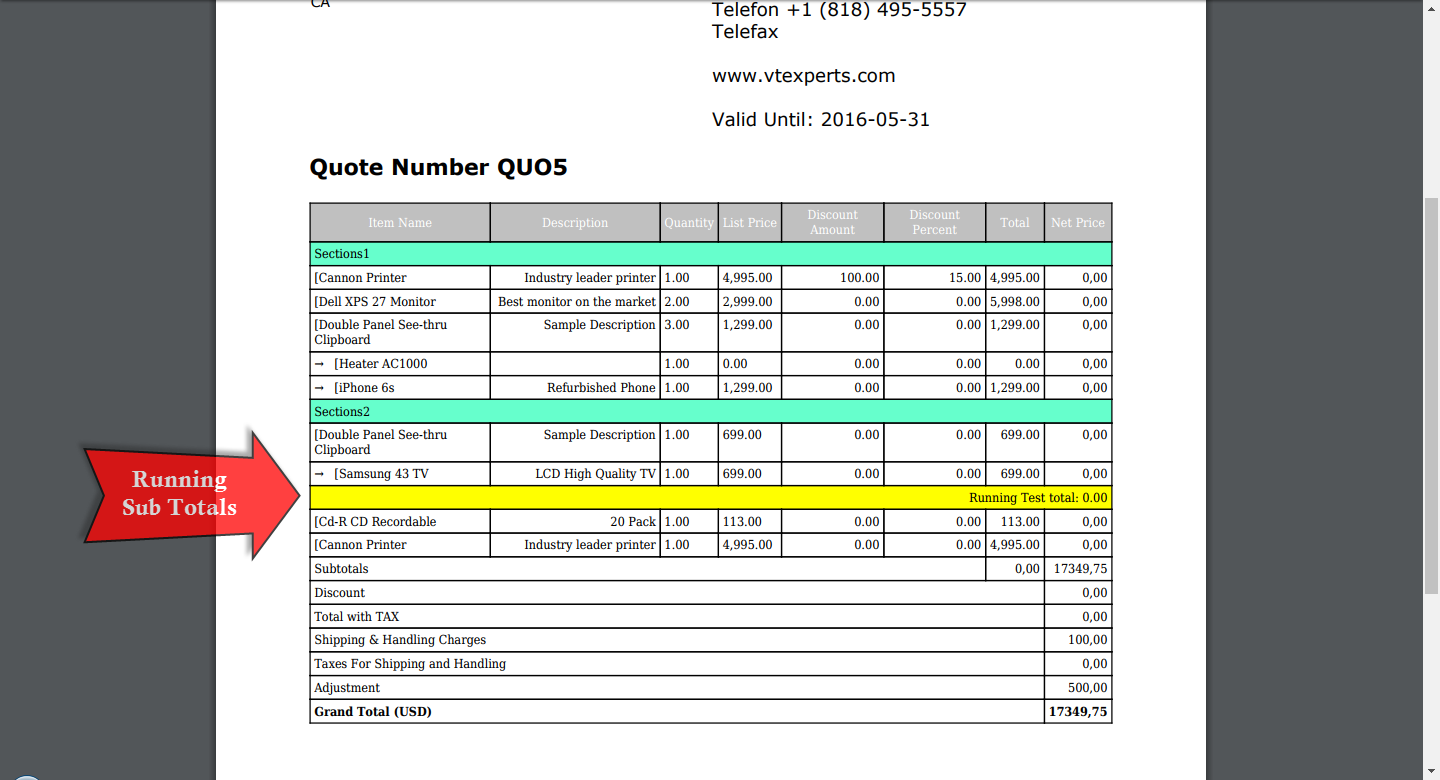
5. Running Subtotals: Each total can be marked as running subtotal, meaning that you will be able to add running subtotal while creating Quote/Invoice/PO/SO and see the total for the products/services that are ABOVE the running subtotal section. (Refer to user interface – subtotals section).
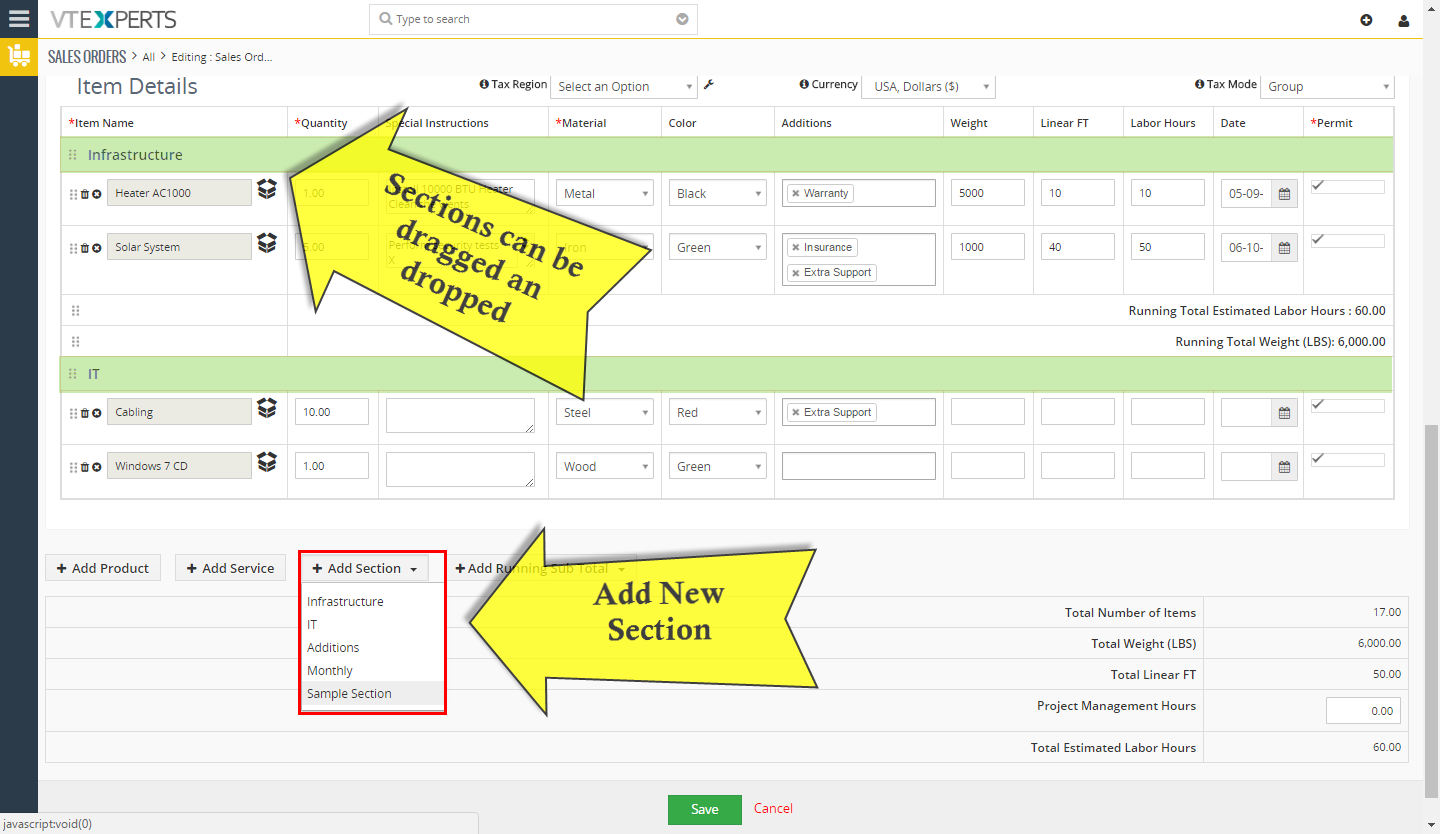
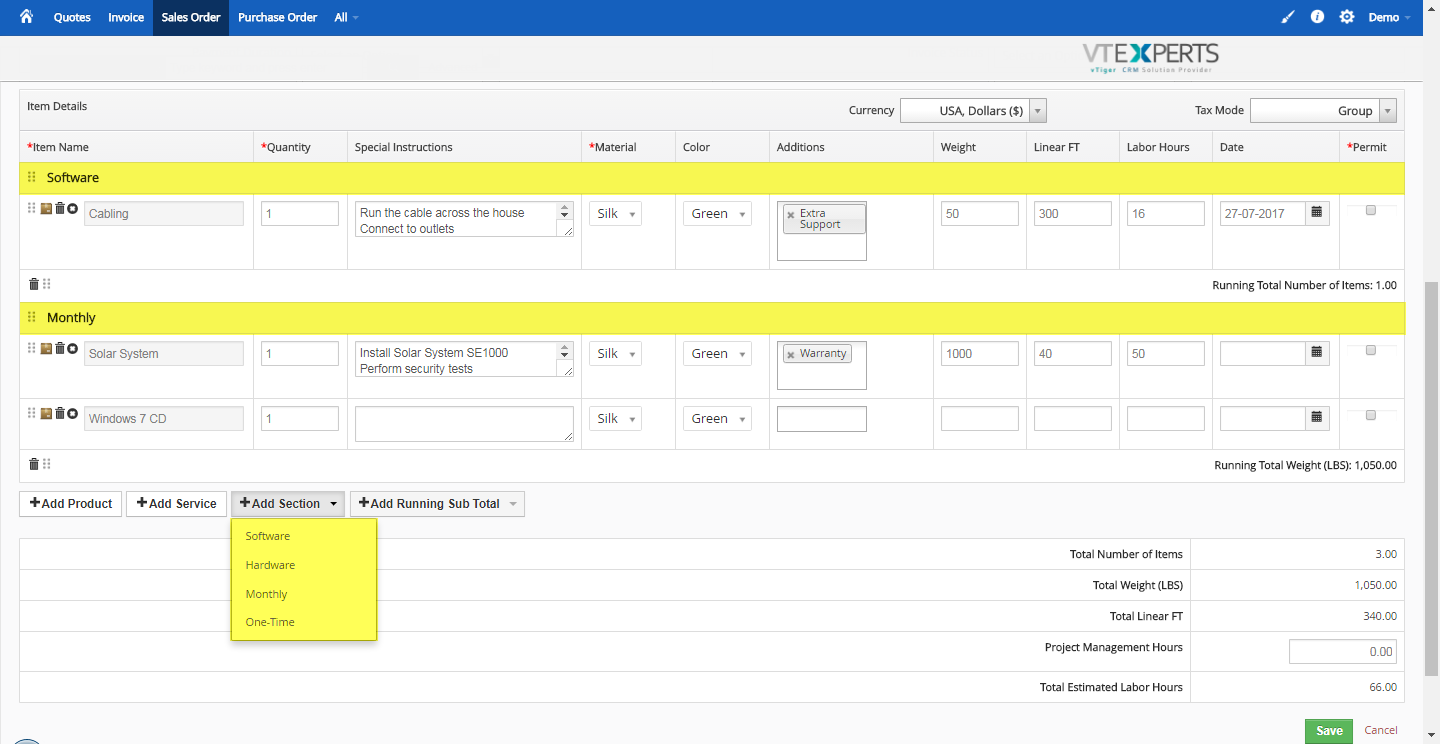
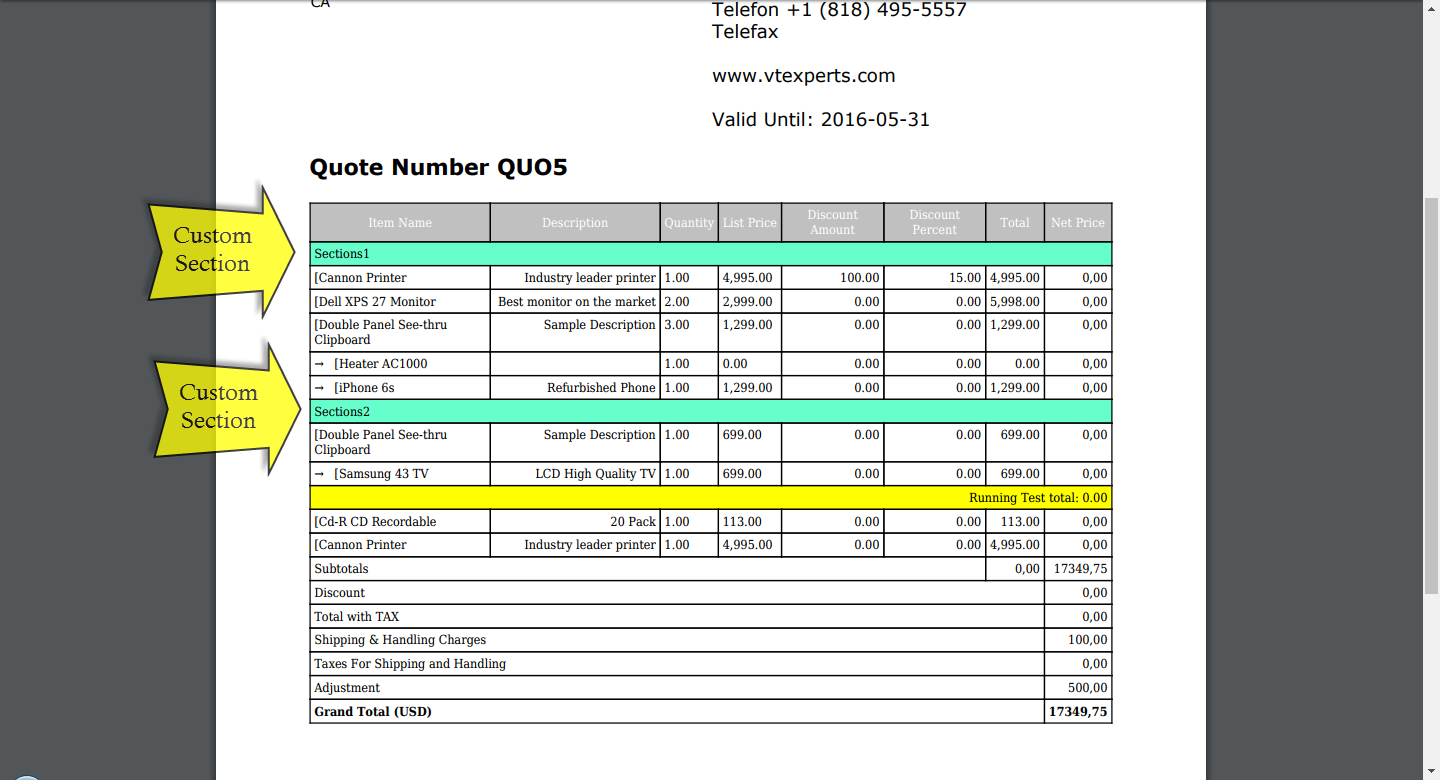
Sections (Grouping)
Sections is a very nice feature that allows to create sections and separate products/services into different sections on the Quote/Invoice/PO/SO.
You can create sections by going to “Sections” and clicking “+Add New Value”.
Section has to be added before it can be used.
Section order can be changed by dragging and dropping
Sections can be deleted.

PDF Maker Integration (its4you)
Item details customizer (Advanced) seamlessly integrates with PDF Maker by its4you. You will be able to include:
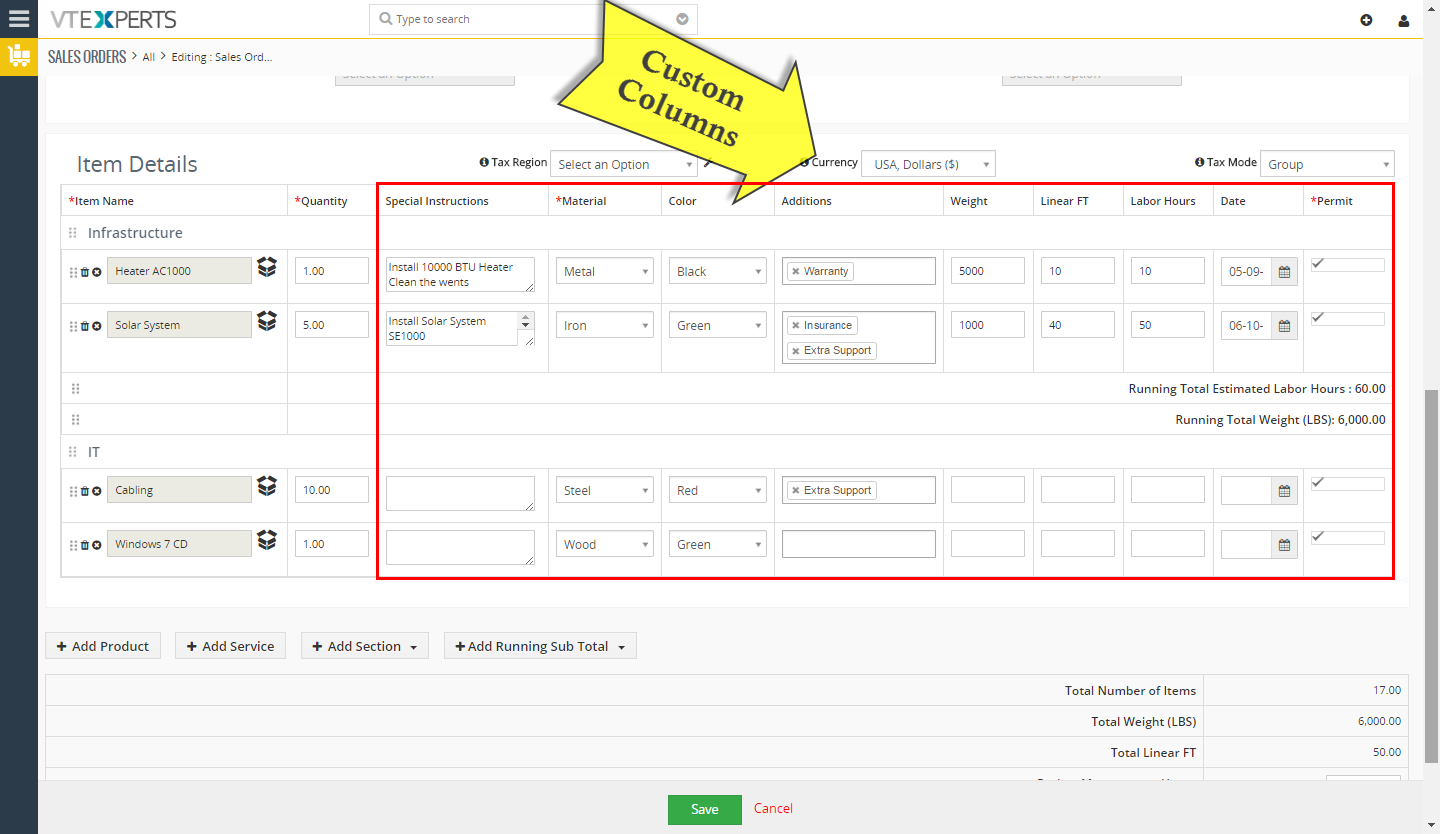
Custom Columns
Custom Totals
Sections
Running Subtotals
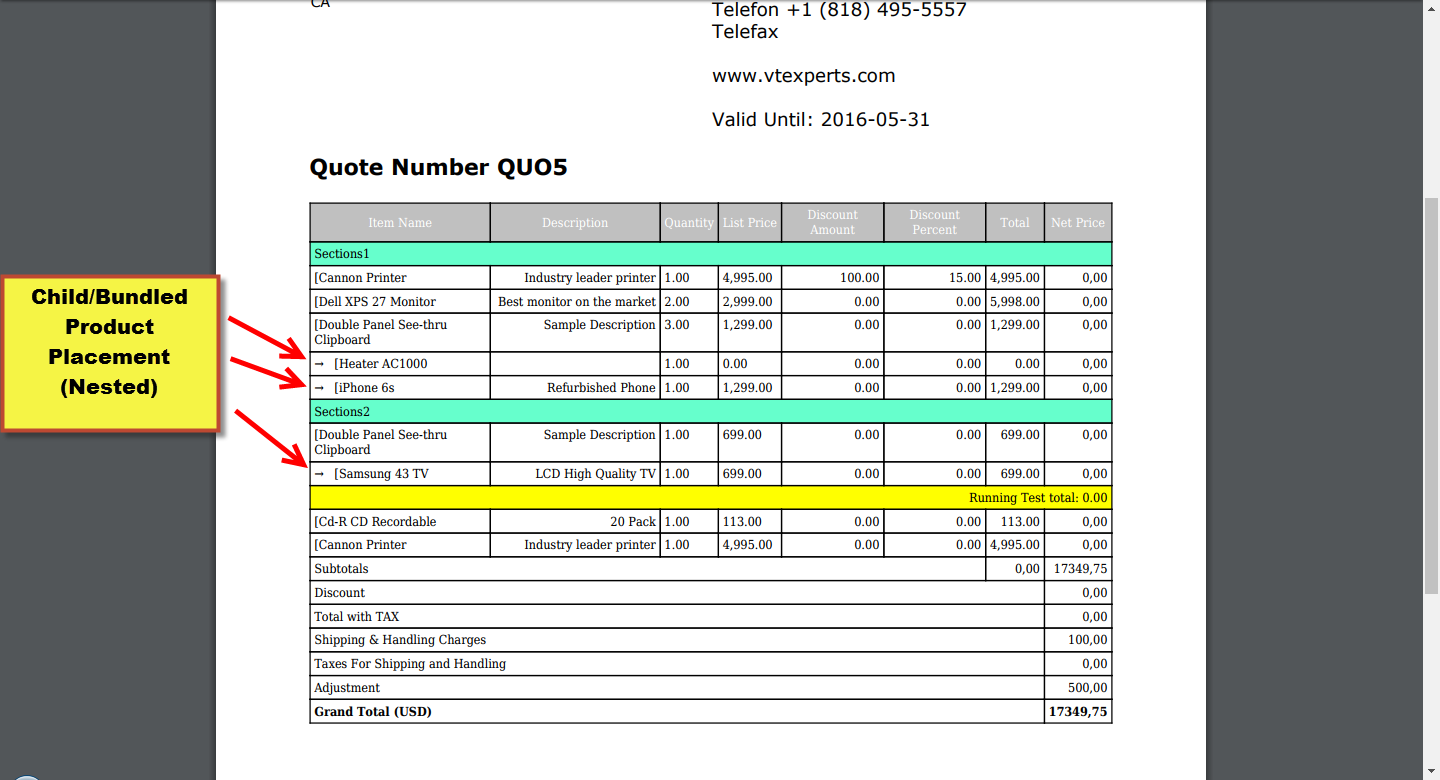
Parent/Child Product Nested View
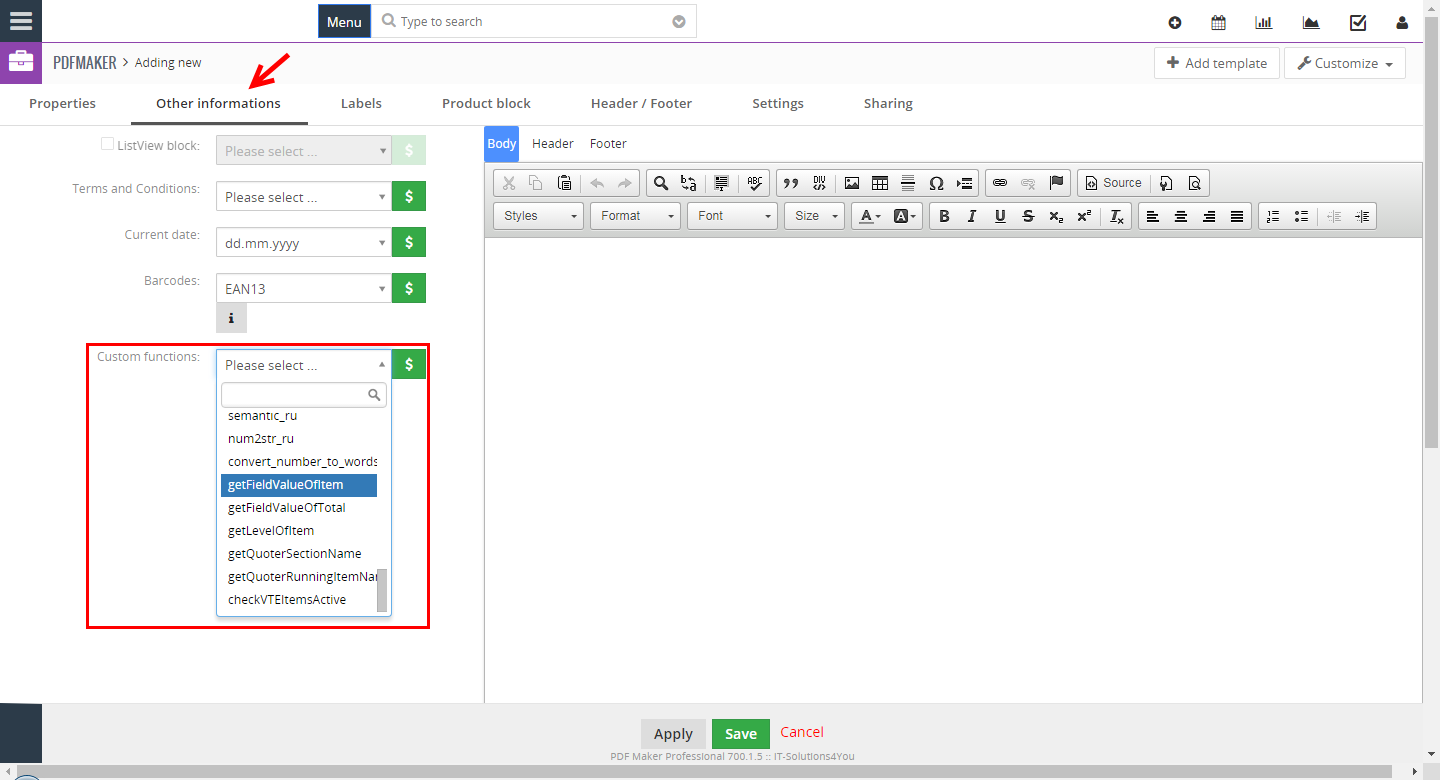
In order to properly create output to PDF, you will need to make sure that “VTE Custom Functions” have been added to PDF Maker. To do so, open PDF Maker template and go to “Other Informations” tab and open “custom functions” picklist. You need to make sure that you see(at the bottom):
getFieldValueOfItem
getFieldValueOfTotal
getLevelOfItem
getQuoterSectionName
getQuoterRunningItemName
If you don’t see these values, you then need to add them here. To add, you will need to download and vte_QuoterFunctions.php and place it in /your/vtigercm/modules/PDF/Maker/resources/functions/.
Link to download vte_QuoterFunctions.php (note it’s a .zip file, you will need to extract it).
Once the file has been placed in the proper folder – those custom (in the picklist) will then show up.

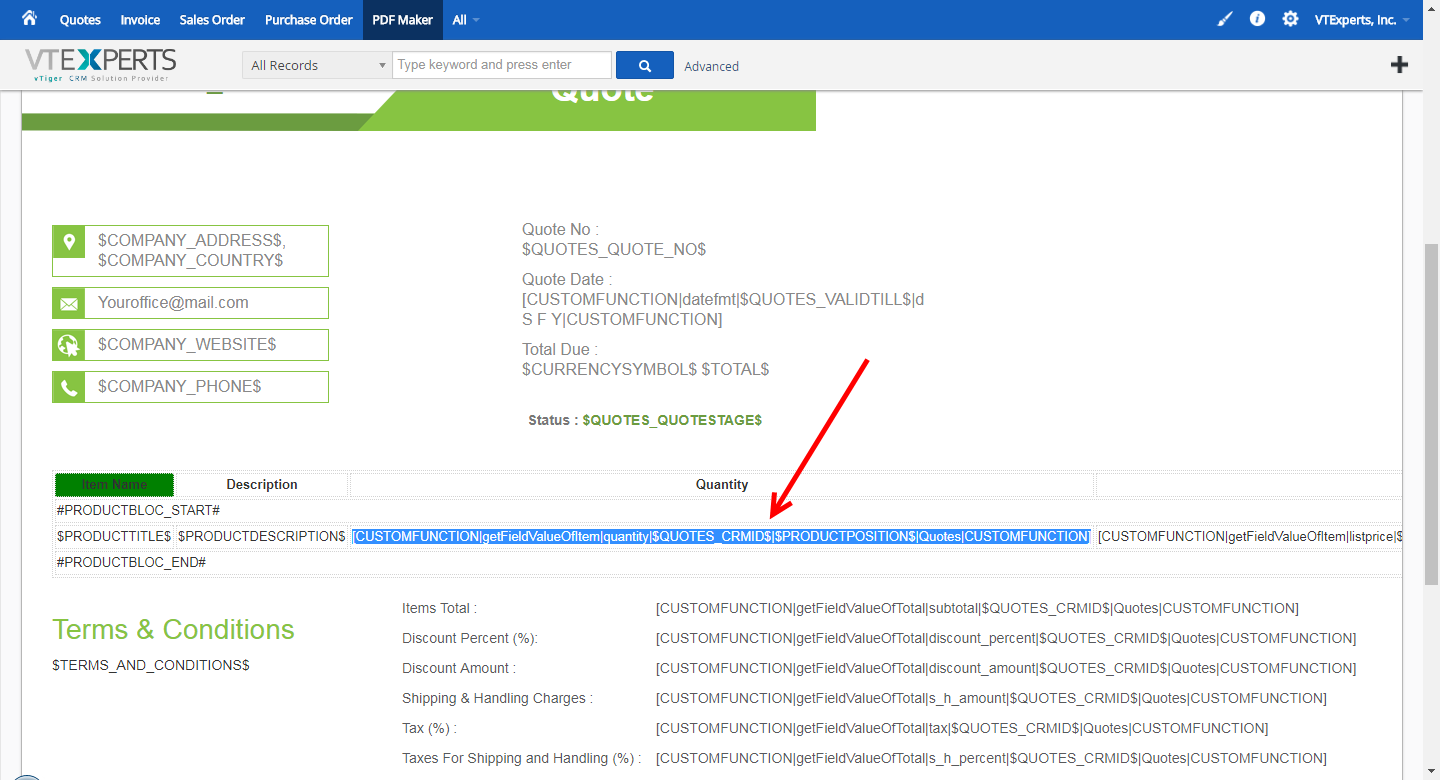
getFieldValueOfItem (Custom Column)
This function is used to merge custom column value from Item Details section.
Syntax: [CUSTOMFUNCTION|getFieldValueOfItem|fieldName|recordId|
itemNo|module|CUSTOMFUNCTION]
You will need to adjust the following values within the syntax:
fieldName – retrieved from Item Details Customizer settings area (see screenshot)
recordId – replace with appropiate value based on the module you are on:
$SALESORDER_CRMID$
$PURCHASEORDER_CRMID$
$INVOICE_CRMID$
$QUOTES_CRMID$
ItemNo – replace with $PRODUCTPOSITION$ (this always remains the same).
module – replace with appropiate value based on the module you are on:
Invoice
Quotes
SalesOrder
PurchaseOrder
Example: [CUSTOMFUNCTION|getFieldValueOfItem|cf_quotes_color|$QUOTES_CRMID$|
$PRODUCTPOSITION$|Quotes|CUSTOMFUNCTION]
Note: In the screenshot(settings) the variable has $ $, however in the function we do NOT include $ $. This only applies to fieldName.
Note: You should insert the custom function into the same area as if you were inserting standard column.
getFieldValueOfTotal (Custom Total)
This function is used to merge custom totals value from Item Details totals section.
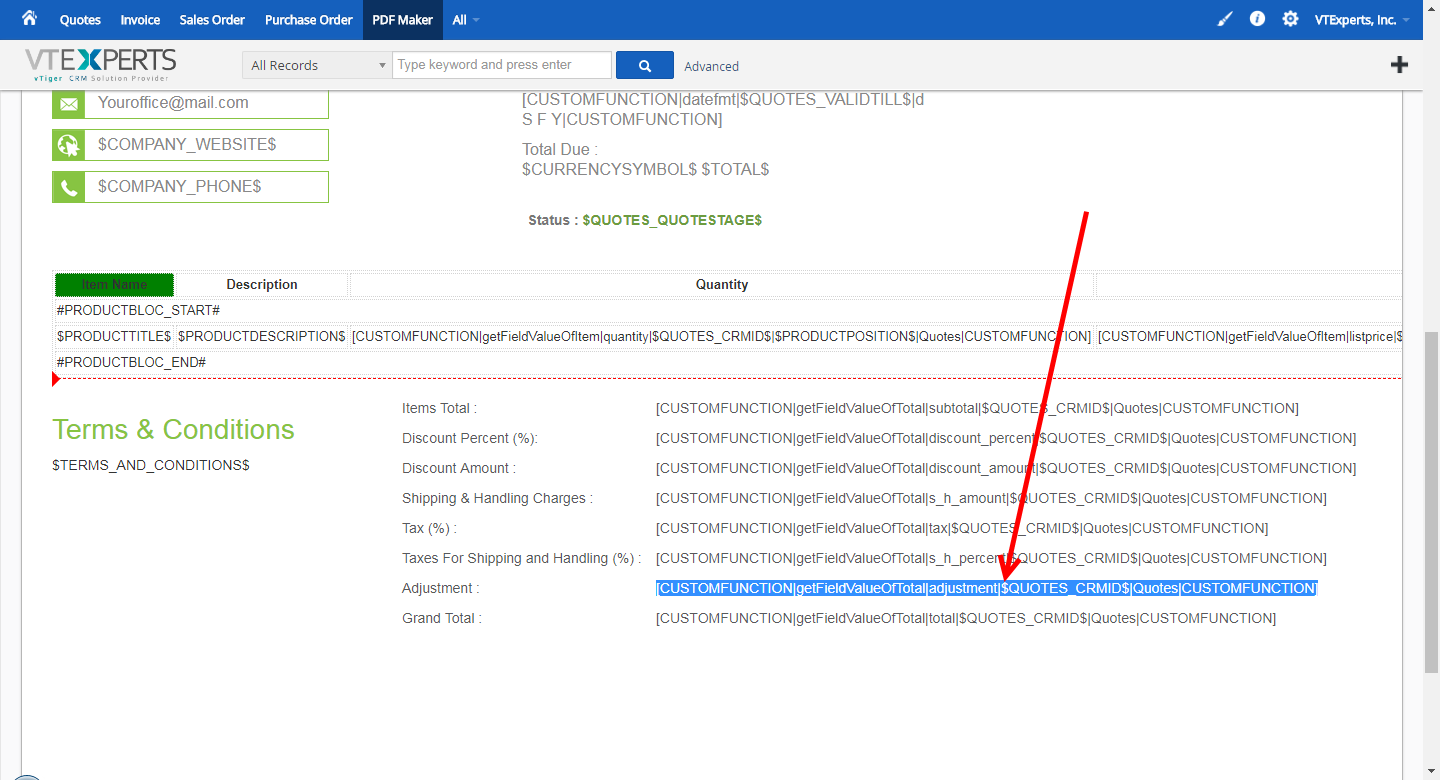
Syntax: [CUSTOMFUNCTION|getFieldValueOfTotal|fieldName|recordId|module|CUSTOMFUNCTION]
You will need to adjust the following values within the syntax:
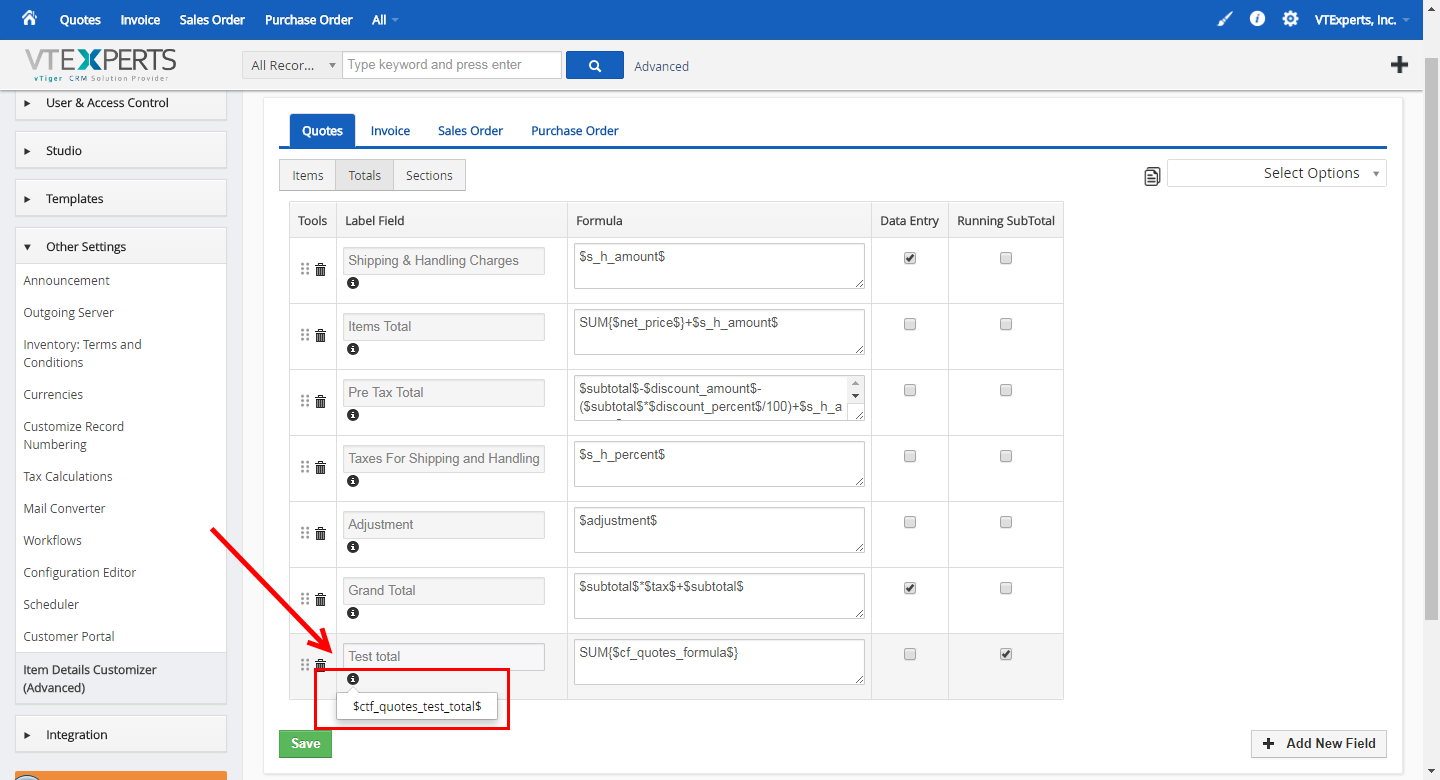
fieldName – retrieved from Item Details Customizer settings area (see screenshot)
recordId – replace with appropiate value based on the module you are on:
$SALESORDER_CRMID$
$PURCHASEORDER_CRMID$
$INVOICE_CRMID$
$QUOTES_CRMID$
module – replace with appropiate value based on the module you are on:
Invoice
Quotes
SalesOrder
PurchaseOrder
Example: [CUSTOMFUNCTION|getFieldValueOfTotal|cf_quotes_test_total|$QUOTES_CRMID$|
Quotes|CUSTOMFUNCTION]
Note: In the screenshot(settings) the variable has $ $, however in the function we do NOT include $ $. This only applies to fieldName.
Note: You should insert the custom function into the same area as if you were inserting standard total
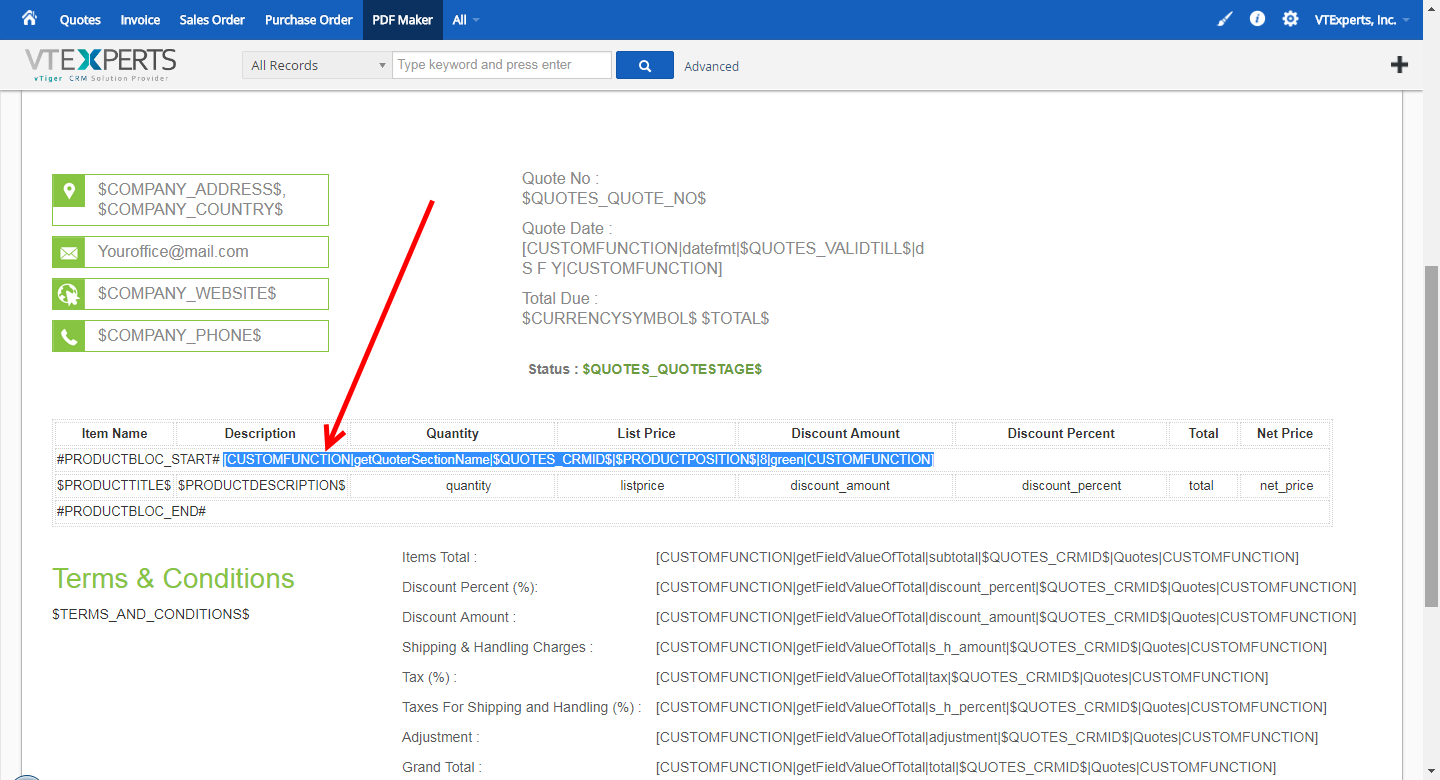
getQuoterSectionName (Section)
This function is used to include custom Sections on the PDF.
Syntax: [CUSTOMFUNCTION|getQuoterSectionName|recordId|sequence|numOfColumn|
backgroundColor|CUSTOMFUNCTION]
You will need to adjust the following values within the syntax:
recordId – replace with appropiate value based on the module you are on:
$SALESORDER_CRMID$
$PURCHASEORDER_CRMID$
$INVOICE_CRMID$
$QUOTES_CRMID$
sequence – replace with $PRODUCTPOSITION$ (this always remains the same).
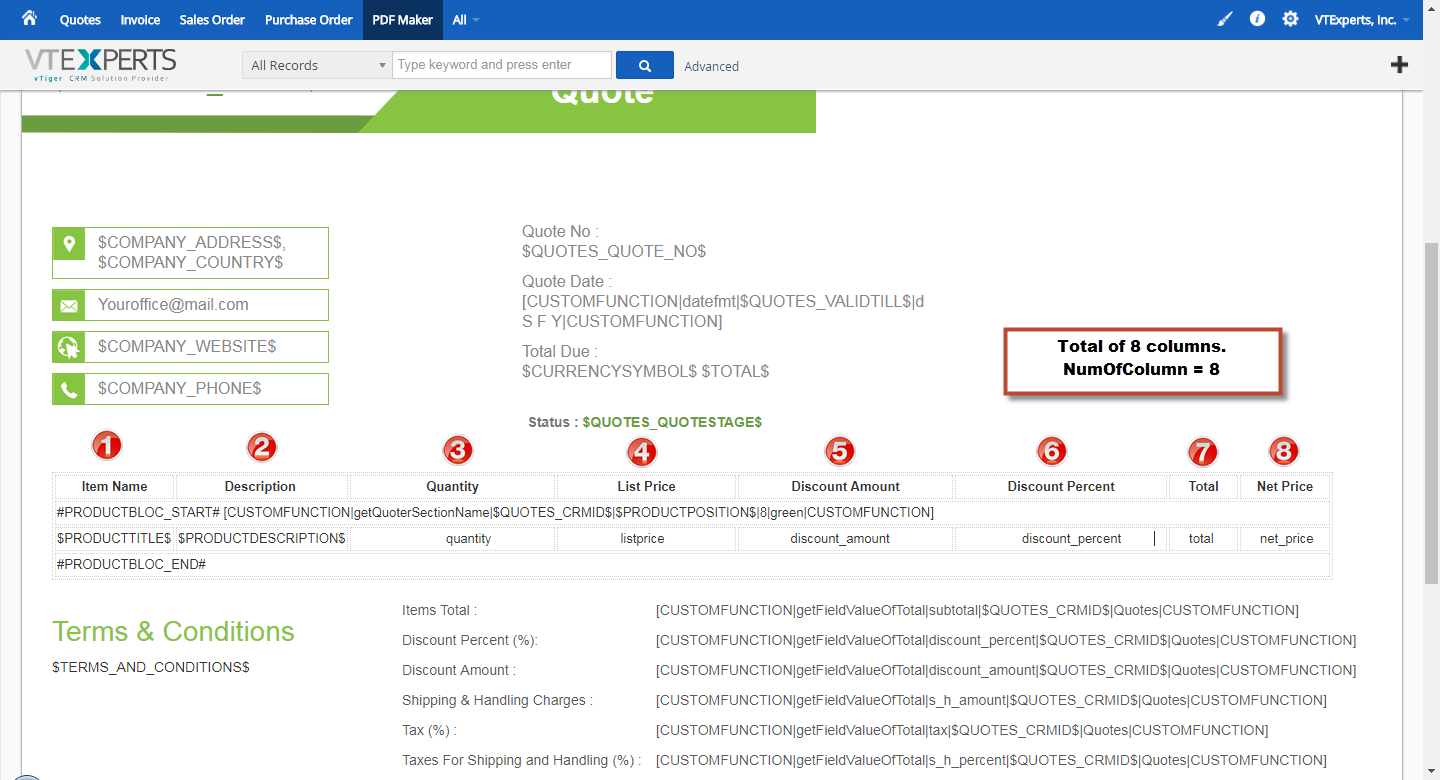
numOfColumn – replace with a number of total columns in the product block. In this example we have 8 columns (see screenshot), so we just put 8.
backgroundColor – this is the color OR color code that will be use to set the background color for the section (once merged to PDF). It accepts colors as word e.g ‘yellow, ‘green’, ‘blue’ OR color codes #123456, #785544, etc..
Example: [CUSTOMFUNCTION|getQuoterSectionName|$QUOTES_CRMID$|$PRODUCTPOSITION$|8|
green|CUSTOMFUNCTION]
Note: You should insert the custom function AFTER #PRODUCT_START# (in the same cell).
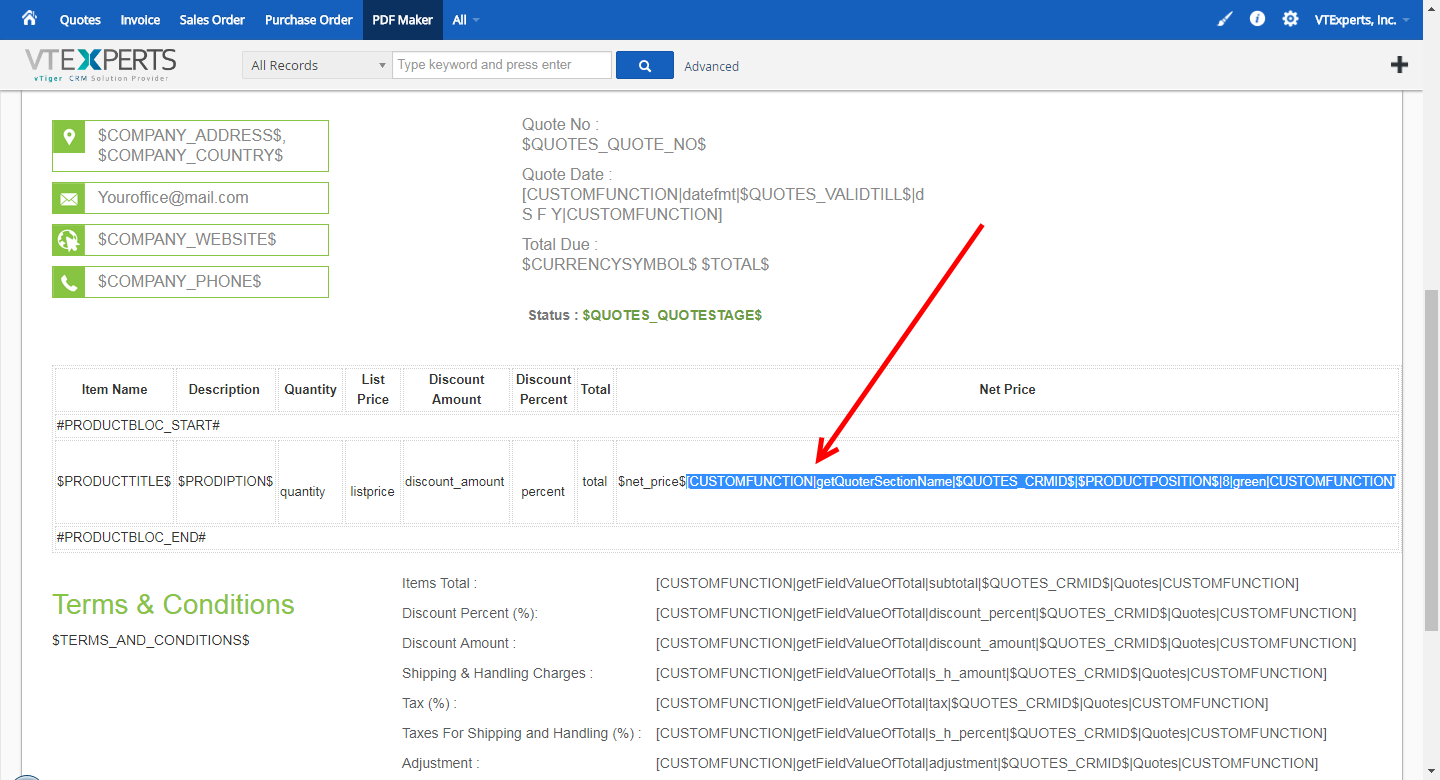
getQuoterRunningItemName (Running Subtotals)
This function is used to include running subtotals on the PDF.
Syntax: [CUSTOMFUNCTION|getQuoterRunningItemName|moduleName|recordId|sequence|numOfColumn|
backgroundColor|CUSTOMFUNCTION]
You will need to adjust the following values within the syntax:
moduleName – replace with appropiate value based on the module you are on:
Invoice
Quotes
SalesOrder
PurchaseOrder
recordId – replace with appropiate value based on the module you are on:
$SALESORDER_CRMID$
$PURCHASEORDER_CRMID$
$INVOICE_CRMID$
$QUOTES_CRMID$
sequence – replace with $PRODUCTPOSITION$ (this always remains the same).
numOfColumn – replace with a number of total columns in the product block. In this example we have 8 columns (see screenshot), so we just put 8.
backgroundColor – this is the color OR color code that will be use to set the background color for the section (once merged to PDF). It accepts colors as word e.g ‘yellow, ‘green’, ‘blue’ OR color codes #123456, #785544, etc..
Example: [CUSTOMFUNCTION|getQuoterRunningItemName|Quotes|$QUOTES_CRMID$|$PRODUCTPOSITION$|8|
green|CUSTOMFUNCTION]
Note: You should insert the custom function at the LAST column, next to the LAST columns variable (in the same column). In the screenshot, you can see that it has $net_price$ which is the last column variable and right next to it – we inserted custom function. It doesn’t matter what is the last column, the only things that matters is that custom function is inserted after last columns’ variable.
getLevelOfItem (Nested Child/Bundle Products)
This function is used to properly show nested view for child/bundled products on the PDF.
Syntax: [CUSTOMFUNCTION|getLevelOfItem|recordId|itemNo|CUSTOMFUNCTION]
You will need to adjust the following values within the syntax:
itemNo – replace with $PRODUCTPOSITION$ (this always remains the same).
recordId – replace with appropiate value based on the module you are on:
$SALESORDER_CRMID$
$PURCHASEORDER_CRMID$
$INVOICE_CRMID$
$QUOTES_CRMID$
Example: [CUSTOMFUNCTION|getLevelOfItem|$PRODUCTPOSITION$|$QUOTES_CRMID$|CUSTOMFUNCTION]
Note: You should insert the custom function at the FIRST column, BEFORE the variable variable (in the same column). In the screenshot, you can see that it has $PRODUCTTITLE$ which is the first column variable and right before it – we inserted custom function.