

Custom Buttons Extension for VTiger was designed to improve efficiency when updating records. Buttons can be configured to show modal popup with selected fields. For example, you can add a button to “Update Address” which will only show address fields when clicked.
It also supports conditional logic, meaning that buttons can be shown or hidden based on certain condition. For example, if organization’s address is incomplete – you could show a button indicating that and with an option to update address when the button is clicked.
Custom Buttons can be customized for Color, Field, Label and Icon. There is no limit to them in numbers, you can add as many as you want. Conditional logic makes it more interesting and verily usable.
Configuration
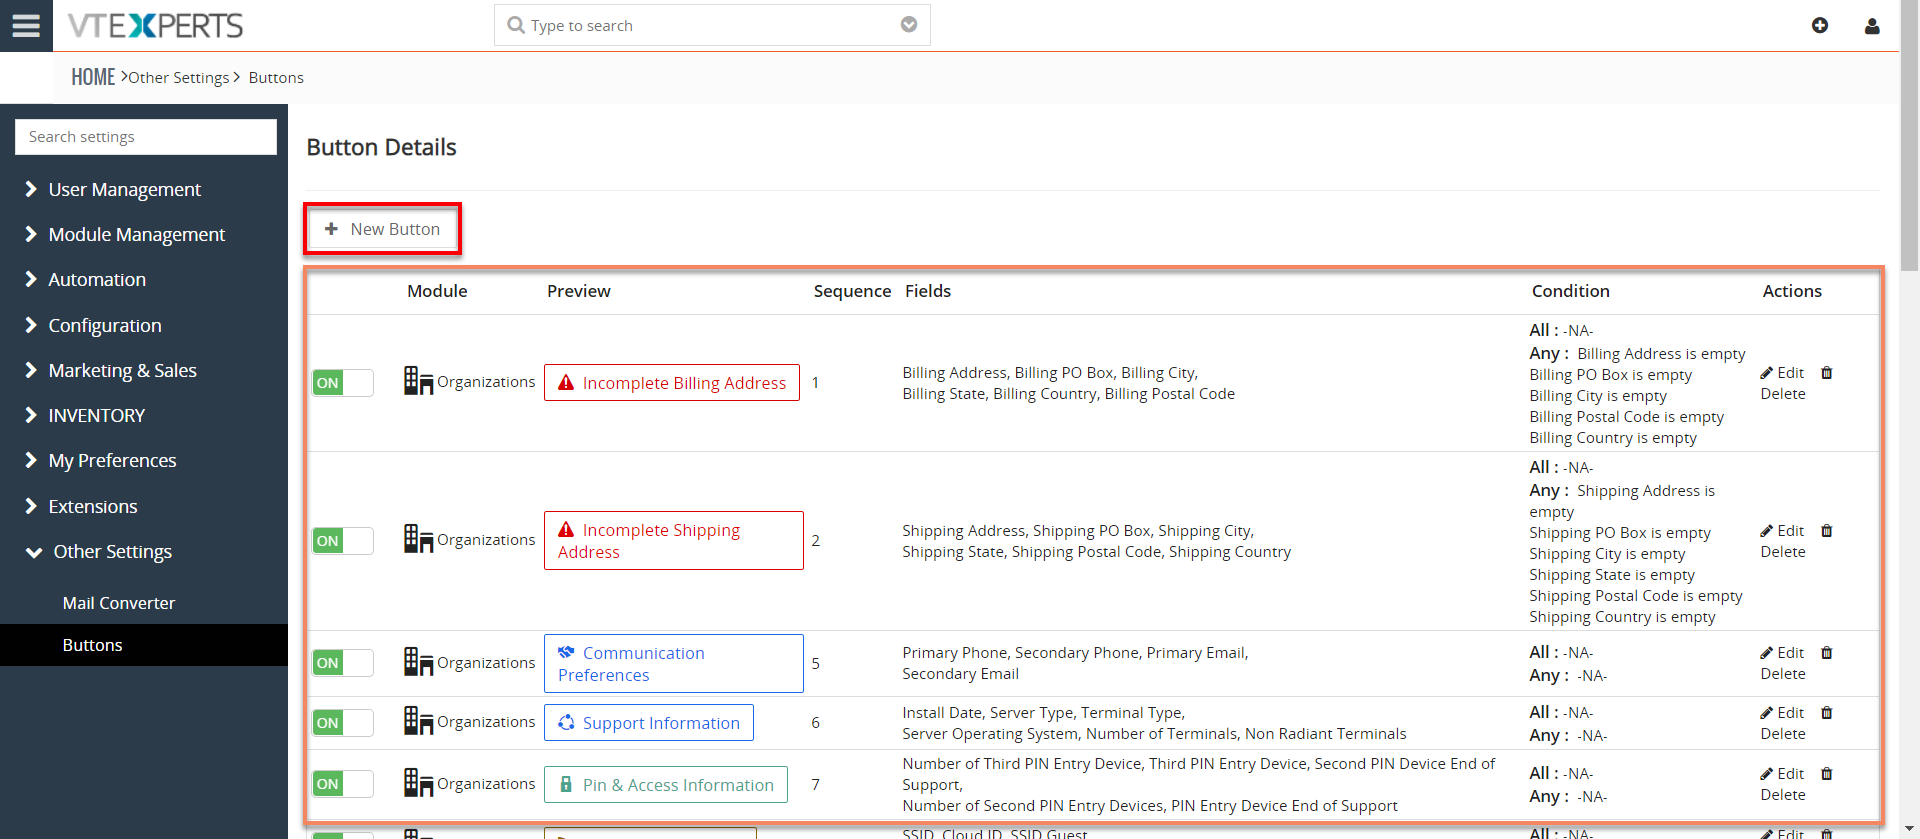
For configuration, go to Settings > CRM Settings > Find “Buttons” under extensions’ list. Configuration Page will open for this extension. This is how the configuration panel looks like:
+ New Button: On the top left you will see the button to add a new Custom Button.
List of all Custom Buttons: The list of all available (active or inactive) buttons show under the “+ New Button”.
1. List of all Custom Buttons
The list of all available (active or inactive) buttons show under the “+ New Button”. This should be empty when you first visit the configuration area. When you add a new button, it shows up here in the list. These are the columns that provide certain information about each of the Button added.
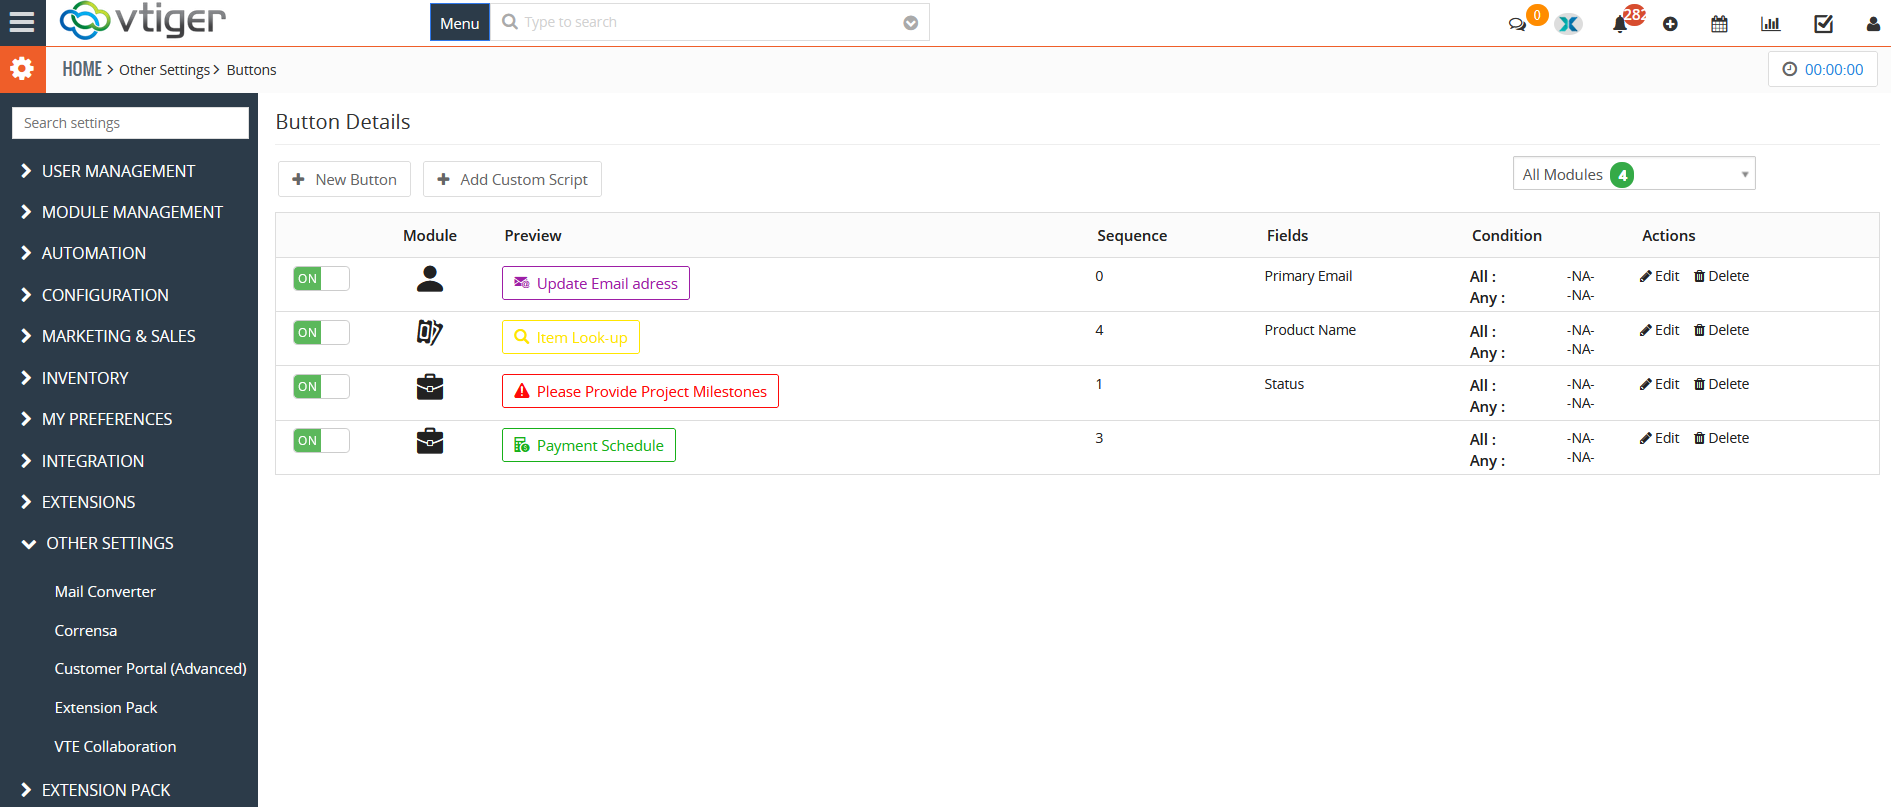
On/Off: Every button has its own On/Off switch to activate or deactivate it.
Module: The module for which a button is configured.
Preview: It displays exactly how a button looks like in real time including color, text, and size
Sequence: The number at which a module will show on a record at top
Fields: The fields that are selected in the “Modal Popup” (see the “Modal Popup” section in the guide).
Condition: The conditions selected in the “Modal Popup” (see the “Modal Popup” section in the guide).
Actions: The configured buttons can be edited or deleted using the options here.
2. Adding New Custom Button
Once you click the ‘+ New Button’ at the configuration panel, a page will open with two sections. Button Details and Modal Popup.
Button Details
There are certain information required to create a custom button:
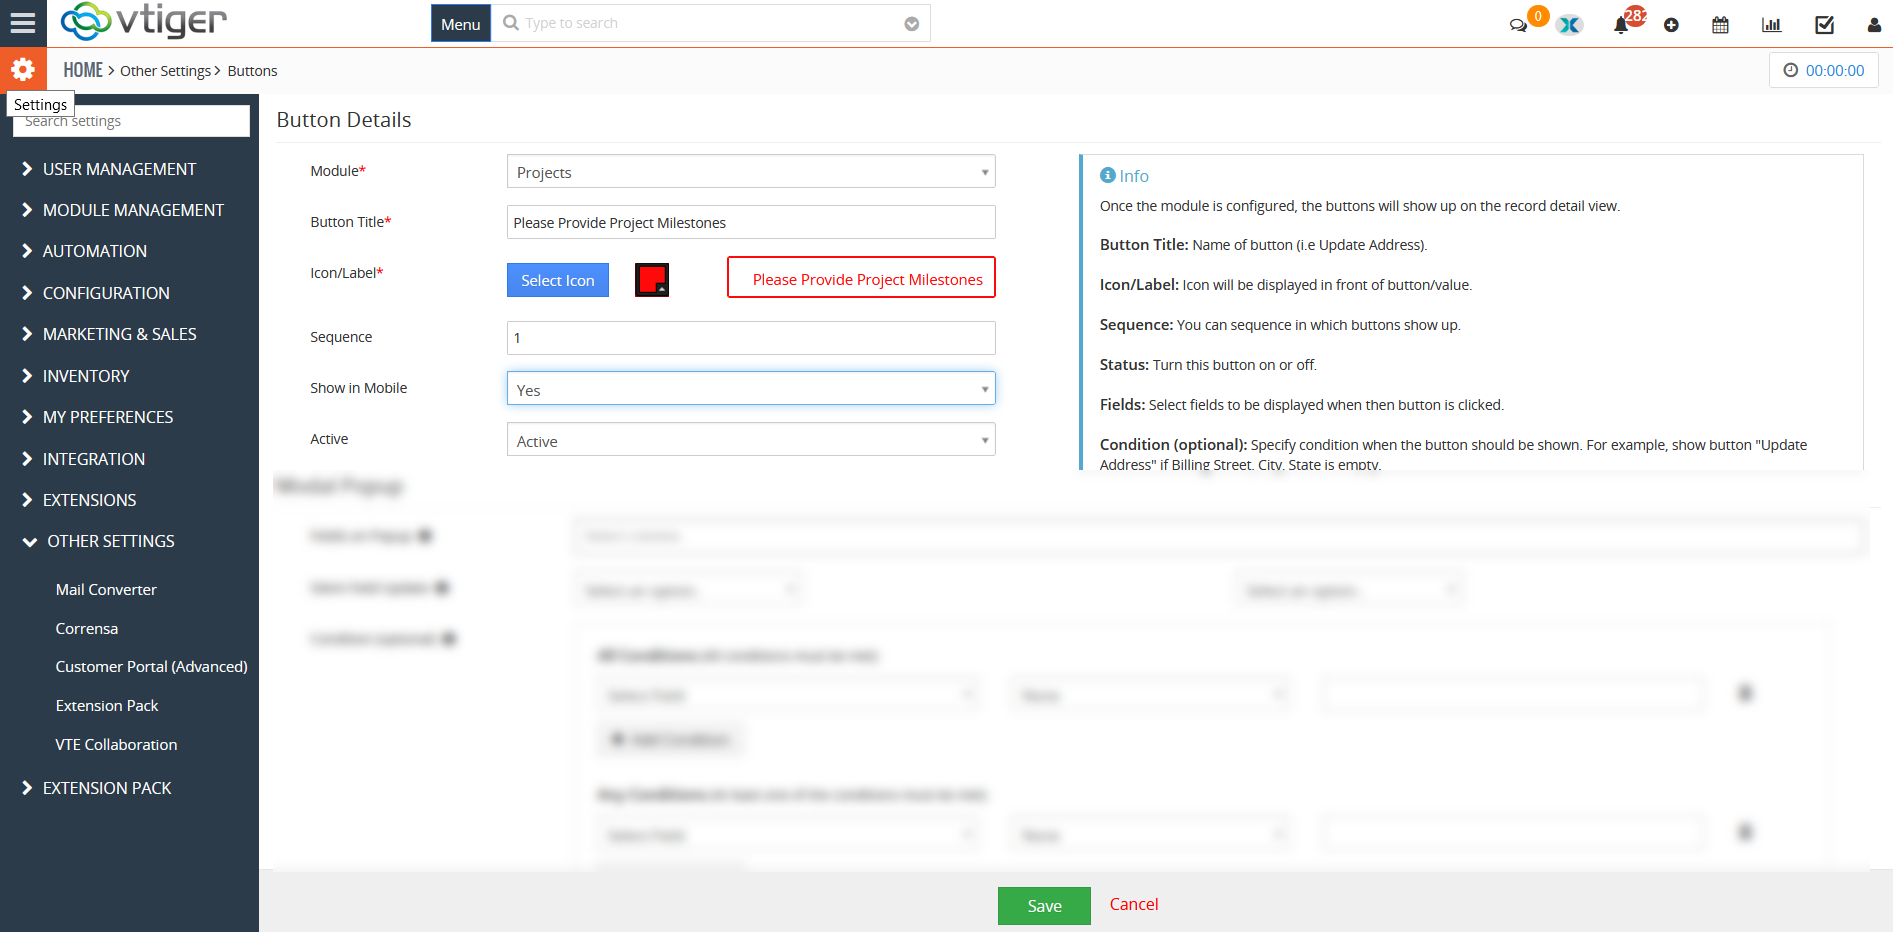
Module: Select the module for which you want to add the custom button.
Button Title: Add the name of the button for example, ‘Incomplete Billing Address’.
Icon/Label: Choose the Icon and the color of the Button.
Sequence: You can choose the sequence number at which you want the button to be shown.
Show in Mobile: Turning this option to “Yes” will make sure that the custom button appears on mobile devices as well.
Active: Status of the button can be chosen either ‘Active’ or ‘Inactive’.
Modal Popup
Once the information above is populated, you need to select the fields as well as the conditions on the basis of which the popup will work:
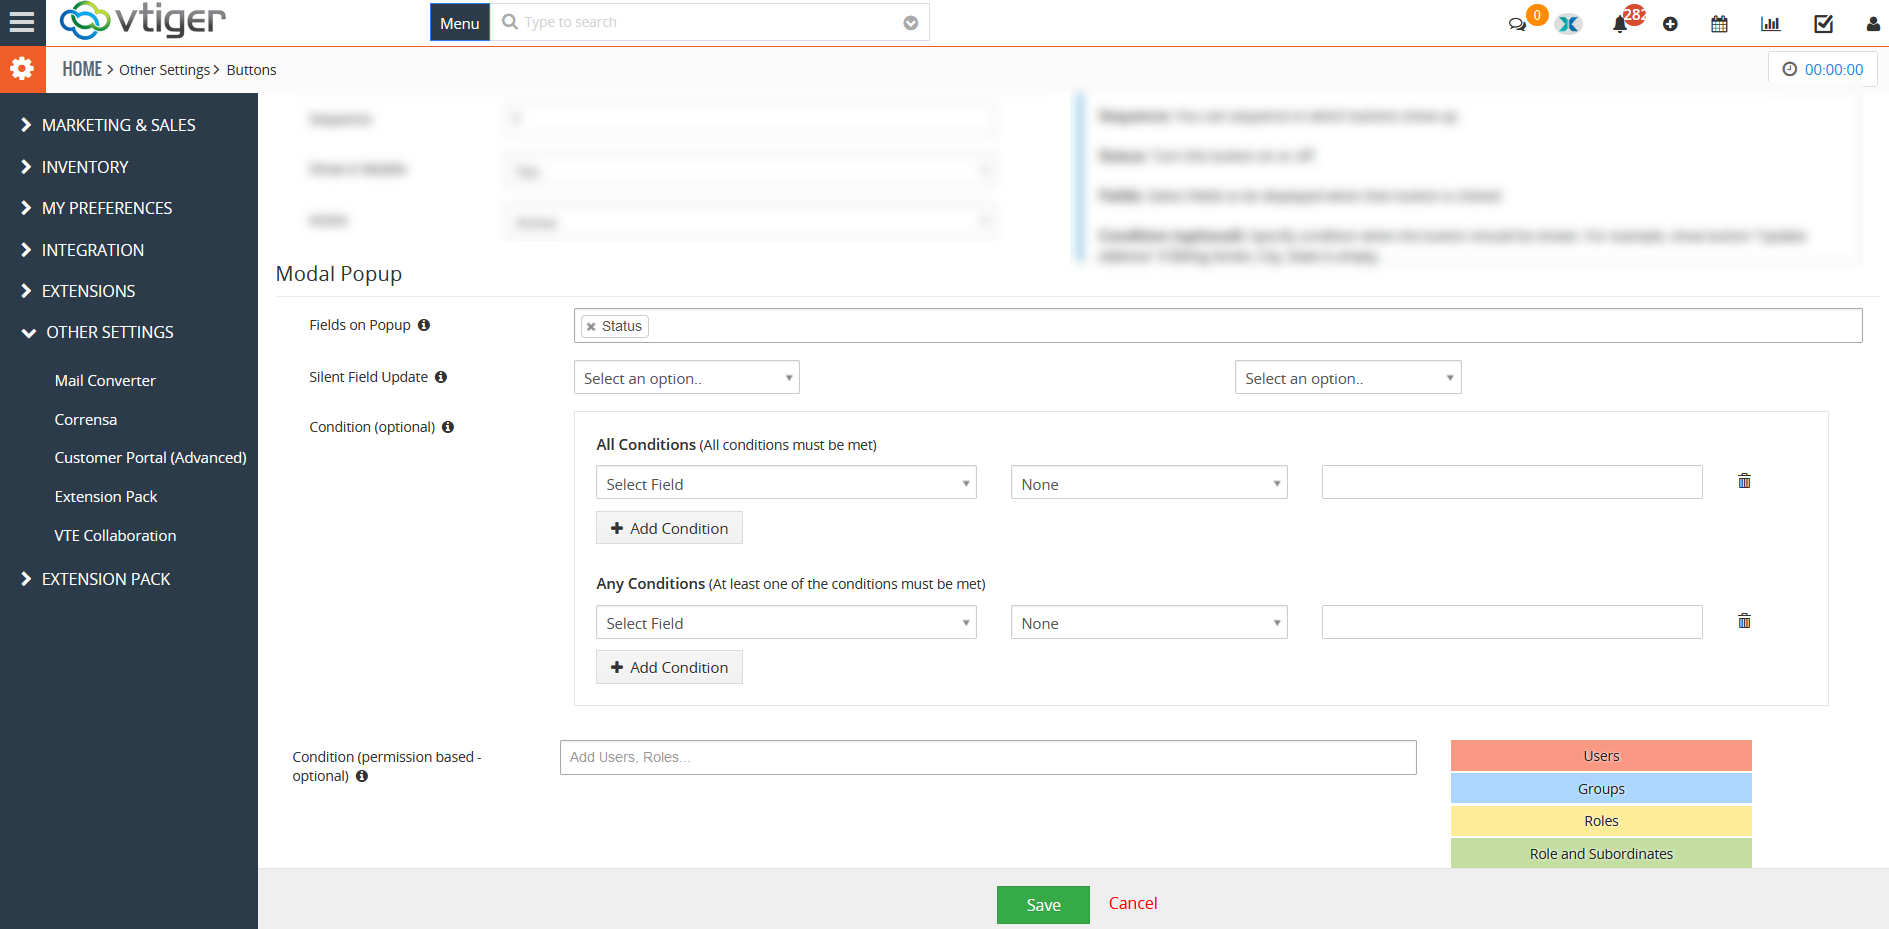
Fields on Pop-up : Fields selected here will be displayed when the button is clicked. If you leave this blank, then only the ‘Silent Field Update’ will be updated (automatically without any popup).
Silent Field Update : If you select Silent Field and do not select any “Fields on popup”, then the popup will not be shown and the silent field will be updated as soon as the button is clicked. (It’s basically a button to set silent field value).
Note : If you select fields here + ‘Silent Field’, then you will be able to set values for the fields on the popup plus the ‘Silent Field’ will be set automatically (based on configuration)
Condition (Optional) : Buttons can be shown or hidden based on certain condition. You can set the condition to only show “Close Ticket” button if ticket.status is “In Progress”.
Condition (Permission Based – Optional) : Buttons can be shown or hidden based on certain condition. You can set the condition to only show “Close Ticket” button if ticket.status is “In Progress”
3. Add Custom Script
Custom buttons can also be incorporated in the VTIger using SQL scripts. If a user have good enough knowledge, that how SQL scripts work, then they can create custom buttons using script as well.
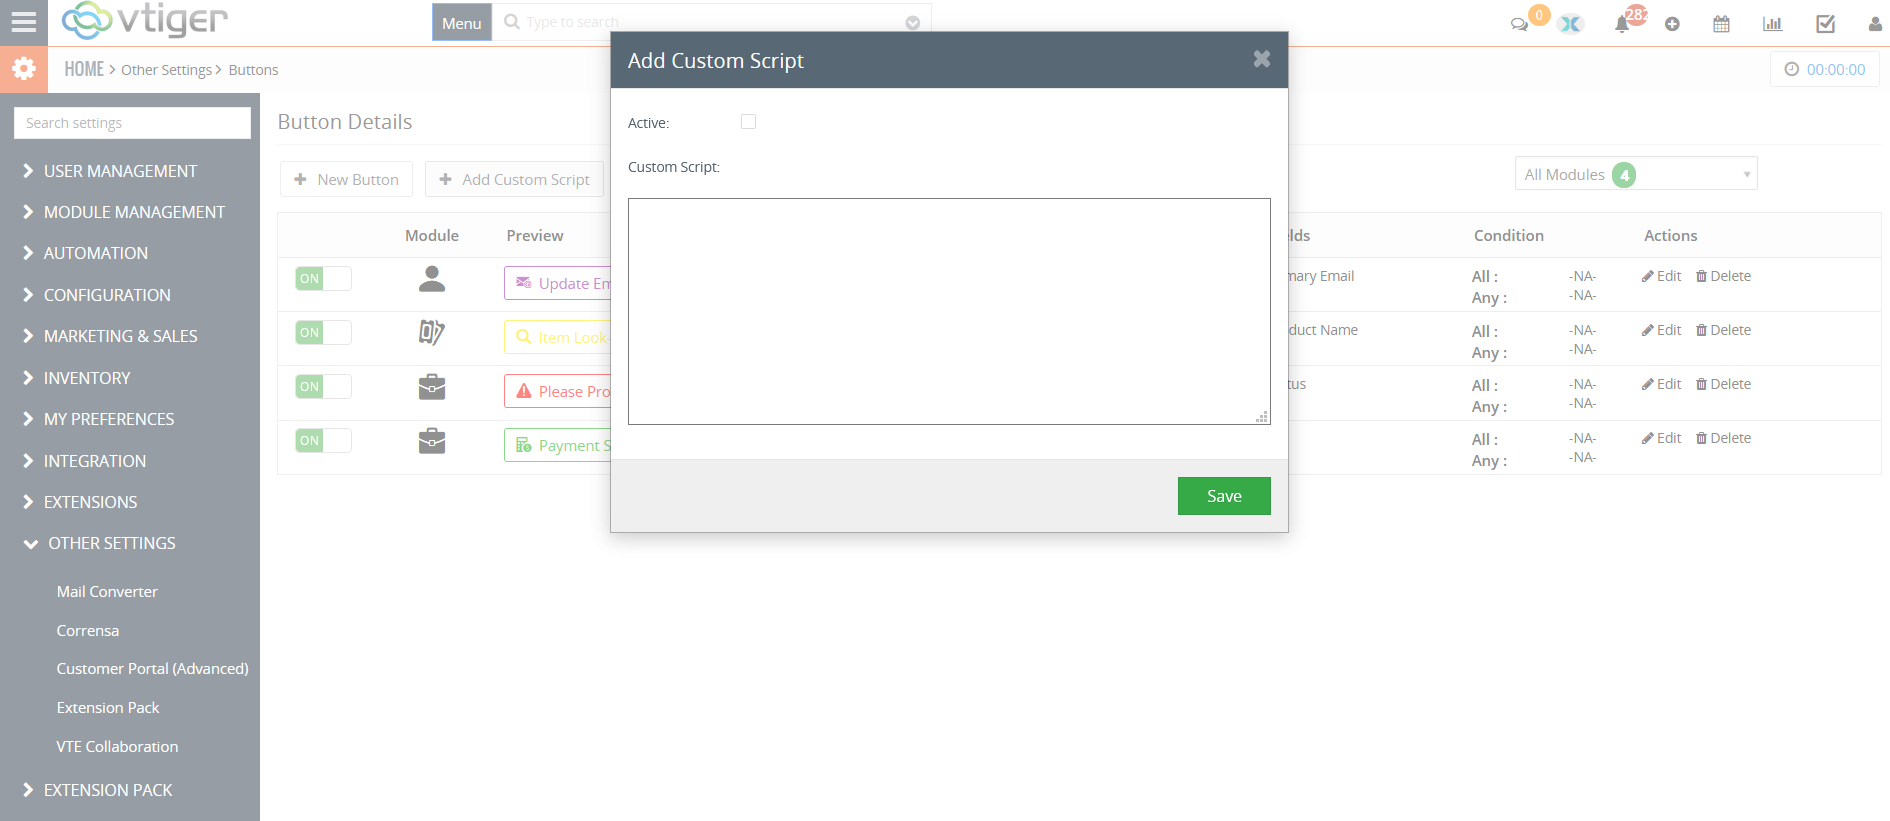
Active: By checking this box, the custom button created through SQL script will be activated
Custom Script: Paste the custom SQL script in this text box to create the button
How do the Custom Buttons Work?
Buttons will appear, when the conditions that you set, are met. They will disappear when you fulfill those conditions, for example, fill in the missing data, close a sale, update info etc. You have to but click a button and modify data in order to update a record. This adds up efficiency and precision to ‘update the record’ process.
To access a button, go to the module selected and open a record.
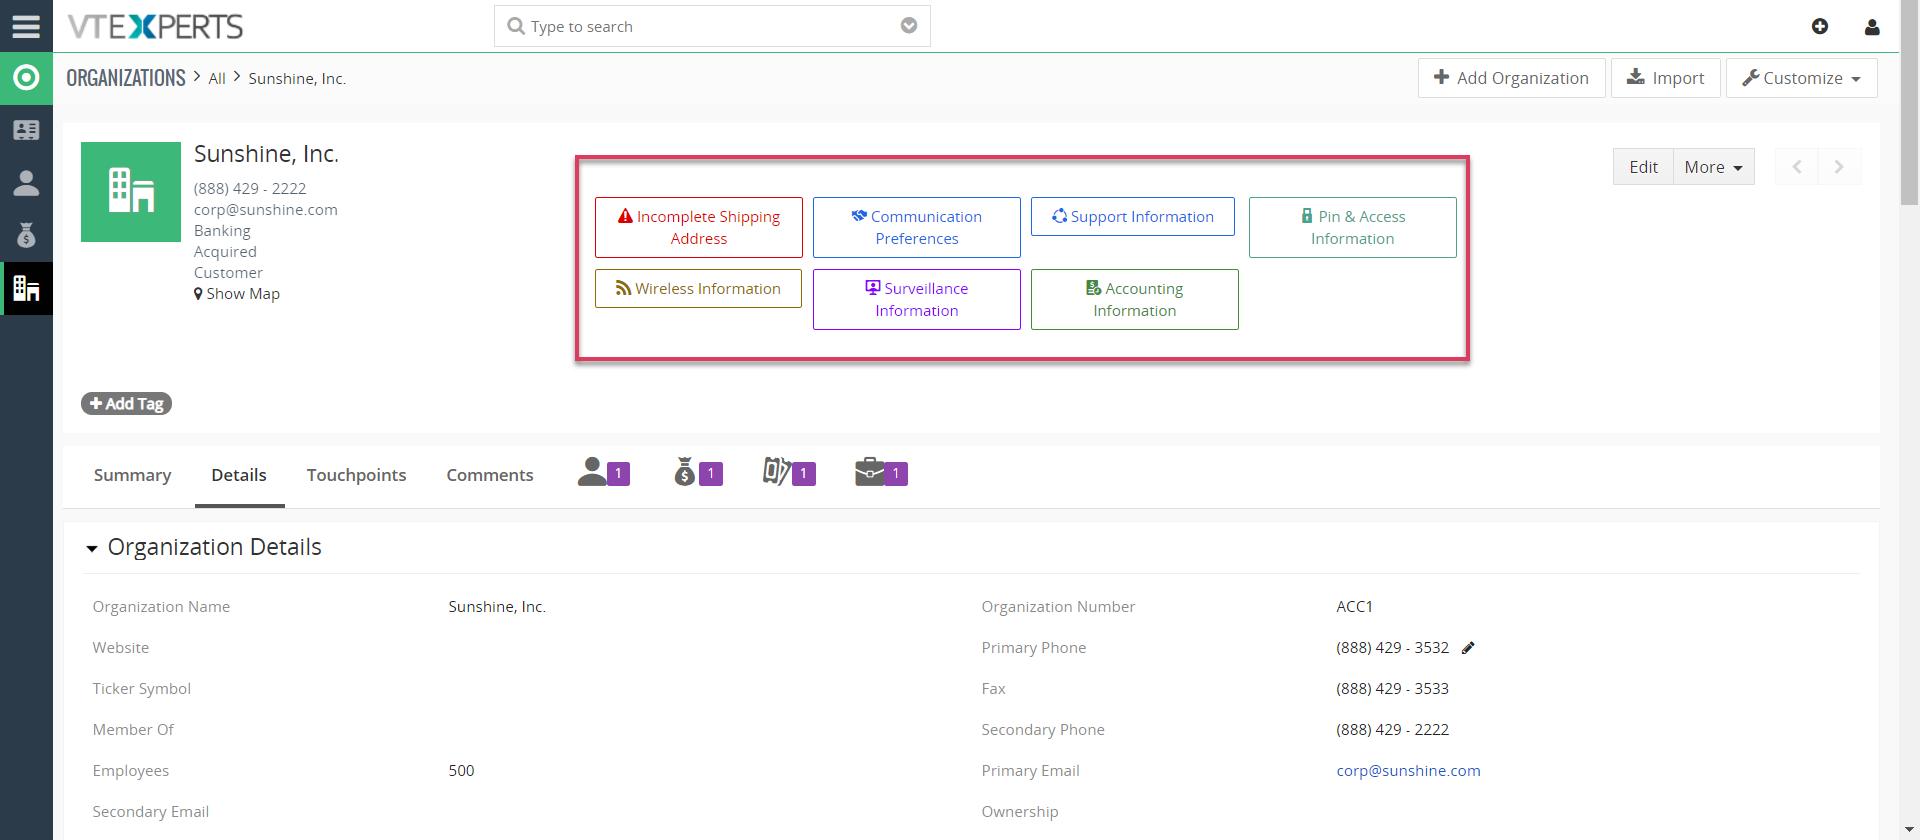
So for example, if you configured it to show the billing address if any of the field from the address is empty, it will show a modal popup with all the fields in the Billing address (that you set).
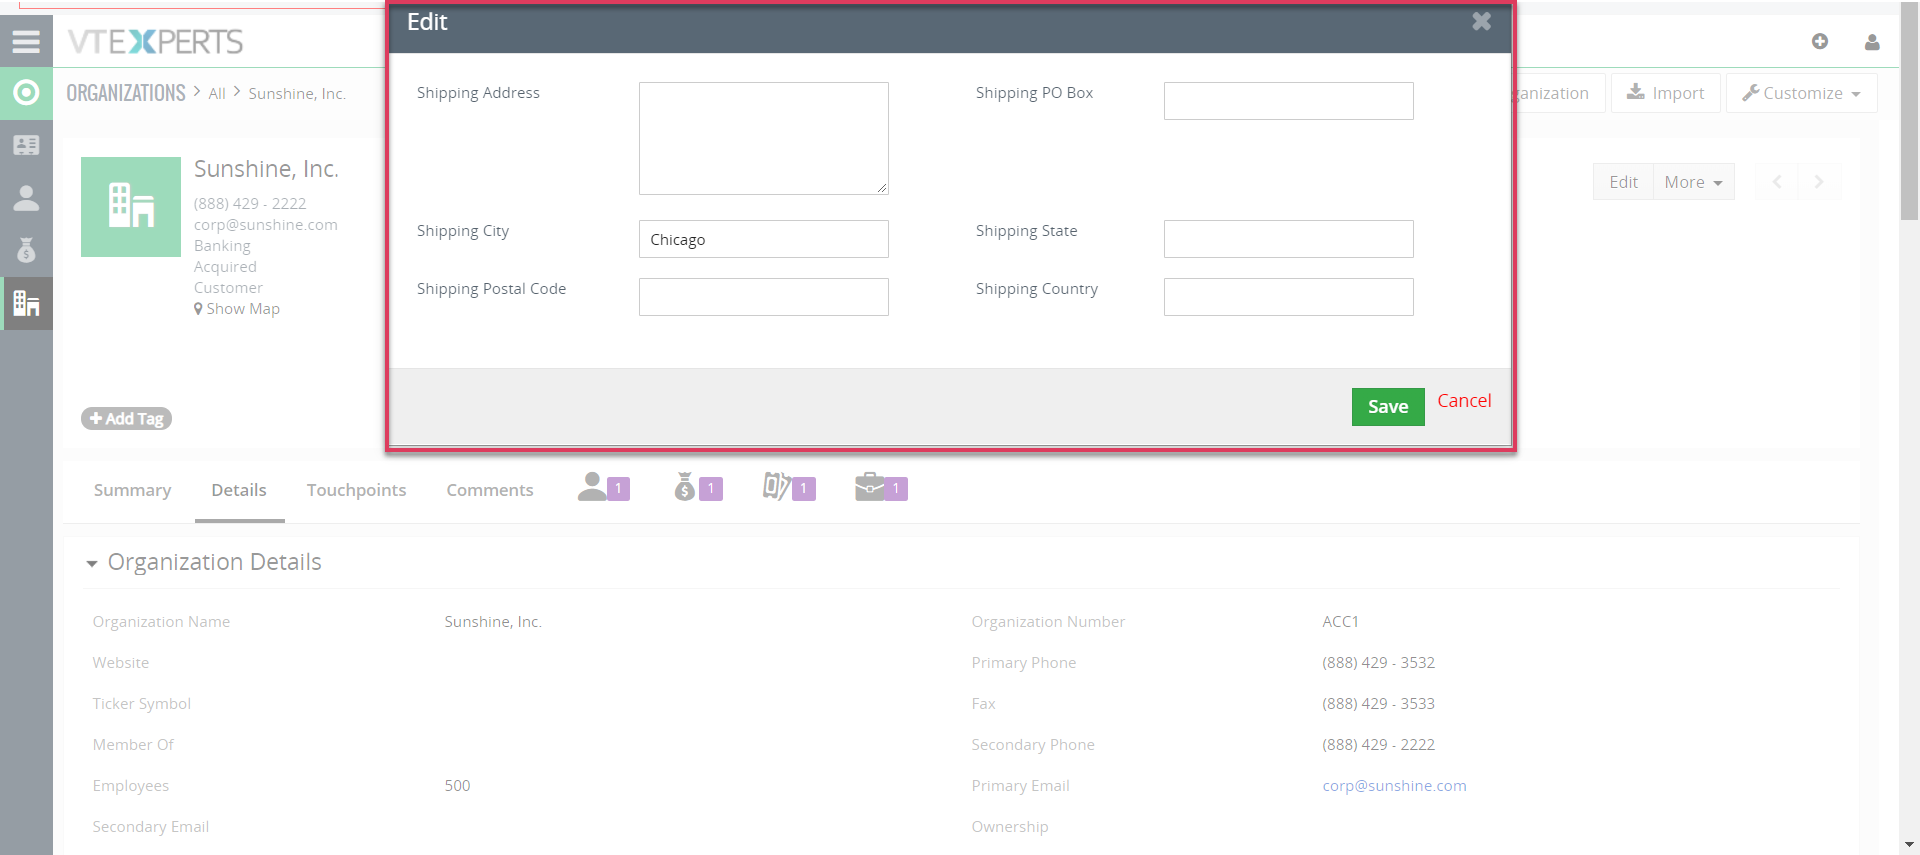
You can input the missing data. Done and the button will disappear from the record until any of the information from those fields, gets removed.