

VTiger Proposal & Document Designer is the ultimate sales tool for document automation. We extend the power of your CRM and give you everything you need to turn your leads into clients and close deals faster.
No need to switch between word processors, CPQ tools, e-signing apps, and your inbox. VTiger Proposal & Document Designer lets you create sales documents, employ dynamic quoting, get electronic signatures, and automate your workflow all the while.
It can be used to create versatile content like Extensive proposals, Quotes, Invoices, Sales orders, Surveys, Feedback forms, update return forms (e.g. ask a user to fill in a form via email. When he/she does, the relevant database at VTiger CRM will be updated), Ads, Subscriptions and lot more.
The business document life cycle typically begins with the design of the template that will be used for the final document (e.g. invoices, contracts, policies, etc.), ideally employing an easy-to-use, flexible and complete document design software.
Template Builder: Overview
Document Designer has a built-in template builder with all the tools you would ever need to create a professional document. This section should provide an overview of the entire document and a description of the scope of the system, its intended usage and specify the intended readership of this document. The purpose of the document is for you to convey information to the course staff about your submission, and more importantly, for you to reflect on your experience and growth as a designer.
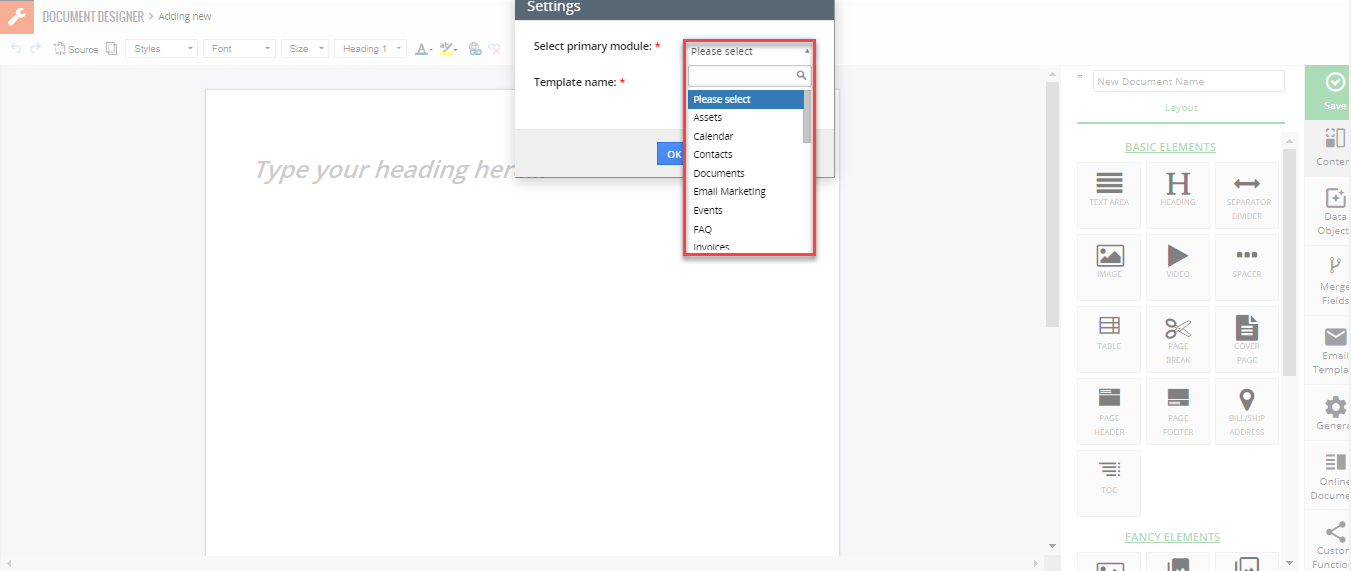
When creating a new document you need to initially select the module to which it should belong to and give the document a name.
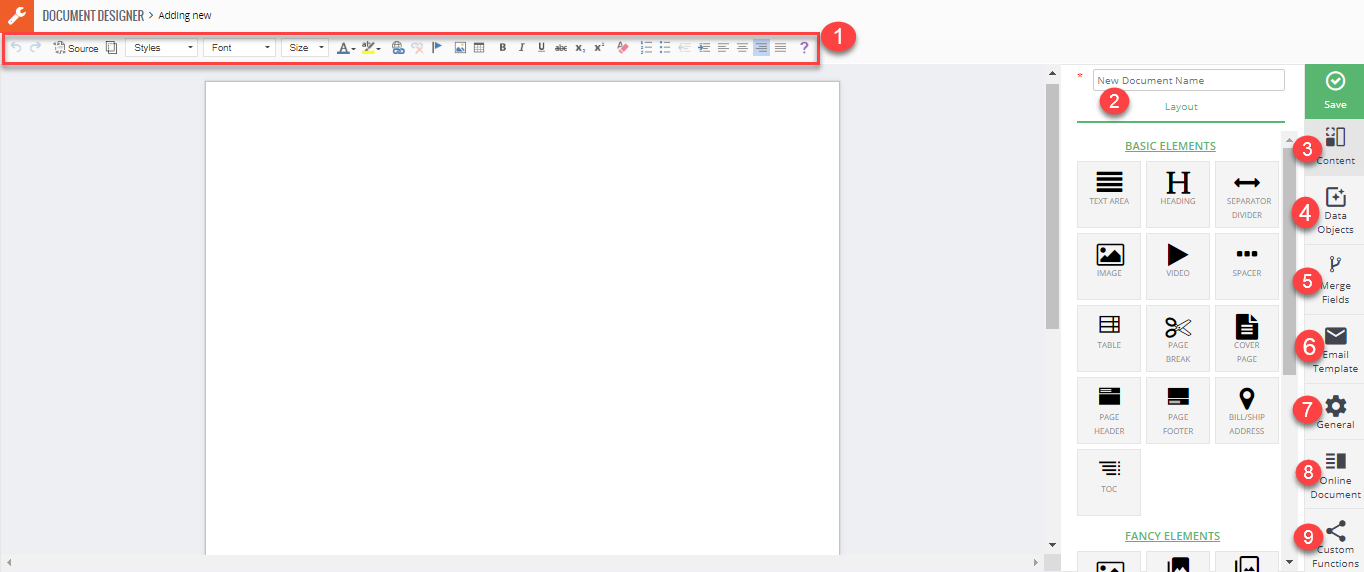
- Rich Text Editor: Used to style your text and elements within the document.
- Layout: Consists of Basic element and Fancy element (heading, text block, etc..) that can be dragged and dropped on the document.
- Content: Opens up 1-4 elements listed above.
- Data Objects: Consists of data elements and data signature that are used to create interactive document e.g update fields, add signature box, initials & more.
- Merge Field: Area to select primary module, related modules as well as pick the fields to be merged on the document.
- Email Template: Area to configure customized email body and can also share PDF file or include online document link.
- General: It allows to change the format of the document, define its owner and also share the document.
- Online Document: Area to configure Accept/Decline buttons, add Notes and enable Auth.net Integration.
- Custom Functions: It allows you to format Text/Data and one can add conditional logic.
- History: Saved copies of each document with ability to restore to an earlier version.
Template Builder: Layout
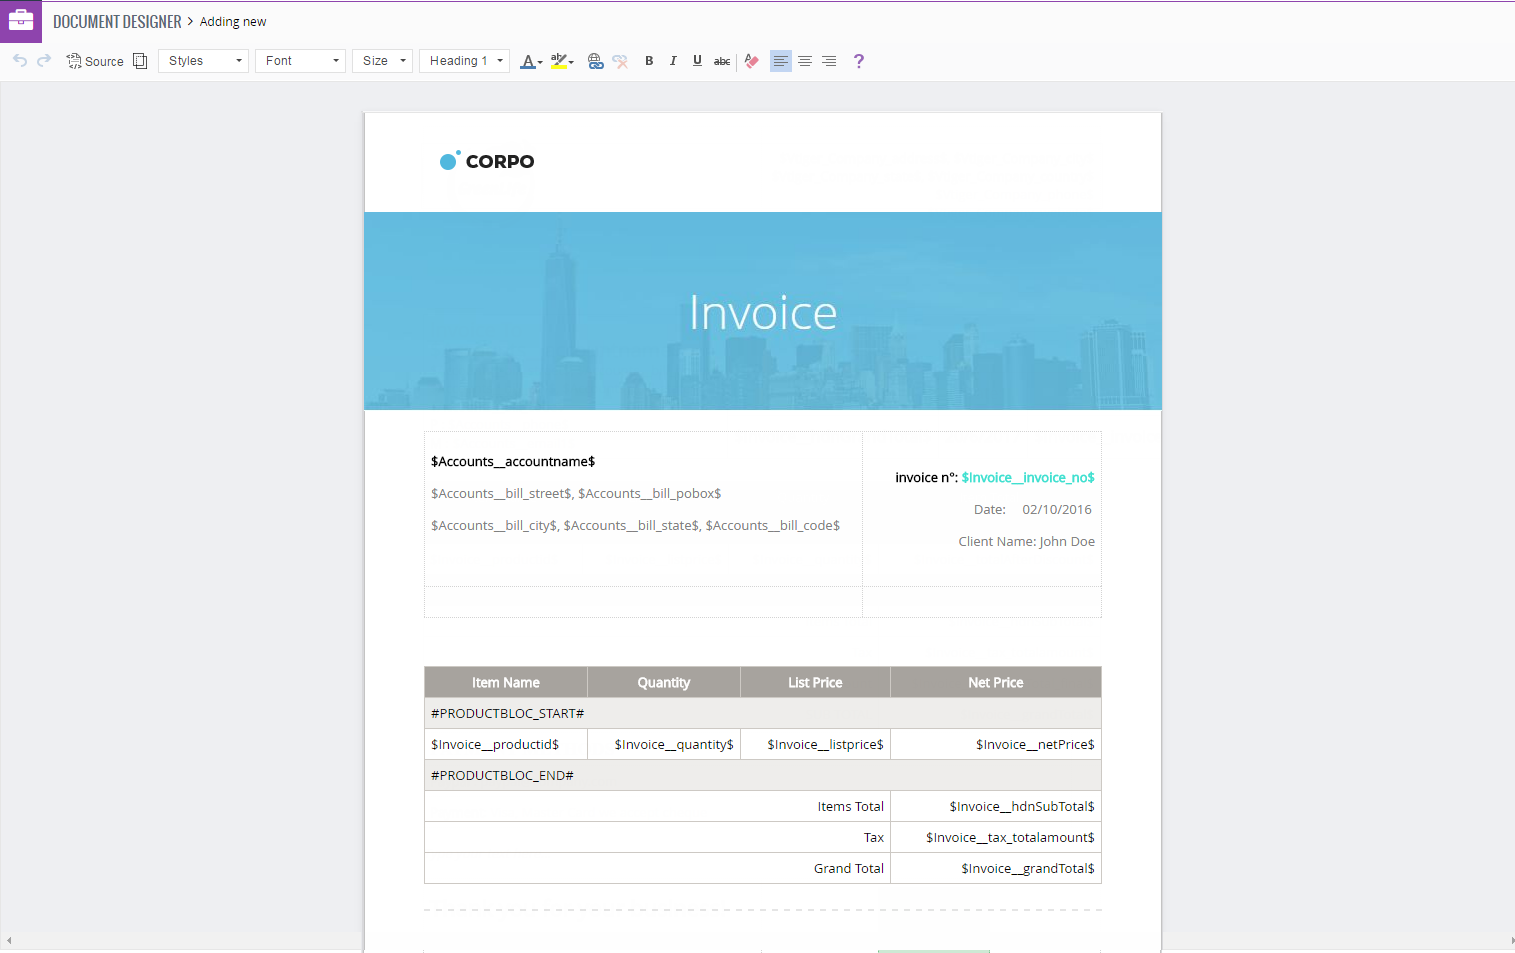
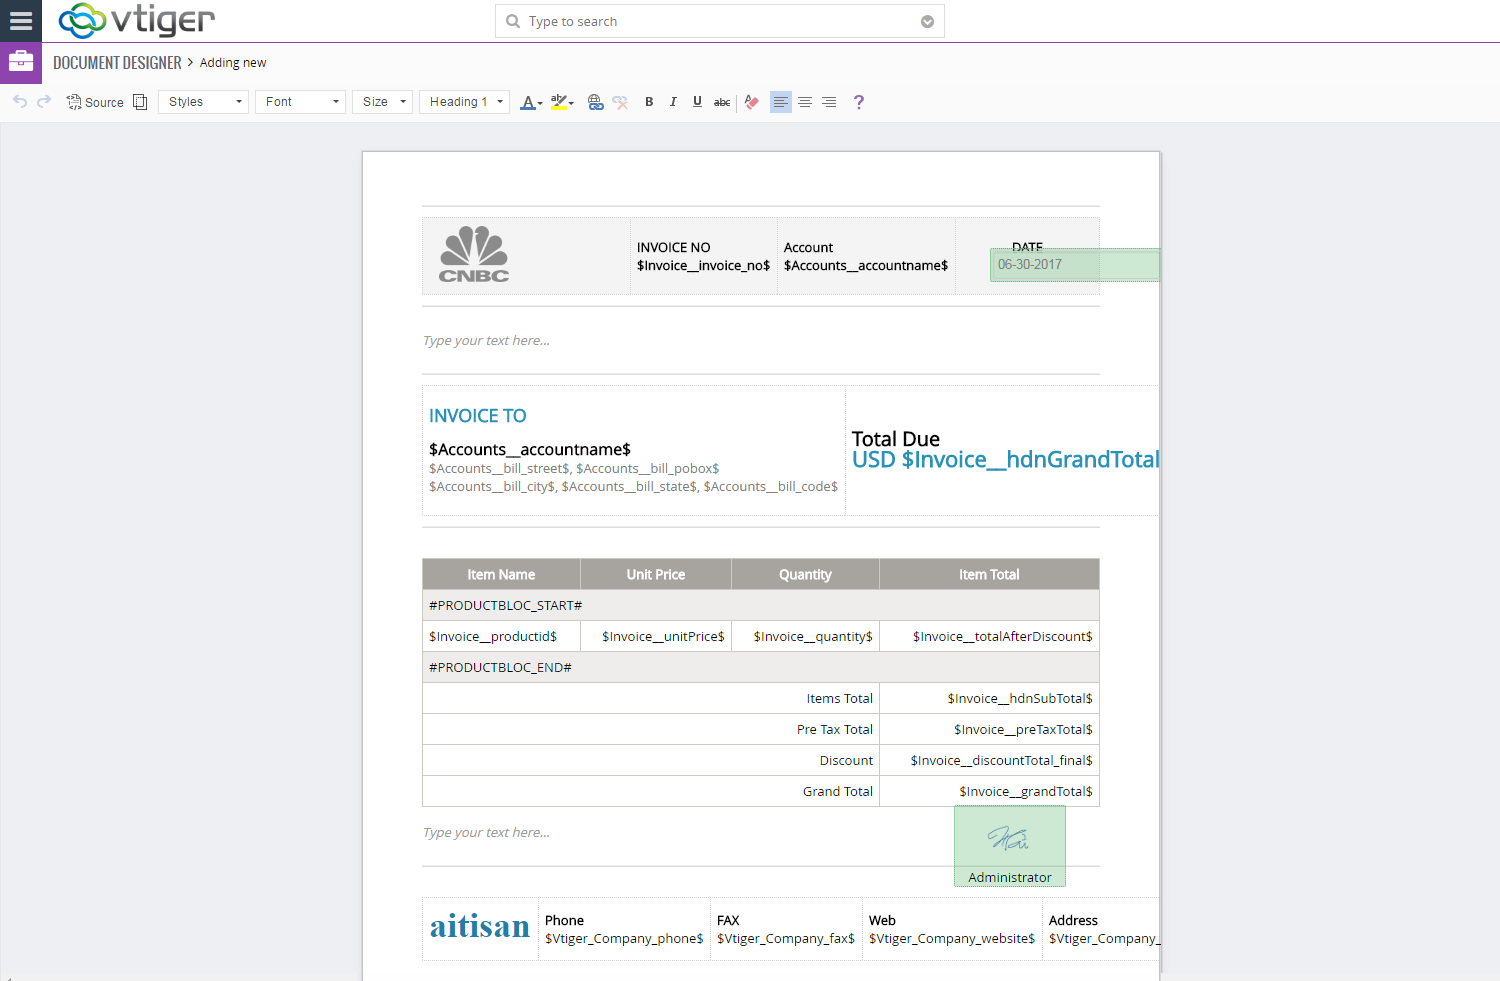
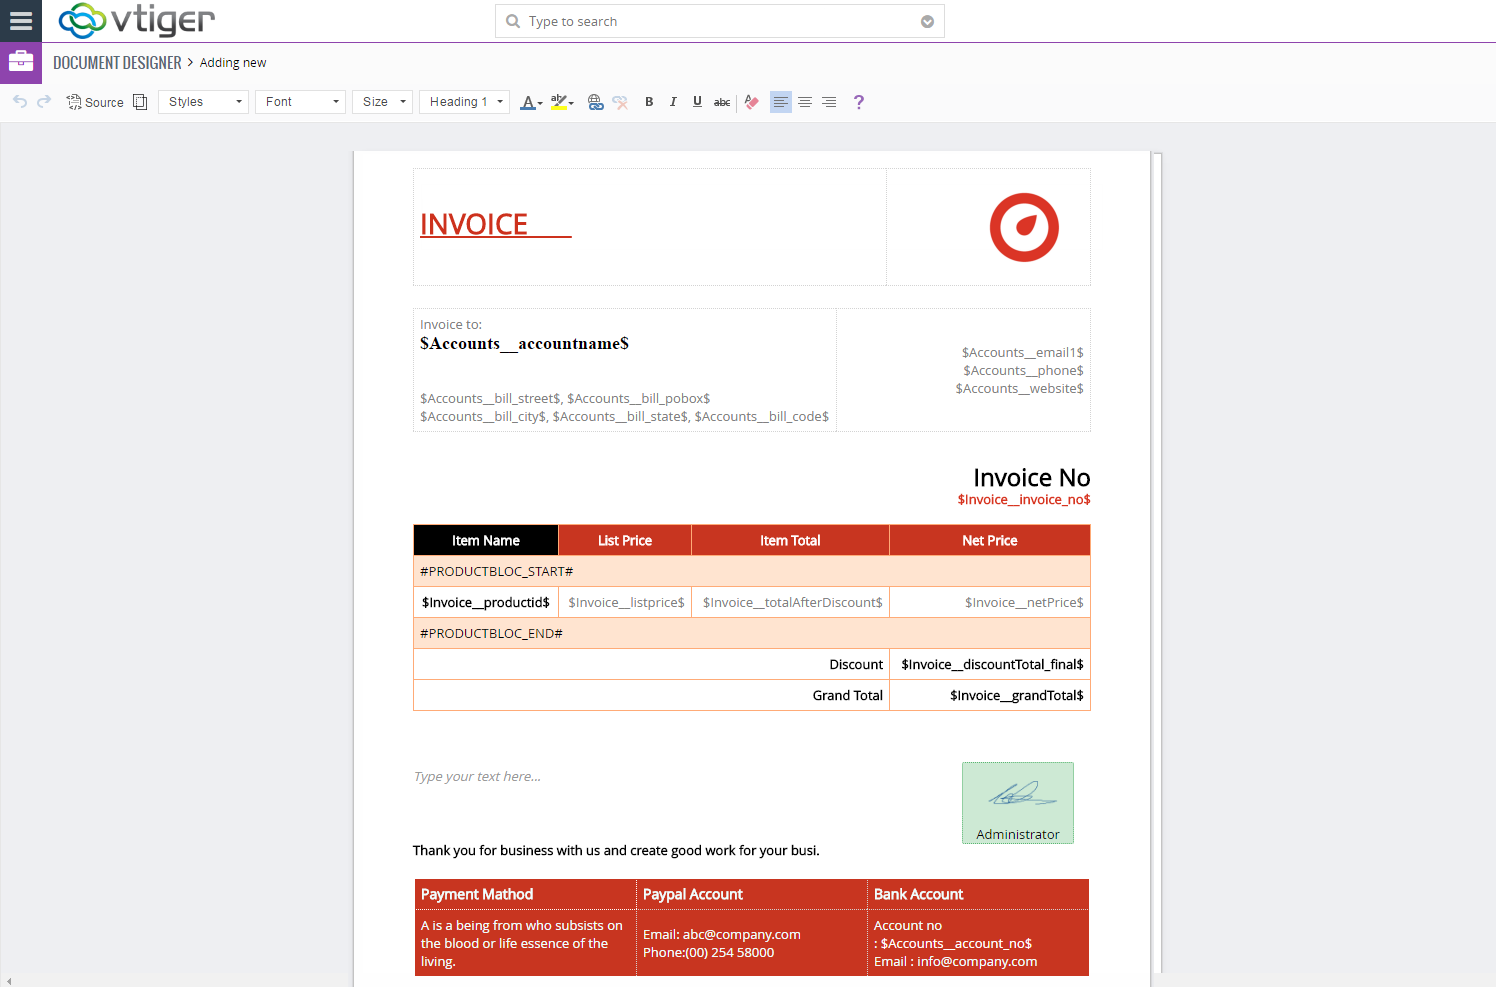
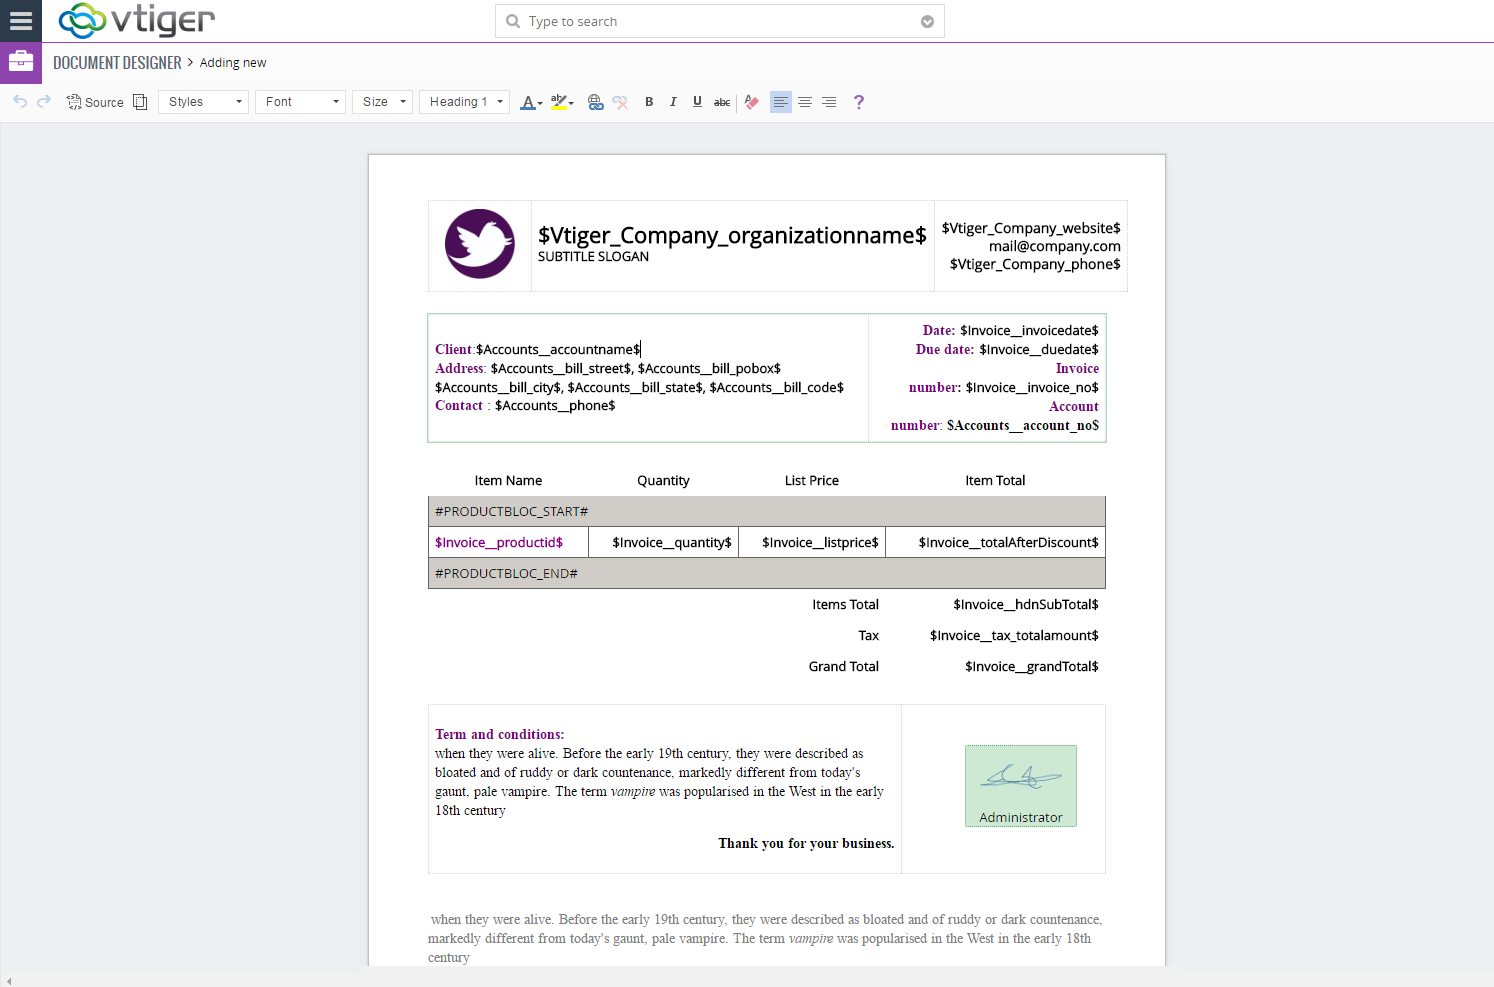
It all begins with understanding your business and its document processes. The demands on an office’s document design, storage and output environment are changing as sources of information increase exponentially. The answer is, without a doubt, the right document design that can be easily expanded with document management and generation features. Layout contains all the necessary elements to build basic or fancy document. This is where you will insert headings, text blocks, images, videos, tables & more.
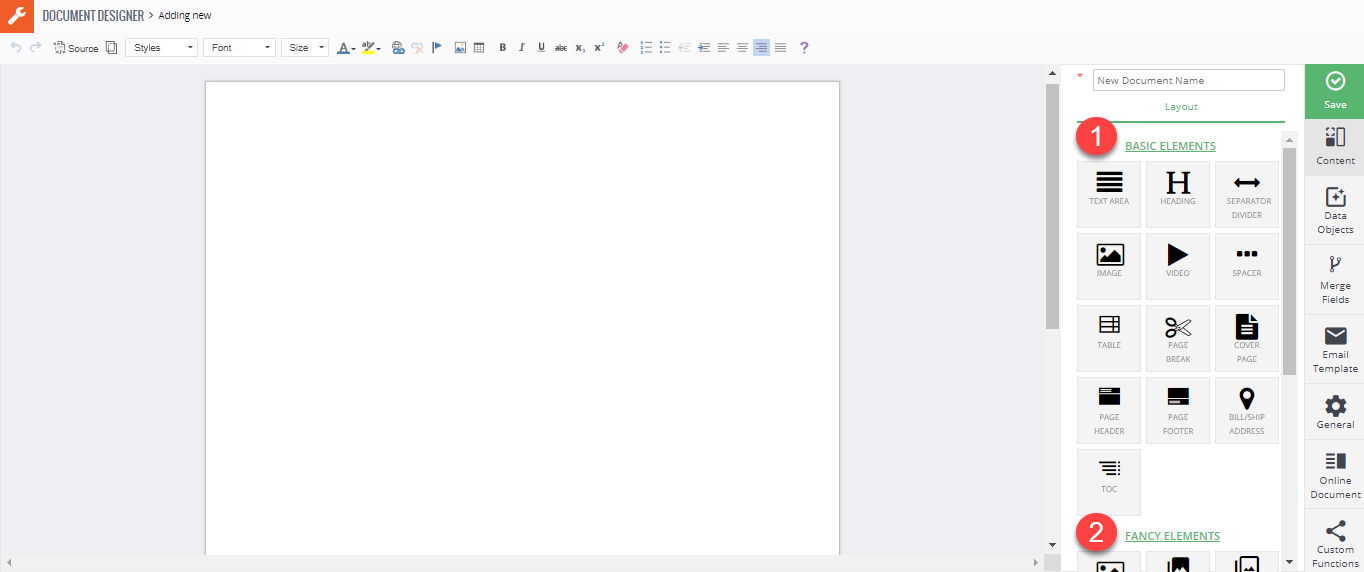
Basic Elements
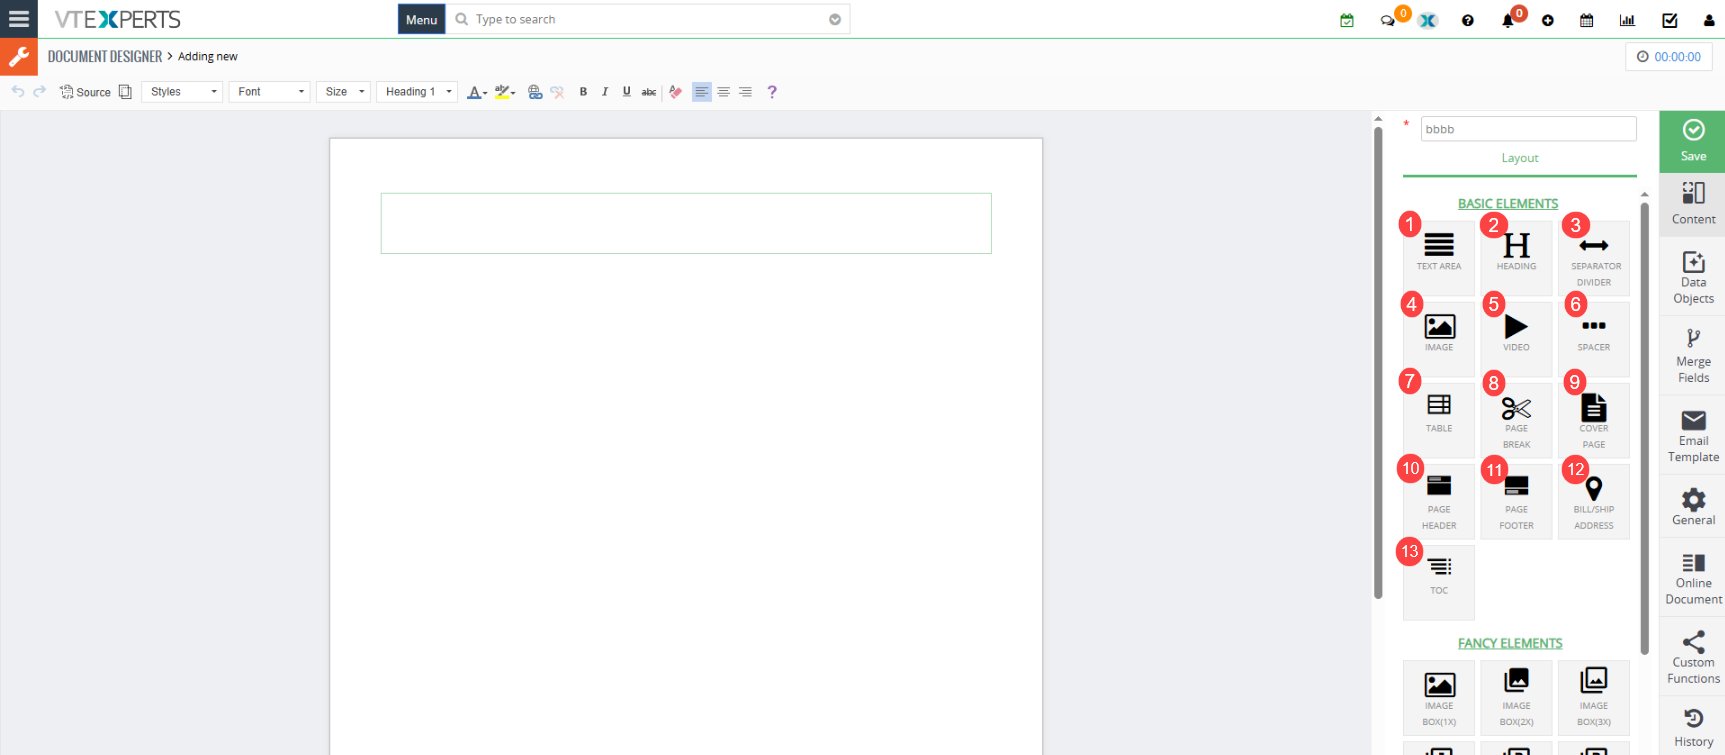
- Text area: Add the Rich Text field anywhere in the doc to insert the write-up.
- Heading: To add a heading for a topic. It can also be shown/hidden in the table of contents. You can turn on/off heading to be shown in the table of contents by hovering over the header element on the document – the gear icon will show up, click on it and popup will show up.
- Separator: Adds a horizontal line or visual break between sections of your document.
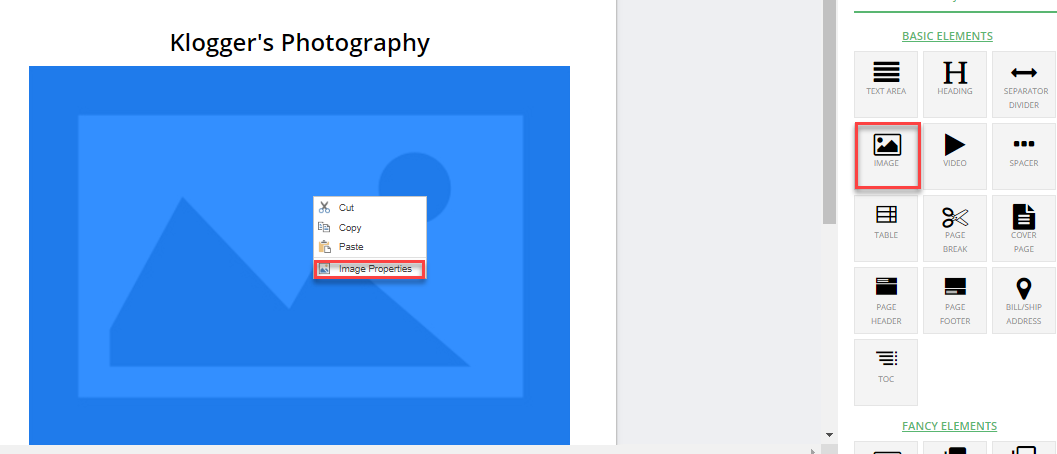
- Image: To add, format, and hyperlink an image to the document.
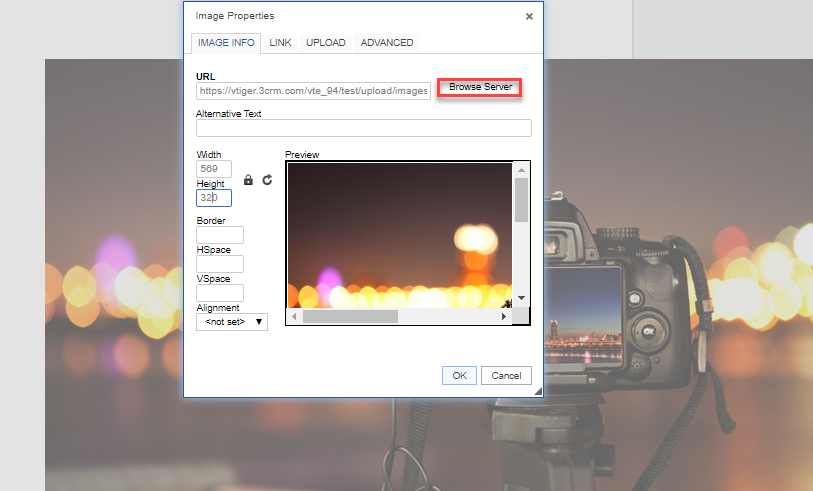
- To open Image properties, you will need to double click on the image (on the document). You will then be able to set custom attributes such as width, height, borders, links & many more advanced functions.
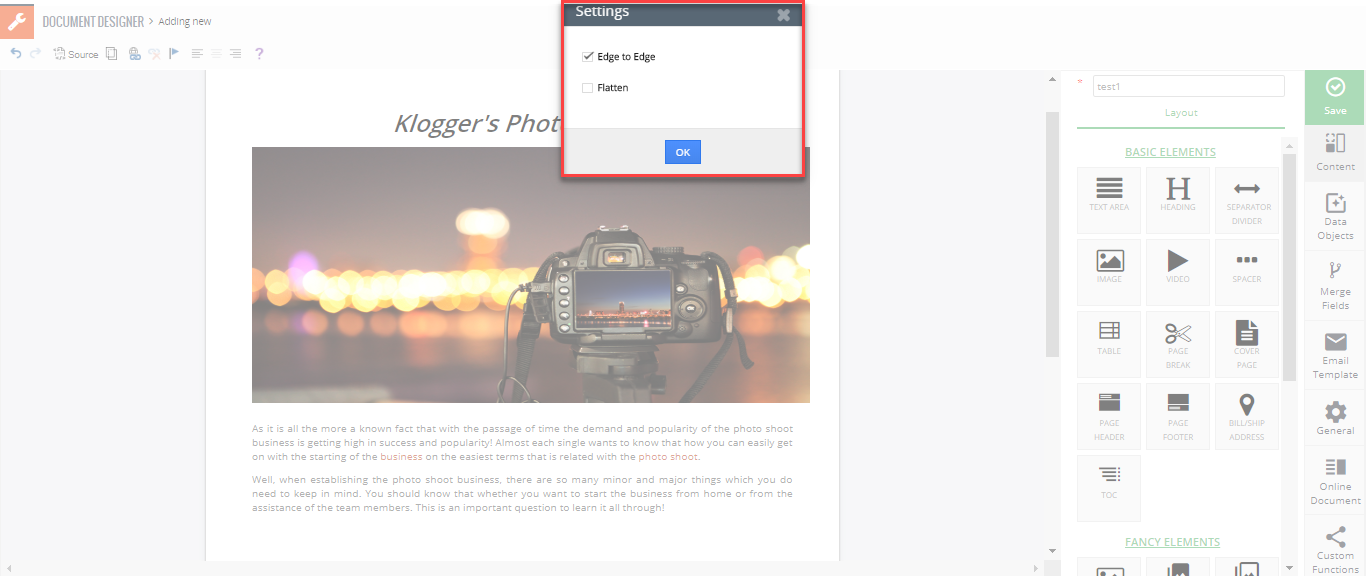
To “Flatten” or “Edge to Edge” image, you will need to hover over the image and click on the gear icon. The “Edge to Edge” option will stretch the image from left to the right border making it a perfect fit. If image if “Flattened” – you can then drag and drop elements from “Fields” section (it is most used where an image of existing PDF is put on the document designer, flattened and fields are dropped on top of it (so the user doesn’t have to recreate the entire PDF, but instead – just drop fields from vtiger)).
5. Video: To insert a video in the document. It allows you to hyperlink the video and let the receiver play on the document.
6. Spacer: Adds empty space (invisible padding) between elements, without showing any line.
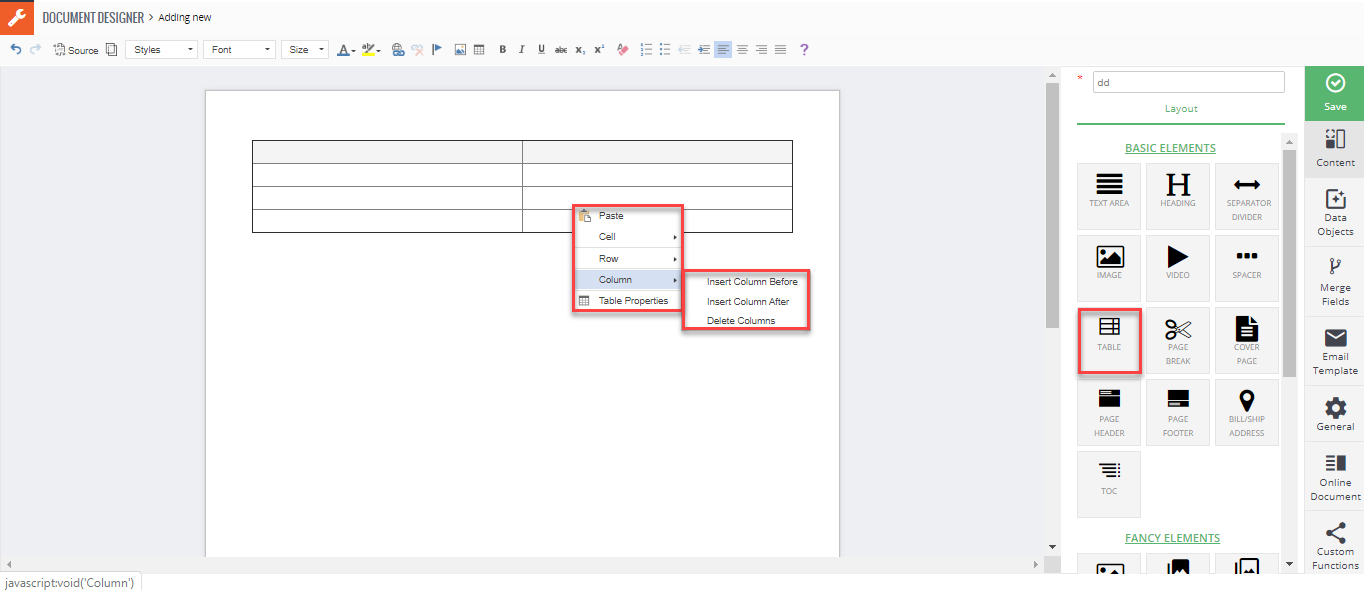
7. Table: To add a table to the document. Its design and number of columns are configurable. To access table properties – add the table and do the right mouse click. You will then be able to add rows, columns, set borders, width/height and much more.
8. Page break: To add a visible page end indicator.
9. Cover page: To add the title/cover of the document. The cover page can be customized in a number of ways including adding logo image, URL, text, as well as styling.
10. Page header: To add header text at the top of page. Header is applied to each page.
11. Page footer: To add footer text at the bottom of page. Footer is applied to each page.
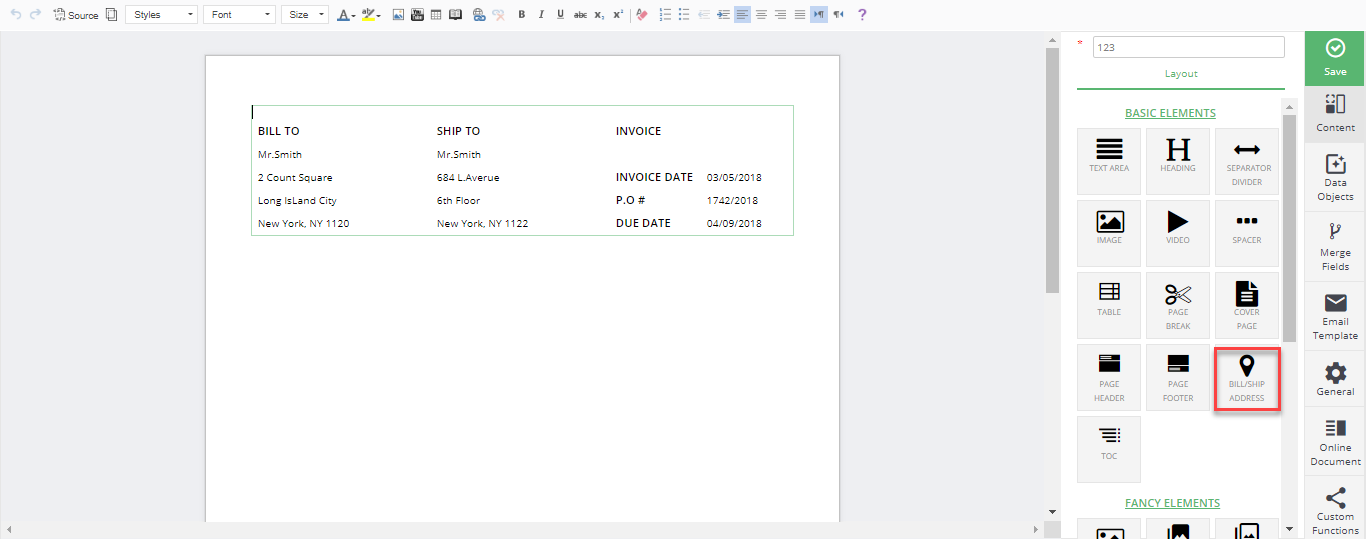
12. Bill/Ship address: To add static billing and shipping address to your document
13. TOC: To add the Table of Contents in the documents. The content in the table will be automatically determined by the headings added.
Fancy Elements
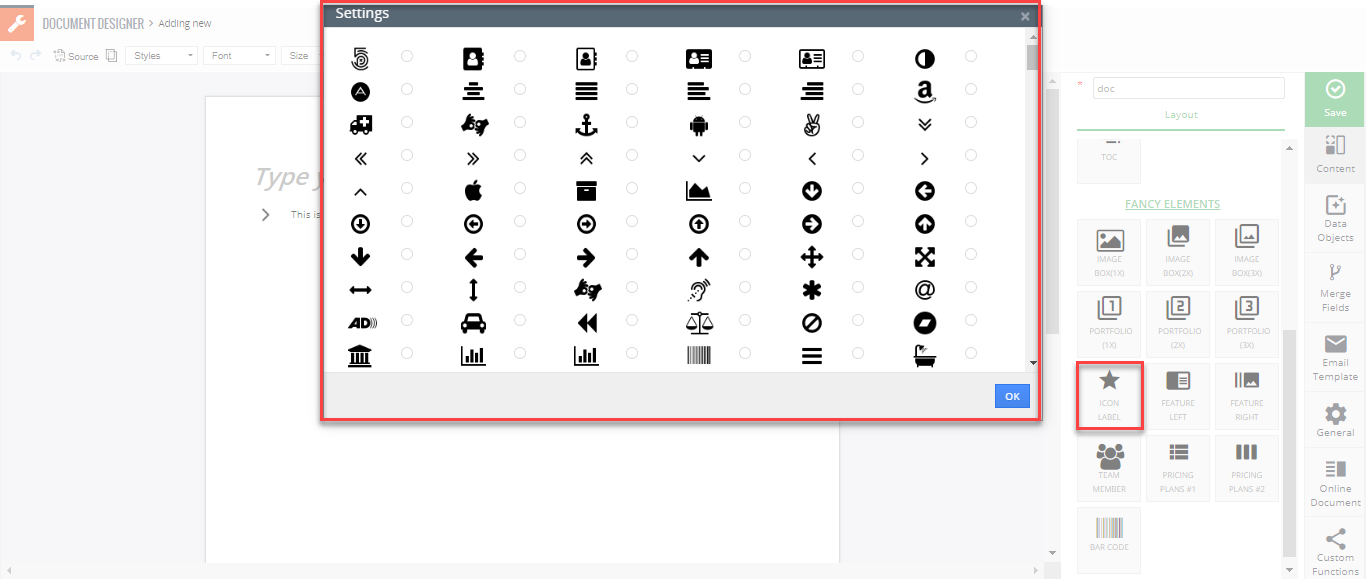
- Icon: Provides with various types of icons.
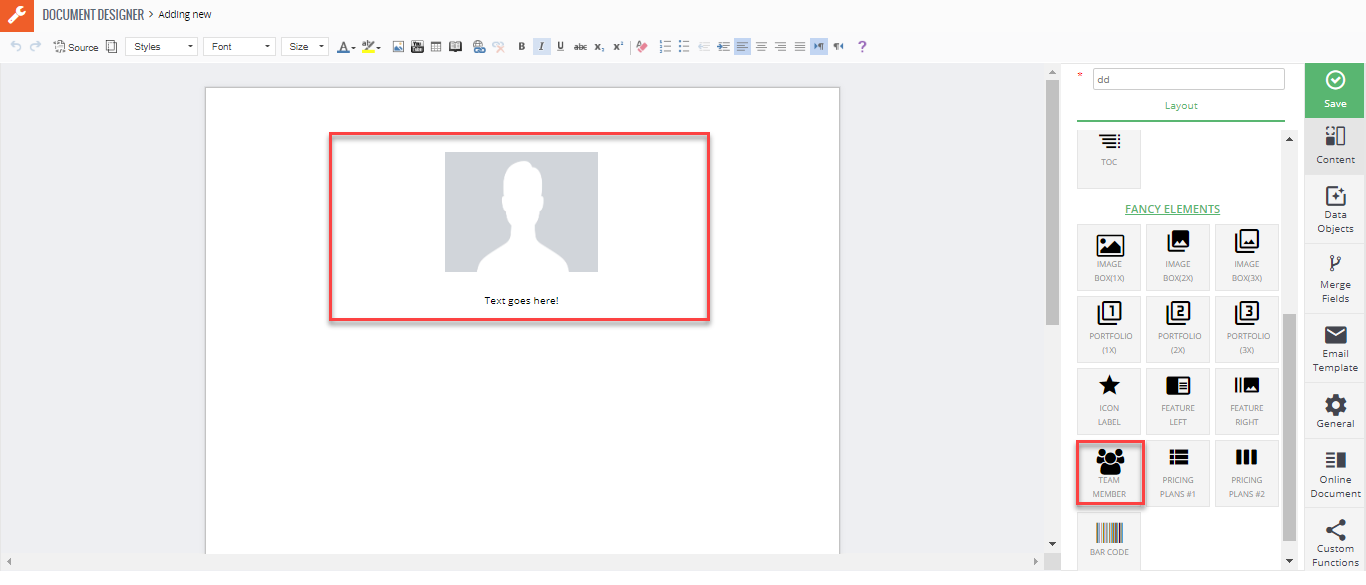
- Team Members: With this feature you can add profiles of employees.
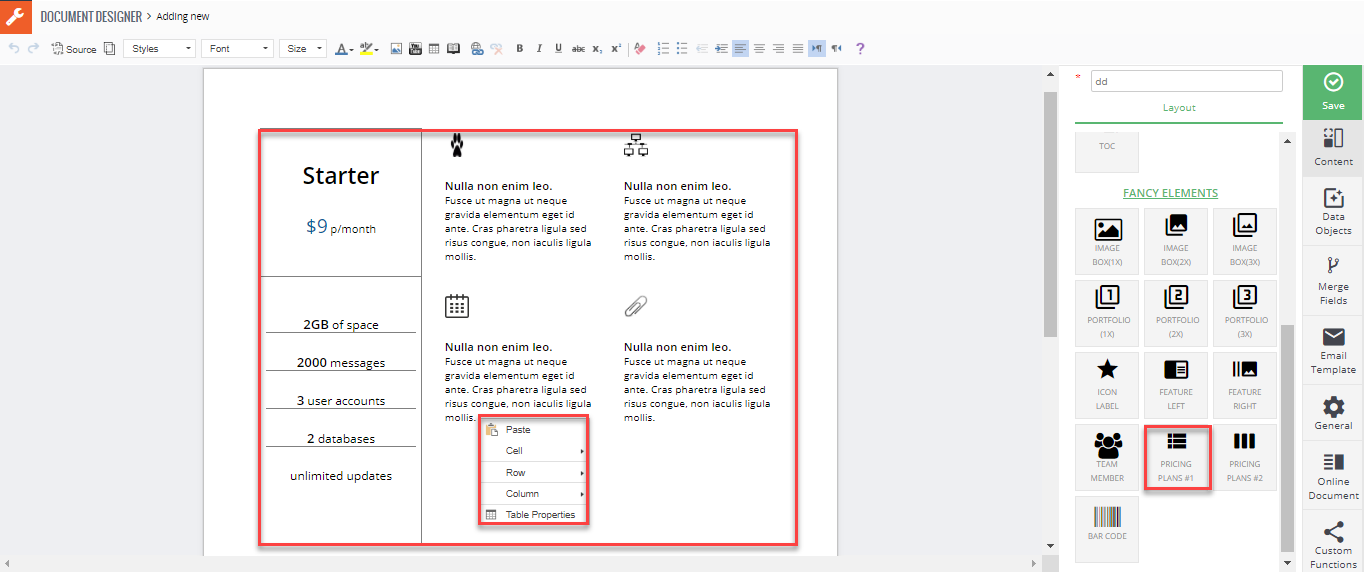
- Pricing Plan: The table with all pre-configured commands you can configure the columns and rows options as well as the design/color of the table. This only applies to Quotes, Invoices, Sales & Purchase Orders.
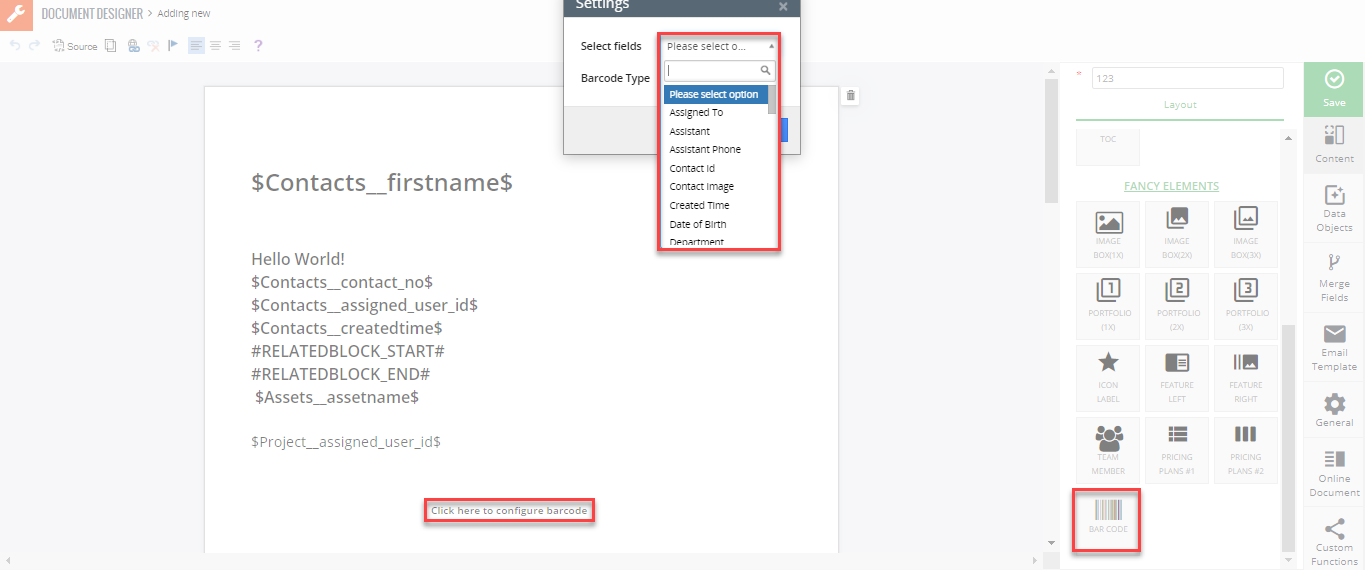
- BarCode: Through this feature you can store product related data like the date of manufacturing, expiry date, name of the manufacturer, country of the origin and price quantity of the product. It gives you a list to choose from by clicking ‘click here to configure bar code’.
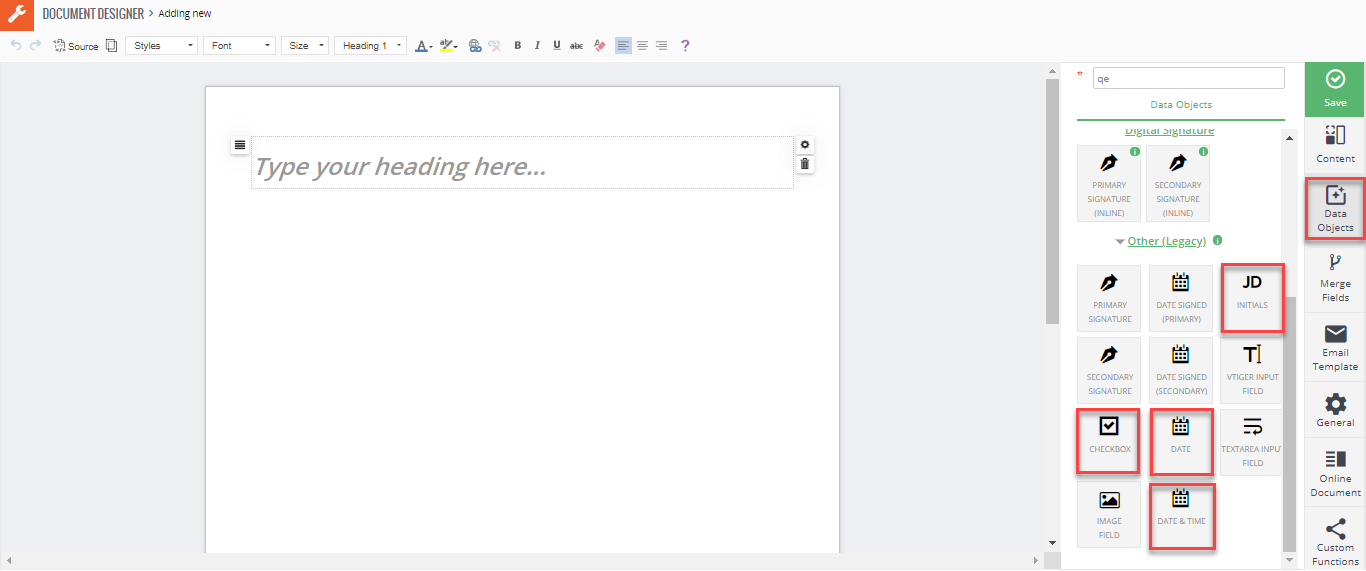
Template Builder: Data Objects
This section lists all the applicable and reference documents, identified by title, author and date. These elements can be placed on the interactive document where the recipient will be able to fill out the fields (on the form), place a signature and date it. Elements can only be dropped on an existing “Block” element, meaning that in order to put interactive element you will need to have e.g “Text” element on the document. Basically, when dragging interactive element – it has to “stick” to something e.g Text block, Table, image, etc..
Data Elements
- VTiger Field: To insert field from VTiger record and merge it on the document. This element also allows to update information back to VTiger. This element can be used to merge VTiger record information e.g Opportunity onto the document, meaning that you can drag and drop the element anywhere on the document and map it to merge the information from specific VTiger field.
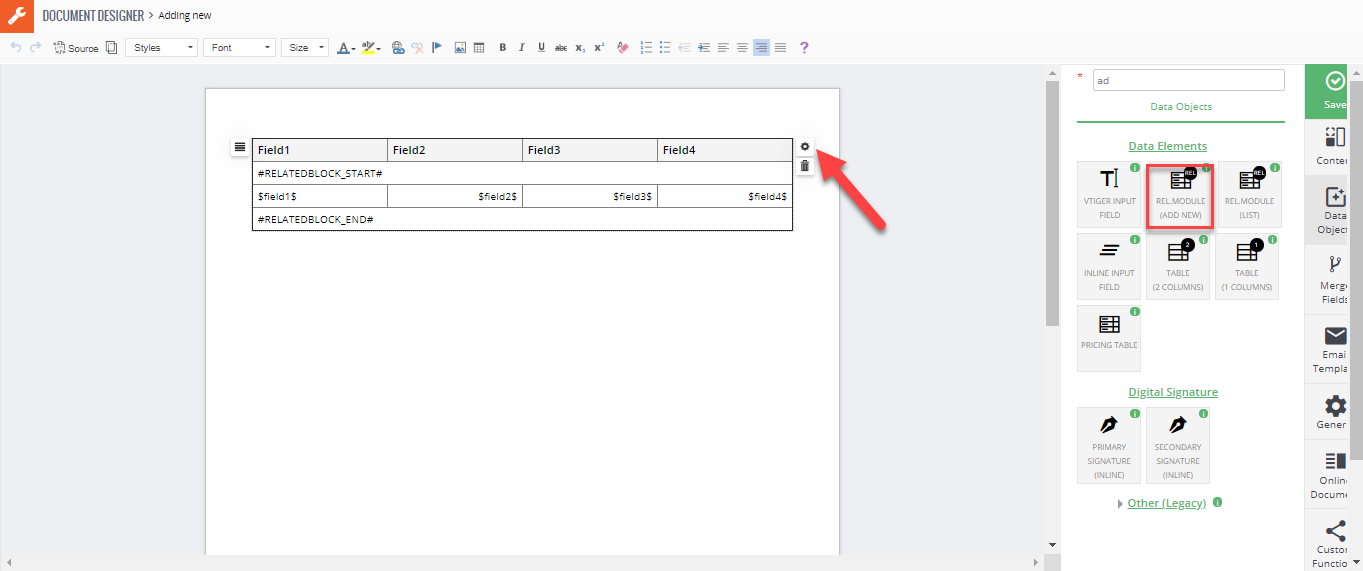
- Related Module: To include related module records on the document. For example, if you are creating a document for Projects module, you can then include information related modules to project in field area. Related information is added as a table which can be configured (selecting module, fields, style and theme color).

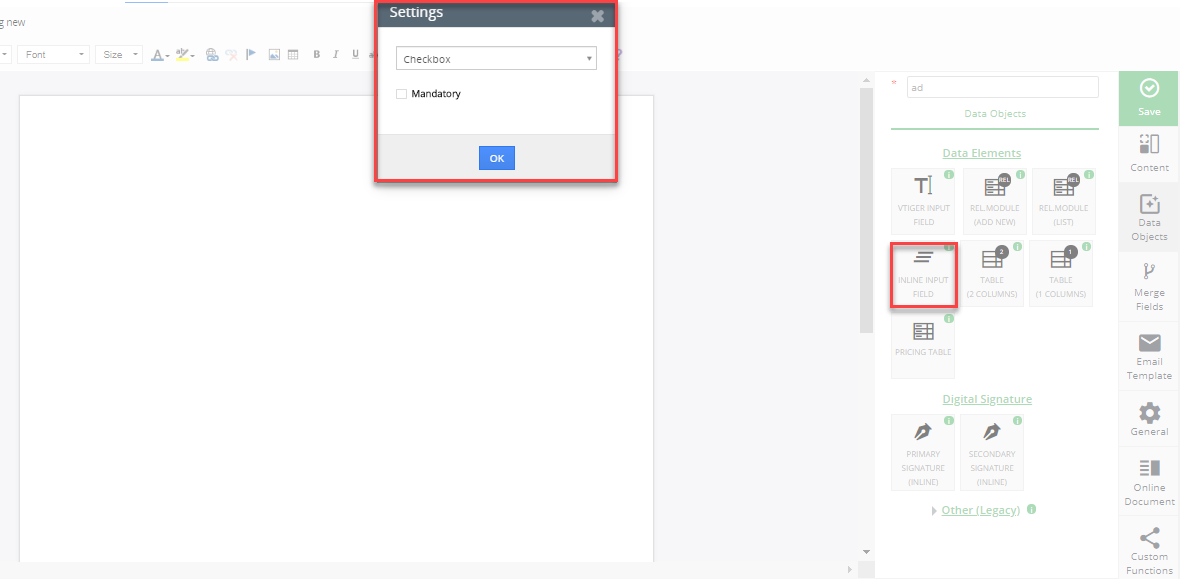
Inline Input: In addition to standard fields, you can use inline input field to collect additional information from contacts. Each document account can use custom contact fields in inline form i.e text field, checkbox or it can be text area field. You can select a date from a calendar or input it into the date field and more than one option from a predefined list of options by clicking in a checkbox.
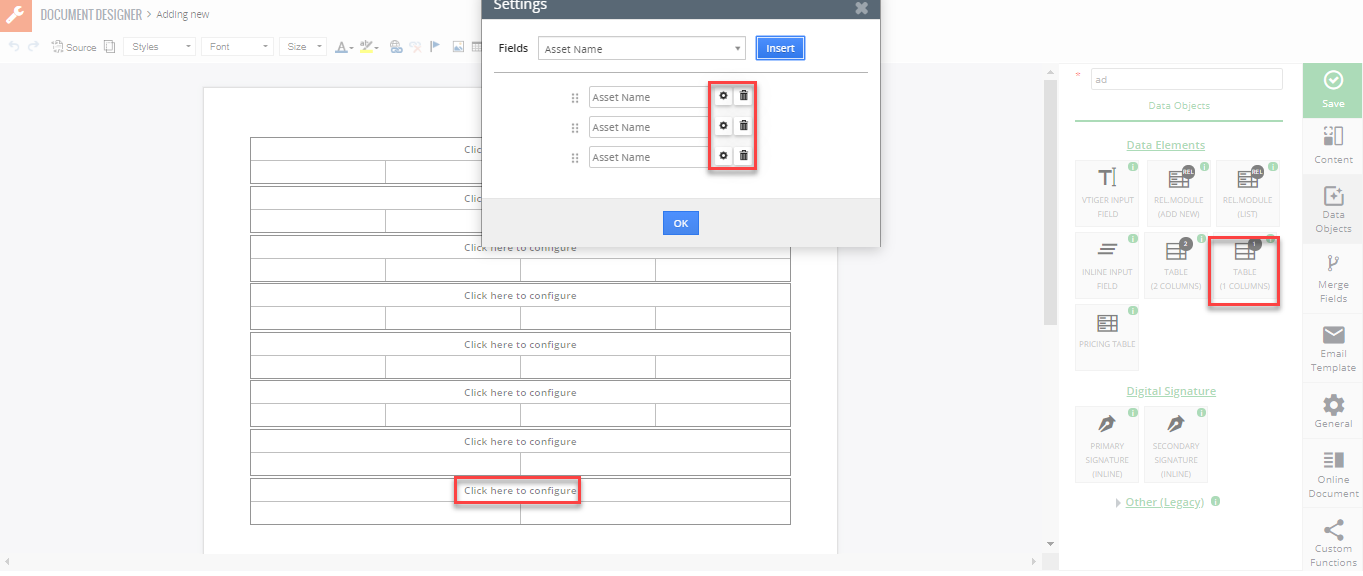
- Table (1 Col): To add interactive table (1 column) where the recipient will be able to fill in the fields which will update back to VTiger. This element was created to simplify creating interactive forms on the document.
Once the element is added, you will need to “Click here to configure” OR click on the “gear” icon to open the configuration area.
Next, you are able to select which fields to include in the form. (In this example, we are creating interactive form for an asset name, which will allow the recipient to fill in some of the basic information such as name and contact number).
- You can drag and drop each field to change the sequence.
- You can change the field label by typing it in.
- You can delete the field from the table.
- You can access advanced field options by clicking on gear icon.
In Advanced Field Options you can set field to be editable (Allow to Edit), meaning that by default, all fields are editable. However, you can set it where some of the fields on the form will not be editable. In addition, you can also make field mandatory on the interactive form.
“Save” and a new table will be created with specified fields. You can then edit the entire table or each element individually.
Finally, if you send this document to a contact, they will be able to fill the information in and it will get automatically updated back into VTiger. For this example, we set “First Name”, “Last Name” to be not editable and Office/Mobile Phone to be mandatory.
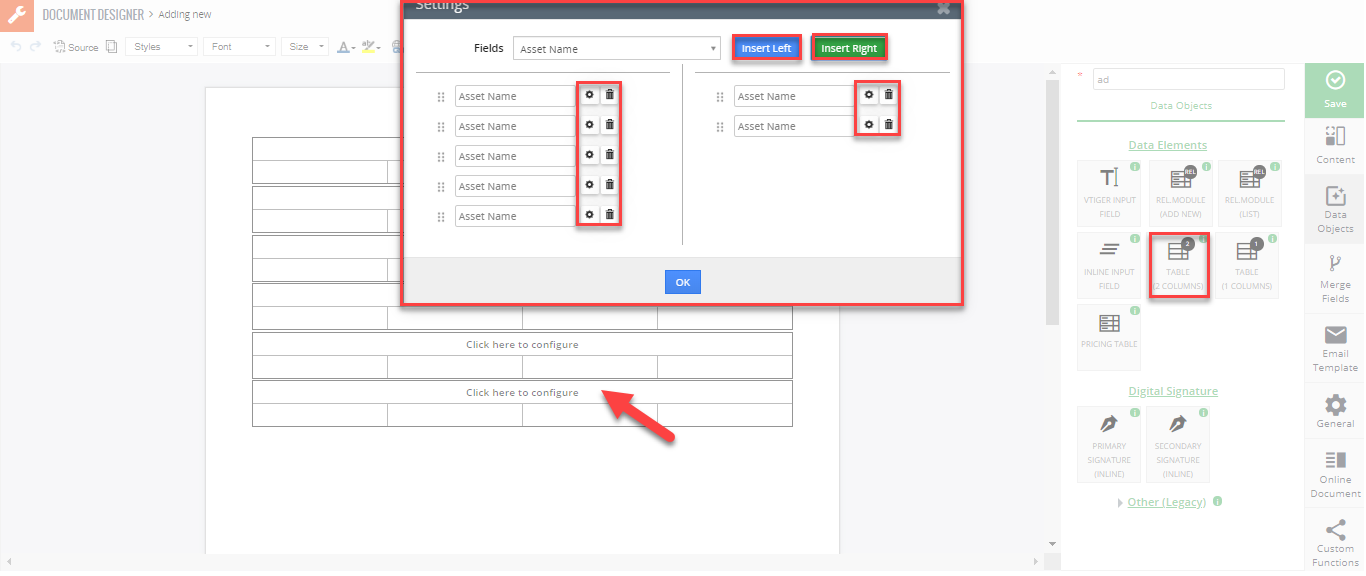
- Table (2 Col): To add interactive table (2 column) where the recipient will be able to fill in the fields which will update back to VTiger. This element was created to simplify creating interactive forms on the document.
Once the element is added, you will need to “Click here to configure” OR click on the “gear” icon to open the configuration area.
Next, you are able to select which fields to include in the form. (In this example, we are creating interactive form for an asset module, which will allow the recipient to fill in some of the basic information such as name & phone).
- You can insert fields LEFT and RIGHT.
- You can drag and drop each field to change the sequence and side (left or right).
- You can change the field label by typing it in.
- You can delete the field from the table.
- You can include field “– PLACEHOLDER (BLANK) –” which is essentially a blank space in the table. (Used to format tables where one side has more fields than the other).
- You can access advanced field options by clicking on gear icon.
In Advanced Field Options you can set field to be editable (Allow to Edit), meaning that by default, all fields are editable, however you can set it where some of the fields on the form will not be editable. In addition, you can also make field mandatory on the interactive form.
“Save” and a new table will be created with specified fields. You can then edit the entire table or each element individually.
Finally, if you send this document to a contact, they will be able to fill the information in and it will get automatically updated back into VTiger. For this example, we set left column fields (basic details) to be not editable and right column (address information) to be mandatory.
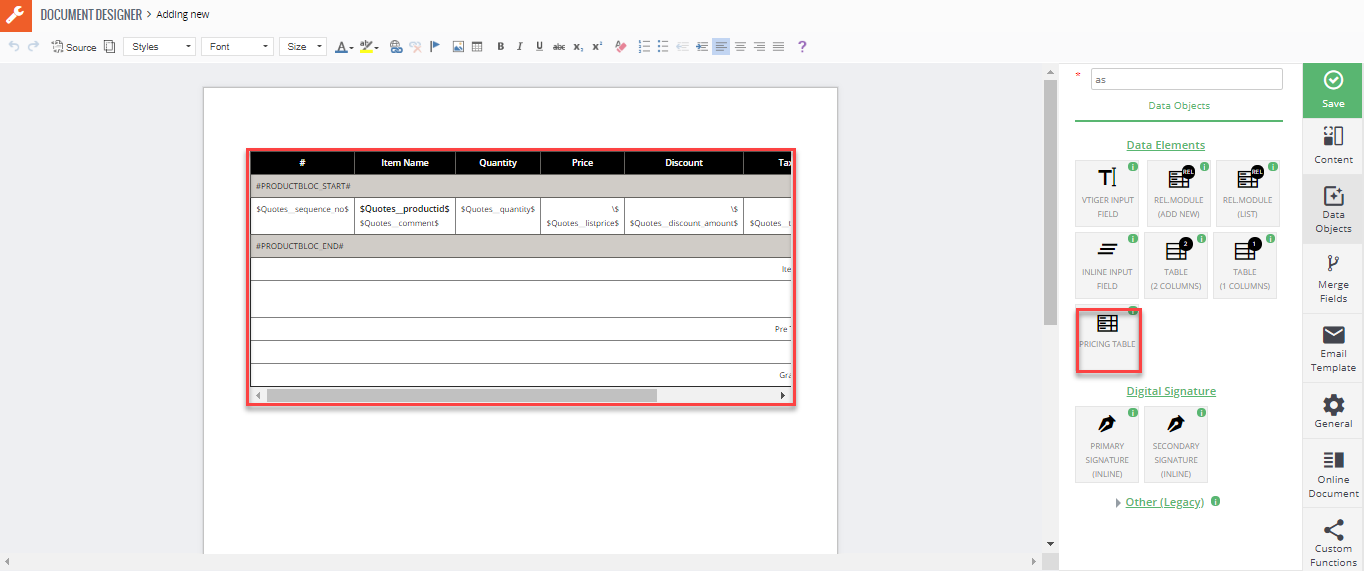
- Pricing Table: Product Block was designed to allow users to manually create and design products/service that are on the Quote, Invoice, Sales/Purchase Order. This feature is used in very rare occasions where the documents produced require complex customization. You can change the style, color, customized your own document just like you can change the color scheme of table.
This feature is identical to “Pricing Table” element. We advise users to use “Pricing Table” interface to build service/product lists on the Quote, Invoice, Sales/Purchase order.
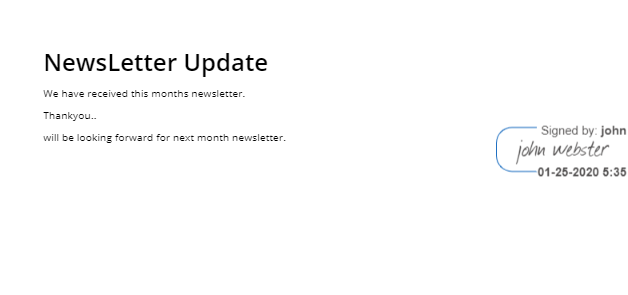
- Signature: Signature is a mark or sign made by an individual on a document to signify knowledge, approval, acceptance, or obligation. Its purpose: To authenticate a writing , and to bind the individual signing the writing by the provisions contained in the document. Add the signature field for the receiver to sign the document or sign it yourself before sending.
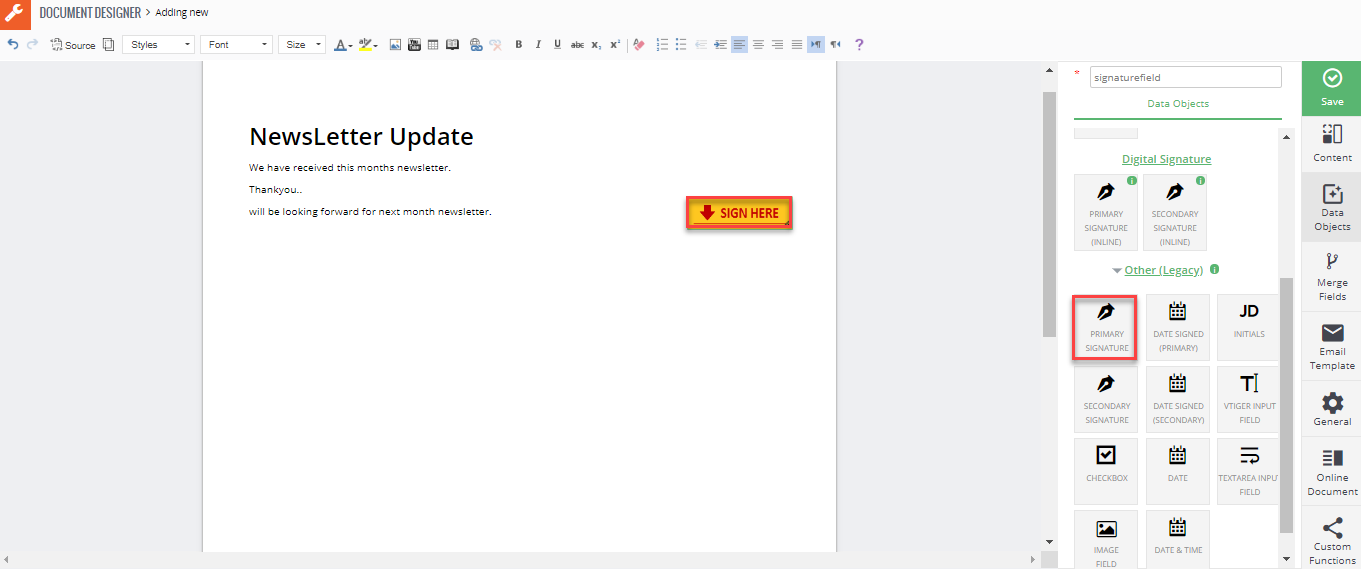
1. When the signature element is first added, it defaults to be “Signed by the recipient”. In most cases this is what we want, meaning that once you send the document, the recipient will be able to click on the signature icon and place the signature.
2. You can also pre-set signature by clicking on the gear icon and drawing the signature. If you do that, your drawn signature will show up and the recipient will not be able to sign, since you already signed.
Use “Replace Signature Button” checkbox to set it be to normal (where recipient will be able to sign it)
You can add multiple signature pads on the document e.g one can be for your drawn signature and another for recipient to sign.
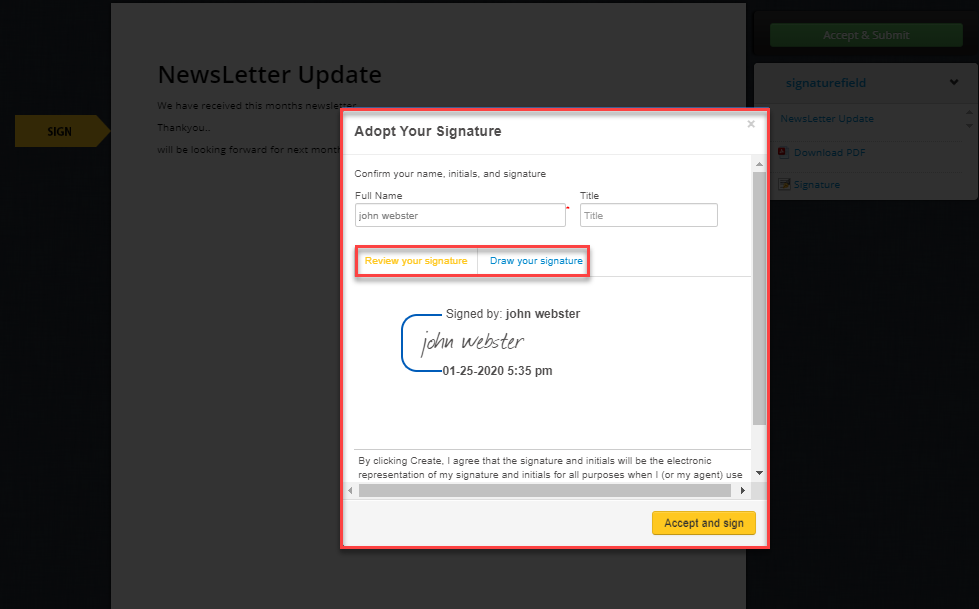
Once the document is sent, the recipient will then be able to click on the signature icon OR on the green button (default is Accept) and the signature pad will popup. Signed document will then be stored in VTiger under “Signed Documents”.
- Checkbox: A check box is always a square box and allows for one or more items to be selected. A button is a circle that only allows for one option to be selected. If you’re creating a list that needs multiple options selected, use check boxes. To add the checkbox element.
- Date: To add the desired date to the document. You can click on the added element and set a default date. You can also click on the “gear” icon and open advanced field options (make it editable or set to be current date).
- Date Time: To add the desired date and time to the document. You can click on the added element and set a default date. You can also click on the “gear” icon and open advanced field options (make it editable or set to be current date).
- Initials: Add the field to let the receiver put their initials. You can also click on the “gear” icon and open advanced field options (make it editable or mandatory).
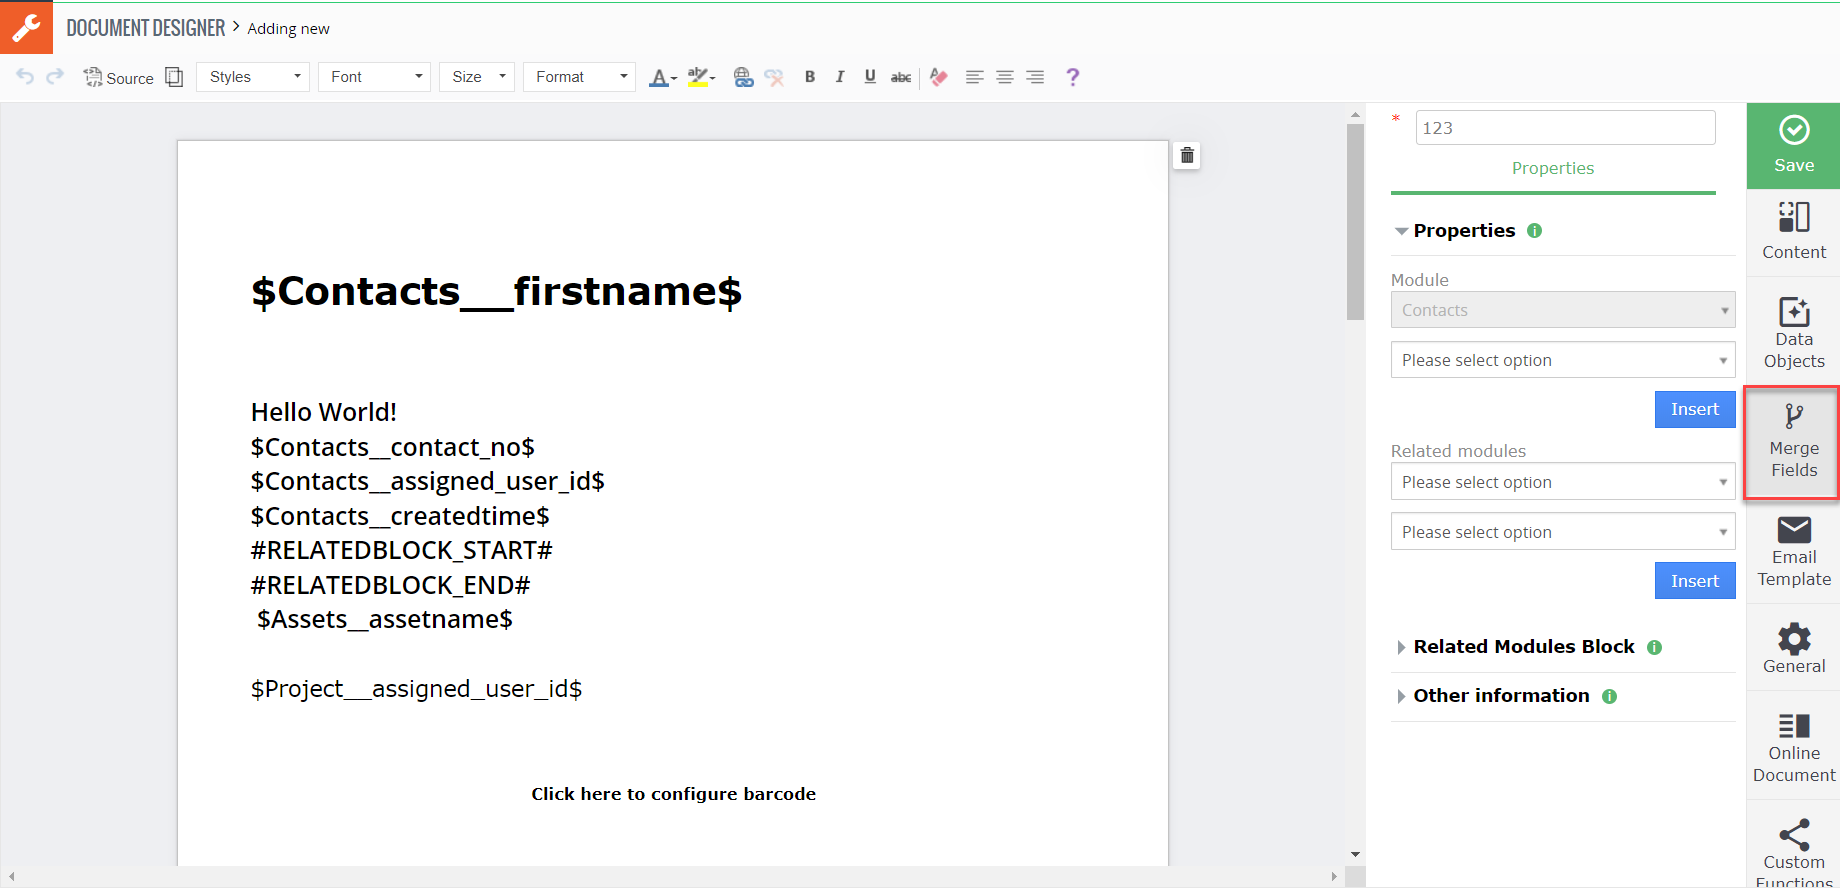
Template Builder: Merge Fields
Use this section to merge information from VTiger. In the ‘Properties’ tab, you can select fields from primary and secondary modules as well as create custom product and related module blocks.
Properties
Properties is an area where you can select your primary module and merge the fields onto the document. In addition, you can insert data from related module e.g “Contact Name” related to the “Invoice”.
To insert the field, you will first need to pick the field from the drop down and hit “Insert”. The field will be inserted where your cursor was on the document. Properties can be inserted on any element (text, table, image).
Related Module Block
Related block feature was designed to allow users to merge related record information on to the document, meaning that if you are creating document for Projects module – you could merge related Project Tasks, Milestones & other related modules on the same document. This identical feature to “Related Modules” element that is available in “Blocks” tab. We recommend users to use that instead, since it’s a lot easier to select the module, columns and table theme. This feature is mostly used for complex related modules, that require custom design and layout.
Other Information
Other information consist of company Information: used to merge VTiger company information (set in VTiger settings) such as company name, phone, address & more.
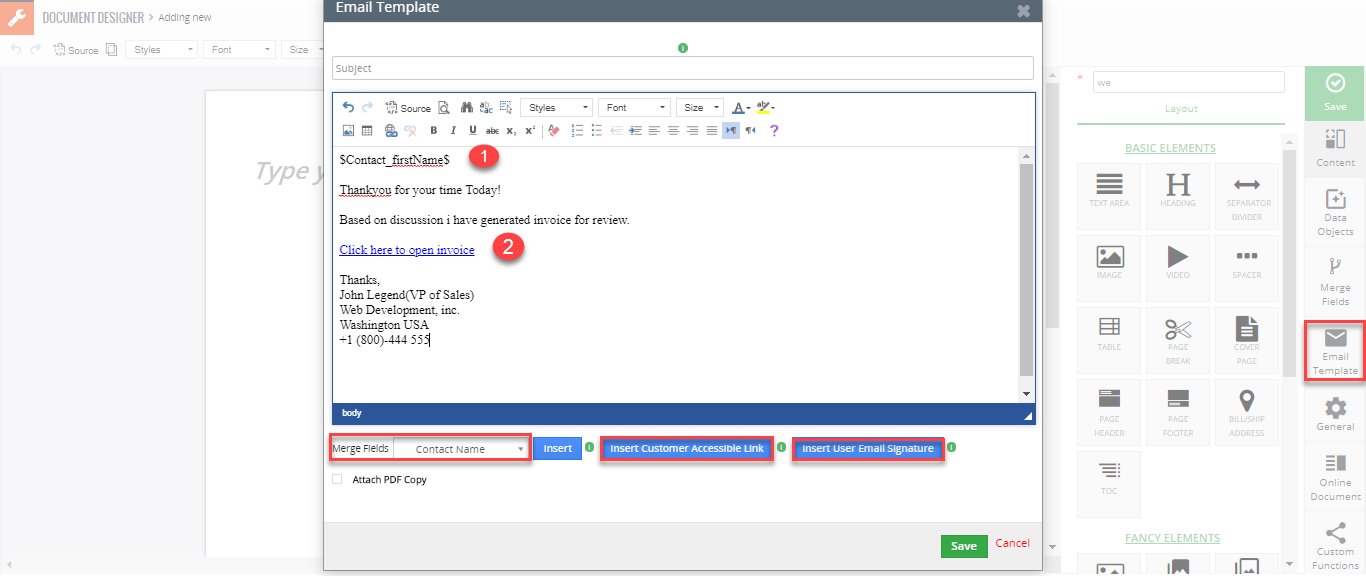
Template Builder: Email Tab
Email tab is to create an email template that can be used every time you send the document. Email template builder includes all the necessary formatting elements as well as ability to merge fields from the record and you can also put your customized signature at the end as we have discussed above.
1. To add merge fields e.g “Contact First Name”, you would need to go to “Properties” tab and insert the field from there.
2. To add interactive document link for the recipient, you will need to got “Properties” tab > “Other Information” section > “Custom Fields” and insert “Proposal Link”. The link will be inserted as a variable $custom_proposal_link$ – you can make it a hyperlink to say something like “Click here to open the document” (as in screenshot).
Template Builder: General
General tab is where miscellaneous configuration items are such as activation of document, page format, form details, document authorization and sharing of file.
- Setting: It shows the status of page whether its active or inactive.
- Form detail: This converts online document into publicly accessible link, which can be used to create new records in VTiger. As you probably know, you can create documents/forms and send them to your existing customers (or any other VTiger records) and have the recipient put in information and submit it (refer to “Contact Update Form” or “SEO Proposal” templates in our demo.). However, this feature allows you to create a static link that can be sent to anyone (not necessarily from VTiger – you can put it on your website or email the link) and once the form gets filled out – it will create new record in VTiger (based on primary module on the form). This is very similar to VTiger webforms, however it’s more powerful and supports all standard and custom modules.Simple Example: Create custom form and place it on your website for new signups (lead/contact information will flow directly into VTiger).Advanced Example: Create custom form that you can send to your customers for Tickets/Support requests, data gathering. The form can be created for any custom module e.g “Orders”. You can generate a link for individual customers (each customer in VTiger can have unique formid) and once the customer fills the form out (once or multiple times) – it will create new records in VTiger and associate/link those new records to an existing customer record. In order to associate new record to existing customer, you either have to send the form from vtiger (to that customer) OR obtain the link as if you were sending the form to the customer
- Page Format & Margin: Define page format, styling of your documentation. it helps you make a difference when presenting a document.
- Sharing: It ensures that everyone can adjust to changing needs and requirements so that the finished result is precisely what is needed. Document sharing also creates considerable transparency. By sharing documents online, you save time during hectic business days. You can get the important documents into the hands of your recipients a lot faster. Also with online document sharing, there are no postage costs so you also save money.
- File Name: It defines the title of your document.

Online Documents
- Setting: Online/Interactive documents can be set to expire in X days. It’s helpful if your proposals/quotes are valid until a certain date and with this – you can prevent access to expired documents.
– Track Open: Enabling this feature records, if the document is opened by the receiver or not
– Lock after Submissions: Once the document is submitted after sign, you cannot re-submit the online document.
– Disable access after submissions: Once the document is submitted after sign, you cannot access the online document.
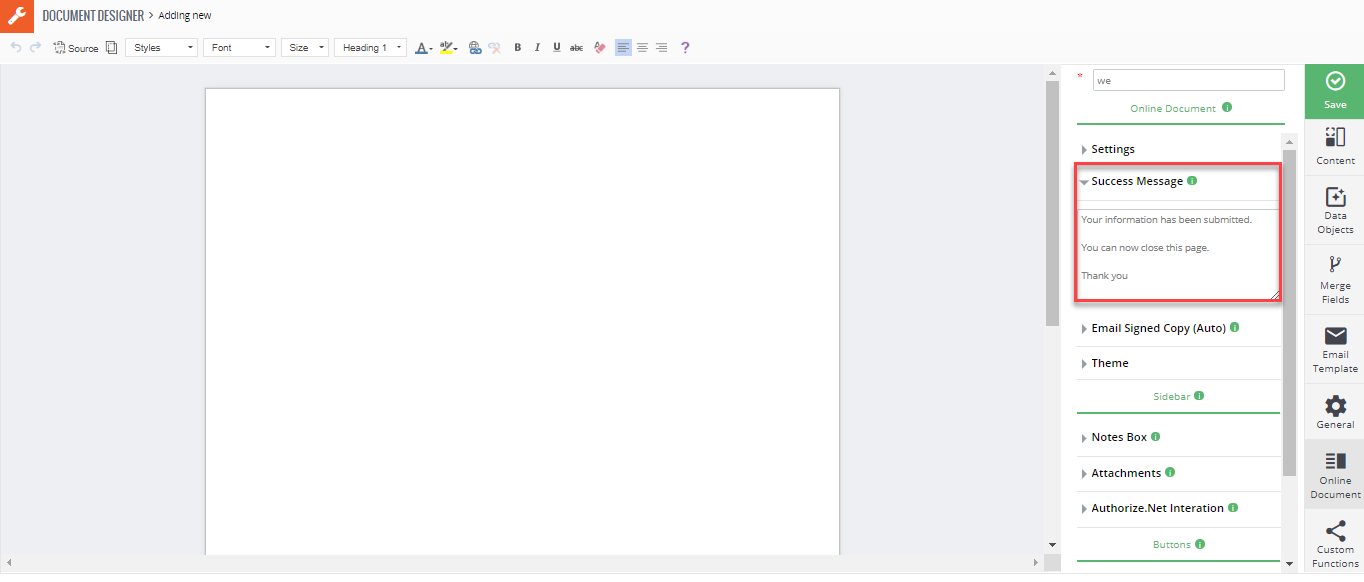
Special image - Success Message: Success message can be added to your document it is customized message which pops up when you successfully submit your document for verification its been submitted.
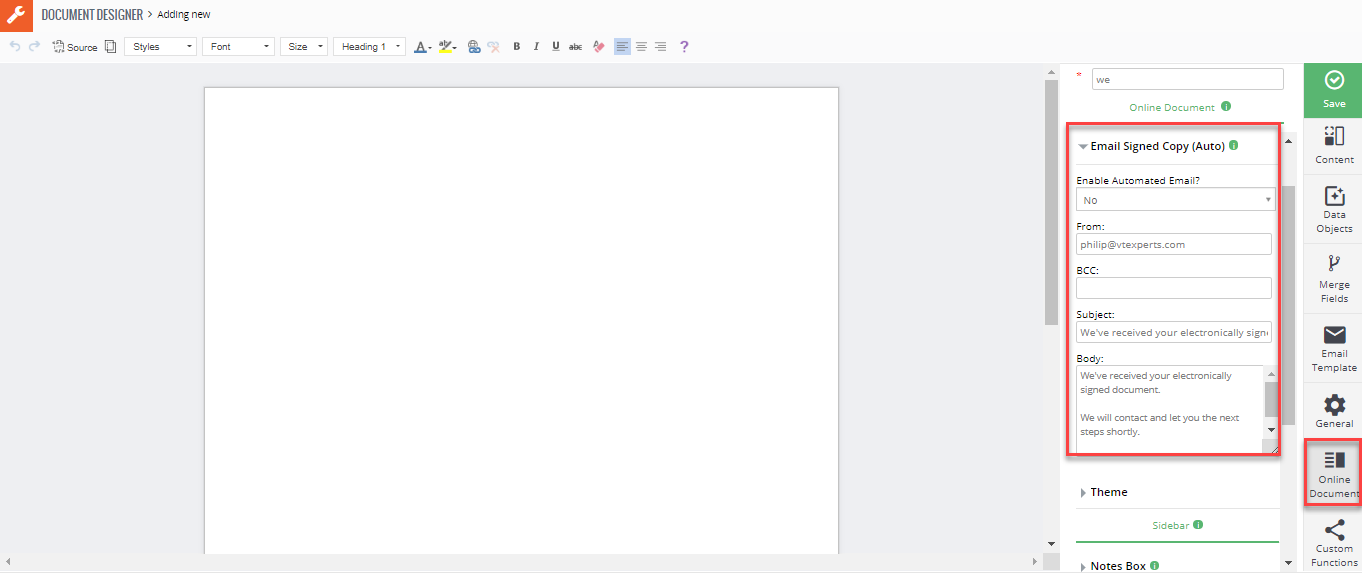
- Email Signed Copy: It allows you to secure your document it is set to be auto generated. For security and privacy reasons, it is best to use the Blind Carbon Copy (BCC) feature when sending an email message to a large number of people. When you place email addresses in the BCC field of a message, those addresses are invisible to the recipients of the email. Email Body is pre-filled from the email template set in the template builder. Subject pre-filled from the email template set in the template builder.
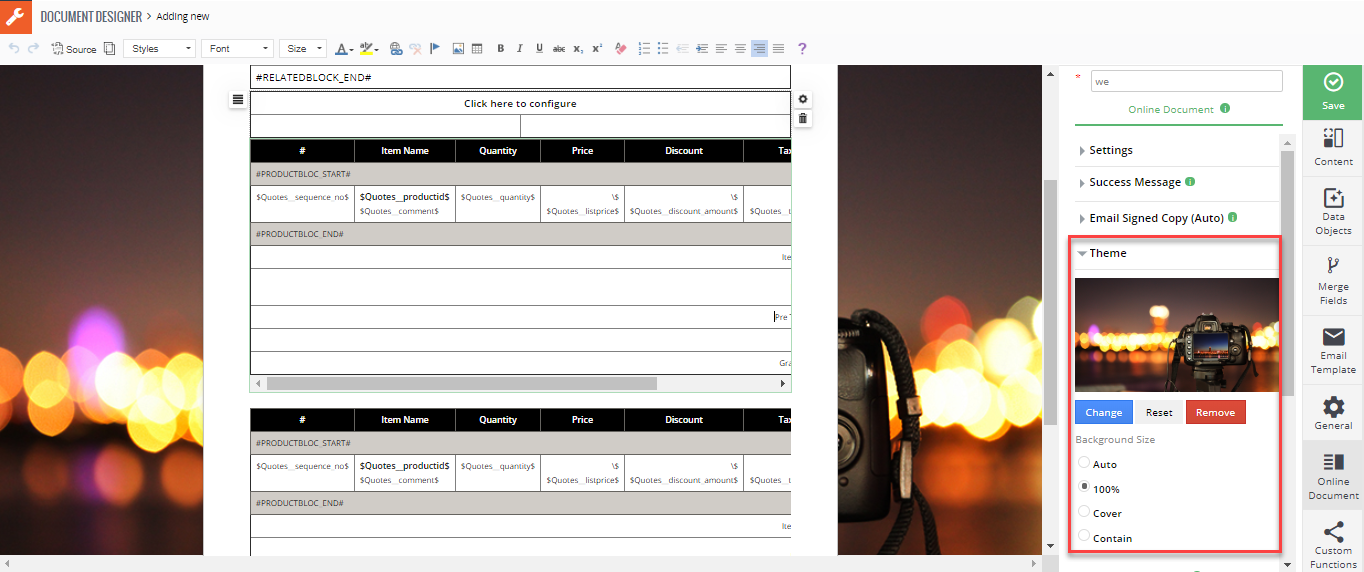
- Themes: Template builder has an ability to set background image on the interactive/online document. It really helps to make a difference when presenting the proposal.Background Image: Change, reset, or remove the background imageBackground Size: Select how you want to use the added image and it will be automatically set to the desired.
SideBar
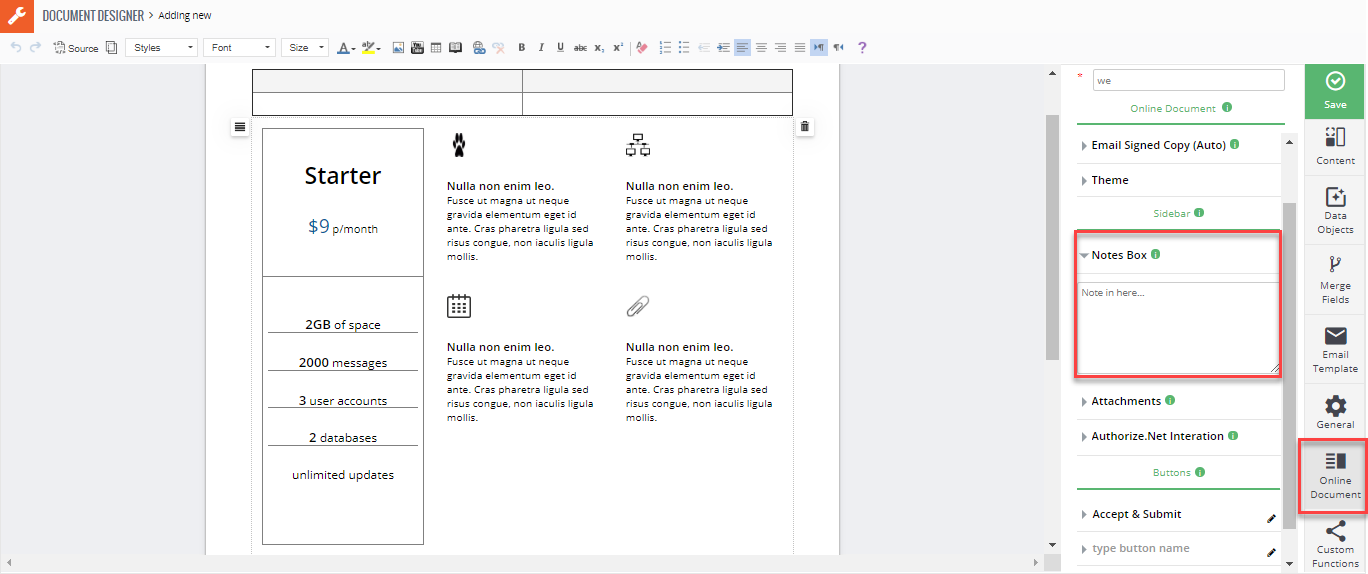
Notes: Custom notes can be added to the document. These notes will only be displayed on the interactive/online document and notes are static on the document (can only be changed in the template builder).
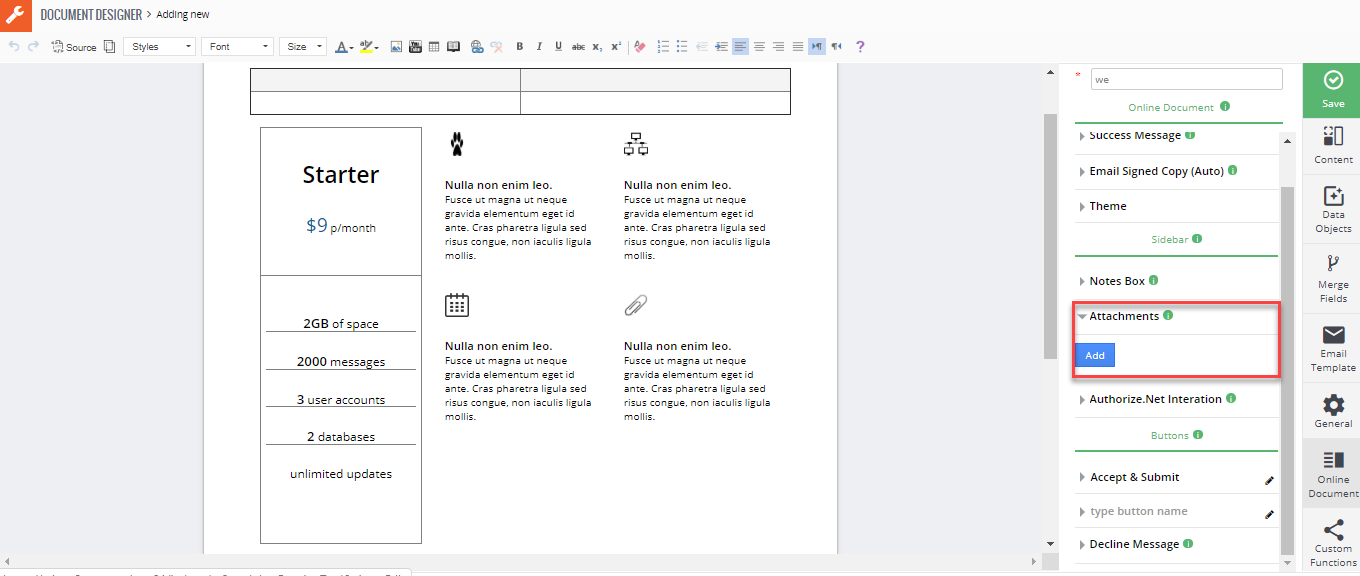
Attachments
Attachment: You can attach static files to the template, meaning that when the interactive/online document is opened by the recipient, they will be able to download those files. It is mostly used for supporting documentation such as product catalogs, pricing sheets, agreement details (basically what doesn’t make sense to put on actual template).
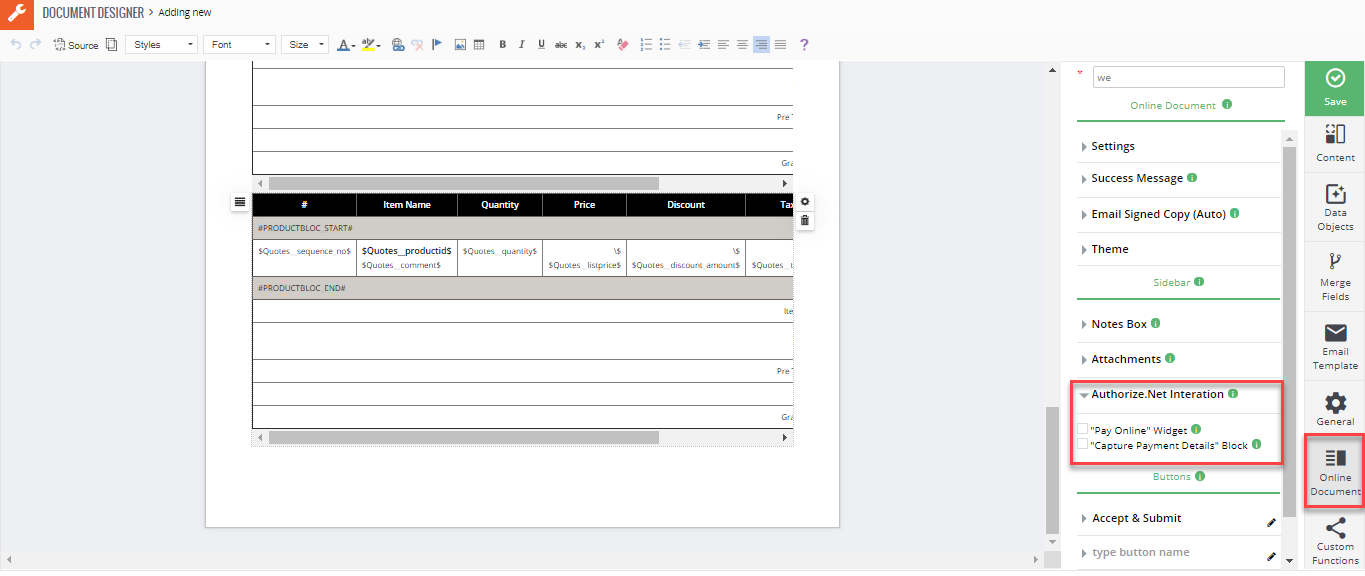
Authorize.Net Integration
Auth.net: Authorize.net integration requires Payments extension to be installed. If enabled, it will add Payments widget on the interactive document.
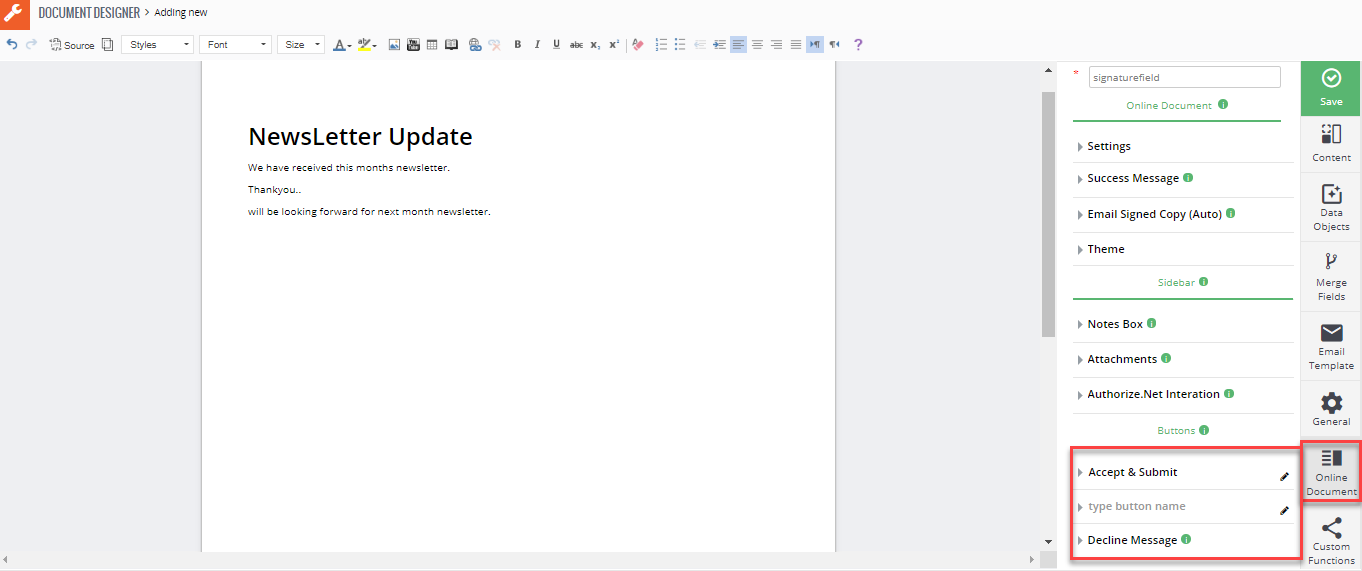
Buttons: Using this scheme much simpler and more manageable. By relative measurements in your style pattern, you can style your documents to look good on any monitor at any resolution. You have finer and more predictable control over presentation. There are three types.
- Submit : Submit button automatically submits a form on click.
- Type Button: You can customized your click to do particular task and perform some action means it is a normal button and you have to bind click event to it to do some action.
- Decline Message: A decline message occurs for example when a customer’s bank refuses to authorize the transfer of funds as a result of possible fraud, insufficient available credit, lost or stolen card, etc
Preview, Send or Export to PDF
Finally, once designed your document – you can then send it via email (manually or via workflow) or export to PDF.
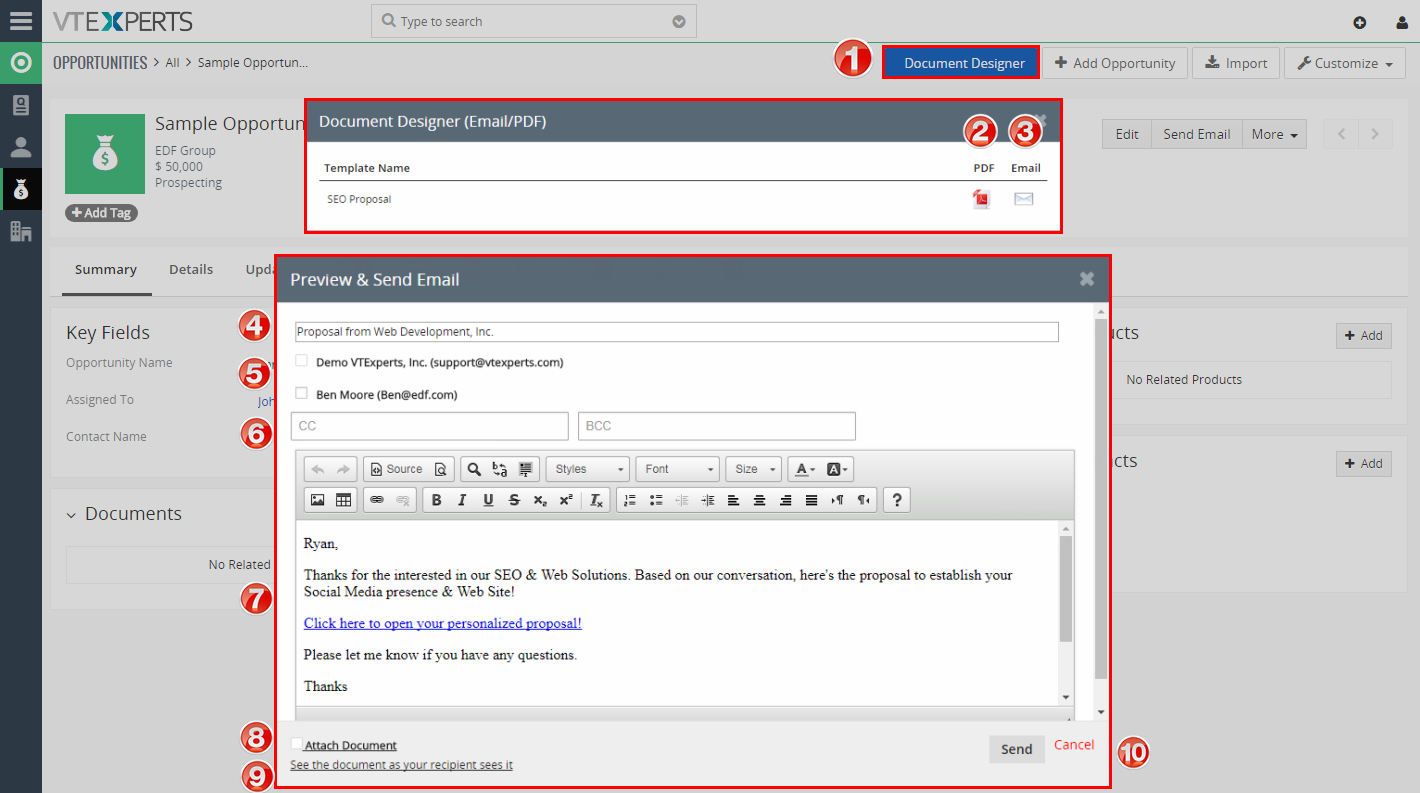
1. “Document Designer” button will appear on every records’ detail/summary view if there is a template created for that module.
2. Clicking the button will open a popup which will allow to Export to PDF (download locally) and Email the document.
3. Email popup consists of:
- Subject – (prefilled from the email template set in the template builder).
- Possible recipients – Document Designer will locate linked records with an email address that you can email the document to.
- CC/BCC – You will be able to add additional email addresses/records.
- Email Body (prefilled from the email template set in the template builder).
- Attach Document – If checked, it will attach a PDF copy in the email (in addition to the online/interactive document link).
See the document as your recipient sees it – is used to open the interactive document before you send it to the customer. It will open the document in new window for you to review. This is very helpful help testing/tweaking the document.
Send/Cancel – used to send the email or close the popup.
Signed Documents (Viewed/Accepted/Declined)
Document Designer is capable of tracking documents that have been viewed/opened, accepted or declined. Such information is stored under “Signed Records” area on each record that has document designer template created.
When the document is viewed, a new “Signed Document” record will be created with type “Opened”.
When the document is accepted (accept button is clicked), a new “Signed Document” record will be created with type “Accepted”.
When the document is Declined (decline button is clicked), a new “Signed Document” record will be created with type “Declined”.
In addition, you can also view the date and time when the document was viewed/accepted as well as download a copy of a signed PDF (File Name column).
It also integrates with Standard VTiger workflows, meaning that you can create a workflow for “Signed Document” record to say “Send me an email when someone opens a document” – so you can call them right away, while the lead is still hot.

Workflow (Send Documents Automatically)
It comes with built in tools to automate document generation and emailing. In addition to sending the document via email or exporting to PDF – you can also setup it to do it all automatically. For example, if an opportunity goes to a certain stage – you can setup a workflow to send out a document to the decision maker automatically.
Extension utilizes standard VTiger workflow functionality, which allows endless possibilities of when , what and how the document should be sent.

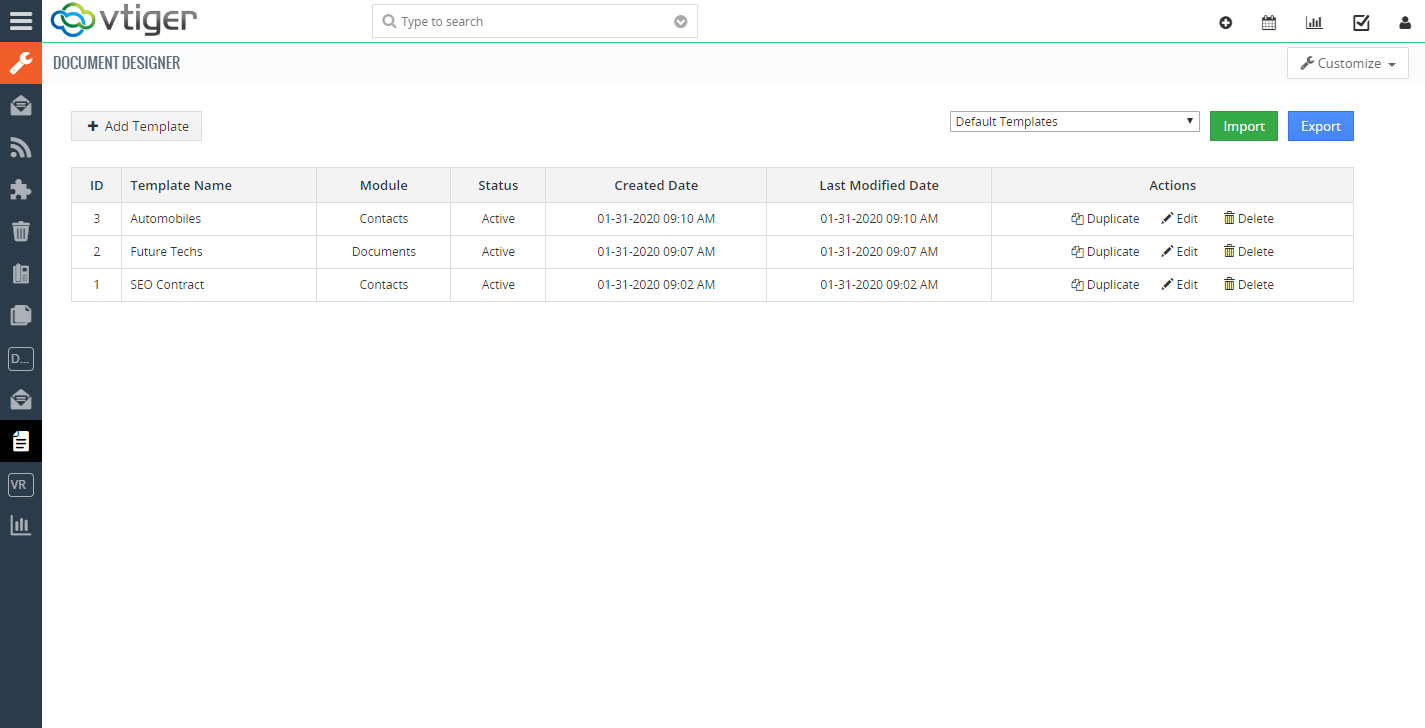
Document List
To access document templates created, go to Menu > Projects > Document Designer. You can also add new templates, import new and export existing ones (helpful when transferring to another instance or backing up).
You can also duplicate, download as PDF (sample), edit and delete templates.
Export/Import Templates
Templates can also be exported and imported. We have created few templates to get you started. All templates are editable as if you were designing a new one. We have released the templates late July of 2017, so if you installed document designer before then – you will need to import these templates manually.
To import template, hit “Import”, browse to the file and hit import.
You can download templates from the links below.

Yellow
Click here to download Yellow Proposal (Opportunity) template
This template consists of 6+ pages. To see the preview please click the link below to open the PDF: