VTiger & QuickBooks Integration is an essential tool for anyone that’s using QuickBooks Online and VTiger. If you are not using it – you are likely creating invoices/customers in QuickBooks manually and that’s just a waste of time. The integration supports multiple modules, bi-directional sync as well as custom mapping to properly get the data across multiple platforms.
The following functionality is supported:
- Customer (2-way): QuickBooks Customer Sync to VTiger Organization/Contact
- Invoice (2-way) Quickbooks Invoice Sync to VTiger Invoice
- Products (2-way): Quickbooks Product (Inventory/Non Inventory) to VTiger Product
- Services (2-way): Quickbooks Service to VTiger Service
- Payments (1-way Quickbooks to VTiger): Quickbooks Payments to VTiger Payments (*requires Payments extension)
NOTE: This extension requires Integration Add-on. Please click here for more details.
For any additional functionality or customization – please contact us. We do provide customization services.
Technical Requirements
In order to use QuickBooks Online & VTiger Integration, you need to meet the following requirements.
- PHP5.6 or higher (lower version will not work. QuickBooks API does not support it)
- PHP Open-SSL Library (usually come preinstalled with apache/webserver)
- IonCube Loader (required as part of the extension pack)
- QuickBooks Online (It does not work with Quickbooks desktop)
- VTiger 6.x or 7.x Open Source (It only works with open source version of VTiger).
- Extension Pack (to install QuickBooks extension + payments (optional))
- Integration Add-on Please click here for more details.
For any questions or assistance, please contact us at help@vtexperts.com
Checklist
QuickBooks and VTiger extension is fairly complex and we strongly recommend to read the user guide to understand how the data will be stored/updated/created in each application. To help you better understand how it works, what is required and what to expect – we created this check list you can use when configuring the integration.
- Backup your VTiger database and files. It’s very important to have proper backup. Very Important
- Connect QuickBooks and VTiger via API. (see QuickBooks API section).
- Turn on sync (one way or bi-directional). (see Configuration section)
- Select Modules to Sync (by default all modules are turned off).
- Understand and Select cut off date when synching from QuickBooks. Very Important
- Select primary data source used to resolve conflicts and on first sync (see Configuration section). Very Important
- Review Customer Mapping and confirm you are OK synchronizing QuickBooks Customers to VTiger Organizations. Reconfigure if needed.
- Review Customer Conflict Resolution & Merge Logic (see Conflict section). Failure to understand how conflicts are resolved can result in duplicate records on both VTiger and QuickBooks. Very Important
- Review Product/Service Conflict Resolution & Merge Logic (see Conflict section). Failure to understand how conflicts are resolved can result in duplicate records on both VTiger and QuickBooks. Very Important
- Review Invoice Mapping – usually works OK with default mapping. Reconfigure if needed.
- Configure Taxes in VTiger (see Taxes section). + Understand how taxes are going to be applied on the invoice. Very Important
- Understand how Discounts are going to be applied in VTiger and QuickBooks (see Discounts section).
- Review Limitations section.
- Configure QuickBooks API Tab
- Test the sync (see How to sync from/to VTiger/QuickBooks section).
- Enable automated sync (see Automated Synching section)
We can’t stress enough how important it is to go through these 15 steps. Failure to do so, might result in duplicate data or data being replaced with incorrectly mapped values.
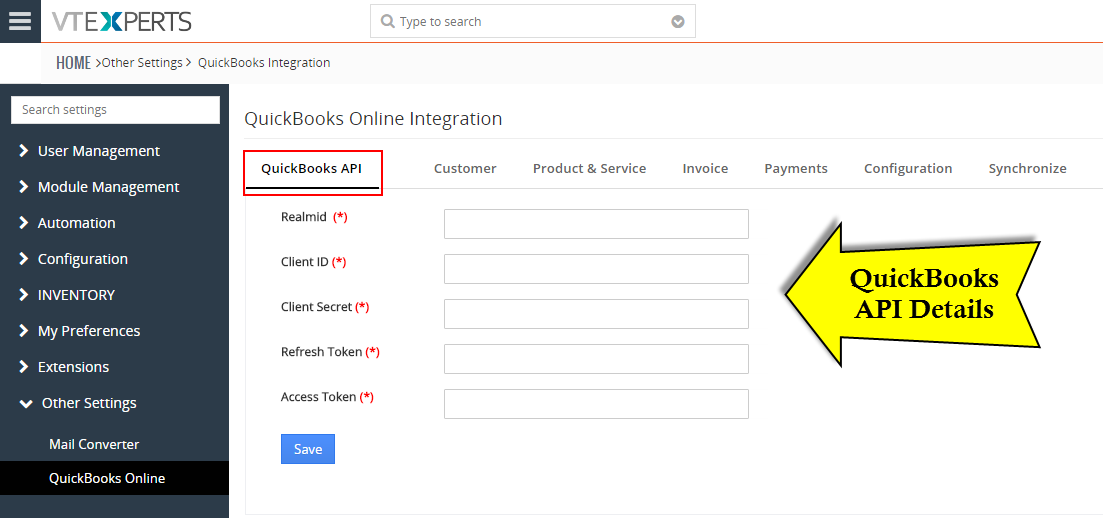
QuickBooks API Connector
This should be the last item on your list. Please review the checklist and confirm you have everything else in place.
How to retrieve QuickBooks API details – please scroll all the way down (in this user guide). QuickBooks API connector steps are at the bottom of this page.
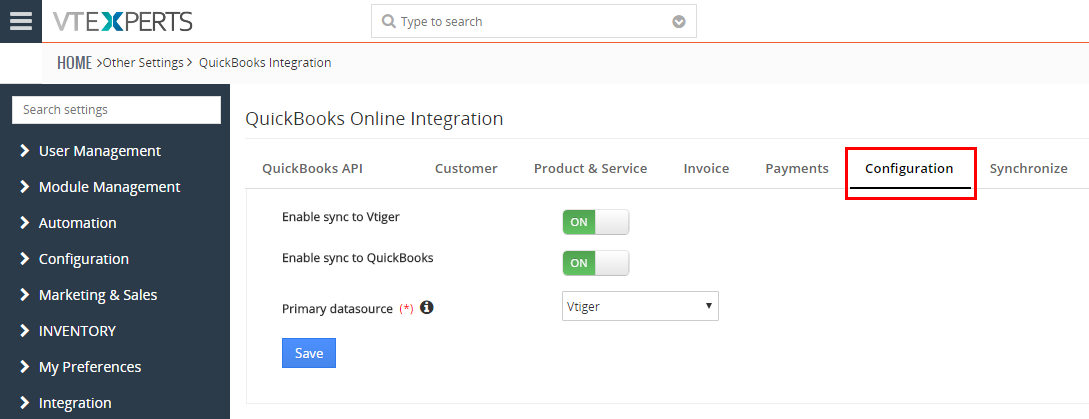
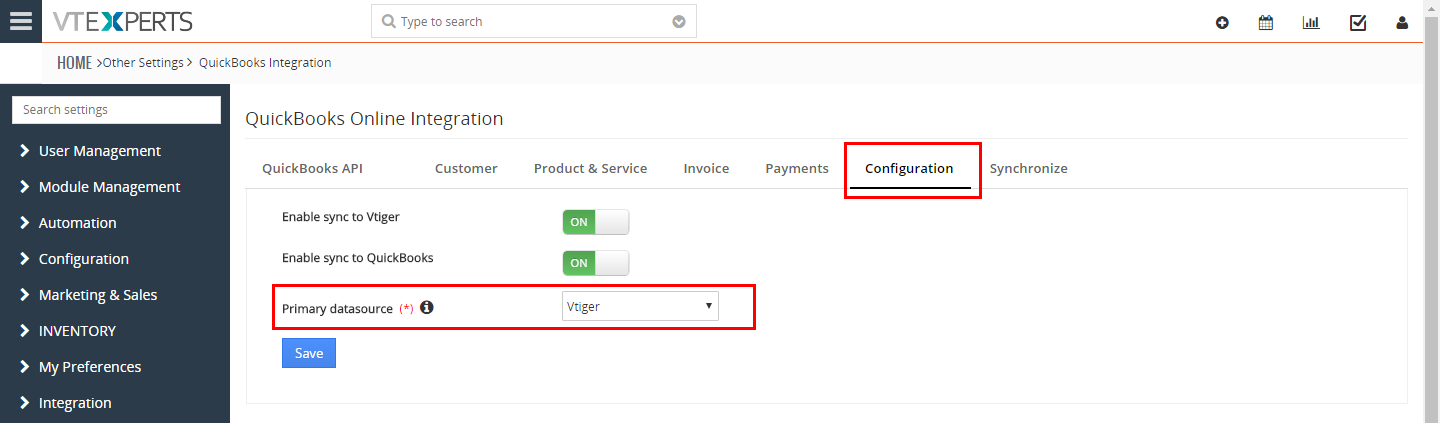
Configuration
Configuration tab is where you set 3 the most important options for the entire integration. By default, all the options are set to OFF.
- Enable sync to VTiger: If turned on, you will then be able to sync data from QuickBooks to VTiger. (If turned off, no data will be synched from QuickBooks to VTiger).
- Enable sync to QuickBooks: If turned on, you will then be able to sync data from VTiger to QuickBooks. If turned off, no data will be synched from VTiger to QuickBooks.).
- *It’s not uncommon to only have one way sync enabled. It depends on your business needs.
- Primary Datasource: You must select primary data source, this will determine the keeper value on first sync or when there’s a conflict. For example, if you have customer phone number in both VTiger and QuickBooks and the phone is different in each platform, the Primary Data Source will decide which phone number is kept and which gets overwritten/deleted. Please refer to “Conflict + Merge (On first sync)” section for more details.
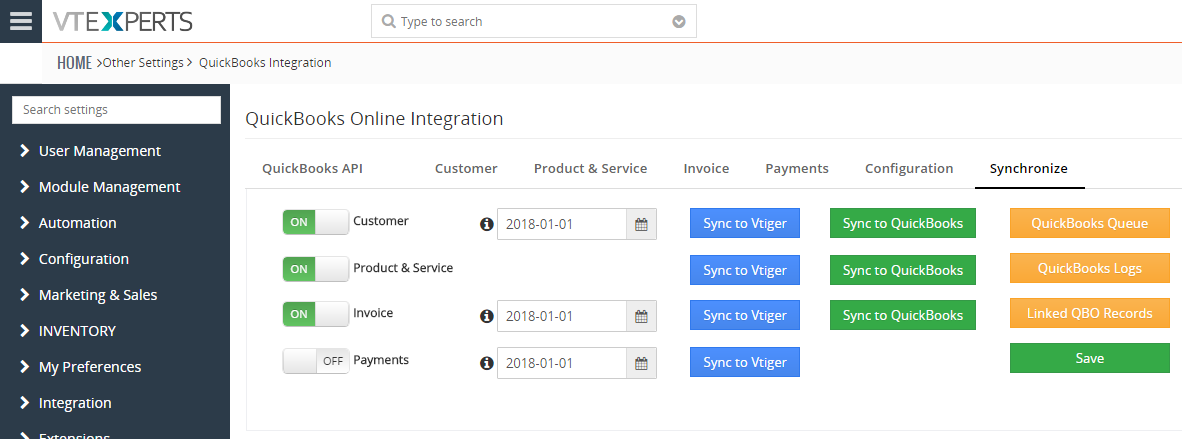
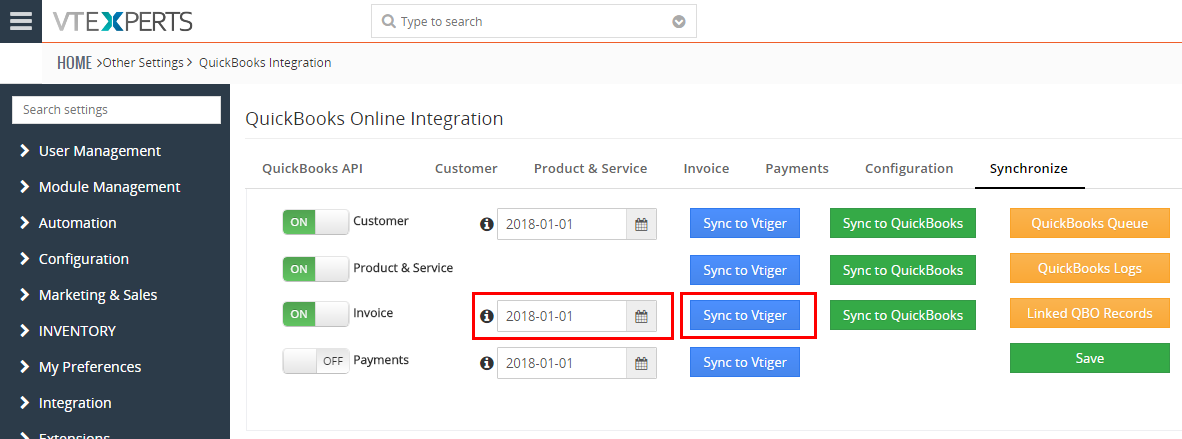
Synchronize
This is also a very important tab, where you can initiate the sync as well as view logs and turn specific modules on/off.
- You have an option to turn on/off certain modules if you don’t want to sync them for one reason or another. All modules are turned off by default.
- Date must be set for each module. It determines how back should we go to retrieve QuickBooks records. If you just want to sync Invoices starting this year 2018, you would then set the date to 01/01/2018 and only invoices created after that date would get imported into VTiger.
- Sync to VTiger – a button to manually trigger the sync for each module.
- Sync to QuickBooks – a button to manually trigger the sync for each module.
- QuickBooks Queue – will take you to the list with all the records added to quickbooks sync queue. (only needed for troubleshooting purposes).
- QuickBooks Logs – will take you to the log list, where you can see status for each attempt to sync. (only needed for troubleshooting purposes).
- Linked QBO Records – will take you to the list which shows you how records are linked between two systems (by the ID). e. (only needed for troubleshooting purposes).
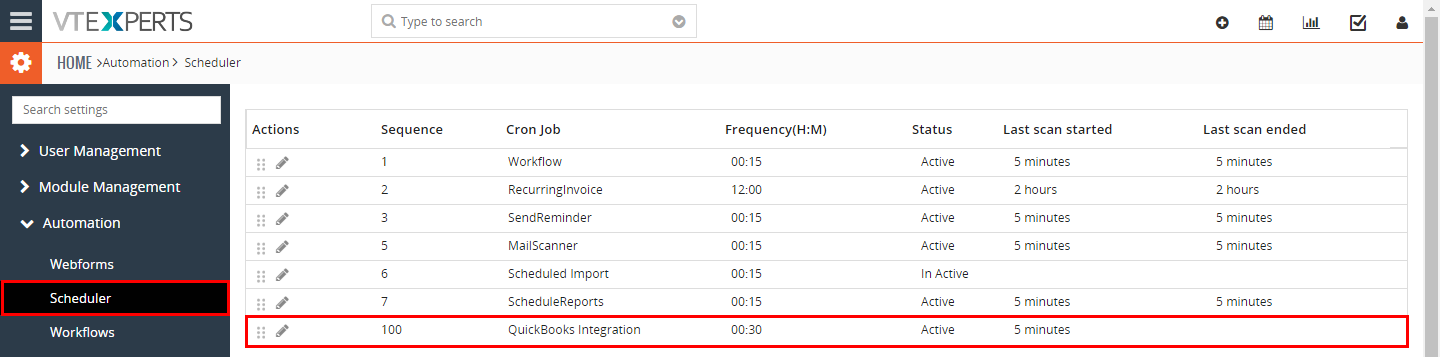
Automating Sync
QuickBooks & VTiger synchronization can be set to run automatically every X minutes/hours. By default, automated synchronization is disabled. To enable it, you will need to go:
CRM Settings > Automation > Scheduler > find QuickBooks Integration, click on a pencil icon and set it to “Active”.
We recommend to run it every 30-60 minutes.
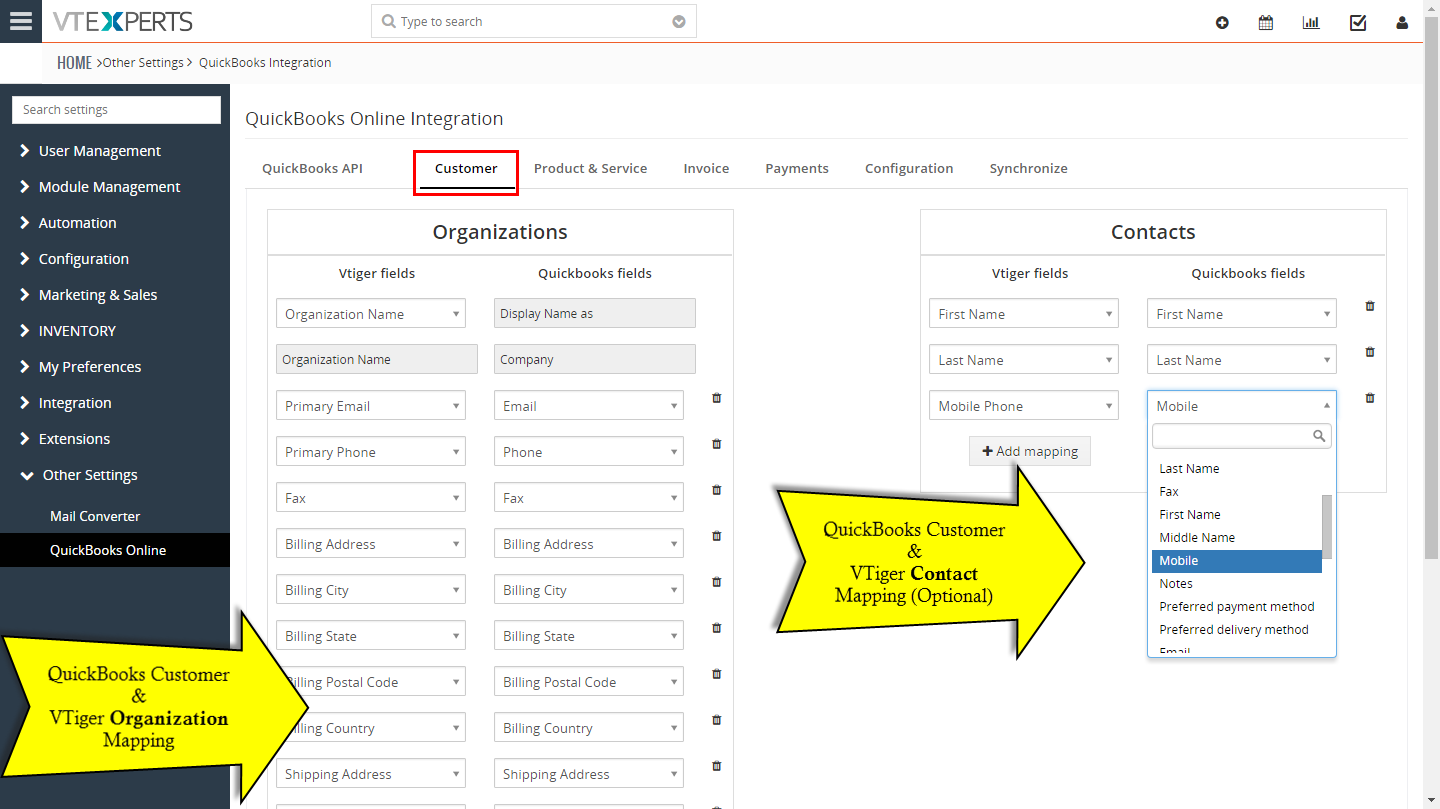
Customers
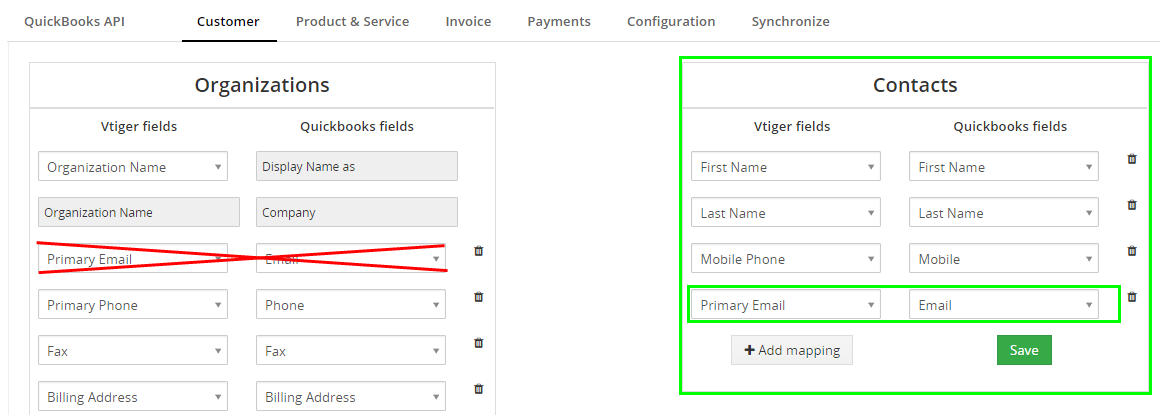
As you probably know, QuickBooks does not have “Organizations” and “Contacts” like VTiger does. QuickBooks only has “Customers” module which stores both contact and organization information. The integration supports contact and organizations, meaning that you can create 1x contact and 1x organization when synchronizing Customer from QuickBooks (and back). We recommend to keep it simple and just map the organization to the customer (upon install – default mapping is to organization only).
You can synchronize QuickBooks customer to Organization AND Contact or just Organization(no contact). At all times, organization is mandatory, because it’s a mandatory field on the Invoice.
Mapping is self explanatory – you just map fields for each module. Few things to keep in mind:
- Display Name as – can be mapped to Contact Name or Organization Name only.
- Primary Email – can only be mapped on contact or organization (not both). *This field plays important role when there’s conflict on first sync.
- Flexible Mapping – you can almost any field from QuickBooks to/from VTiger for each module.
New QuickBooks Field Block
There will be a new field block added on the organization and contact once the extension has been installed. Here’s what each field represents:
- Sync to Quickbooks: It’s a yes/no field. It will be used to tag the record to be synched to QuickBooks. Each record has to be set to “Yes” in order for it to be synched to QuickBooks. (You can also do mass update using VTiger interface). This field will get set to “Yes” automatically when an update or new record is created from QuickBooks.
- Last Date Synched: Last date the record was successfully synched either direction. This field is not editable.
- QuickBooks Status: Represents quickbooks record status. (Quickbooks can have active and inactive customers).

Conflicts + Matching (On First Sync)
If you are just starting with VTiger or QuickBooks and the data resides only on one application – you can simply sync data from one to another and you will be fine. However, what if you already have customers in QuickBooks and VTiger? In this case, the customers will get merged based on the mapping specified for organizations/contacts as well as few other factors.
1. Here’s what happens when there’s a conflict on first sync:
The option set in the “Primary Datasource” in the “Configuration” is considered a master record. For example, if you set it a “VTiger” – during conflict – the data from VTiger will take precedence over QuickBooks.
Note, that ONLY conflicting fields will be merged, meaning that if you have a Shipping Address in Quickbooks, but the same fields in VTiger are BLANK – those fields in QuickBooks will NOT get overwritten, because we only merge fields that conflict/are not blank.
2. Here’s the logic used to determine the conflict.
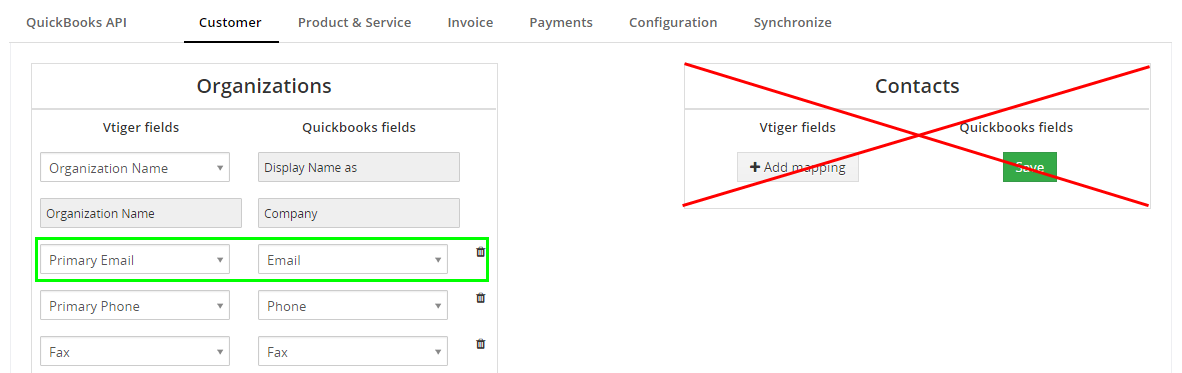
Case 1: If fields are mapped ONLY for Organization AND Email is mapped.
During the sync, we will use “Email” address to find a match in QuickBooks or VTiger, that means if there’s a match in Quickbooks and VTiger for the same email – we will then establish relationship between 2 records and merge the data based on primary data source setting.
*If email field is blank (customer/organization does not have email set) – we will then match on “VTiger Organization Name” and “Quickbooks Company Name” . If the match is found we will then establish relationship between 2 records and merge the data based on primary data source setting.
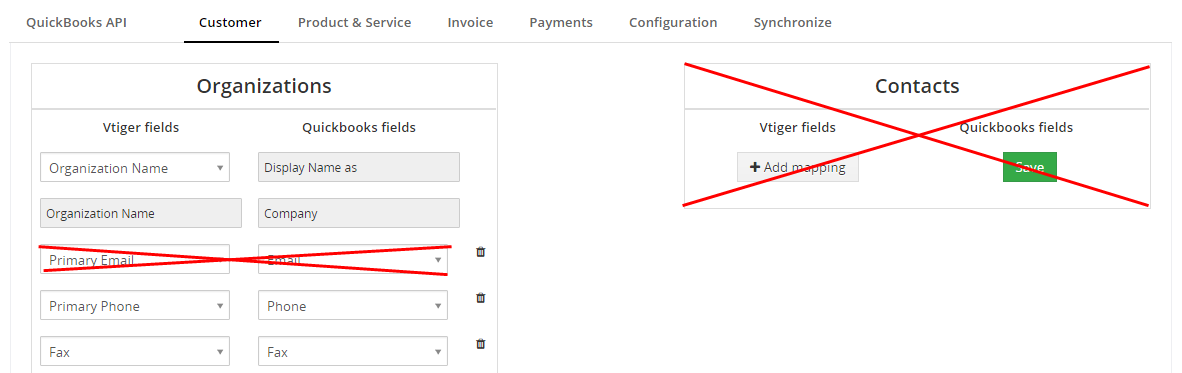
Case 2: If fields are mapped ONLY for Organization AND Email is NOT mapped.
During the sync, we will then match on “VTiger Organization Name” and “Quickbooks Company Name” . If the match is found we will then establish relationship between 2 records and merge the data based on primary data source
Case 3: If fields are mapped for (Organization AND Email is mapped on Organization) AND fields are mapped on Contact.
During the sync of Organization – we will apply the same logic as in Case 1 (match on email) or Case 2 (match on company name).
During the sync of Contact – we will check if:
Quickbooks.Firstname = VTiger.Firstname AND Quickbooks.Lastname = VTiger.Lastname
Then
If Sync Direction is QuickBooks TO VTiger AND Firstname & Lastname match was found – existing contact in VTiger will be updated. (This only applies if we find a first/lastname match that is LINKED to the same organization. (if contact exists with same name, but not linked to this organization, the we will assume that no match was found)
If Sync Direction is QuickBooks TO VTiger AND Firstname & Lastname match was not found – new contact will be created in VTiger.

Case 4: If fields are mapped for (Organization) AND (fields are mapped on Contact AND Email is mapped on Contact)
During the sync, we will use “Email” address to find a match in QuickBooks or VTiger, that means if there’s a match in Quickbooks and VTiger for the same email – we will then establish relationship between 2 records and merge the data based on primary data source setting.
*Note, given that email is on the CONTACT – we will merge data onto contact’s ORGANIZATION based on mapping and primary data source.
*If email field is blank (customer/contact does not have email set) – we will then match on:
“VTiger.Organization Name” = “Quickbooks.Company Name” AND “VTiger.Lastname” = “Quickbooks.Last Name”
If the match is found we will then establish relationship between 2 records and merge the data based on primary data source setting.
*The same logic (Case #4) will apply if the email field is not mapped.
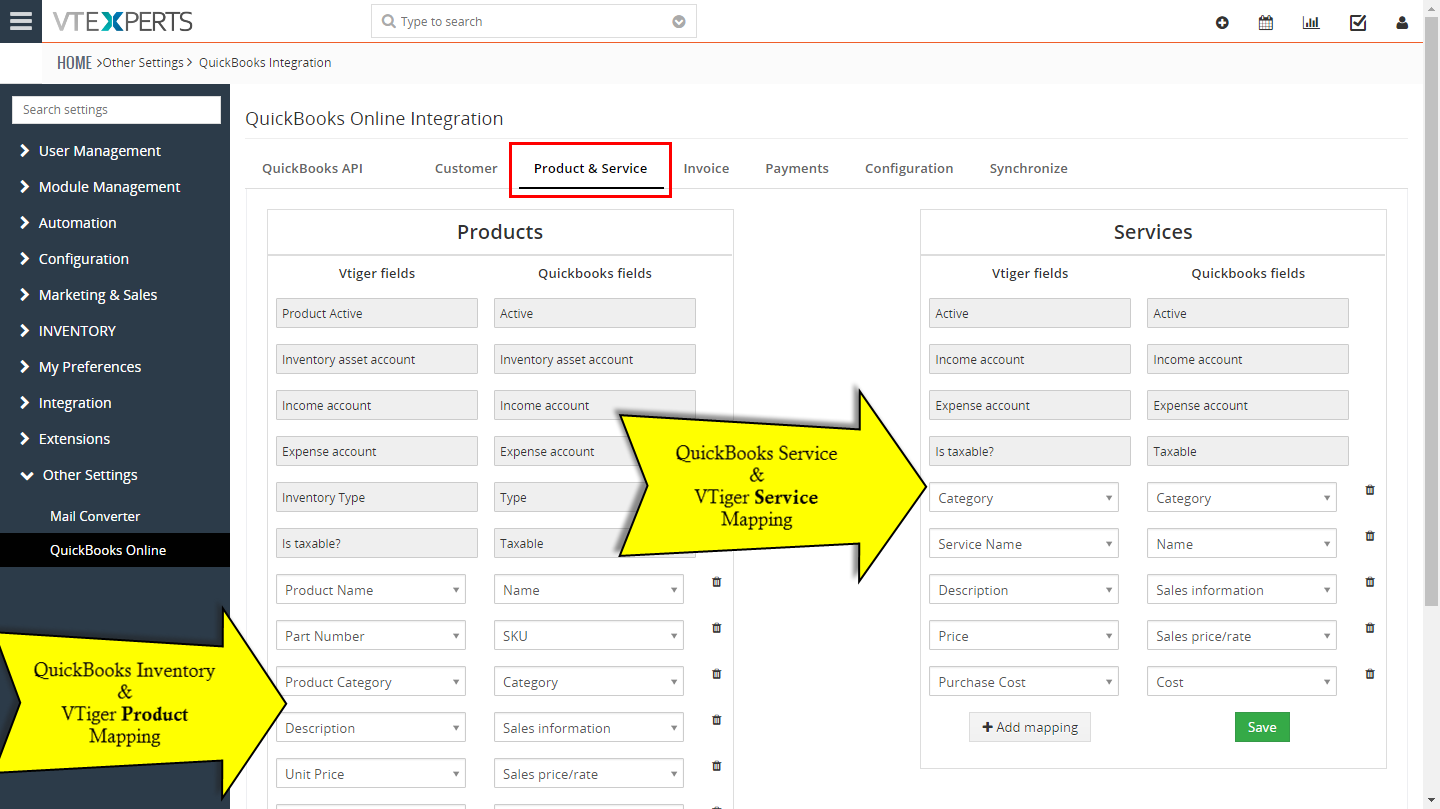
Products and Services
The integration fully supports 2-way synchronization for products and services. The mapping is self-explanatory – you can easily map fields from QuickBooks into VTiger in the mapping tab. Some of the fields are required and mapping can not be removed or changed.
- Active: field that exists in both VTiger and QuickBooks.
- Inventory Asset Account: this is a required field in QuickBooks and has a predefined list of asset accounts. In order to accomodate this requirement, we created a picklist field in VTiger. Picklist values are synched automatically as you add them in QuickBooks or VTiger.
- Income Account: this is a required field in QuickBooks and has a predefined list of income accounts. In order to accommodate this requirement, we created a picklist field in VTiger. Picklist values are synched automatically as you add them in QuickBooks or VTiger.
- Expense Account: this is a required field in QuickBooks and has a predefined list of income accounts. In order to accommodate this requirement, we created a picklist field in VTiger. Picklist values are synched automatically as you add them in QuickBooks or VTiger.
- Inventory Type: this is a product type(Inventory, Non-Inventory) in QuickBooks. In order to accommodate this requirement, we created a picklist field in VTiger
- Is taxable: this field indicates if the product/service is taxed. It’s a very important field and you carefully read “Taxes” section in this user guide to understand how it works.
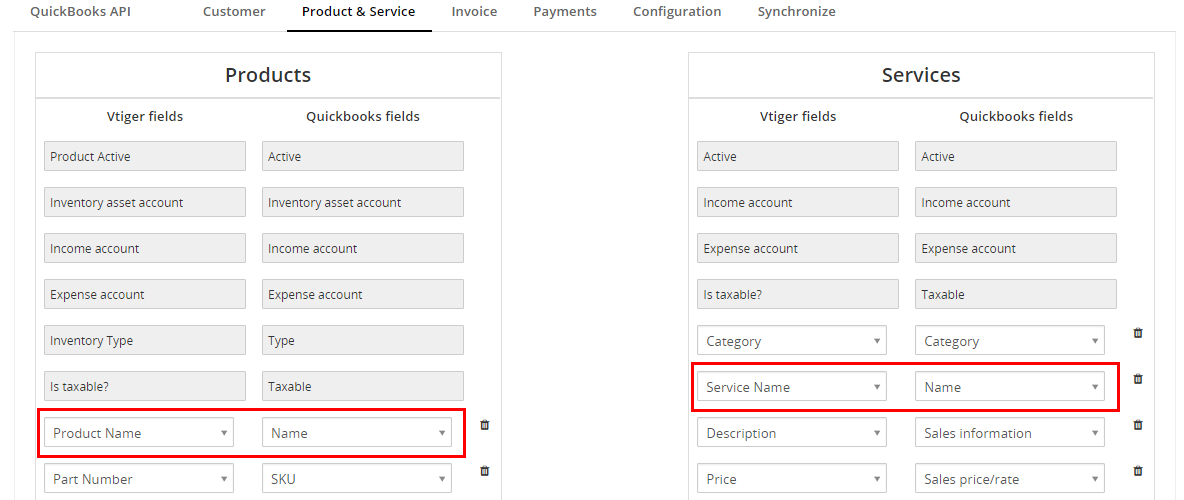
Conflicts + Matching (On First Sync)
The way QuickBooks treats products and services is different than VTiger does. In QuickBooks, the product/service NAME field is a unique identifier and you can not have the multiple product with the same name.
If your VTiger product/service names match up with QuickBooks – that’s great! However, if you use a different identifier (such as part number) for your QuickBooks product/service name – you probably want to map “Quickbooks Name” field into a different field in VTiger than Product/Service Name.
If a match is found in QuickBooks and VTiger (on first sync or conflict) – the data will be merged based on Primary Data Source setting. Again, we are matching it against “QuickBooks Name” field and whatever you have mapped in the mapping.
QuickBooks Field Block on Products/Services
Once extension is installed, several new fields will be created on products and services. All of those fields are explained at the mapping section.

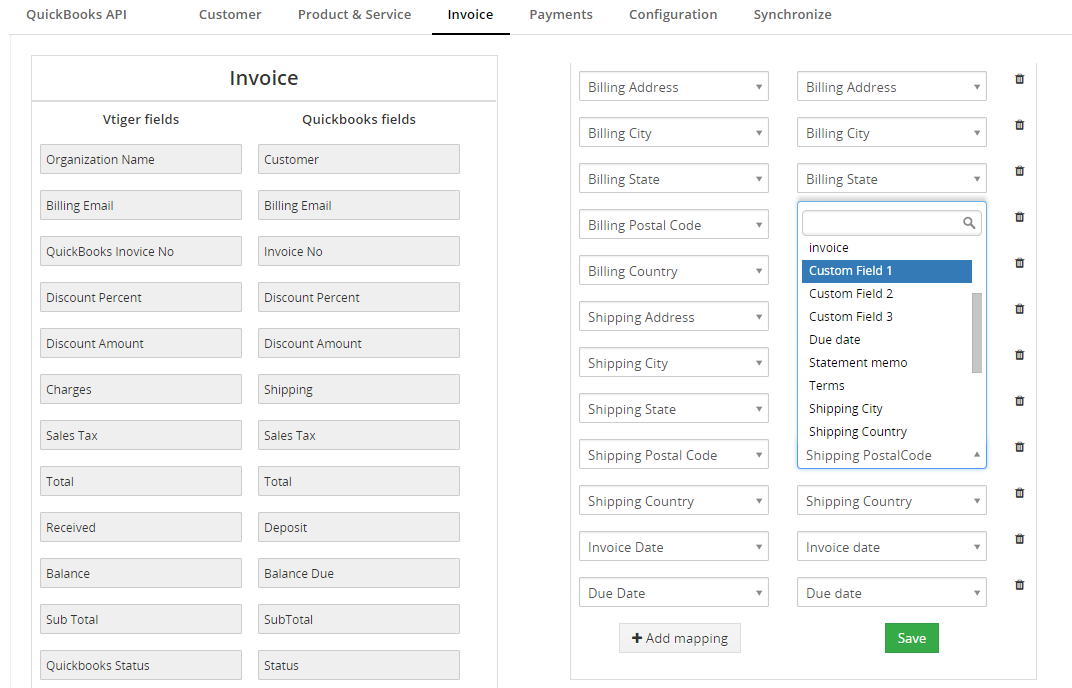
Invoice
Invoice synchronization is probably the most important piece of this integration. It was designed to fully support 2-way invoice sync.
In the configuration, invoice fields can be mapped from Quickbooks to/from VTiger, which also includes custom fields.
Hardcoded fields in the mapping are self explanatory, it mostly includes the fields from the totals and item details sections. You can not remap or change those fields.
QuickBooks Field Block on Invoice
Once extension is installed, several new fields will be created on the Invoice.
- Sync to QuickBooks: It’s a yes/no field. It will be used to tag the record to be synched to QuickBooks. Each record has to be set to “Yes” in order for it to be synched to QuickBooks. (You can also do mass update using VTiger interface). This field will get set to “Yes” automatically when an update or new record is created from QuickBooks.
- Last Date Synched: Last date the record was successfully synched either direction. This field is not editable.
- QuickBooks Invoice No: It gets updated when invoice is synched from QuickBooks to Invoice. It stores Invoice number generated in QuickBooks.
- QuickBooks Status: It gets updated with invoice status in QuickBooks. Field is not editable in Quickbooks or VTiger. It’s automatically set in QuickBooks. (Due, Partially Paid, Paid, Overdue)

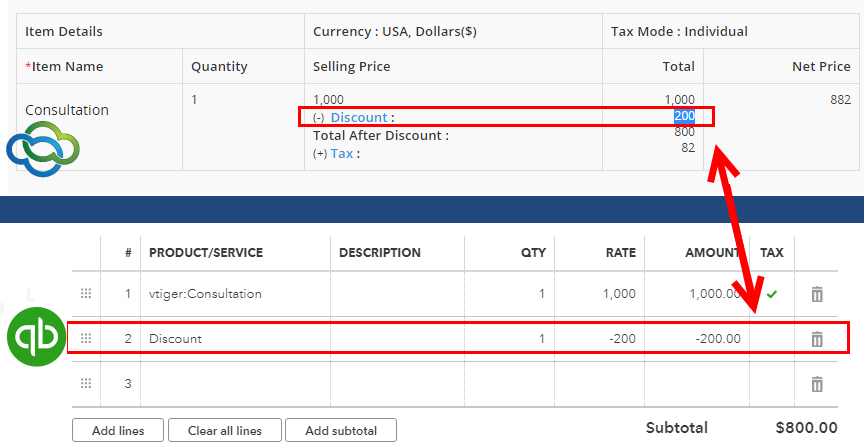
Discounts
Quickbooks handles discounts differently than VTiger does. If you are a QuickBooks user, you probably know that in order to add a LINE discount – you have to add a “Discount” item, add quantity and then negative amount. It’s a tedious process, however that’s the only way to apply line discounts in QuickBooks Online.
In VTiger on the other hand, you can apply amount ($) and percentage (%) discounts directly on the line item. In order to accommodate both applications, here’s how it was designed:
If you add an amount ($) or percent (%) discount on the line item in VTIGER – then the invoice is synched to QuickBooks, will automatically create a new line for “Discount” with the discount amount.
If you add a Discount line item below a product/service in QuickBooks – then the invoice synched to VTiger will automatically add discount amount ($) on the line item above.
As far as you are concerned – you don’t need to do anything special and it will work out of the box.
Taxes
The integration supports tax sync, however you will need to do and make sure that your QuickBooks and VTiger are both setup properly to avoid any inaccurate amounts.
In QuickBooks Online, you can no longer set your own tax (%) and all taxes come pre-set, meaning that in order to properly sync data both ways – we will need to use QuickBooks tax configuration as the primary setting. We are going to assume that you have already selected your state tax in QuickBooks and applied it to products/services. (This is usually done when you start using quickbooks and create products/services).
In our example, we will use Illinois tax, since we are located in Illinois.
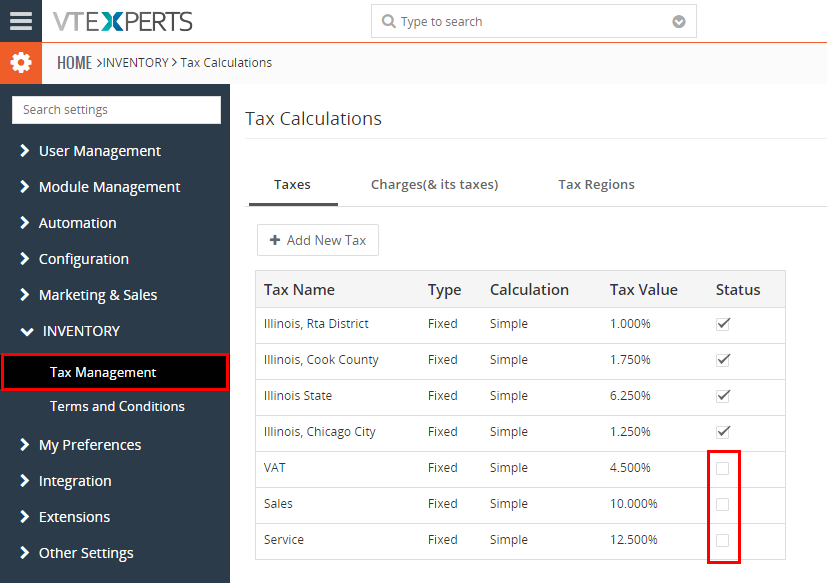
Disable Standard VTiger Taxes
You will need to disable all the taxes that are not used in VTiger. Go to CRM Settings > Inventory > Tax Management. There you need to uncheck taxes that did not come from Quickbooks. (if you already ran the sync – the taxes have already been created in VTiger).
*It’s very important to turn off all the non quickbooks tax, otherwise the amounts will not be correct when synching from/to vtiger/quickbooks.
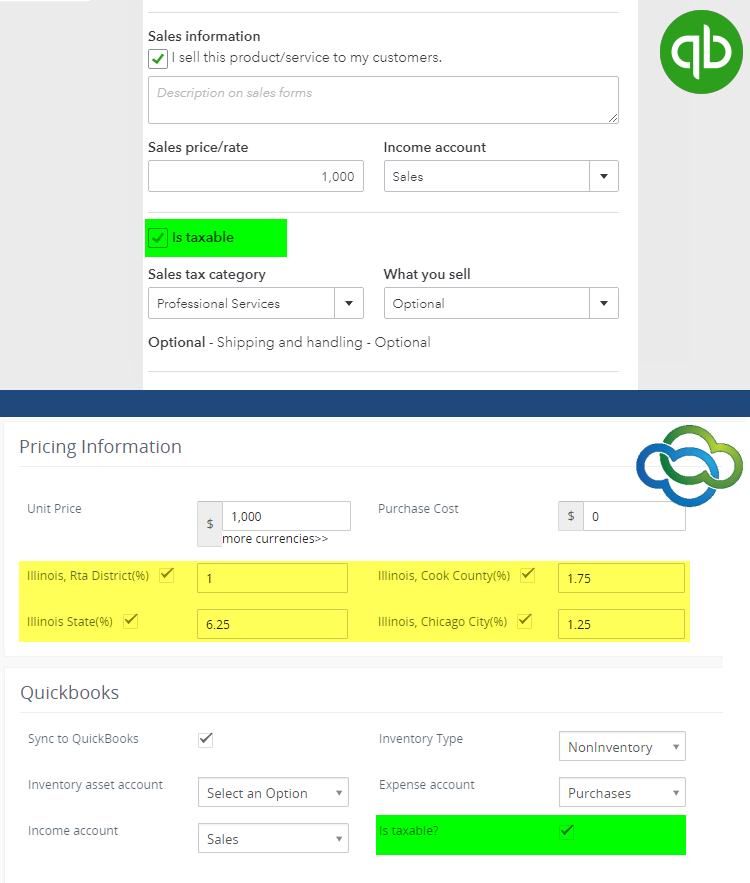
Sync Taxes to Product/Service
If you are using taxes in QuickBooks, you likely have some products/services that you charge tax for. In QuickBooks – it’s very simple to enable the tax for product or a service (check the box “Is taxable” and you are done).
In VTiger – taxes are more flexible and user can enable a single tax per product/service, while in QuickBooks it’s all or nothing. In order to properly sync taxes both ways – we are also enforcing that taxes on the product/service in VTiger have to be all set (or none).
We added a field “Is taxable” on VTiger product/service and it works exactly as in QuickBooks.
If “Is taxable” = yes, then the taxes on product/service will be enabled. (By setting to Yes, tax fields are automatically enabled on vtiger service/product).
If “Is taxable” no, then taxes on product/service will be disabled. (By setting to No, tax fields are automatically disabled on vtiger service/product).
Sync Invoice with Taxed Product/Service
When the invoice sync from/to quickbooks/vtiger with an item that is taxed, it should come without any issues. When you add taxed products and services to QuickBooks Invoice – the “Tax” checkbox is automatically checked, which indicates the item is taxable.
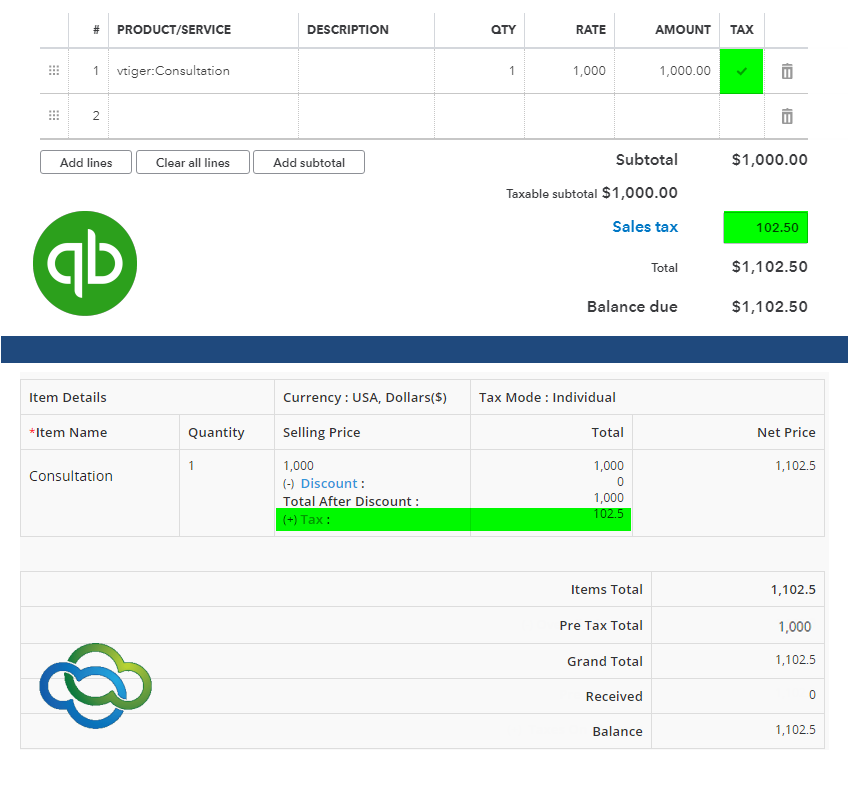
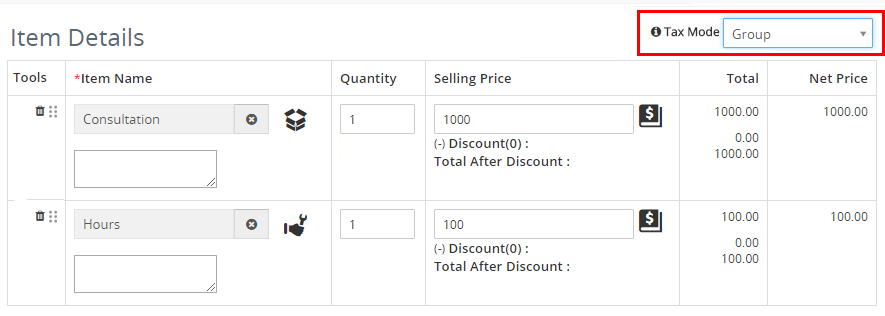
Tax Mode – Individual vs Group
There are few things you need to keep in mind when synchronizing taxed products/services.
If you set “Tax Mode” as “Group” in VTiger’s Invoice – all the products/services (even if they are set as NON taxable on record level) will sync as TAXED to Quickbooks. (Group mode means that you want to apply tax to all the items regardless, however such mode doesn’t exist in QuickBooks so we apply tax to all items during the sync)
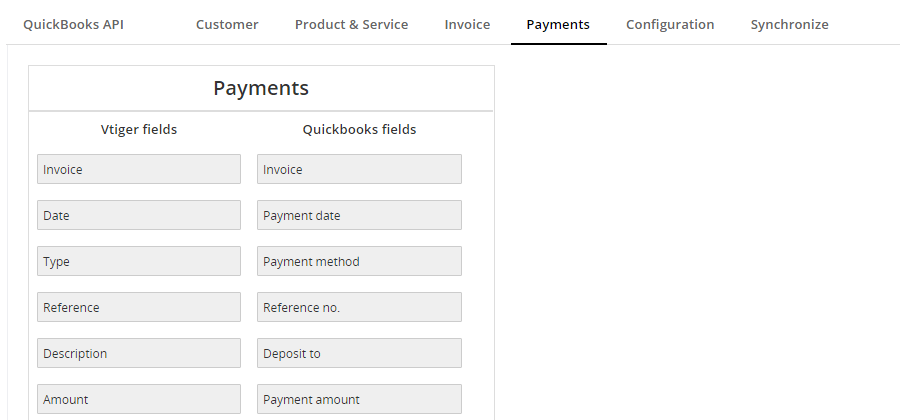
Payments
Payments sync is only supported one direction, and that is QuickBooks to VTiger. In addition, to sync payments, you will need to install Payments extension from our extension pack.
To ensure data accuracy – None of the fields are editable in the mapping
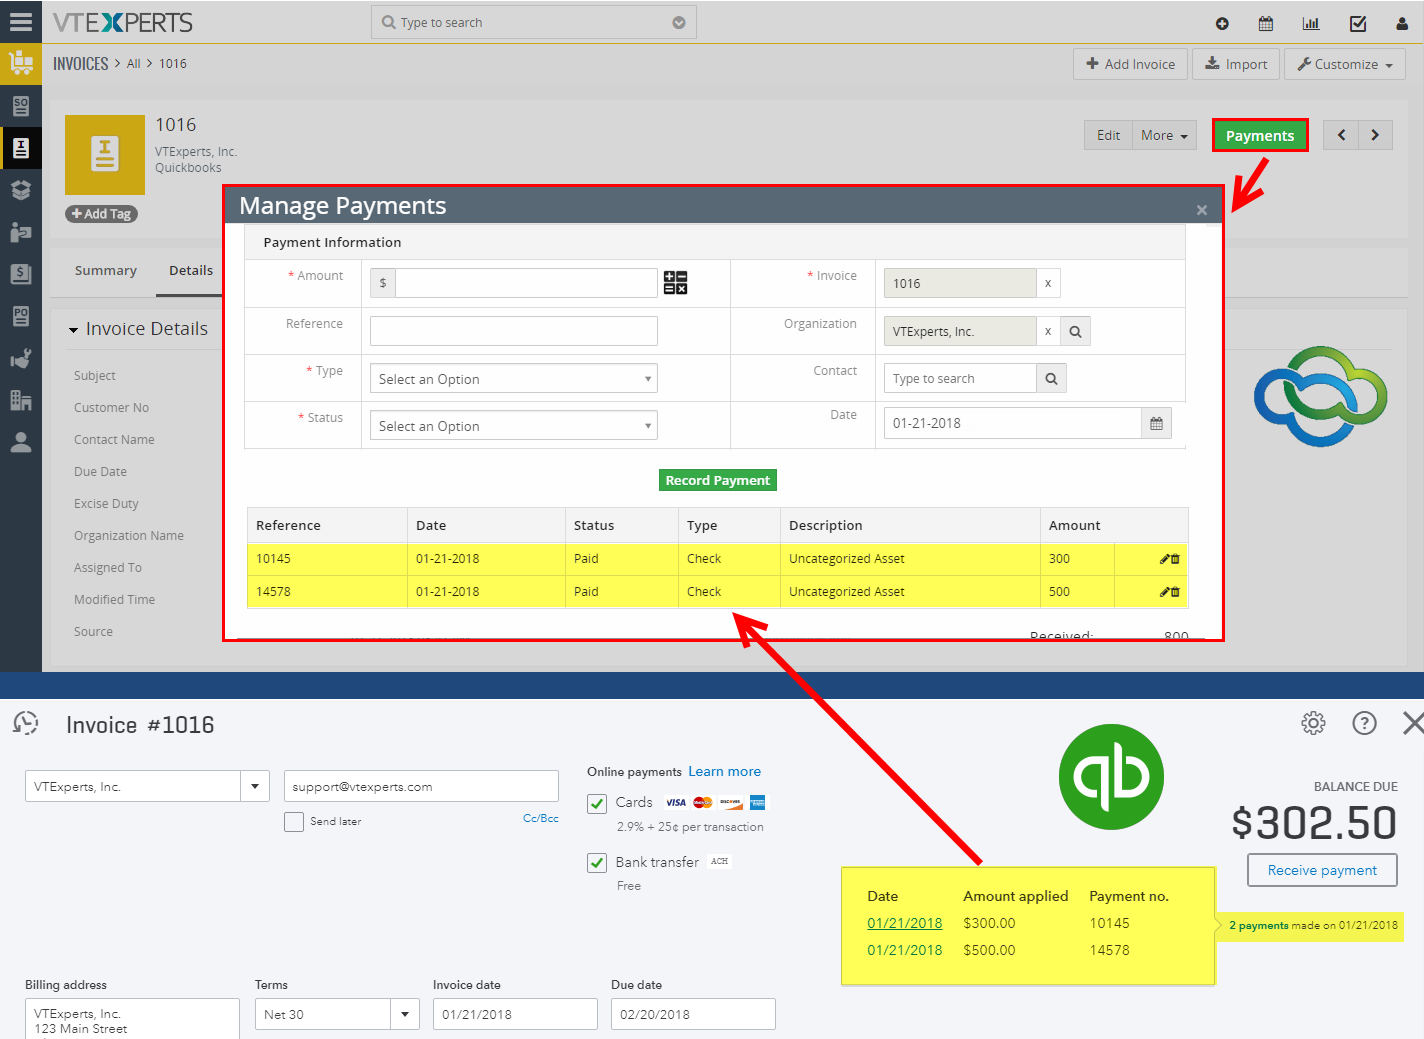
Payments synched from QuickBooks show up in the Payments area on the Invoice. To access it, click “Payments” button.
How to Sync: VTiger to QuickBooks
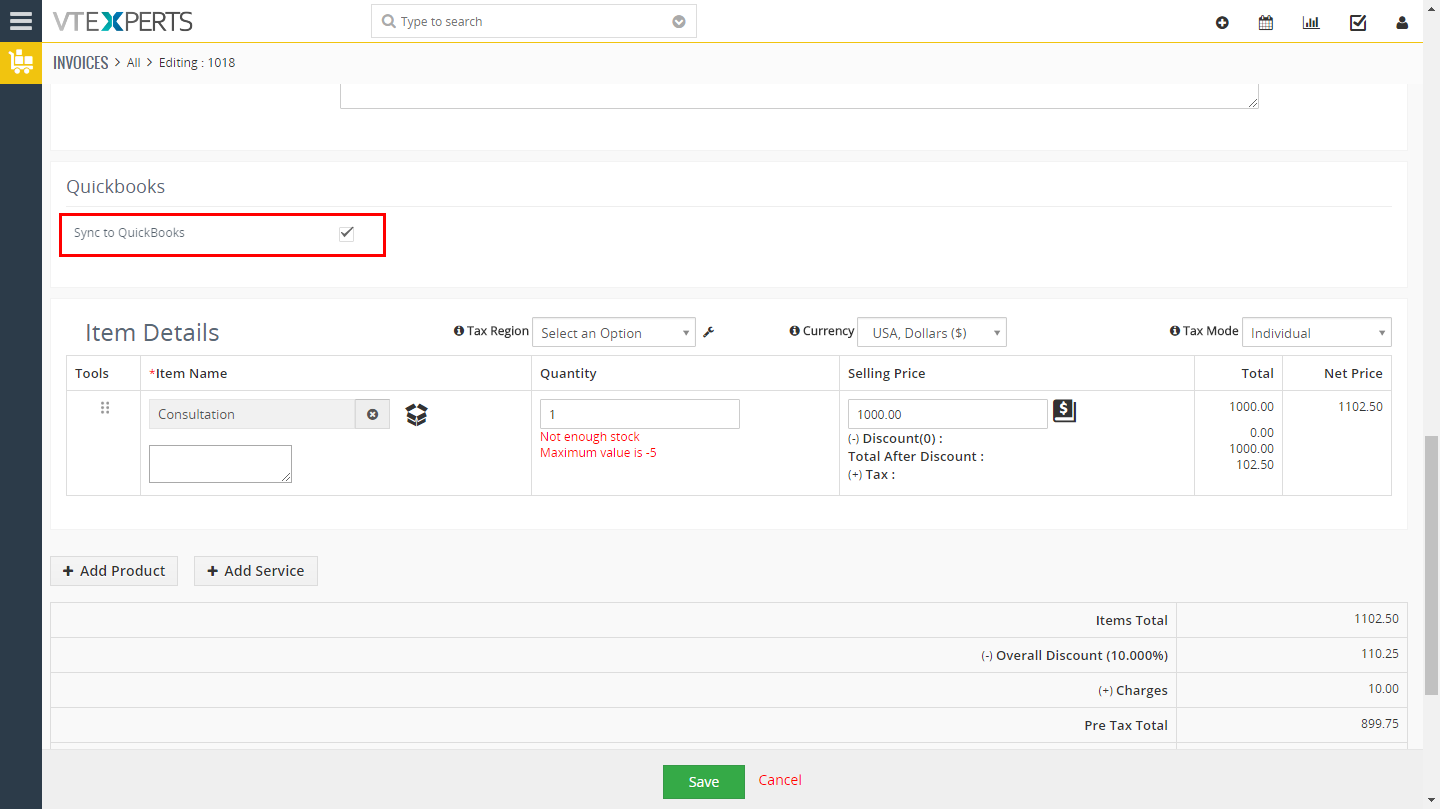
Assuming you went through the checklist and are ready to sync the data – it’s going to be very simple. In order to sync data from VTiger to QuickBooks – you simply need to open a record you want to sync i.e Organization or Invoice and set the field Sync to QuickBooks to “Yes”.
Once the checkbox is checked, the record will be added to the queue.
Next, you will need to go to QuickBooks Online configuration area in VTiger and hit Sync to QuickBooks .
This will then send all the records from queue (including the one you just checked) into QuickBooks. (If you cant find the record in QuickBooks – please check the QuickBooks Logs (click the button) and see why it failed. In most cases the message will be very clear.)
How to Sync: QuickBooks to VTiger
Assuming you went through the checklist and are ready to sync the data – it’s going to be very simple. In order to sync data from QuickBooks to VTiger – you need to make sure you set a proper date in the configuration area – Synchronize tab. This date will determine which records will be synched to VTiger.
For example, if you set a date of “01/01/2018″ for invoices, that means that ONLY invoice created (in QuickBooks) after 01/01/2018 will sync to VTiger. Basically, this is a safe guard so you don’t import entire QuickBooks database by accident into VTiger.
Next, you click Sync to VTiger and the sync will then start. (If you cant find the record in VTiger – please check the QuickBooks Logs (click the button) and see why it failed. In most cases the message will be very clear.)
Important Sync Information
Integration with an accounting system, such as QuickBooks is not a straight forward process and often things are done differently in VTiger. We’ve written up some of the limitations as well as things that you should be aware of.
- Sync will NEVER delete any data. (If you delete invoice in Quickbooks – the invoice will still remain in VTiger until you delete it from VTiger. Due to security concerns, delete function was not implemented).
- Any NEW record that is created in VTiger (from QuickBooks) – will be assigned to a group “QuickBooks“. (QuickBooks group is automatically created during the install. This should allow you to restrict access to certain people by configuring vtiger permissions utilizing that group).
- New Invoice created in VTiger (from QuickBooks) – will have a subject of “QuickBooks Invoice Number”, unless you’ve mapped Subject to another field. (Subject is mandatory field in VTiger and we use quickbooks invoice number to fill it out).
- If you set “Sync to QuickBooks” = “Yes” on the Invoice, however if the Organization has not been set to “Sync to Quickbooks” – then the organizations and invoice will still be synched to QuickBooks, because the invoice was set to sync. (This only applies to Invoices – it is required to sync customer together with the Invoice).
- Picklist fields on the Products/Services (Income Account, Expense Account, Inventory Type) are automatically updated every time you add new value in VTiger or Quickbooks (it sync automatically both ways).
Limitations
1. Product Bundle Sync is NOT supported.
2. You can not set “Sync to QuickBooks” field via workflow. If you setup workflow to do so, it will not add records to the queue properly. Instead, you just need to set default value for ‘Sync to Quickbooks’ to yes.
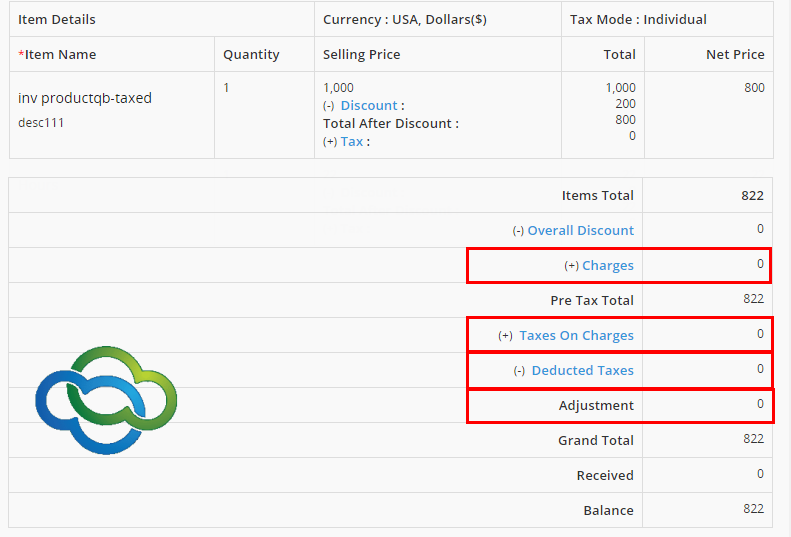
3. Invoice “Total” fields are not supported: Charges, Taxes On Charges, Deducted Taxes, Adjustment. (Simply because there’s no equivalent to this in QuickBooks, so even if you add data there – it will not sync).
4.
Multiple discounts can not be added one after another. (If you add multiple discounts, one following the other – the second discount will not be applied when synchronizing to VTiger. The reason for that is – the discount below the product is converted into product/service discount on VTiger (see discounts section for details)). This only applies from QuickBooks to VTiger.

QuickBooks API Connector
You will need to enable QuickBooks API by authorizing your account to use “Intuit Developer” area. The process is very simple and only takes few clicks.
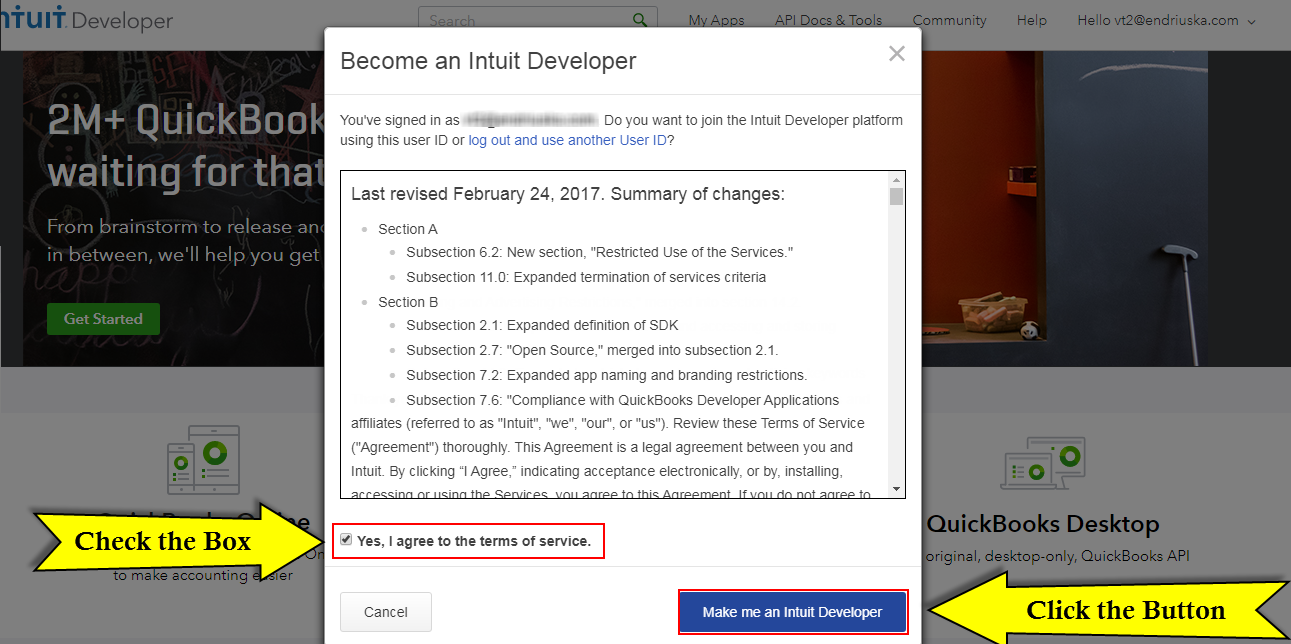
1. “Become an Intuit Developer”.
- Go to the link https://developer.intuit.com/ (will open in new window)
- Agree the terms of service
- Click “Make me an Intuit Developer“.
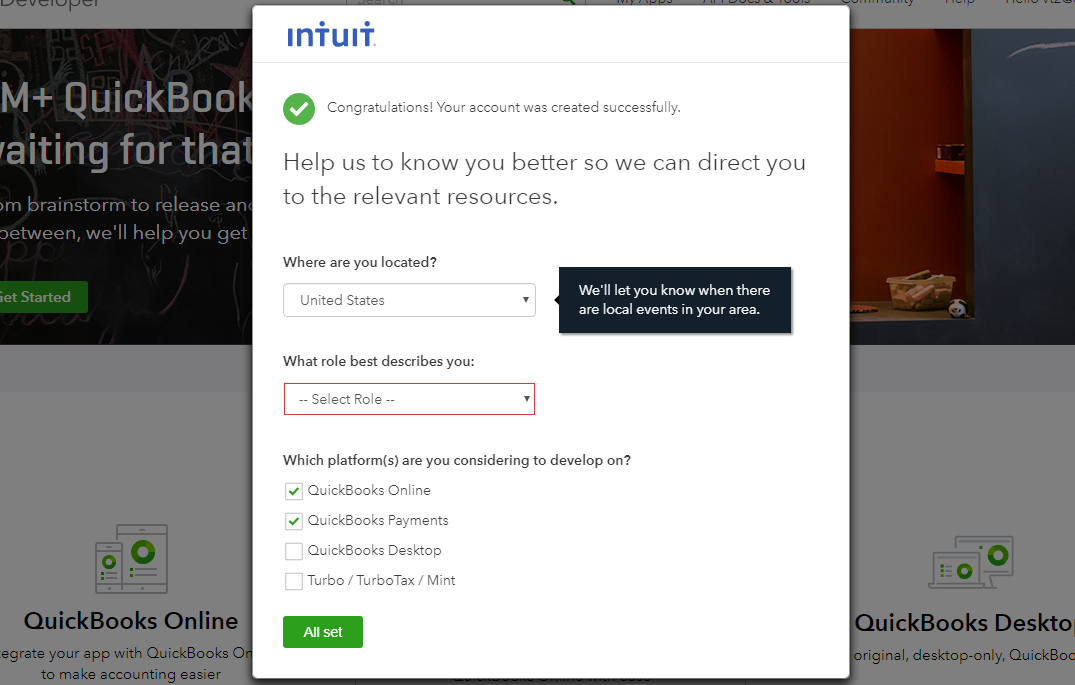
2. Confirm and enter details.
- Please select your Location,
- Select any Role (any – does not matter)
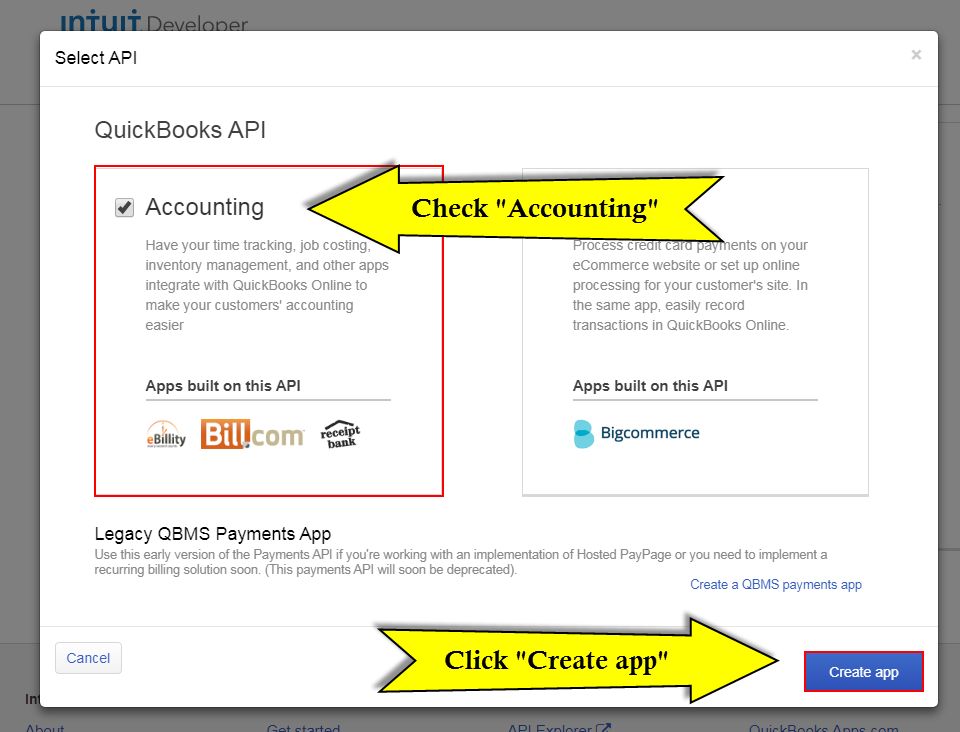
- And check “QuickBooks Online” and “QuickBooks Payments“.
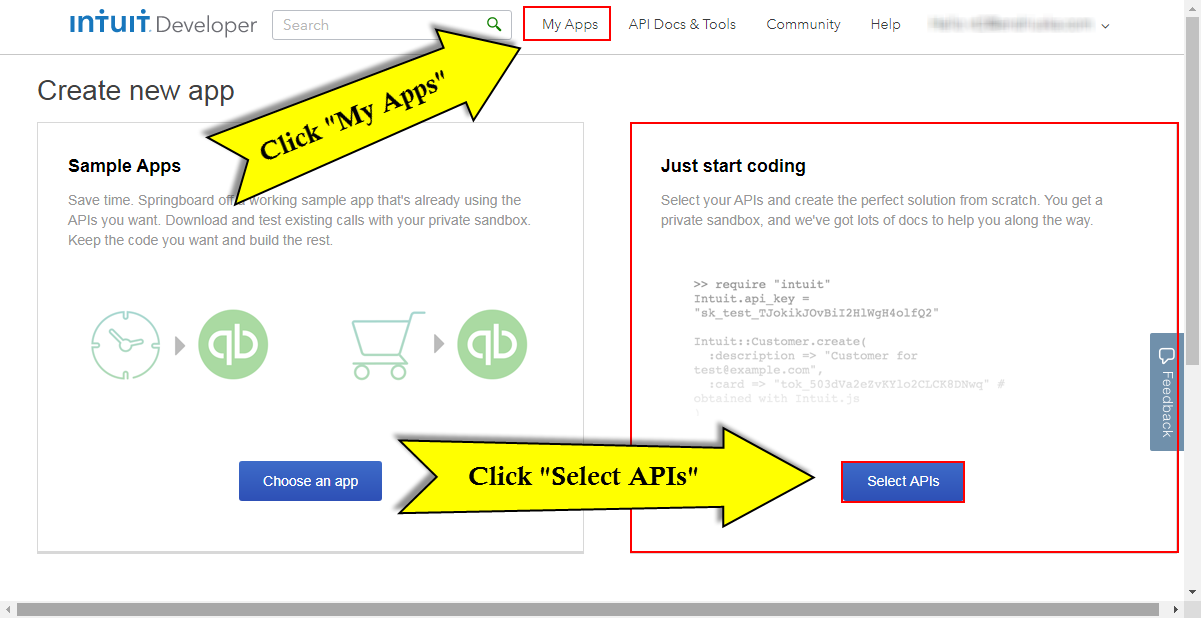
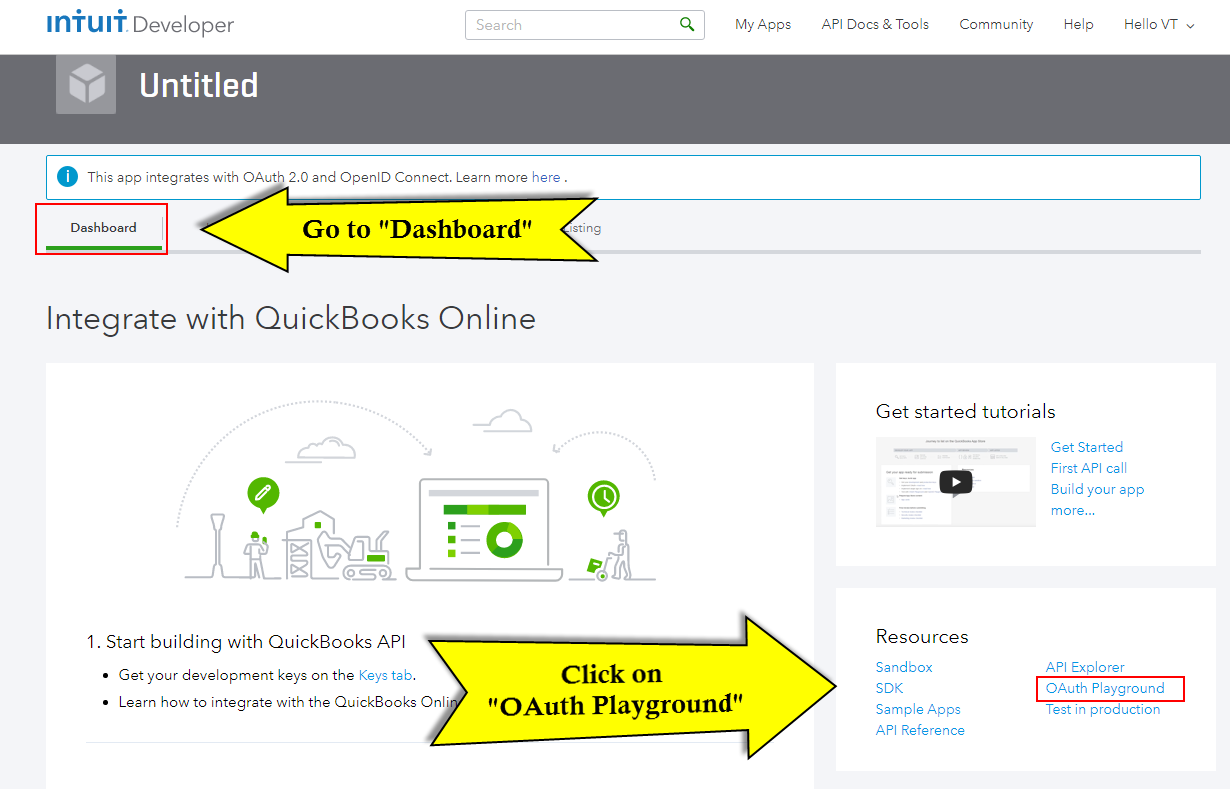
3. Start new app
- Click “My Apps” (on the website navigation menu)
- and button “Select APIs”
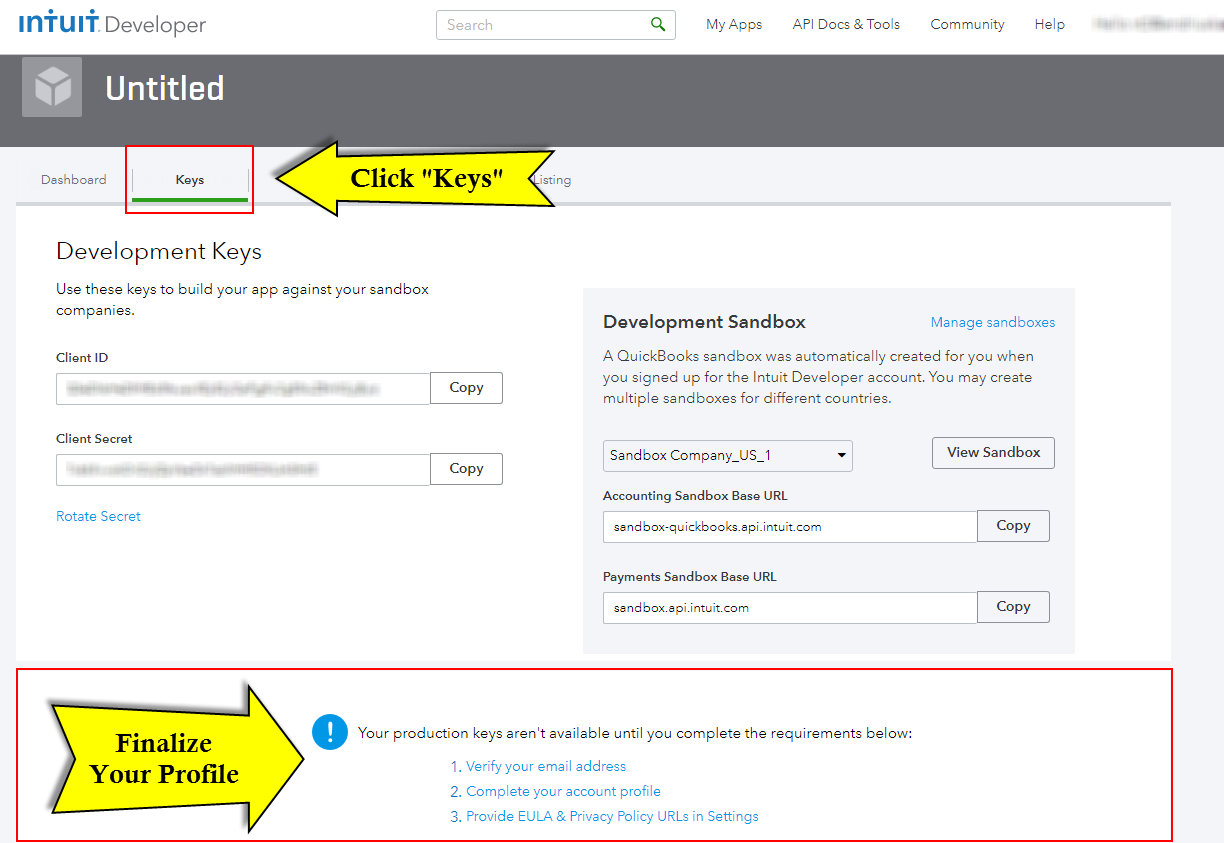
5. Verify Details
Next, click on “Keys” and you will need to verify your email address, complete your account profile (if you are currently using QuickBooks – likely you have already done this, so you just might need to complete step #3).
- Click on each request e.g “Verify your email address” and follow the prompts.
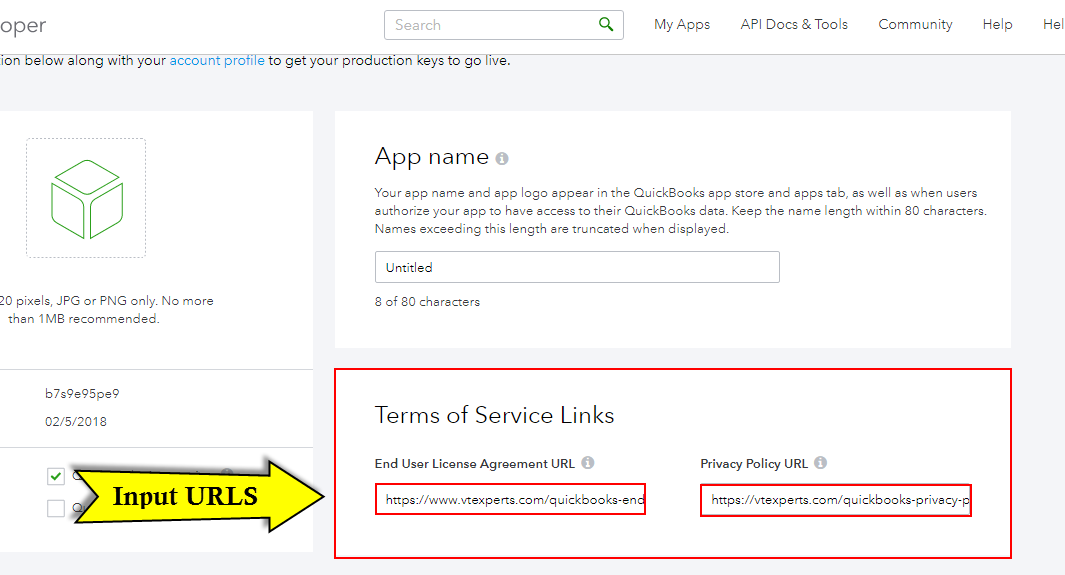
6. Validate Provide EULA & Privacy Policy URLs:
- Click on “Provide EULA & Privacy Policy URLs in Settings” and enter the following urls:
- End User License Agreement URL: https://www.vtexperts.com/quickbooks-end-user-license-agreement-url
- Privacy Policy URL: https://www.vtexperts.com/quickbooks-privacy-policy-url
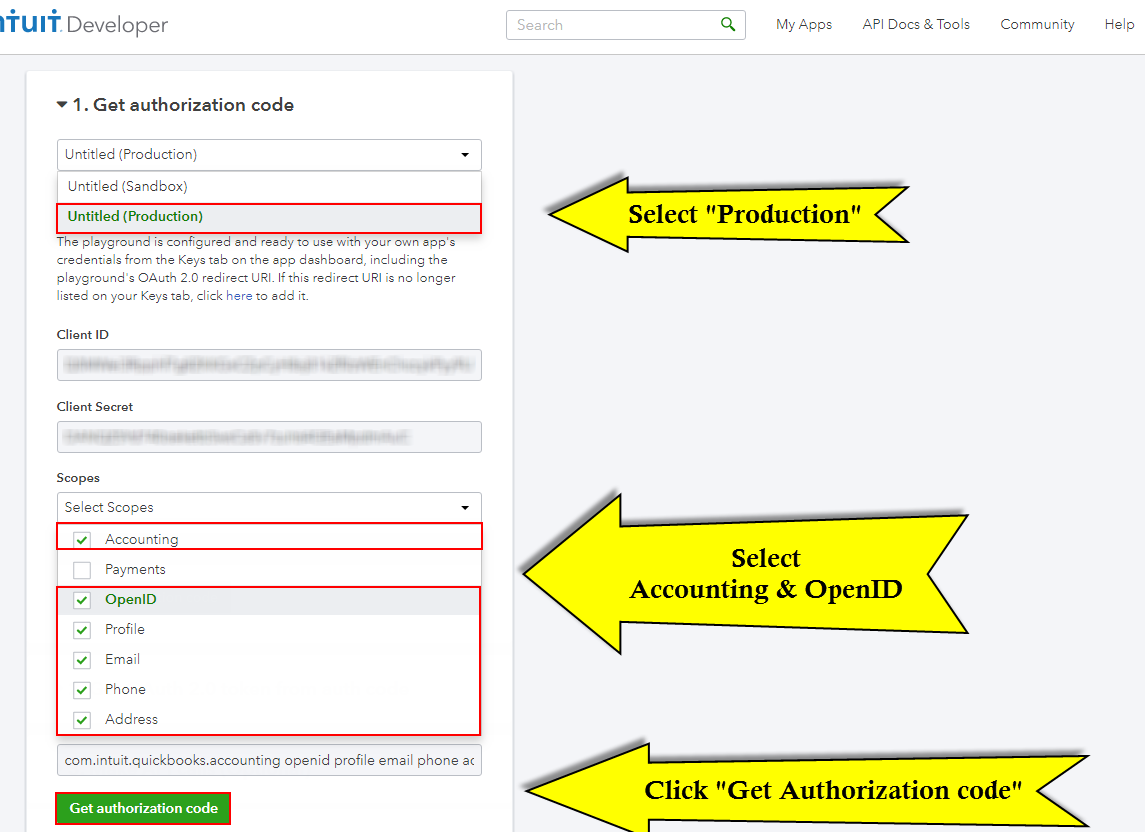
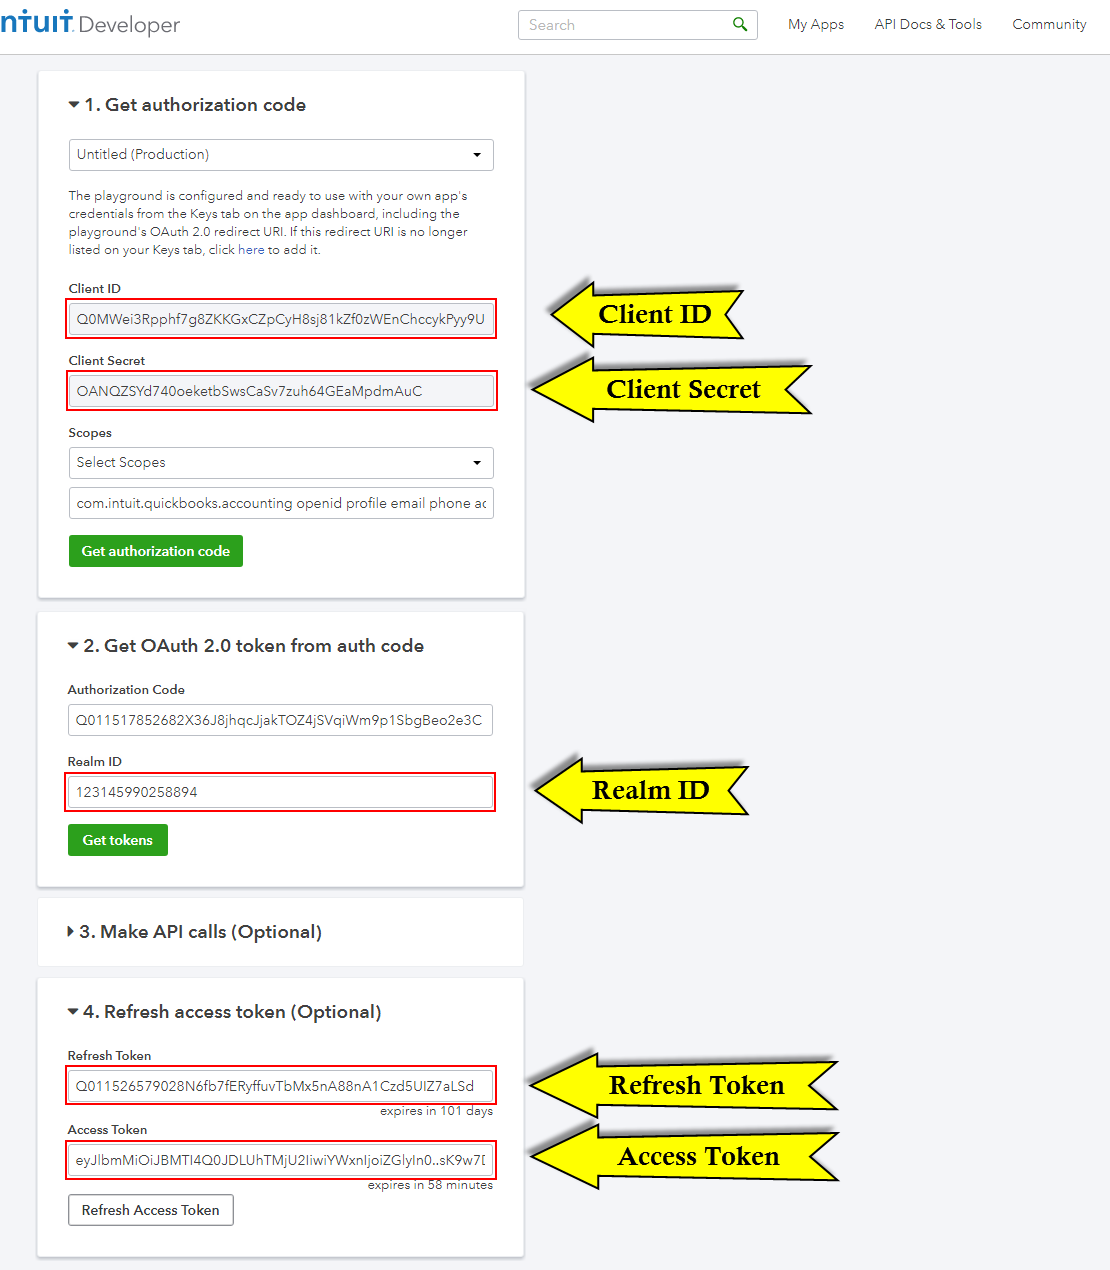
8. Get Authorization Code
- Select “Untitled (Production)“
- Select Scopes – “Accounting” and “Open ID”
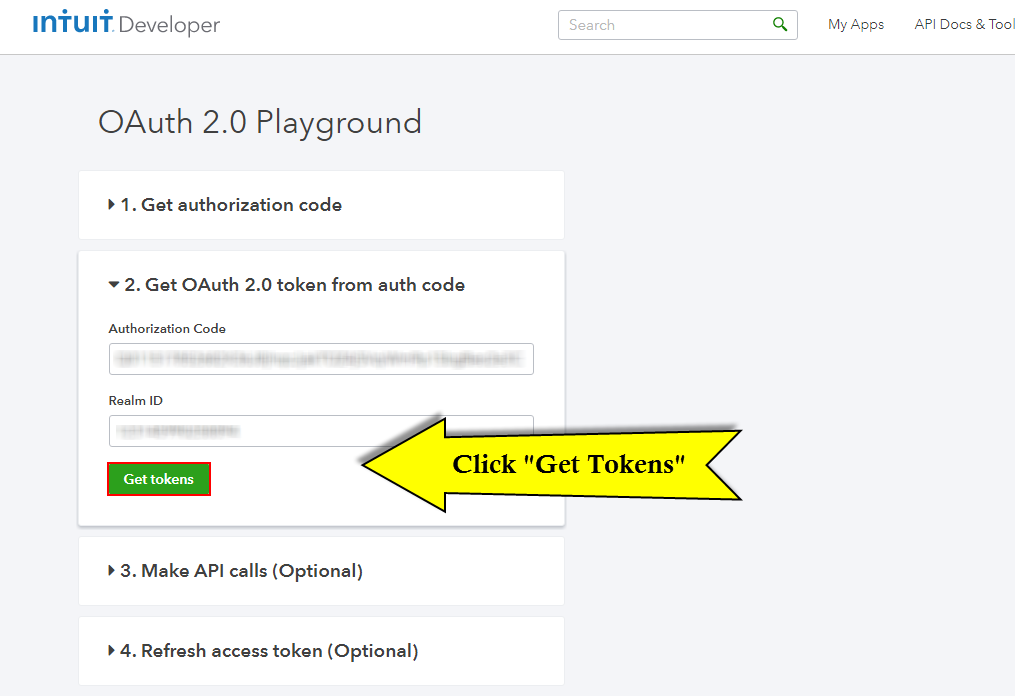
10. Retrieve Tokens
- Expand “2. Get OAuth 2.0 tokens from Auth code”
- Click “Get Tokens”
11. Copy QuickBooks API Keys.
- Copy keys from the page and paste them into QuickBooks API Tab (in vTiger)
13. Enter API keys in VTiger.
- Go to QuickBooks Online Extension
- Open “QuickBooks API” Tab
- Enter keys from QuickBooks