

Timesheets is an extension for VTiger designed to elegantly track employee (user) time, with ability to visualize it. It supports custom periods, where you can adjust the length of the period to fit your business. In addition, periods can be locked to prevent any further modifications. It’s simplistic design, makes it extremely easy to log the time and specify the reason, description as well as associate it with an existing record in VTiger.
It supports imports and exports (only for admins) as well as automatically calculates totals for the period and displays them in a very easy to understand manner. Timesheet extension can potentially be used to do payroll or track contractors.
Configuration
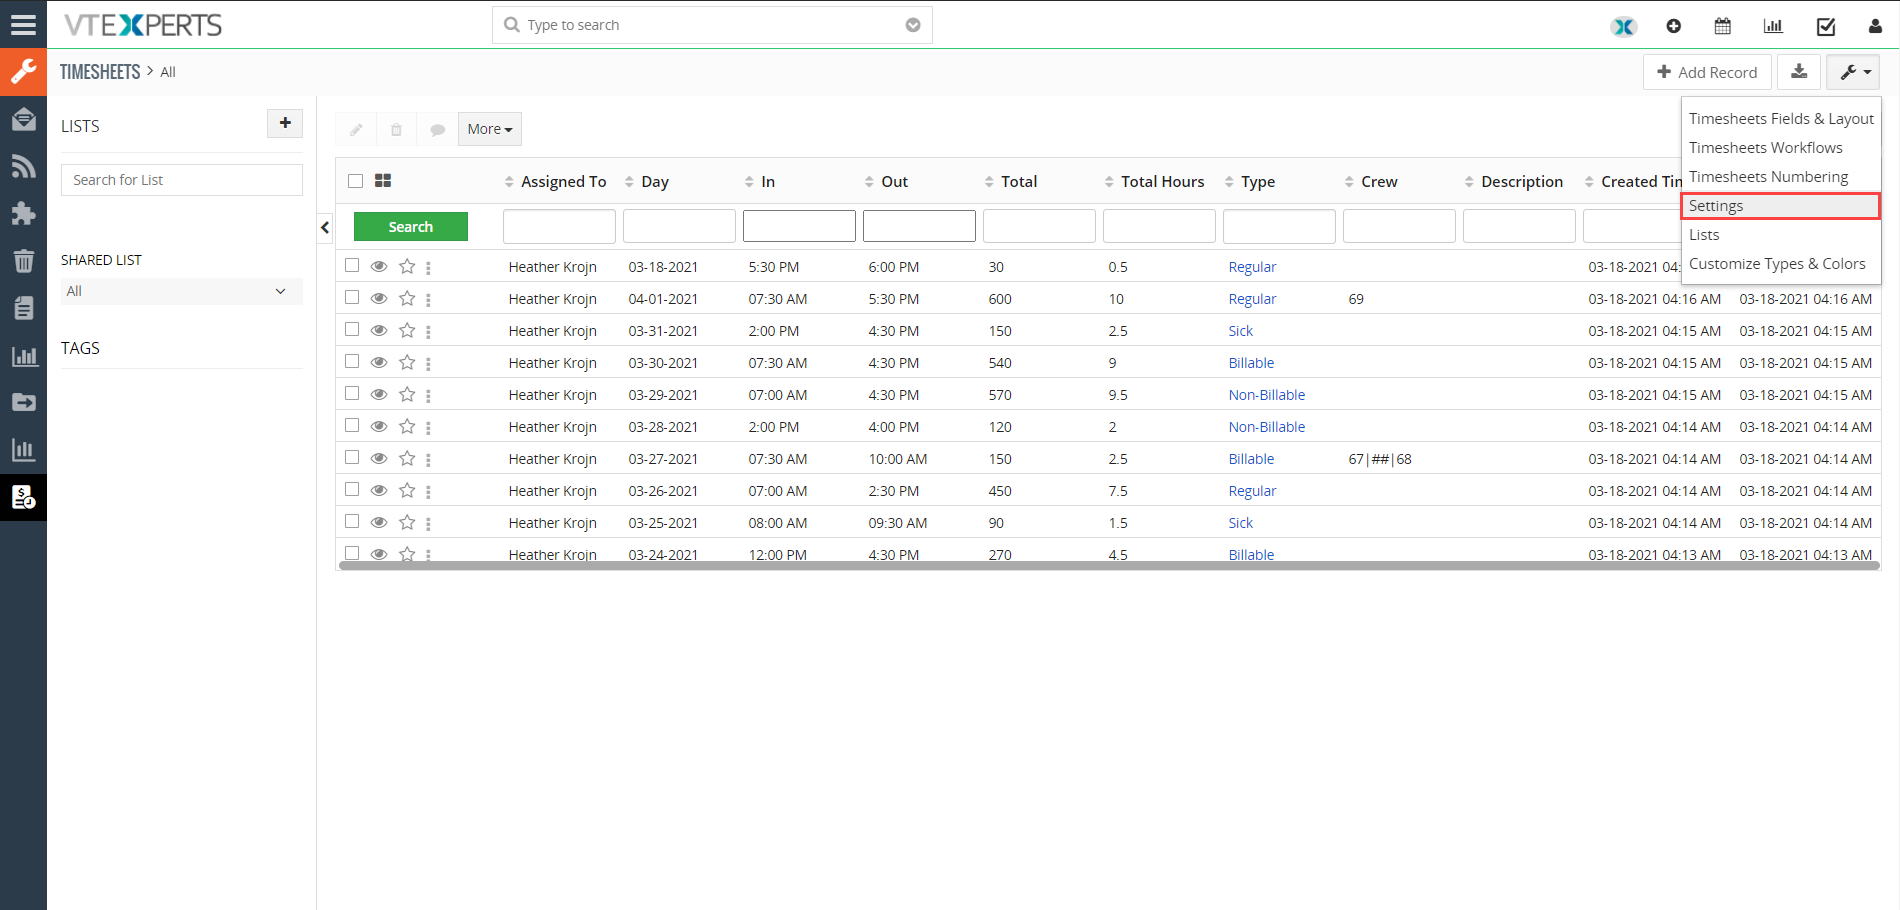
The extension can be configured by going to the VTiger Main Menu > Settings > CRM Settings > VTiger Premium > Timesheets.
The same configuration panel can also be configured by going to the VTiger Main Menu > Projects > Timesheets > Customize (dropdown button at the top right) > Settings.
Once you’re in the settings area, you’ll see several options to be configured. Let’s take a look at them:
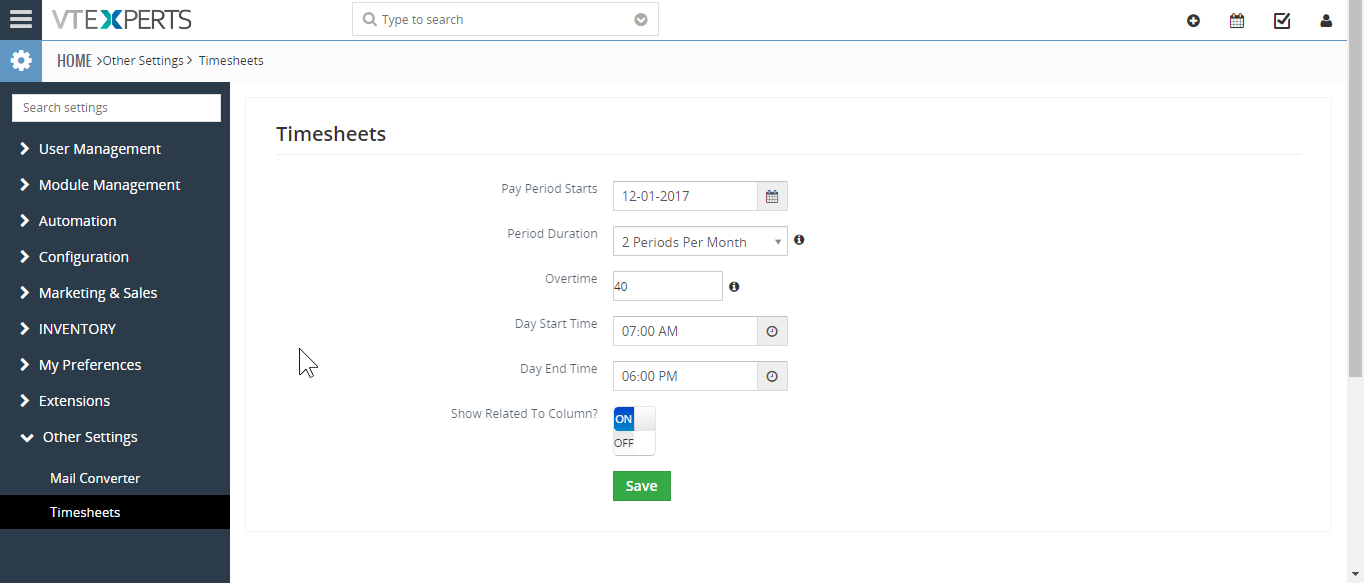
Pay Period Starts: This allows you to set the date from which the paying system will start
Period Duration: This is the duration for which one Pay Period will last. After that, it will renew automatically. You can select “7 Days”, “14 Days”, or “2 Periods Per Month”, so that will start the next Pay Period after 15 days
Overtime: Specify the regular number of hours for users. The hours more than the specified will be considered as overtime. Leave it blank if you do not want to configure any overtime and mark all the hours worked as regular
Day Start Time: Instead of filling the sheet with complete number of hours from 0-24, you can set the time of the day when the users start working
Day End Time: This will be the time when the day is supposed to come to an end
Show Related To Column? Turn this switch on or off according to your needs if you want the “Related to” column be available on the time sheets
Once you’re done with the configuration, hit “Save” to apply the settings.
Understanding the Timesheet
Let’s understand the view, information available, and columns of the Timesheets.
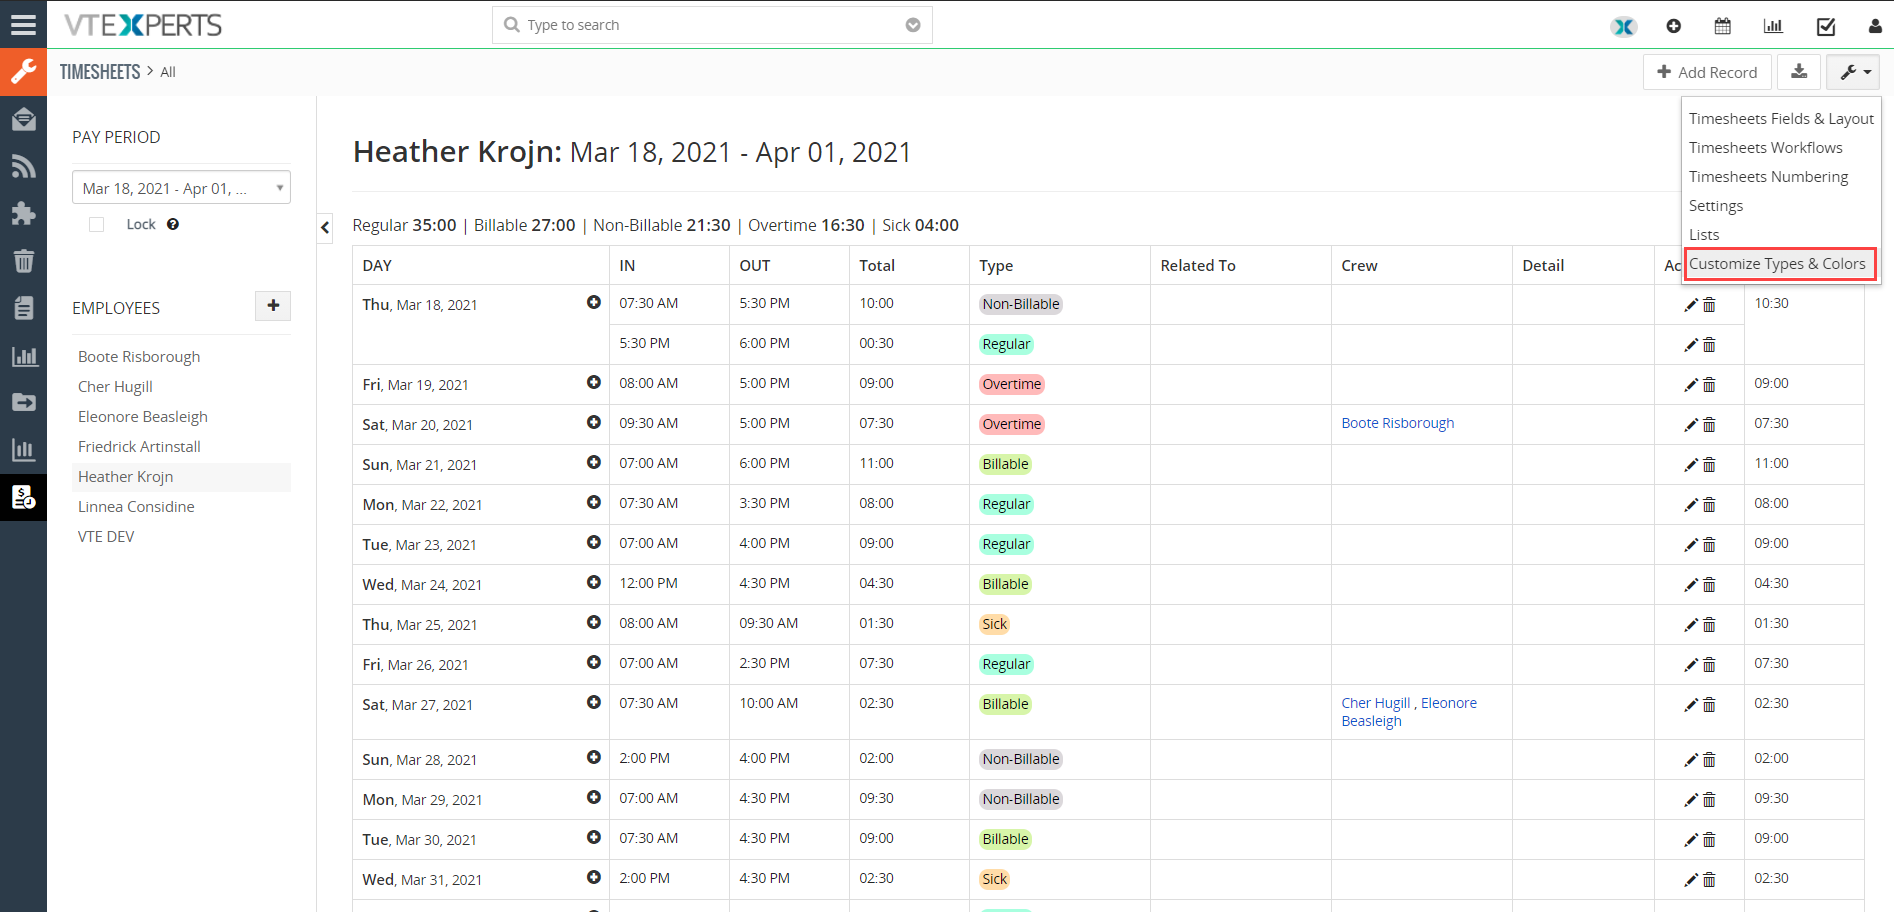
“Timesheets” gets added to the CRM as a new module in the Main Menu. Once you go to the Main Menu > Sales > Timesheets, you will see something similar to the following:
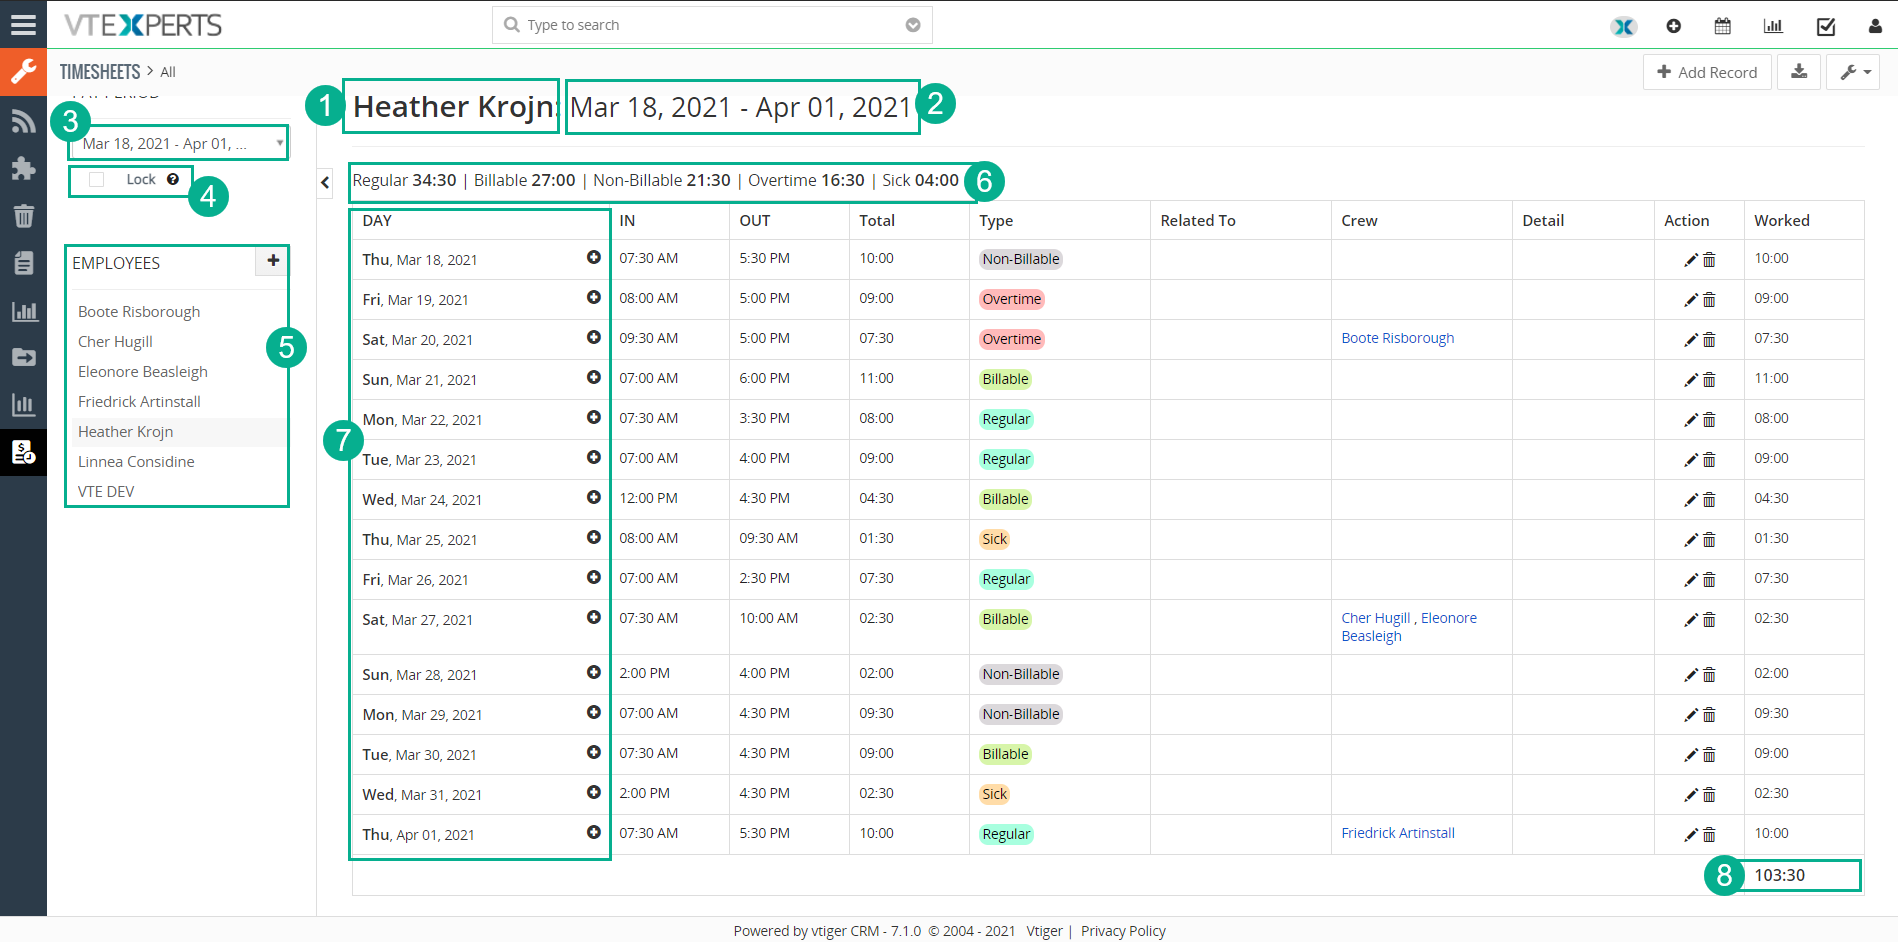
Let’s see what each block is for.
- First block in the image above is showing the name of the user for which the time-log is being viewed
- Second block shows the Pay Period selected currently
- Number 3 is the drop down named as “Pay Period” that gives you the option to select a specific pay period from the list and view the time-logs for it
- The “Lock” checkbox, if selected, lets admins to lock the sheets for users so no modifications can be made after its been reviewed or a specific date is passed
- Below “Lock” is the list of the users you have enabled the time sheets for. You can add more users using the [ + ] icon which gives the list of the remaining users that are not already in the list
- Sixth block in the list is showing the types of the hours categorized and totaled. The “Types” of the hours are selected while adding a time log and configured in the “Customize Types & Colors” (discussed later)
- The #7 is the column that enlists days for the selected Pay Period. Each row shows a day to which multiple hours can be added (discussed later)
- Finally, at the bottom left of the sheet, you can see the total number of hours logged during a specific Pay Period. The total for one day is also calculated in the “Worked” column in each row.
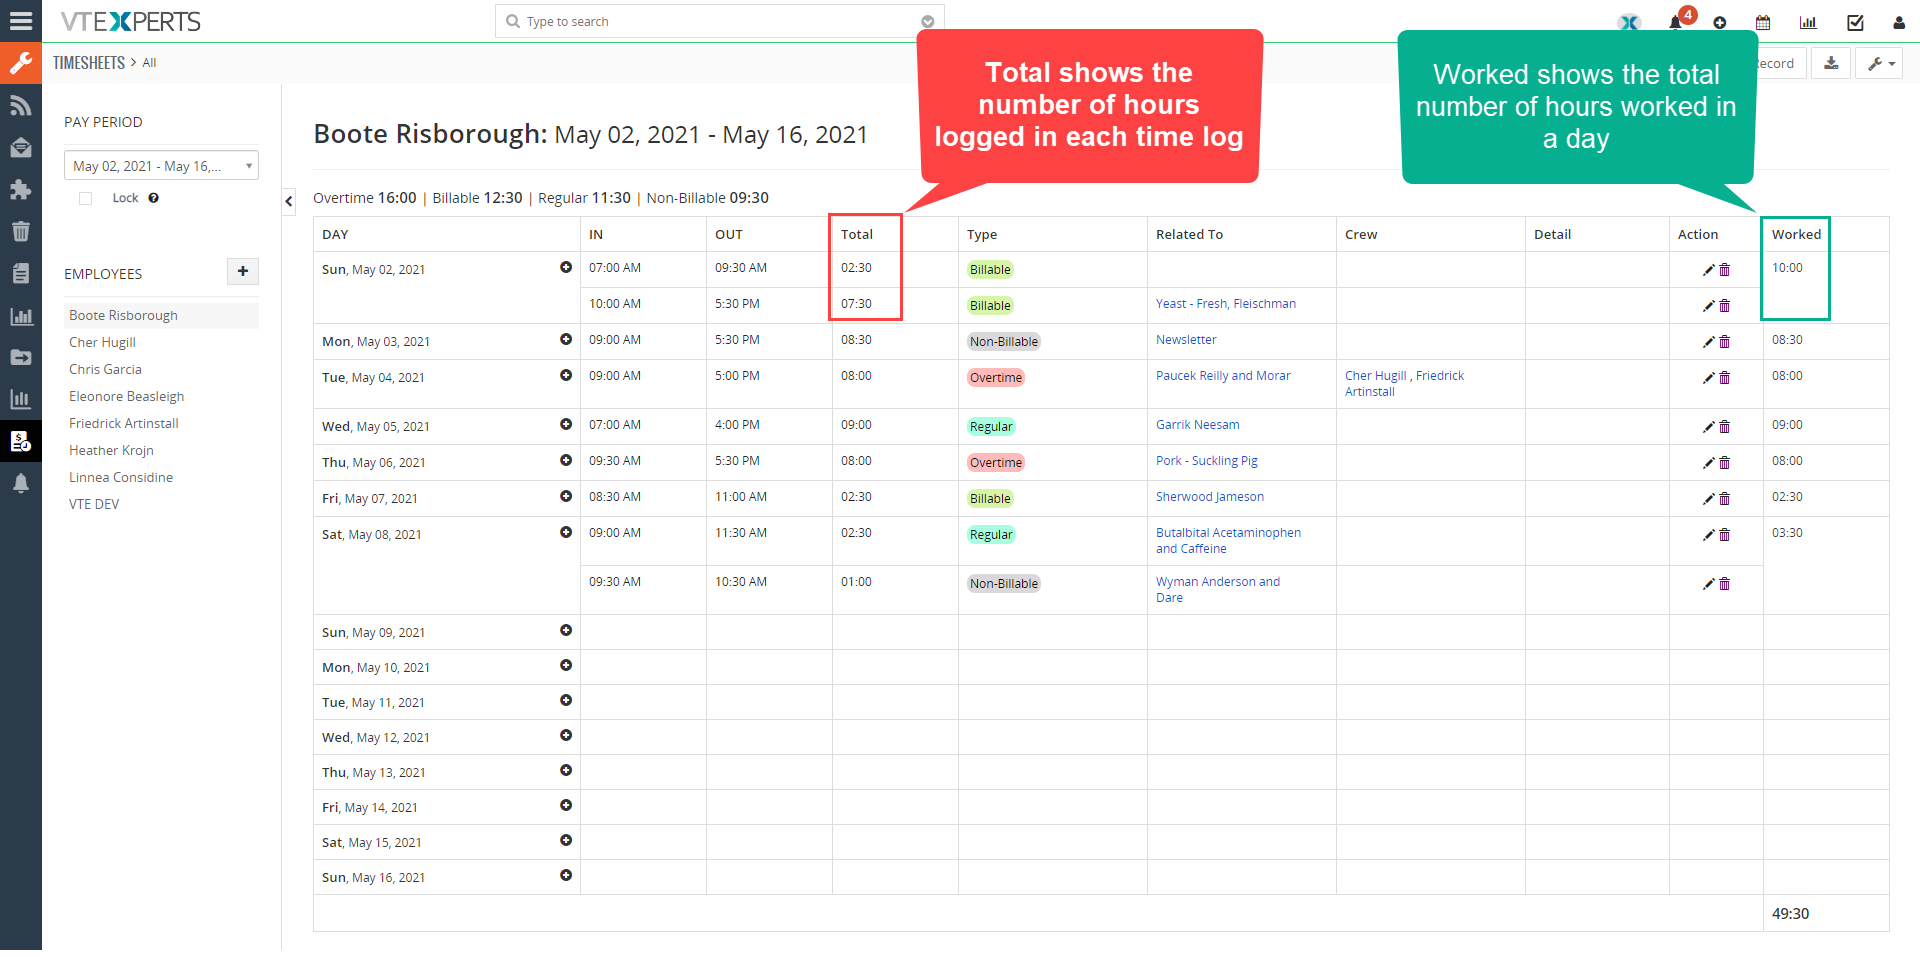
Difference between “Total” and “Worked”
The total shows the number of hours in each time log entrym while the worked shows the total number of hours worked in each day
Adding a New Log to the Sheet
As you’d probably already know that one row is designated for one day in the “Day” column; considering that, let’s see how can we add a new log of hours to a day.
To add a new duration worked, select the date to which you need to add the time and click the (+) icon. It will add a new sub-row to the same row of the day.
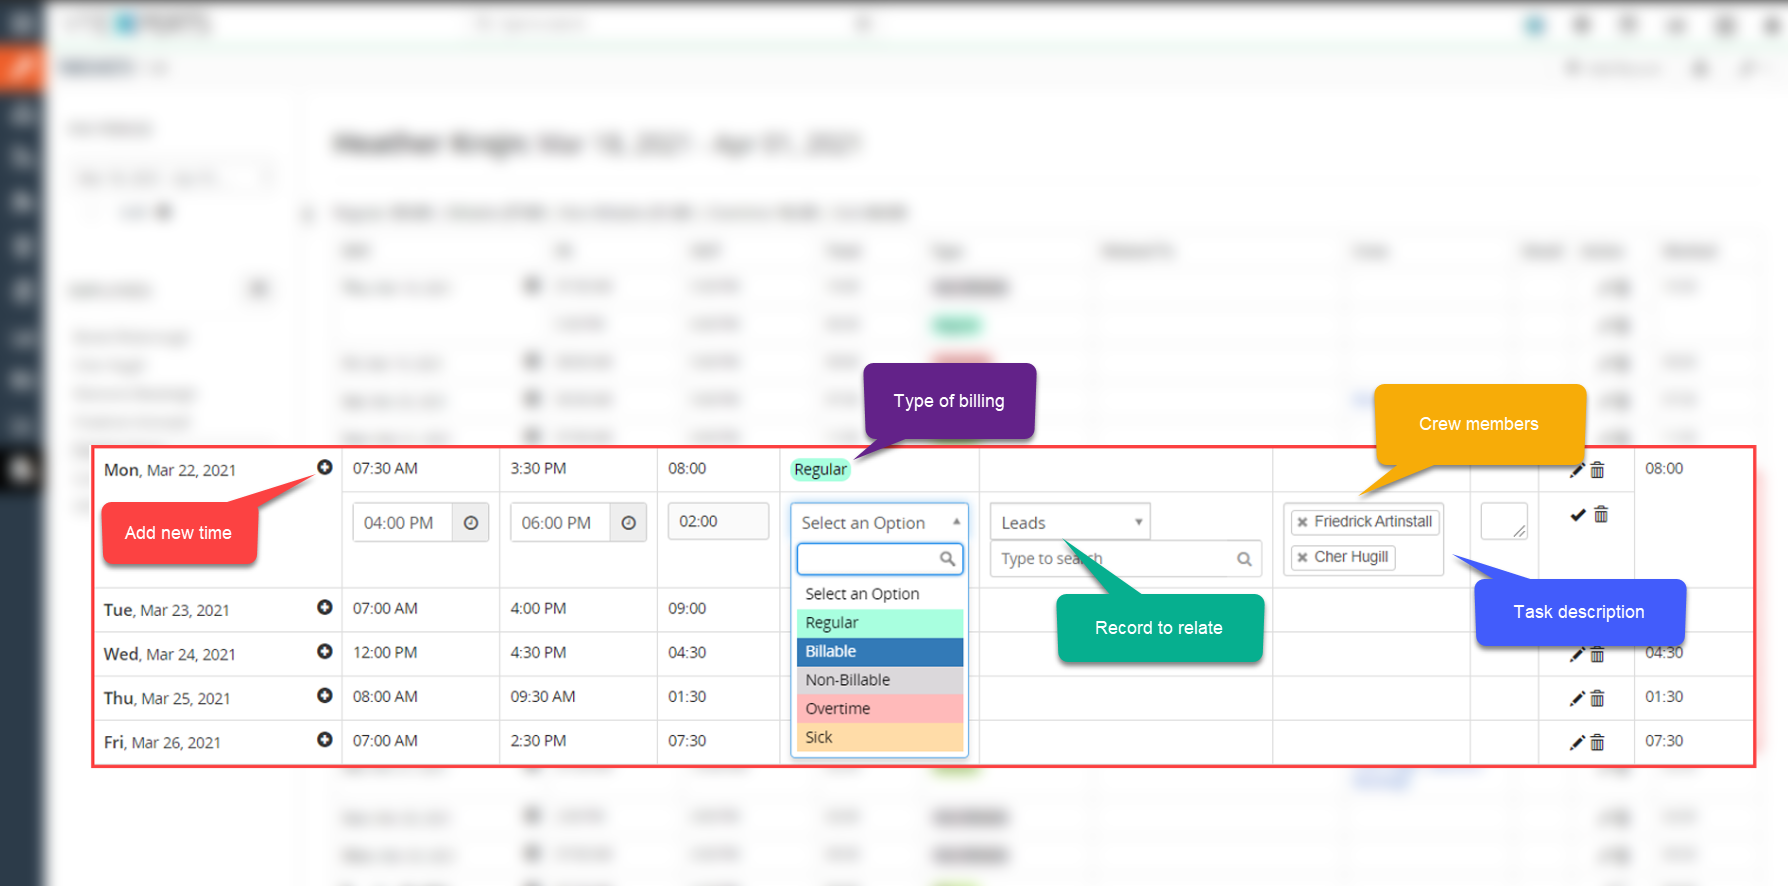
IN: Select the starting time of the work done
OUT: Pick the time when the work was completed
Total: Once the start and end time of the task is added, the total number of hours for that task will be calculated and shown in this column besides that in and out time
Type: This is the column where you or users can mention the type of hours worked either billable, overtime, non-billable etc. The picklist options can be configured (discussed later)
Related To: In this column, a record and a module can be selected to link the time spent to. That will help to understand where and how the time was spent and which client or project took the time
Crew: Mention who else worked on the task with the user
Detail: Users can add any details about the tasks performed, meeting or call attended, or project worked upon, in this text field
Action: Once the information is entered, click the tick mark to save the logged time. If there is a need to delete the current sub-row, that option is available in the “Action” column as well
Worked: In this column, the total time spent in a day is calculated automatically and logged. The total of all the days and hours worked can be seen at the bottom of this column
Customize Types & Colors
The “Type” column in the sheets depicts the type of the time spent. This is configurable and you can use it per your requirements. For example, if the hours worked were regular, overtime, low or high wagered etc. You can configure the types by clicking the “Customize” button at the top right section and clicking “Customize Types & Colors”.
As you can see that you can use the standard feature of VTiger 7 to configure and color the picklists.
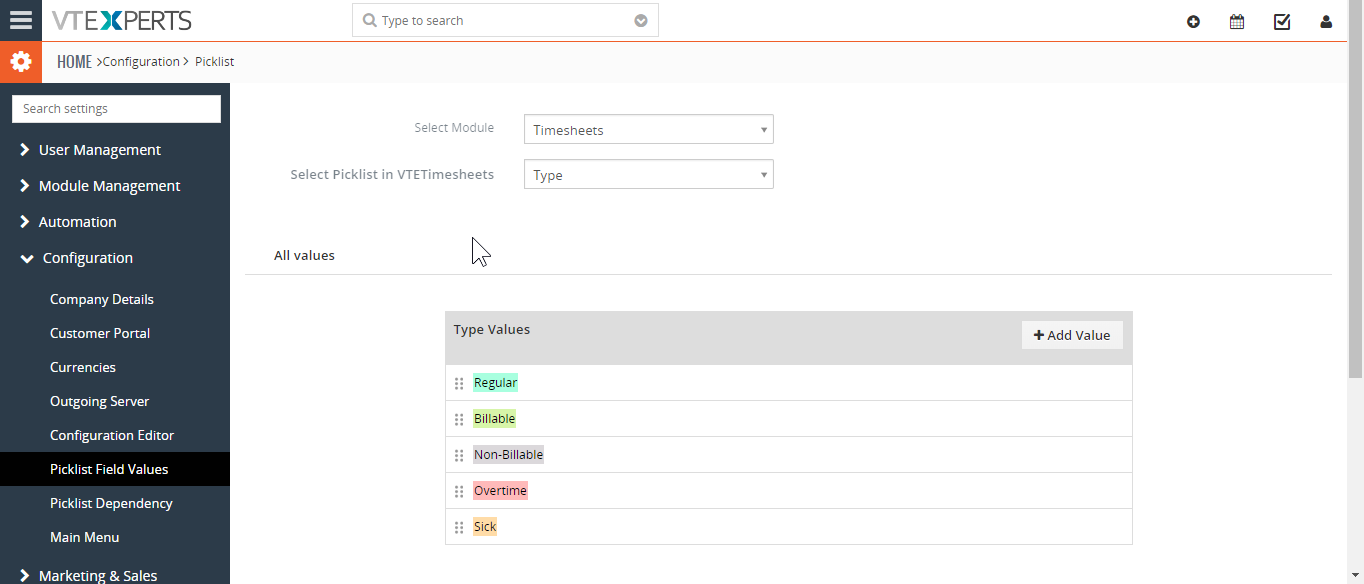
Select Module: The module in this block will and should be “Timesheets”
Select Picklist in VTETimesheets: This will be set to the “Type” and no other option is available to be configured
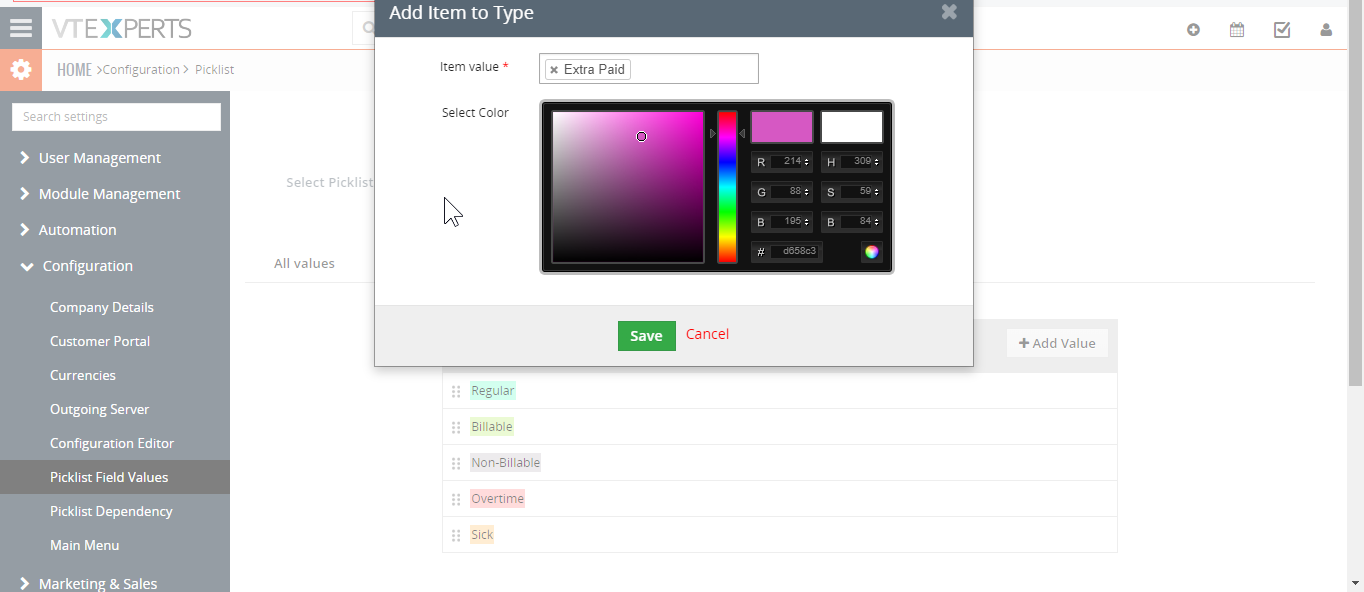
+ Add Value: To add and configure a new value to the “Type” picklist in the timesheets, use this button. It will allow you to add a new picklist value as well as assign a color to it
All Values: under the list “Type Values”, you can see all the items of the “Type” picklist. You can edit or delete a value by hovering the cursor over it and selecting the corresponding option
List of the Times Logged
The system admins can access all of the time logs entered by the users, as a list. Each time logged, is entered as a new record to the “Timesheets” module. So the list of the times lets admins and users to use them as any other record with specific options in VTiger 7. It also allows admins to import/export the data, run reports, or create workflows using these time records. The details of an individual time record in the list can be seen by opening a time and going to the detail view. It also shows the “Created Time” in the list as well as in the “Updates” section. A user can only see the times for him/herself.
To access the list of all the times, click the “Customize” button and select “Lists”.
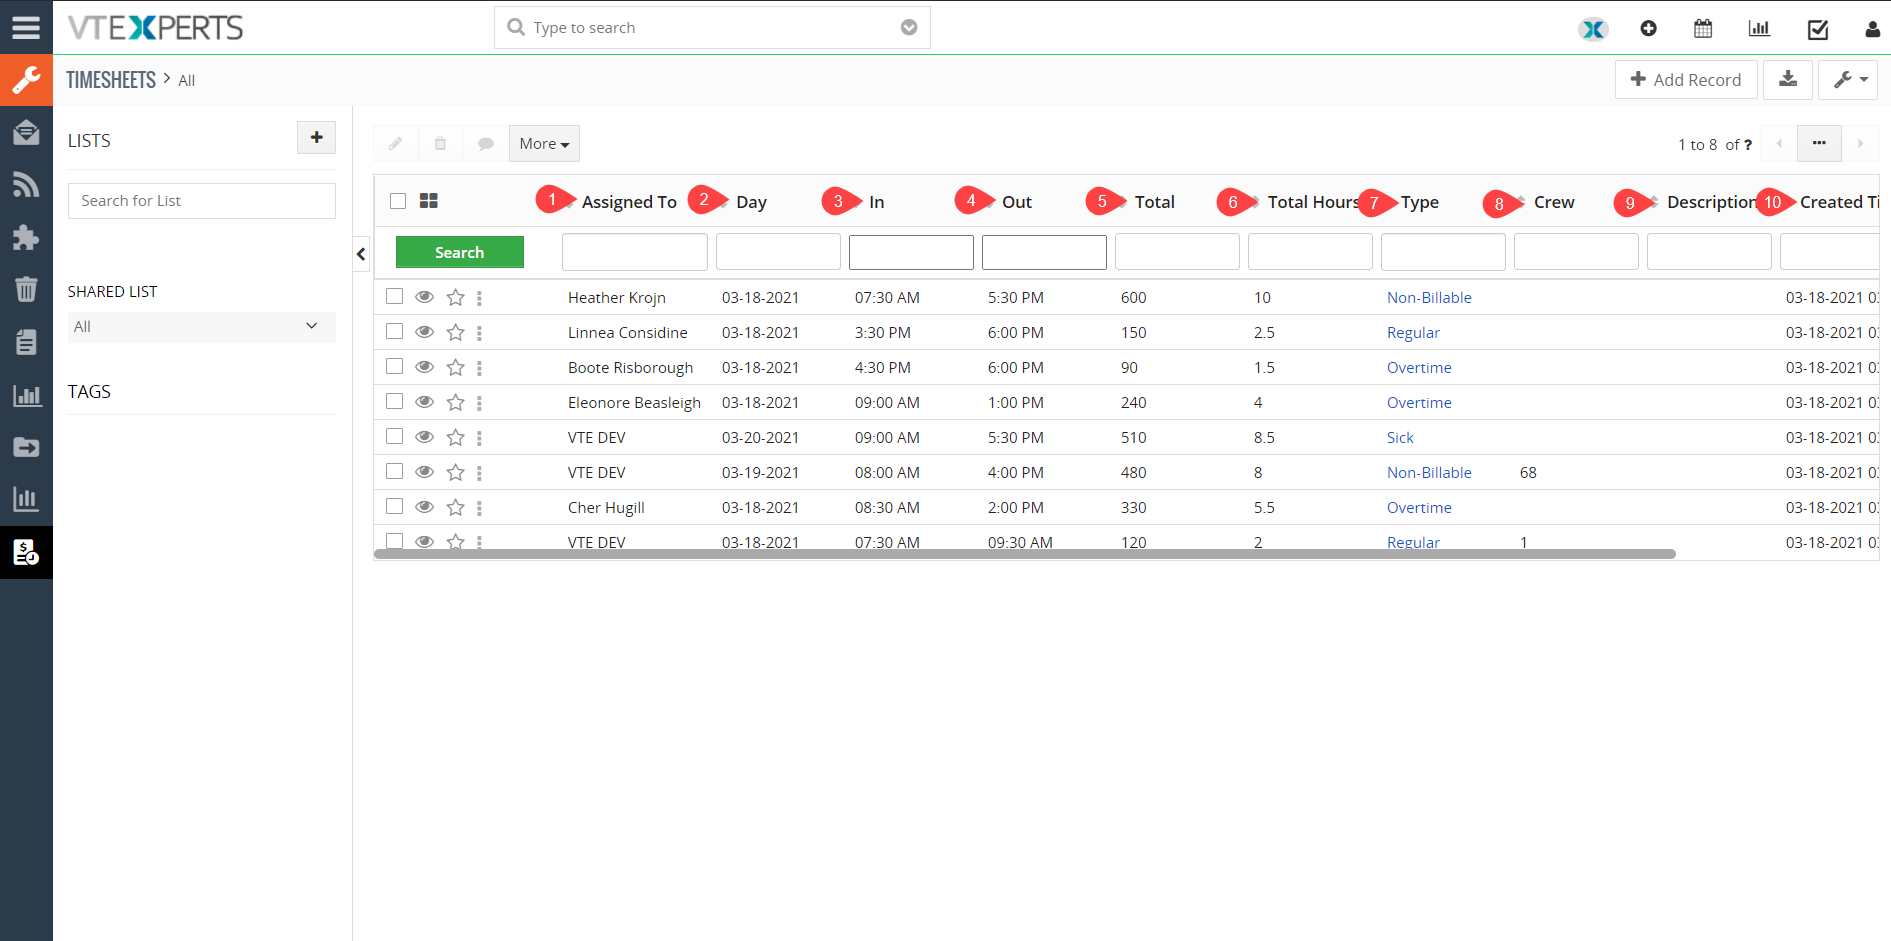
- Assigned to: It shows the name of user whose time is logged into the timesheet
- Day: It shows the date of the day for which time is logged
- In: It shows the starting time of the user. Time from which the user started to perform their duties
- Out: It shows the ending time. Time at which user stopped to perform their duties
- Total: It shows the total time in minutes for which the user made an entry in the timesheets
- Total Hours: It shows total time in hours for which the user made an entry in the timesheets
- Type: Type specify the type of work on which the logged the time. e.g. regular, billable, non-billable, overtime etc.
- Crew: Shows the crew id, who else worked on that task with the user
- Description: Shows the description of the logged time if any.
- Created time: Shows the time at which the timesheet entry is made
Note 1: Timesheets will show time logs of all the users to admin user only, rest of the users can only see their own time logs
Note 2:Timesheets do not stop a field to be appearing in timesheets, even if the field is set to be hidden from field layout editor