We enhanced standard VTiger calendar by adding a Job/Work Scheduler view, which is a must-have for organizations that rely on calendar and scheduling. It was designed to show all the users/groups as rows, while the days/hours/weeks remain as columns. This allows users to see events assigned to each user without them overlapping onto other users/hours.
VTiger Job/Work Scheduler Calendar is an addition to existing calendar and supports most of the standard calendar features such as click to edit event, click to create new events, display different calendar types (tasks, events, project tasks, invoices, birthdays, custom types).
Understanding the UI
The Job Scheduler is another view for the standard VTiger calendar. So it is accessed by going to Calendar > Shared Calendar, and clicking the “Job Scheduler” button next to the standard Month, Week, and Day views.
You will see something like this:

Let’s see what each button and section do.
Horizontal Calendar View
This is the main functional part of the Job Scheduler. Columns show the hours of the day, rows are for the users’ list, and the top left section is the current date.
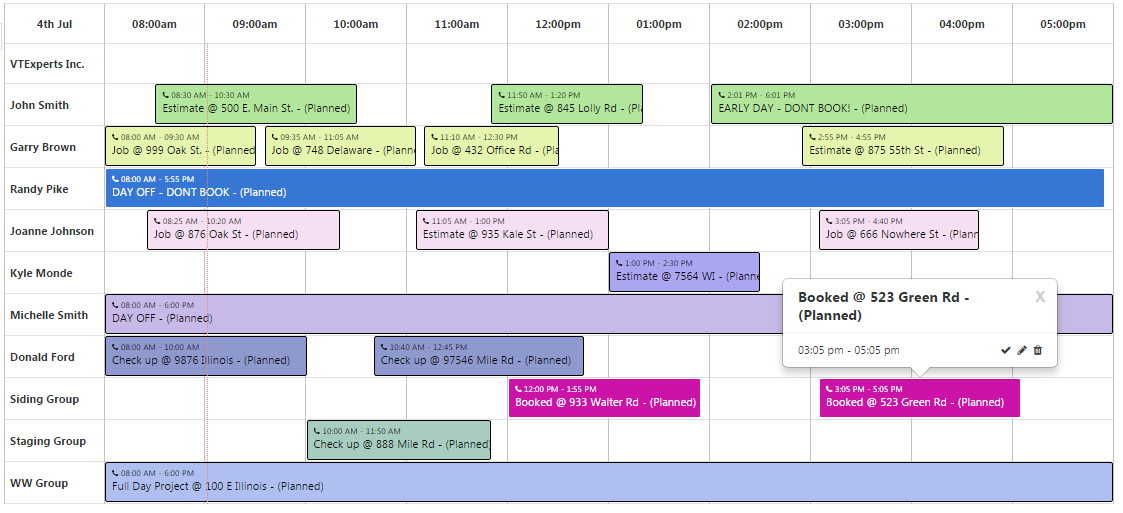
Clicking on an empty box, you can schedule an event, meeting, or a call. It will pick the box’s row’s user and column’s time. It will open the following popup where you can customize and specify the activity.
Subject: the purpose of the activity i.e. event, meeting or call
Start Date: select the date of the activity. It picks the current date by default
End Date: the date at which the activity expectedly ends
Start Time: the starting time of the event. It picks the time of the column where you click the calendar
End Time: when the event is going to end
Assigned to: the user to which the event, meeting or the call is being assigned to. By default, it will pick up the user whose row was clicked
Status: set the status of the event as ‘Planned’, ‘Held’, or ‘Not Held’
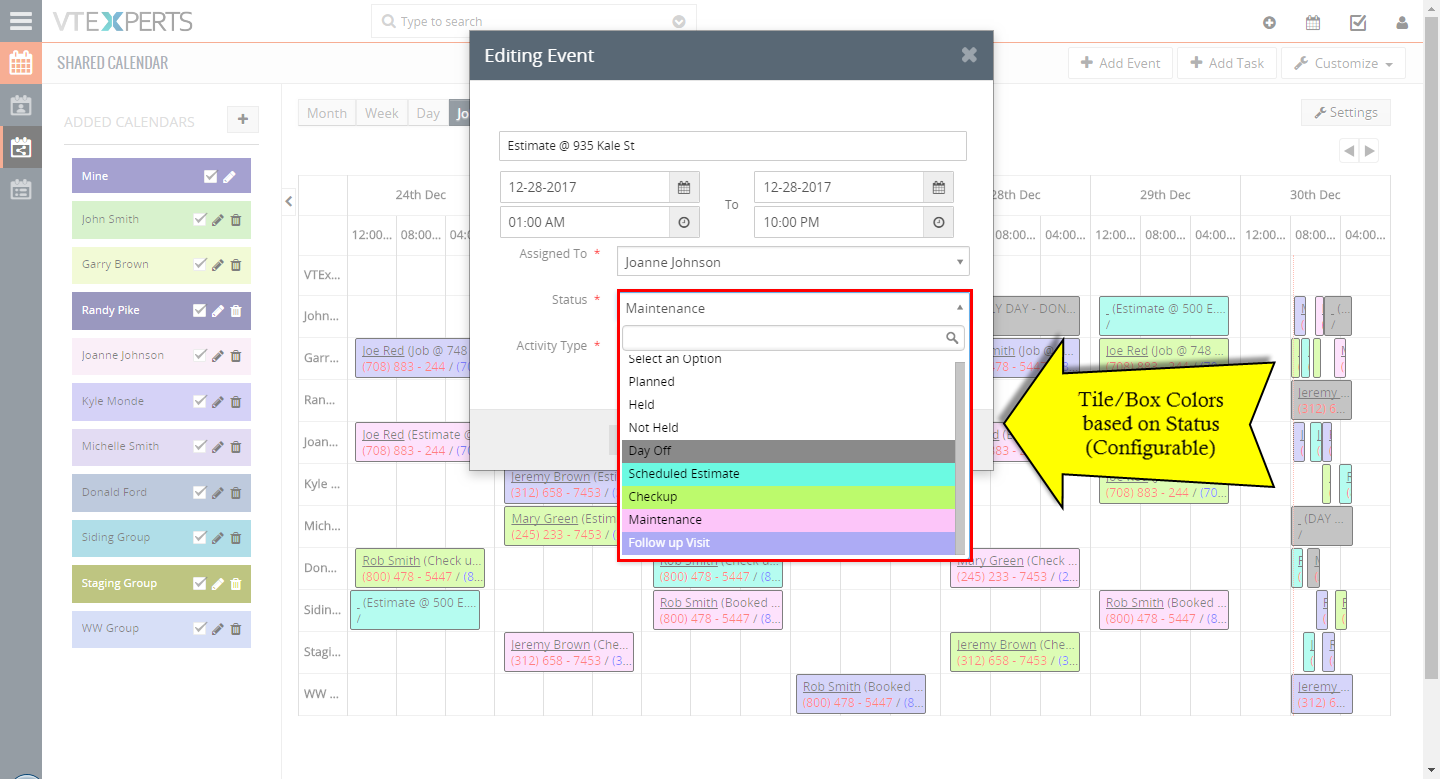
Activity Type: select the type of the activity that is being planned.
Once an activity is created, it can be modified in a number of very easy and quick ways.
1. Move an activity (drag & drop) from one user to another (between rows)
2. Move an activity (drag & drop) from a scheduled time to another if rescheduled (between columns)
3. Change the duration of the activity by holding the starting or ending sides of the block and moving left or right (increasing or decreasing the width of the block, where width = duration)
4. Hover your mouse over an activity to see its details
5. Hover your mouse over an activity and click the “tick” button to mark it as held/completed
6. Click the block to change the event details or hover your mouse over the activity and click the “pencil” icon to modify
7. Hover your mouse over a block/activity and click the “trash bin” icon to remove the activity
Scrolling Through Days
At the very top right of the Calendar, you can see several buttons:
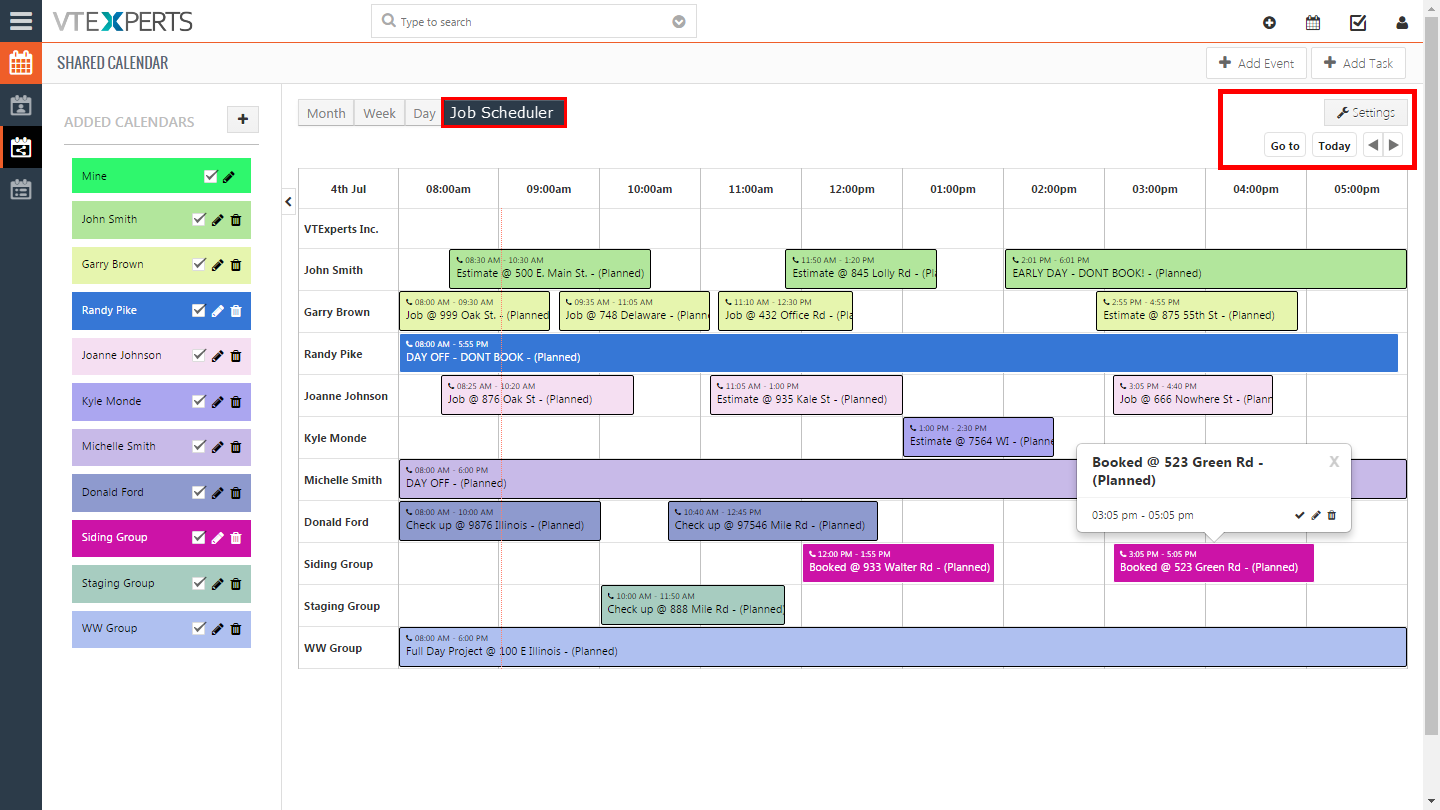
Go to: move quickly to a specific date, month, and year quickly and see the schedule
Today: click and move to the current date with one click
Arrows: use left right arrows to scroll through previous or next dates 1 day per click
Settings: the basic configuration of the Calendar (Job Scheduler)
Settings
You will see following settings for the Calendar:
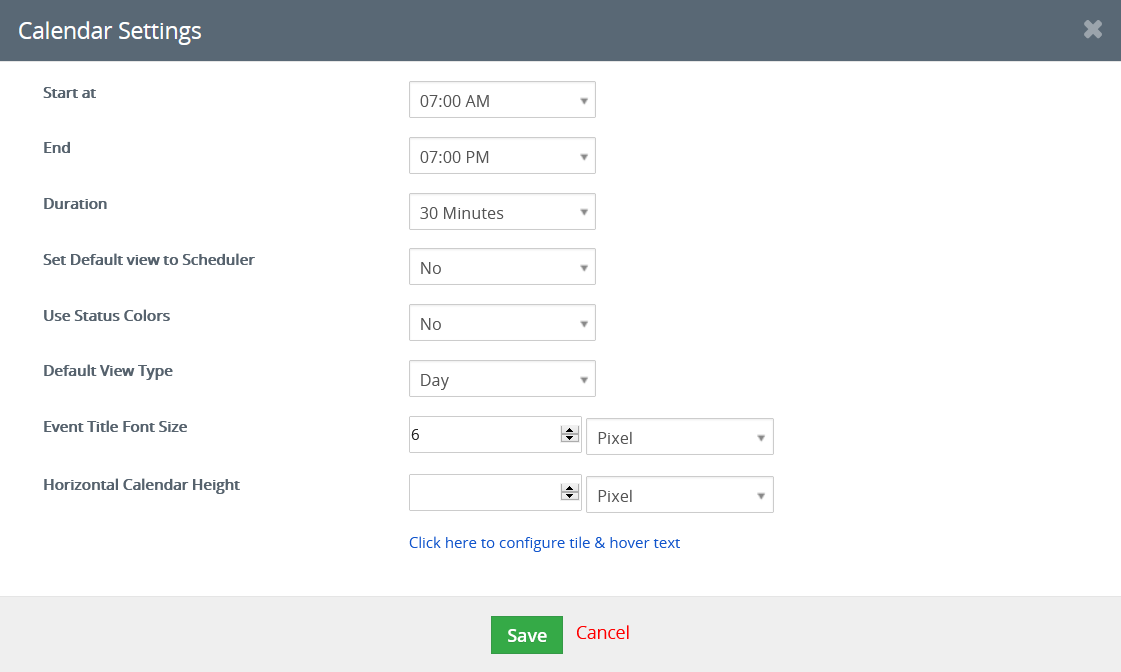 Start at: configure when do you want to start the working day in your Calendar
End: the time at which the working hours end
Duration: the minimum short time duration with which a schedule can be changed (increased or decreased by)
Set Default view to Scheduler: set or remove the Horizontal view (Job Scheduler) as default view for your Calendar in VTiger
Use Status Colors: set this option as “Yes” if you want to differentiate the events with colors on the basis of “Status” (refer to the section “Status Colors” below for more information and how to configure)
Default View Type: choose the type of the default view as “Day“, “Week“, or “Month” once the Job Scheduler view is enabled. Note that the default view of the Job Scheduler is different from that of the stock calendar.
Event Tile Font Size: Using this option you can change the event tile font size, to change the size you can use two scales (Percentage & Pixels)
Horizontal Calendar Height: Using this option you can change the Horizontal Calendar Height, to change the size you can use two scales (Percentage & Pixels)
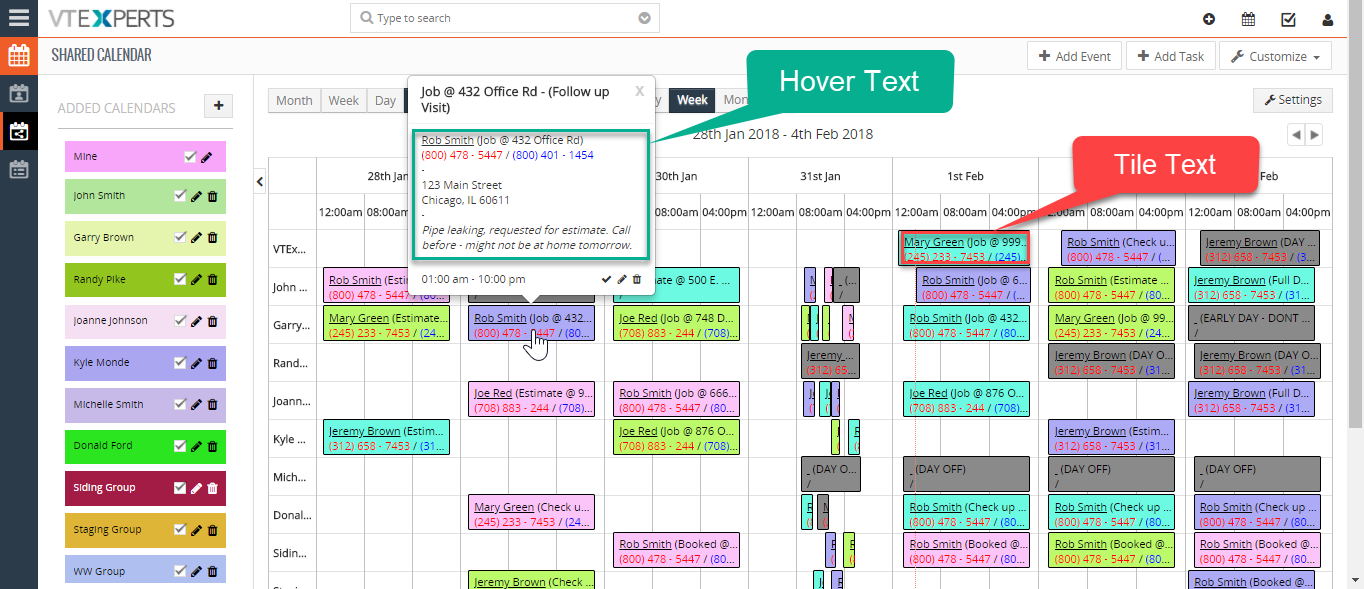
Click Here to configure tile & hover text: “Tile text” is that appears on the event blocks when you open any view of the Job Scheduler. While “Hover Text” is referring to the text in the block that appears once you hover your mouse cursor over an event block. Now you can edit that text in the settings. (Refer to the section “Tile & Hover Text” below to understand the configuration)
Status Colors
This feature allows to assign different colors to different statuses of Events. Once the feature is enabled in the Calendar Settings (see the section “Settings” above), the colors can be configured as follow:
- Click “Customize” button in Events
- Go to the “Picklist Values“
- Select the Module as “Events“
- Select the Picklist in Events as “Status“
- Use the “+Add Value” button to create a new picklist value or edit an existing one
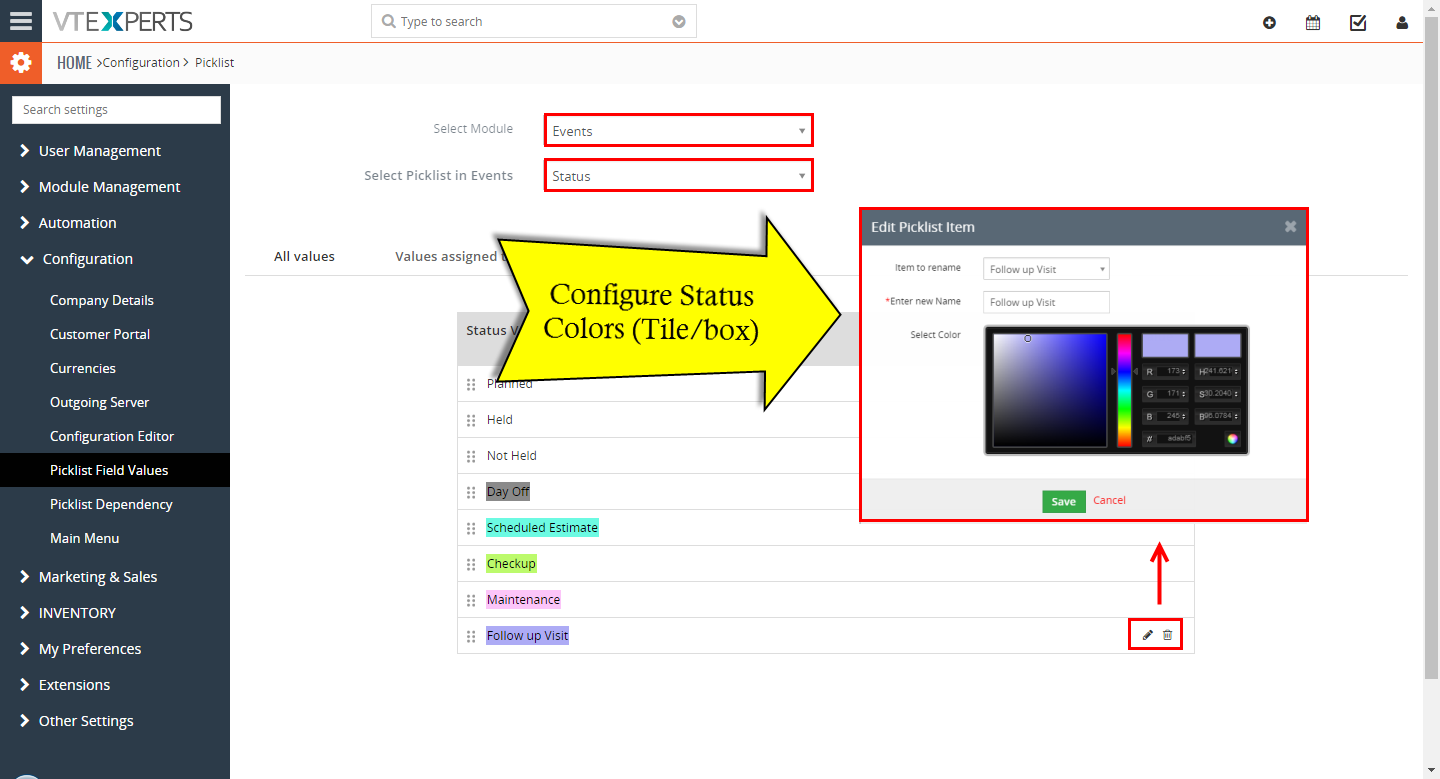
- Assign the value name and choose a color, then save
All set. Now when you go to the events, or create a new event, the statuses will be seen as colored differentiated.
Tile & Hover Text
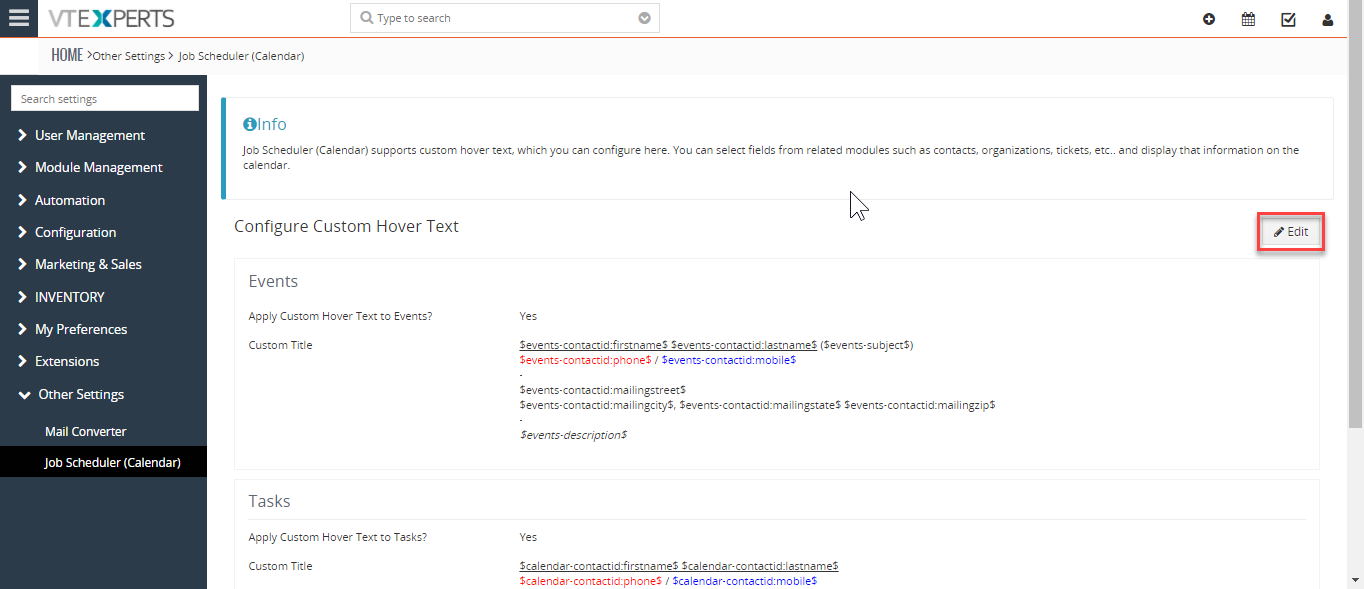
“Tile text” is that appears on the event blocks when you open any view of the Job Scheduler. While “Hover Text” is referring to the text in the block that appears once you hover your mouse cursor over an event block. Now you can edit that text in the settings. Lets see how to do it:
- In Calendar, click “Settings“
- Then click “Click Here to configure tile & hover text“. It will show you 2 separate blocks for Events and Tasks each.
- Click “Edit“
- You will get a Rich Text Field editor where you will be writing the text and mapping the fields to be shown on the tiles & hover bubble
- The first 2 lines are specified for the “Tile Text”
- The rest of the lines will map to “Hover Text”
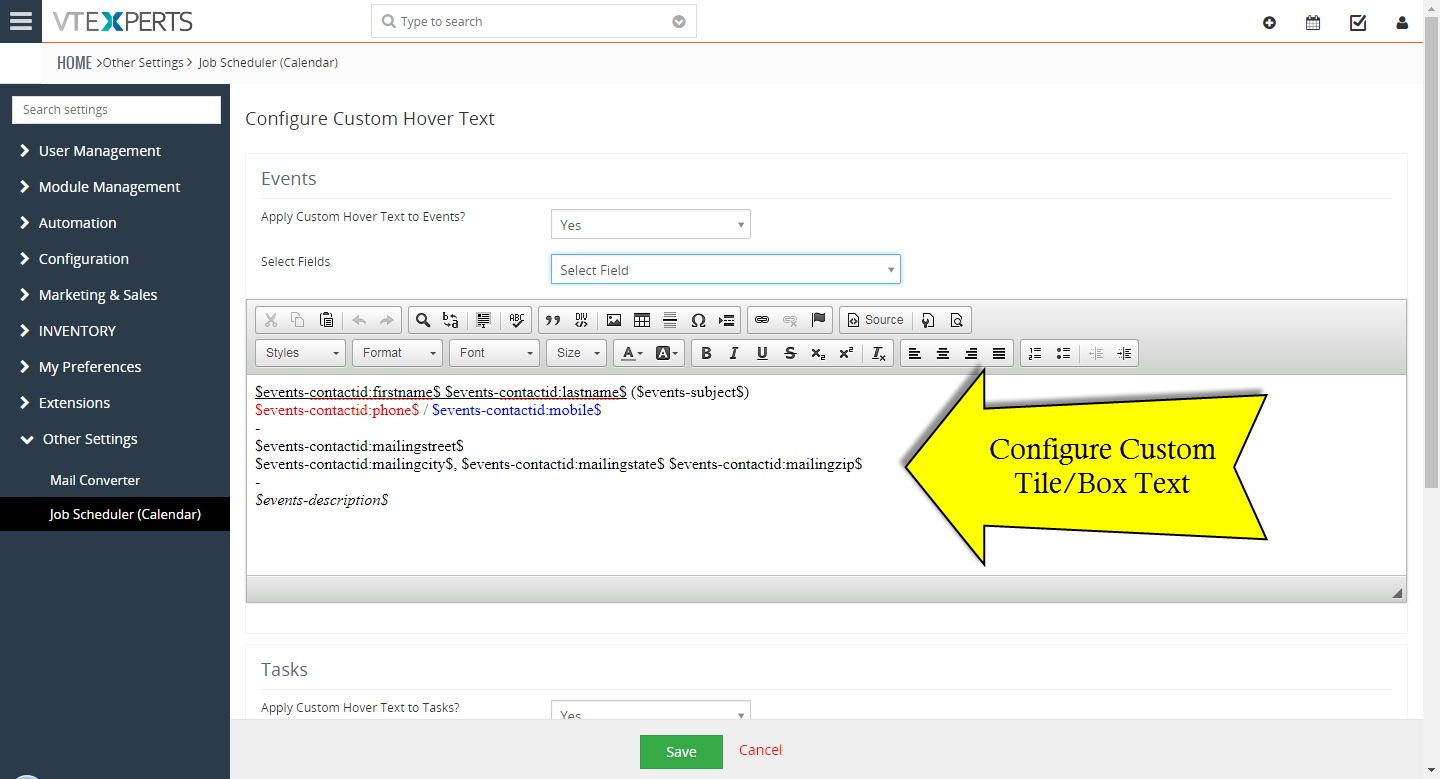
- Once you enter the text + proper codes for the fields you want to map with the help of “Select Fields” picklist, click save.
Now when you go to the Calendar > Job Scheduler view, you will see the Tile text on the event/task blocks. Move your cursor over any block and it will show you the proper information as configured in the Hover text section.