VTiger email parser automatically grabs important data from recurring emails based on your own custom parsing/mapping rules. Once a new email is processed your data gets transferred to VTiger as a new or an update to an existing record.
The extension was built to support a broad variety of use-cases and has a flexible architecture. You can set up custom parsing rules step-by-step which are tailored to your needs.
Email Parser directly integrates with VTiger Mail Converter. VTiger Mail Converter comes standard with VTiger and is used to automatically create leads, contacts, organizations, tickets as well as attach emails to certain records. The standard functionality is fairly limited and it does not support any mapping or additional modules. Our plugin “VTE Email Parser” enhances mail converter and allows email messages to be parsed and data mapped into VTiger records.
Mail Converter (Standard VTiger)
In order to use VTE Email Parser – you will first need to configure mail converter. Once Email Parser is installed, go to:
Menu > “CRM Settings” > “Other Settings” > “Email Parser”
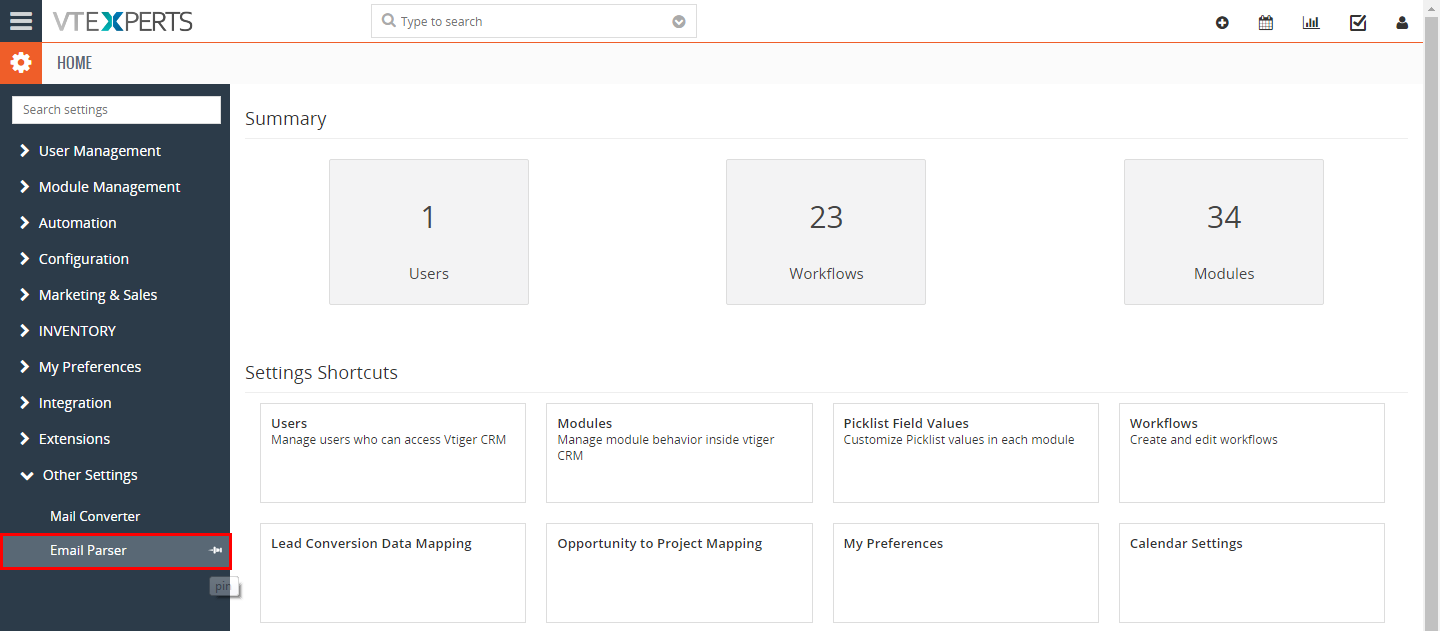
Next, to get to the Mail Converter you can either go through “Other Settings” (as in screenshot above) OR click “Mail Converter” button on the Email Parser interface. The “Mail Converter” button is a shortcut to open VTiger Mail Converter.
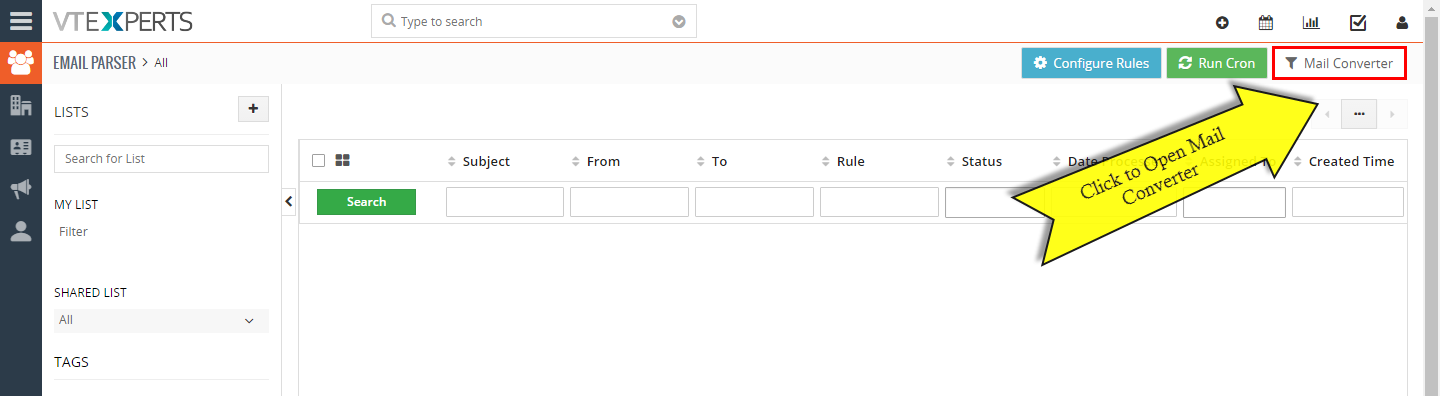
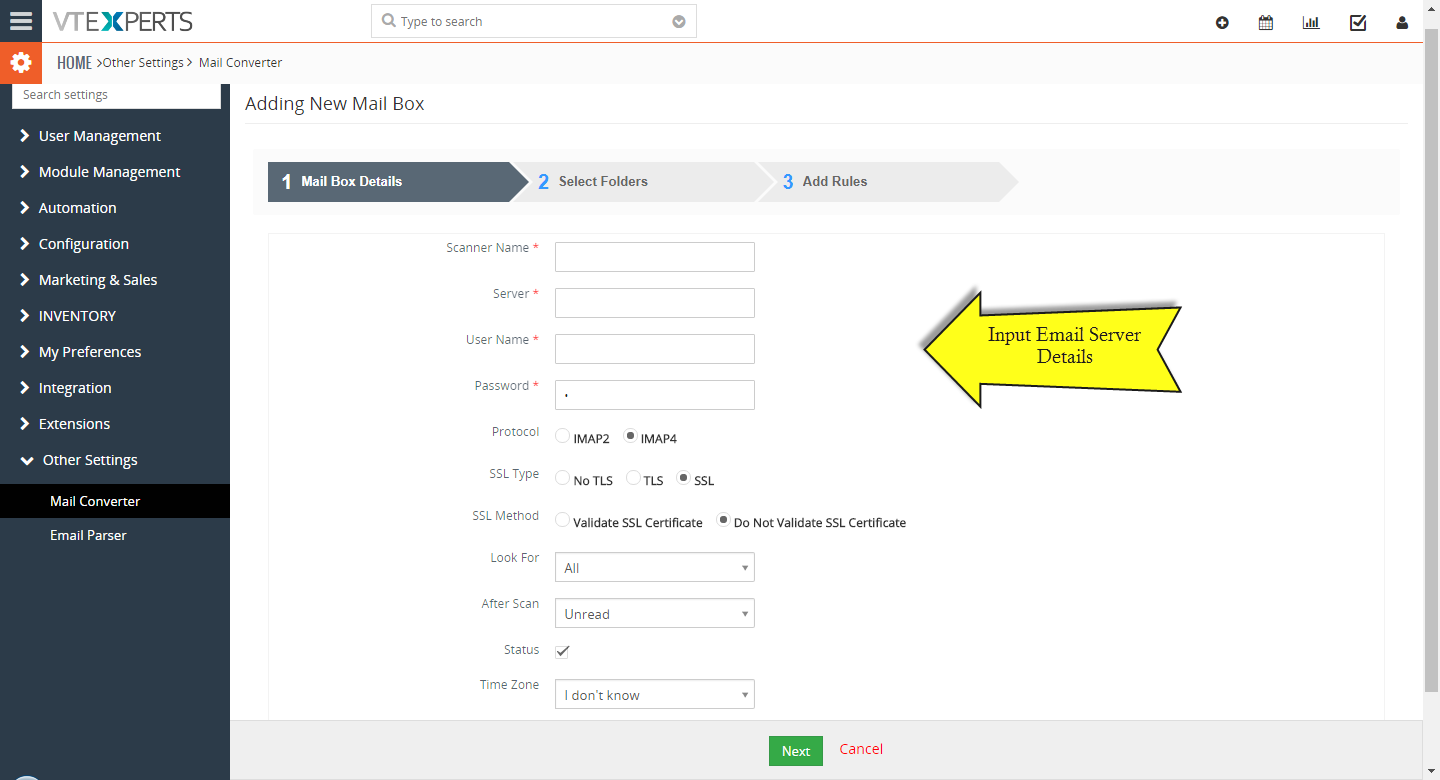
Next,Click “+Create Mailbox” and you will be required to configure Mail Converter with an email account which will be used to retrieve messages to be parsed. (Email account can be changed/updated at any time).
| Scanner Name | Provide a label for your Mailbox. This is only for your reference. Eg. mygmail,mailscan etc |
| Server Name | Provide your IMAP mail server name. Eg. imap.gmail.com for Gmail. |
| User Name | Provide your unique mail client user name |
| Password | Provide your email client password. |
| Protocol, SSL Type and SSL Method | Fill in these fields with respect to your Mail Server configuration. |
| Look For | Select All to scan all emails, select Unread to scan only unread emails. |
| After Scan | Your emails will be marked as read after the scan. |
| Scan Mails From | Selects the time/date from when scanning needs to be done. |
| Status | Enable the checkbox to keep this MailBox in an active state. |
| Mail Sever TimeZone | Time zone of the IMAP server configured |
NOTE: If you are getting error below, you will need to fix by updating few files – click here for the fix details. It’s a known VTiger bug. You can also contact us for help resolving it.
Input array has 1 params, does not match query: ‘SELECT * FROM vtiger_mailscanner WHERE scannerid = ‘
Next, select folders to be scanned. You can specify which folders should be scanned for emails and which to exclude.
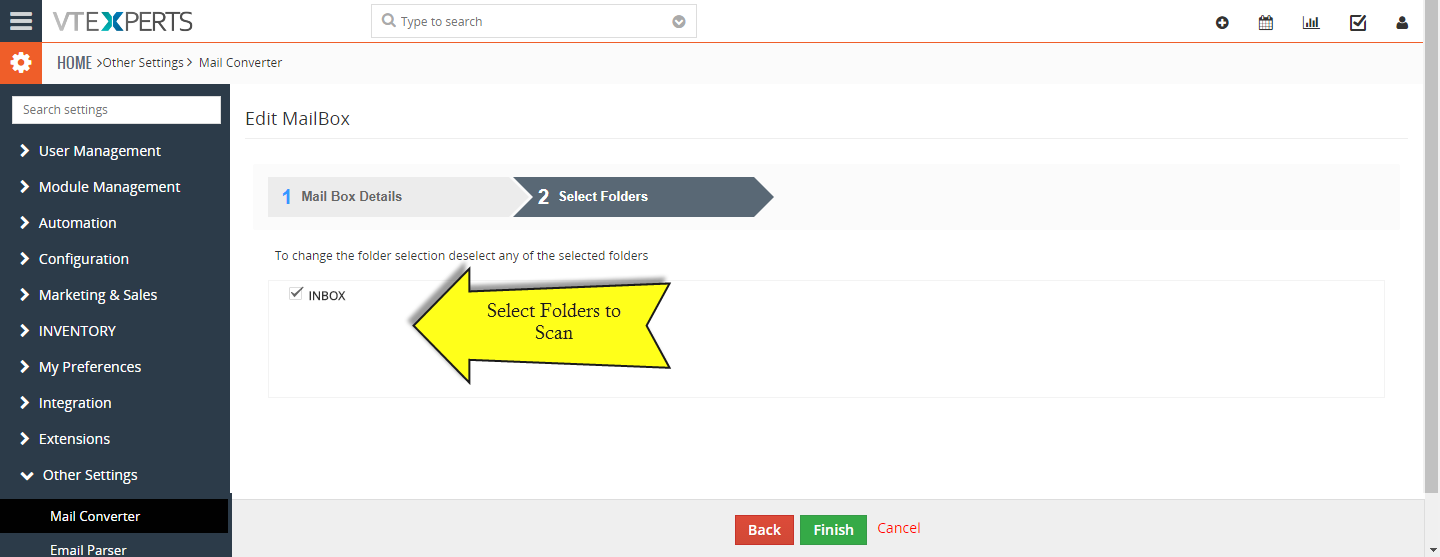
Next, you will asked to create a “Rule”, but at this point – we have not created any email parser rules, so just hit “Finish” and we’ll come back to this later.

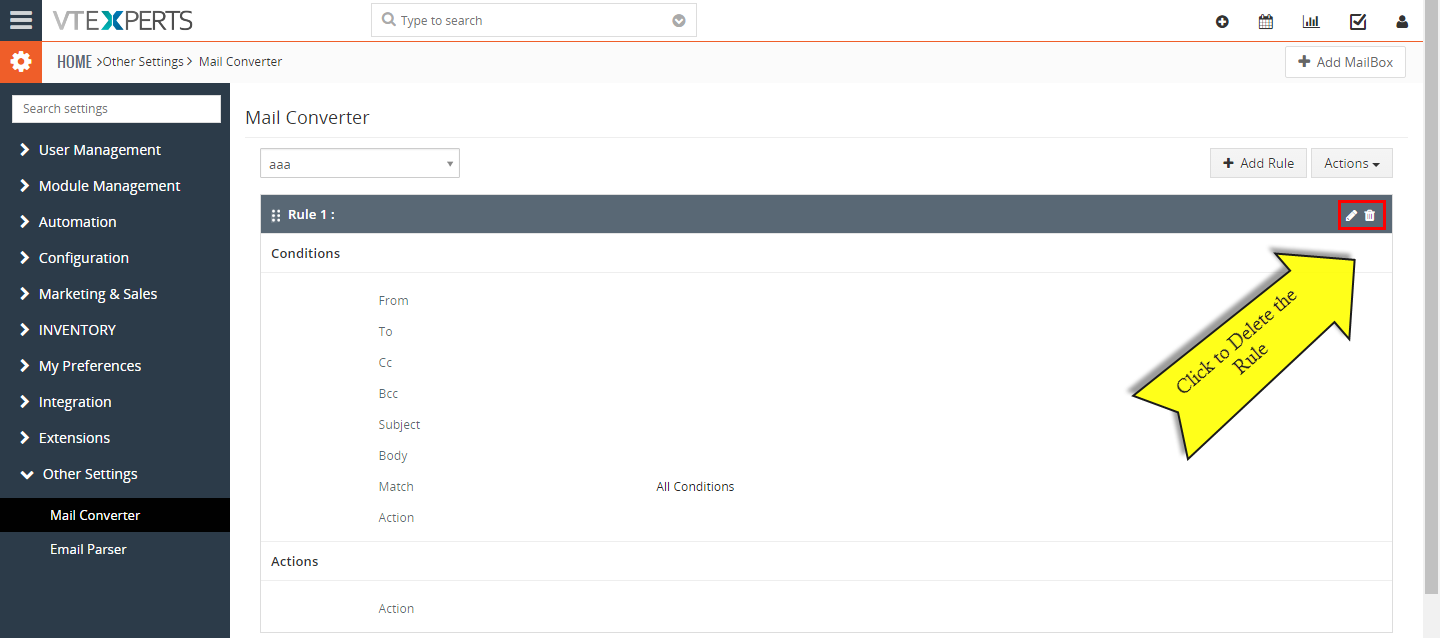
Lastly, delete the “empty” rule created by clicking on recycle bin icon as this rule is not going to be used and was created part of the mail converter configuration process.
Email Parser
Now that we configured Mail Converter – it’s time to setup Email Parser. Configuration will consist of multiple parts:
Creating the Rule (which will be assigned to Mail Converter action)
Scanning our first email (which we will use to create mapping)
Creating mapping out of our first scanned email.
Executing Email Parser Rule
Automating entire process
It has a lot of moving parts, so feel free to contact us at help@vtexperts.com.
Create Email Parser Rule
To create email parser rule, we need to go back to Email Parser area, to do so, go to:
Menu > “CRM Settings” > “Other Settings” > “Email Parser”
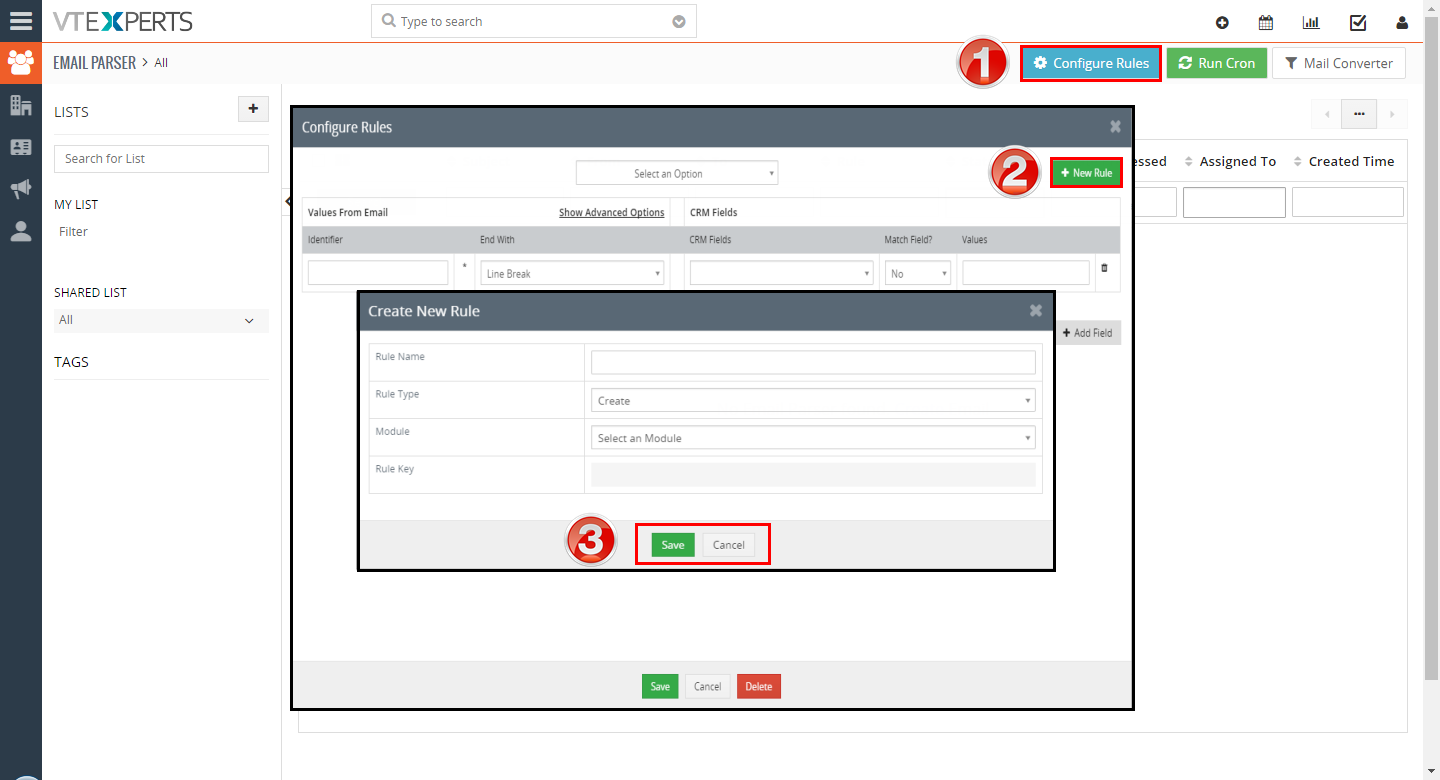
Next, click on “Configure Rule”, the popup will open, then click “+New Rule”, then another popup will open and this is where you will create the first rule.
Rule Name: keep it short and name it something like “New Lead” or “New Lead from xxx website”
Rule Type: You can select it to be an “Update” or “Create” rule, meaning that you can either create new records using this rule OR update existing(This will be covered down below(matching and all)).
Module: Select the module to apply it to.
Rule Key: Automatically generated key. You don’t need to do anything here.
Hit save and the new rule will be created.
Assign Email Parser Rule to Mail Converter.
Now that we have created our first rule “New Lead” – we can apply it to Mail Converter. To do so, open the mail converter either using the shortcut “Mail Converter” button from Email Parser area or go to Menu > “CRM Settings” > “Other Settings” > “Mail Converter”.
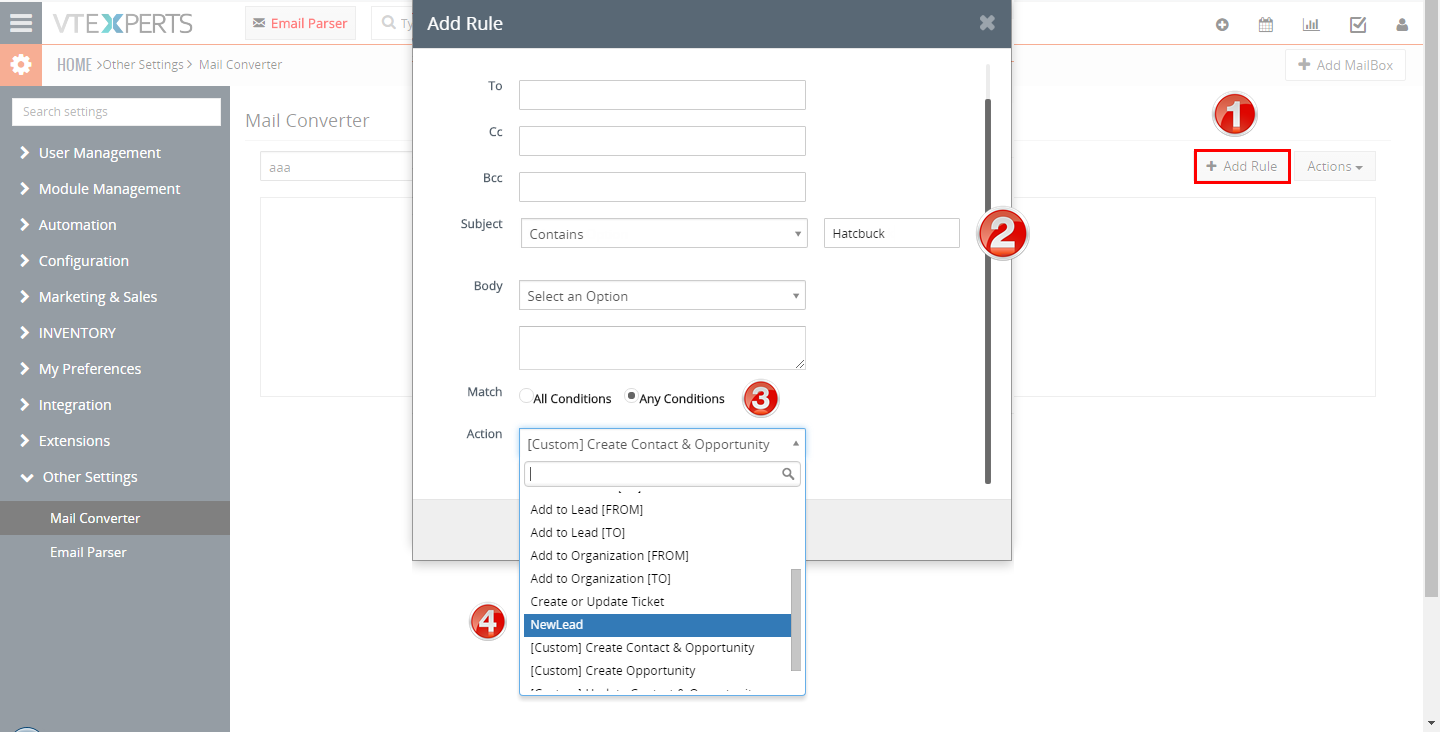
Next, click “+Add Rule” to create new rule. In the popup, you will be able to create a “filter” for your email messages, meaning that you can set it up so it only parses emails that meet the criteria set in the popup. For example, say if you sign up for a lead generating service and all your lead emails (that need to be parsed) always from with a subject of “New Lead from Hatchbuck: xxxxxx”, you could then set it up to say that only email messages with the subject containing “Hatchbuck” will be assigned to this rule (marked as #2). This is just one example, but you can do the same email TO,BCC,CC and email body.
In addition, you must select “Any Condition” in the “Match” area, unless you know exactly what you are doing (If you were to choose “All Conditions” that means, all the fields above have to be filled out and must match 100% in order for email to be parsed). We recommend “Any Condition” to avoid any unnecessary issues (you can change that later on if you would like).
Lastly, you need to select “Action” – which is essentially Email Parser Rule you just created (marked as #4).
Scanning Mail Converter Email Account
Now that we configure our first Mail Converter rule and assigned an Email Parser rule/action to it – we can now scan the email account and pull in any emails that match the criteria.
Note, make sure there’s an email message in the account that you setup so it can be pulled into VTiger and be processed.
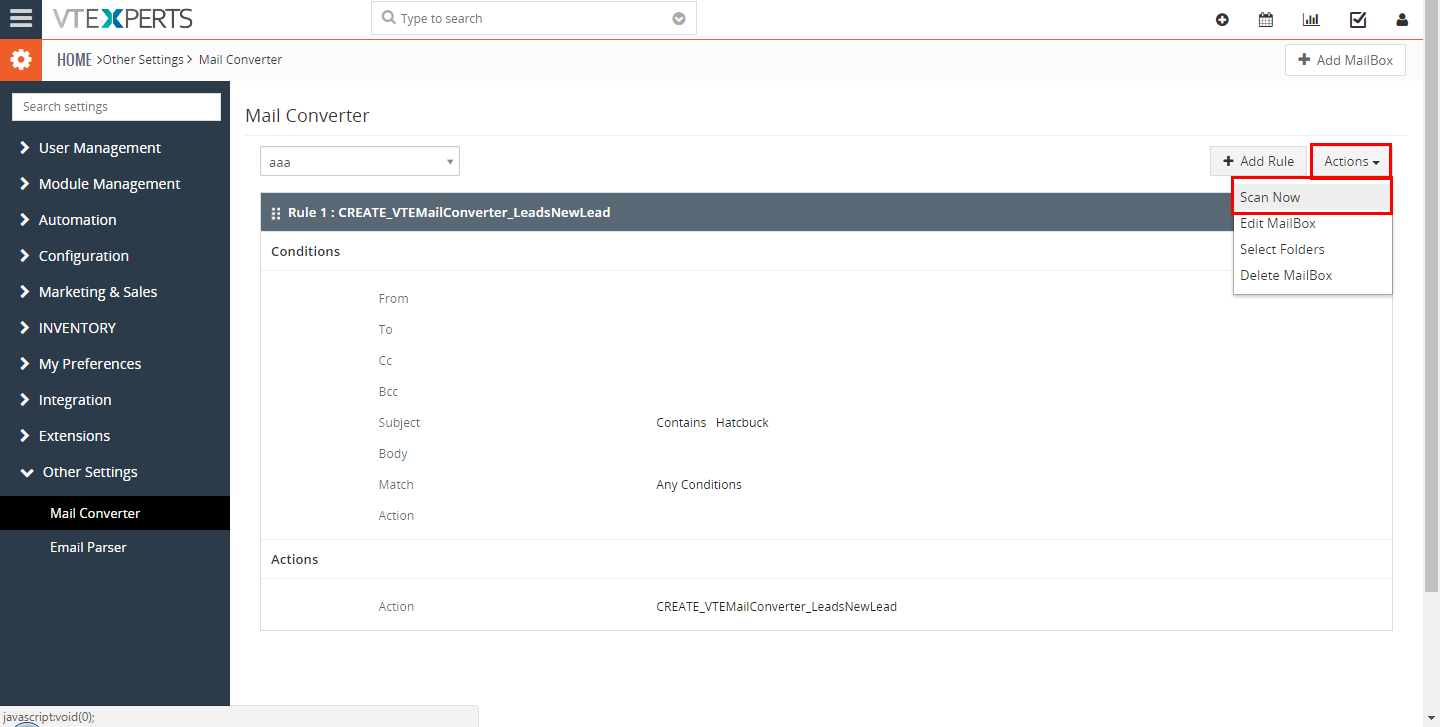
Click “Actions” > “Scan Now” to pull in any messages that match your rule.
Note: Once you scan the mailbox, it remembers the last time/date it was scanned, so if you are trying to parse email from the past (after mailbox has already been scanned) – it will not work. You will either need to resend the email OR you can update “Last Scan” date in the database (it’s stored in vtiger_mailscanner_folders table, column is “lastscan”). Also, if you scanned the mailbox AND noticed that the rule is incorrect e.g you misspelled the subject – you will either need to resend the email again OR update last scan date in the database (remember every time you hit “Scan Now” – it will only pull in emails from the last time it scanned, regardless if there are emails that have not been scanned and are dated BEFORE lastscan date).
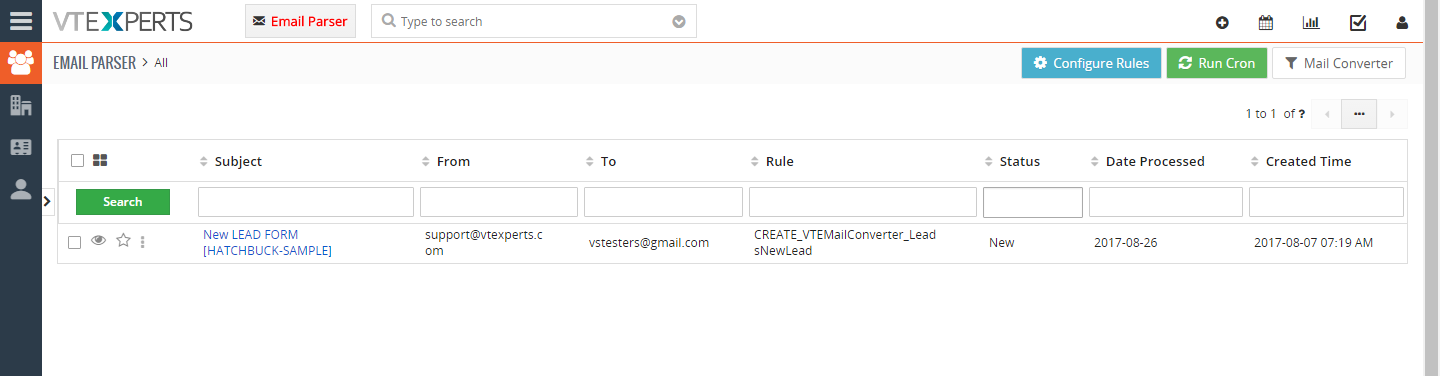
Assuming there were email(s) which matched the condition – you should now find them in your email parser queue. Go back to email parser area and you should see them listed there.
Create Mapping for Email Parser Rule
Now that we have our first email pulled into email parser queue, we can start working on the mapping. The idea is to have at least one email that we can use as a template to create mapping. The record that you see in the email parsing queue has original email header information such as from/to/cc/bcc/subject/email body (both PLAIN TEXT and HTML).
In order to create mapping, we recommend to open both email parser queue record as well as the email parser rule you created – it’s a lot easier this way since you need to look at both to map the rule.
The mapping is created from the “Body Plain Text” content. (It’s to difficult to properly parse information from HTML email body, so all incoming emails are converted to Plain Text so we can map the data more easily).
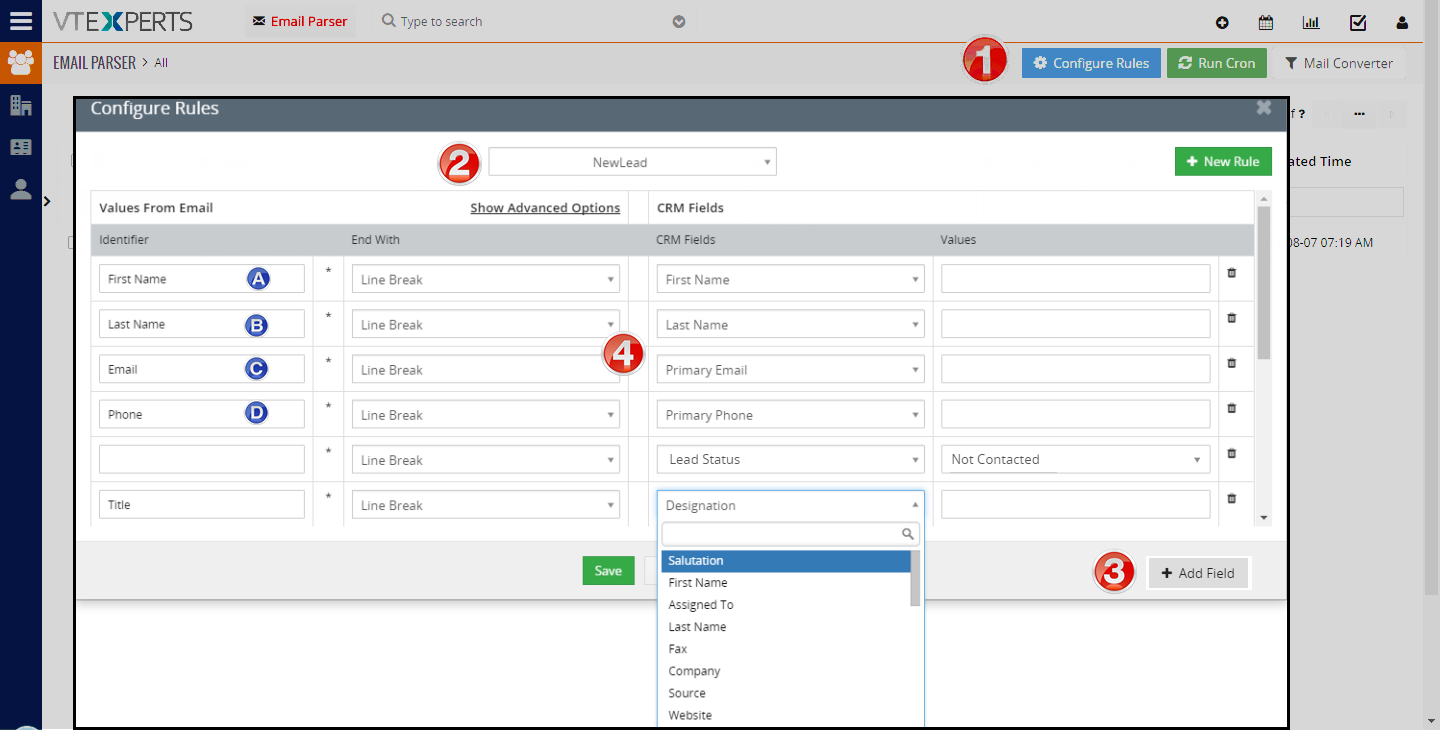
1. Go to Email Parser and click “Configure Rules”. The popup will open up with all the rules.
2. Select the rule you just created “NewLead”.
3. Click “+Add Field” to start adding rows into the mapping.
4. The mapping itself is very straight forward.
Identifier: Word(s) that will identify the start of the string to be parsed.
End With: How does the system know when to stop parsing.You have 3 options:
EP_LINEBREAK (Line Break) – means we will take everything until the new line starts.
EP_SPACE (Space) – means will take everything until next word(separated by empty space/line).
EP_END_OF_BODY – once you select that option, you can put in ANY text in there and it will be used as “stop” word/string/character.
CRM Fields: Based for which module you created the rule – you will be able to select available fields from the list.
NOTE: If you leave the “Identifier” empty and map the “CRM Fields” – that means, as the vtiger record gets created/updated – it will set that value as default. See “Lead Status” CRM Field being mapped to “Not Contacted”. (this means all new leads created will default to “Not Contacted”).
Values: If you want to override any values, mostly used for defaults.
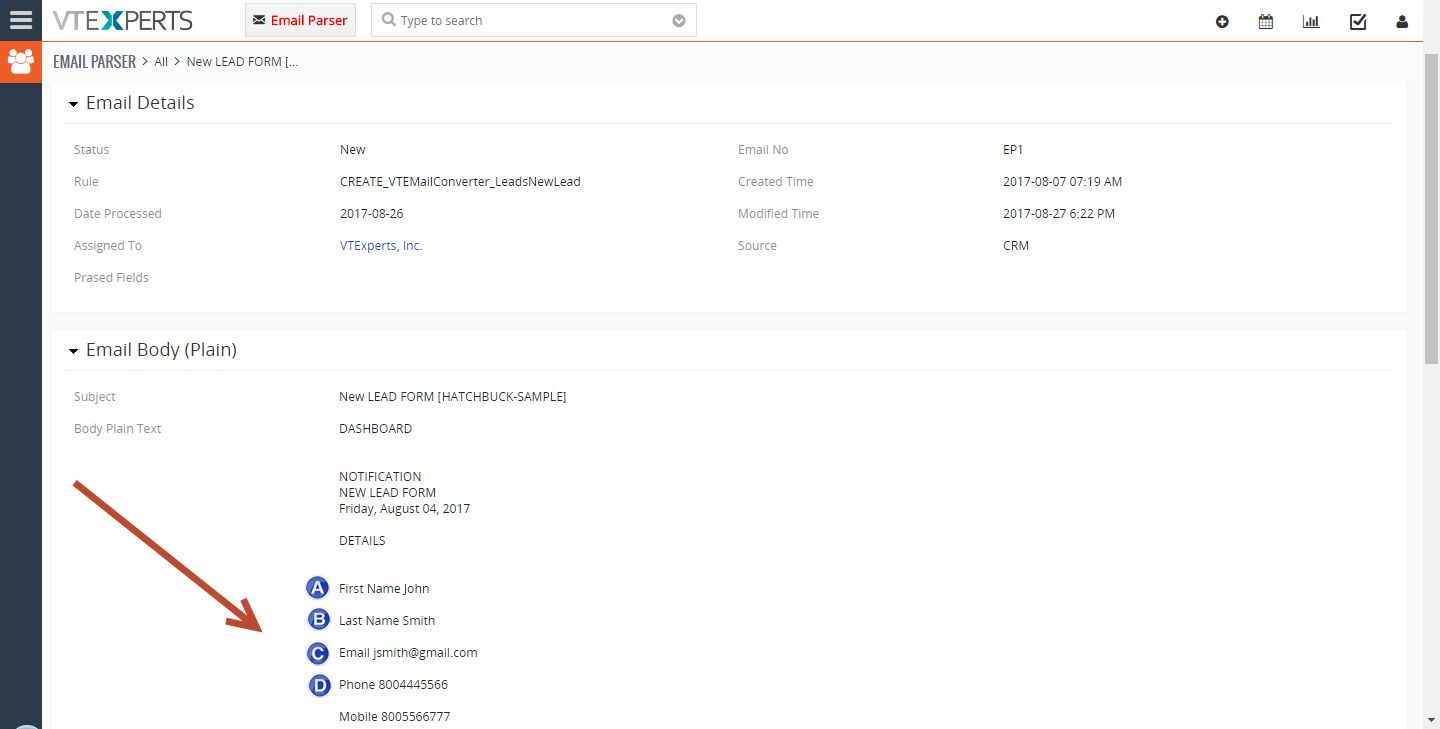
The mapping in screenshots is mapped using the logic below:
A) First Name John
B) Last Name Smith
C) Email jsmith@gmail.com
D) Phone 800444566
And here’s the screenshot of Email Parser queue record:
Execute Email Parser Rule
Assuming you created/update your email parser rule with the mapping based on the queue record – you are now ready to execute the rule and see the outcome. To do so, go to email parser area and click “Run Cron“. It will take few seconds to run and you should see that after the cron runs – it will update “Status” from “New” to “Processed”.
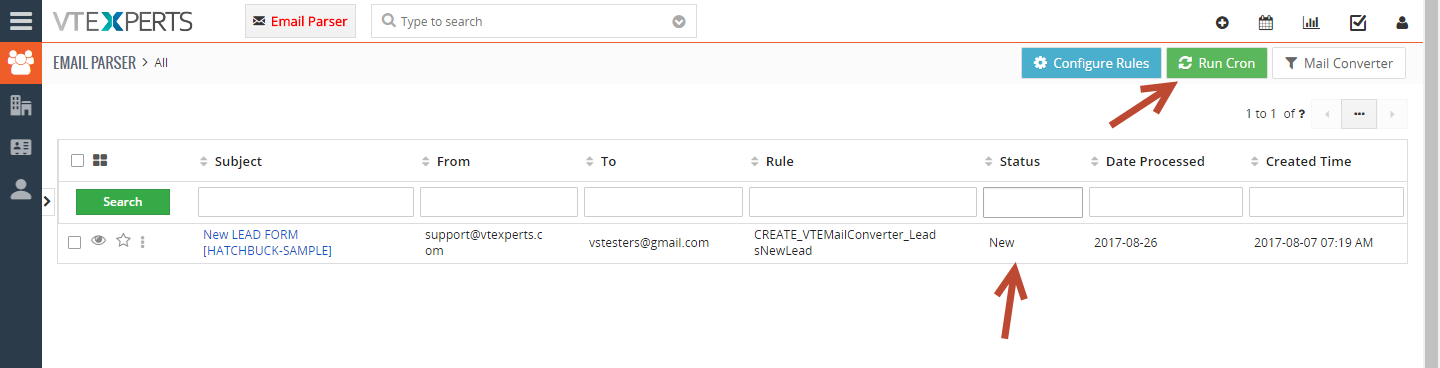
Once the queue record is processed, it should have created a new vTiger record – in our case, it’s a new lead. There are few things you should do now.
1. Make sure “Status” changed to “Processed”
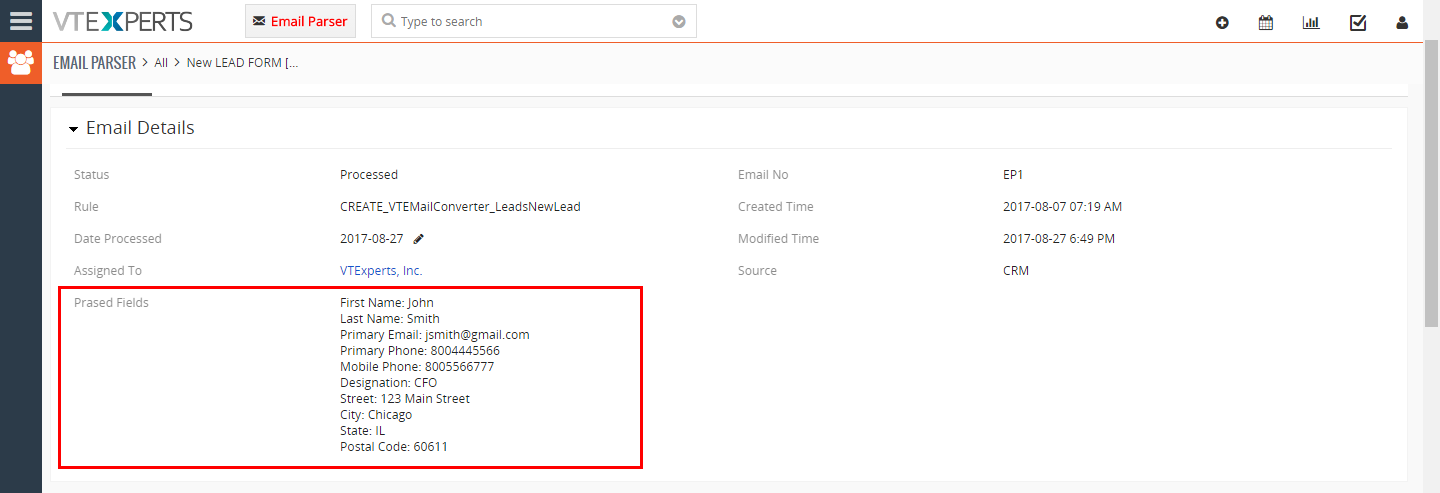
2. Open Queue record and look at the “Parsed Fields” field, this will tell you what was parsed from the email using your email parser rule. In the screenshot below – you can see that it parsed multiple fields such as first, last name, email, phone and so on. This field is very helpful when troubleshooting issue related to certain fields not being inserted into vtiger or parsed properly.
NOTE: If you want to process the same email parser queue record AGAIN – you just need to change status from “Processed” to “New”. This is very helpful and does not require you to send in new email to continue testing/troubleshooting/mapping.
3. Lastly – make sure that the new record was created in VTiger. The screenshot below is an example of the lead created using our mapping.

Automate Email Parser/Mail Converter
You can configure the whole process to be automatically executed every XX minutes. To do so, you will need to have vtigercron enabled/configured and working. Go to:
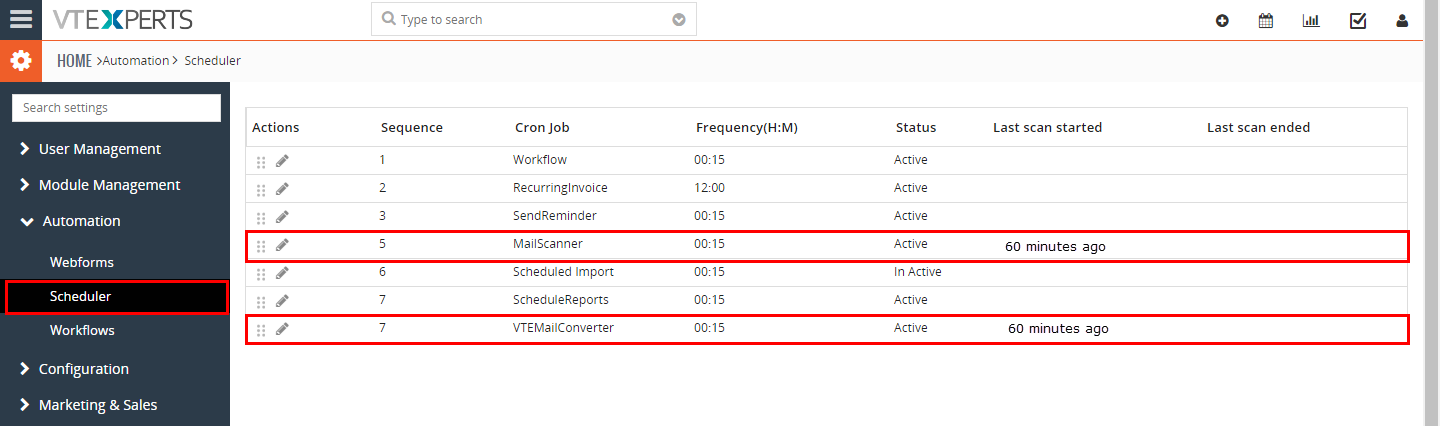
CRM Settings > Automation > Scheduler
You will then need to make sure that “MailScanner” is Active and has a value in “Last Scan Started”. This means that the vtigercron is setup properly and working for you.
Same applies to “Email Parser”, however it is called “VTEMailConverter” in the scheduler.
If you not see anything in “Last Scan Started” – that means your vtigercron is not setup. Click here for instructions.
If you need help configuring it – please contact us at help@vtexperts.com
Email Parser Special Notes
Email Parser is a very powerful extension and can significantly improve efficiency as far as data entry goes, so we added this custom section to point out few custom features that we added down the road.
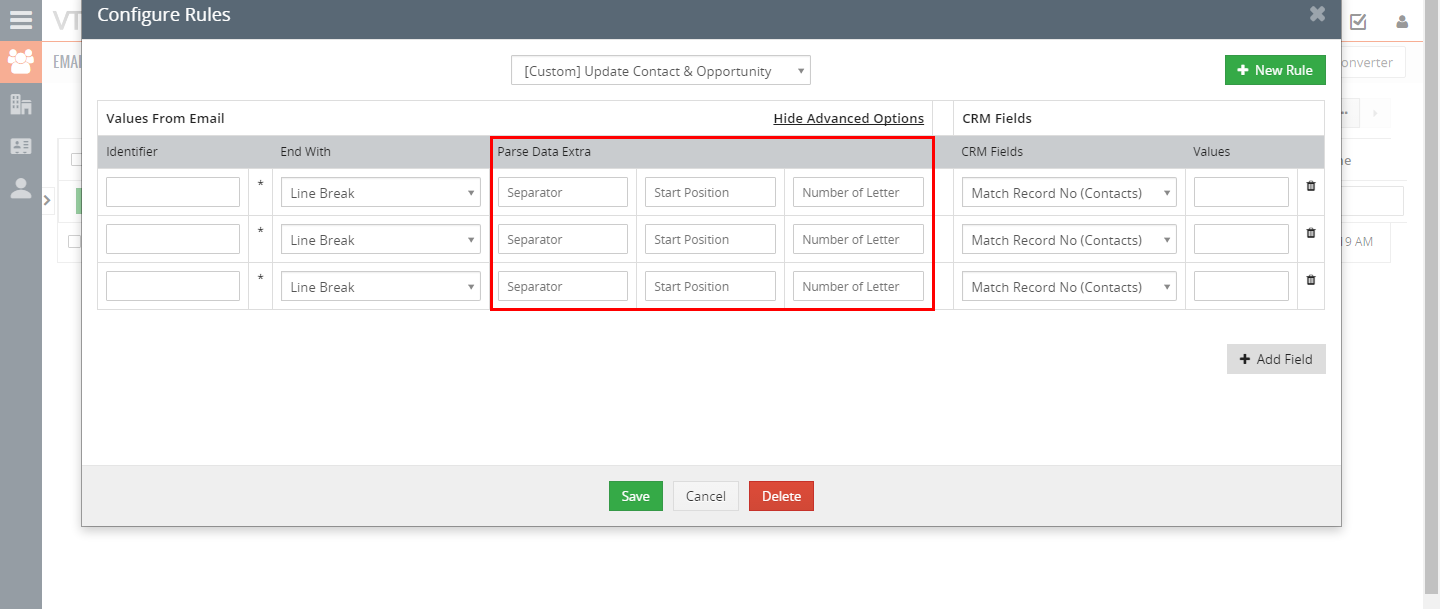
What are [Custom] Rules?
We’ve created few custom rules that allow to create and update multiple modules e.g Contact & Opportunity. You will be able to map fields from 2 different modules. You will also see “Match Record XXXX”, meaning that you can match records on certain fields.
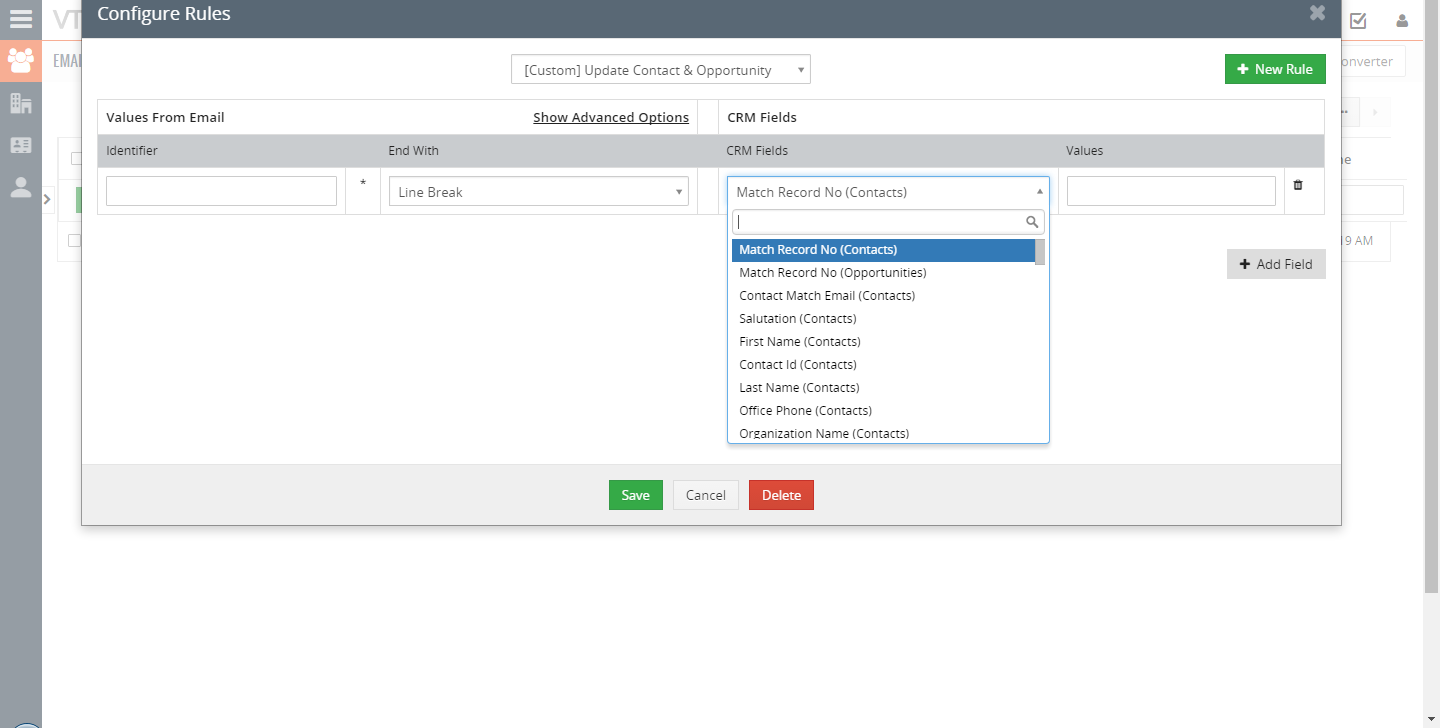
How does UPDATE rule type work?
Updates can be made on the “Record No” field or “Email”. If the match is found – it will update record based on mapping, however if the record is not found – IT WILL CREATE NEW RECORD.
How do Advanced Options Work?
Advanced Options are based on text to str PHP function. Please contact us for examples.