

SLA Policy Extension for VTiger was designed to improve response times, accountability, when dealing with time sensitive matters. It’s mostly used in support/helpdesk department, where each ticket/case has to be assigned and worked on/resolved by certain date and time. It allows administrator to create custom SLA Policy rules, which then get automatically applied to a record. For example, if a new critical gets created and does not get claimed/assigned by a user, a policy can be setup to notify the available users every 10 minutes since the ticket has been created. In addition, you can notify supervisor via email or text (workflow) 20.. 30..40.. minutes after if the ticket has not yet been worked on.
Configuration
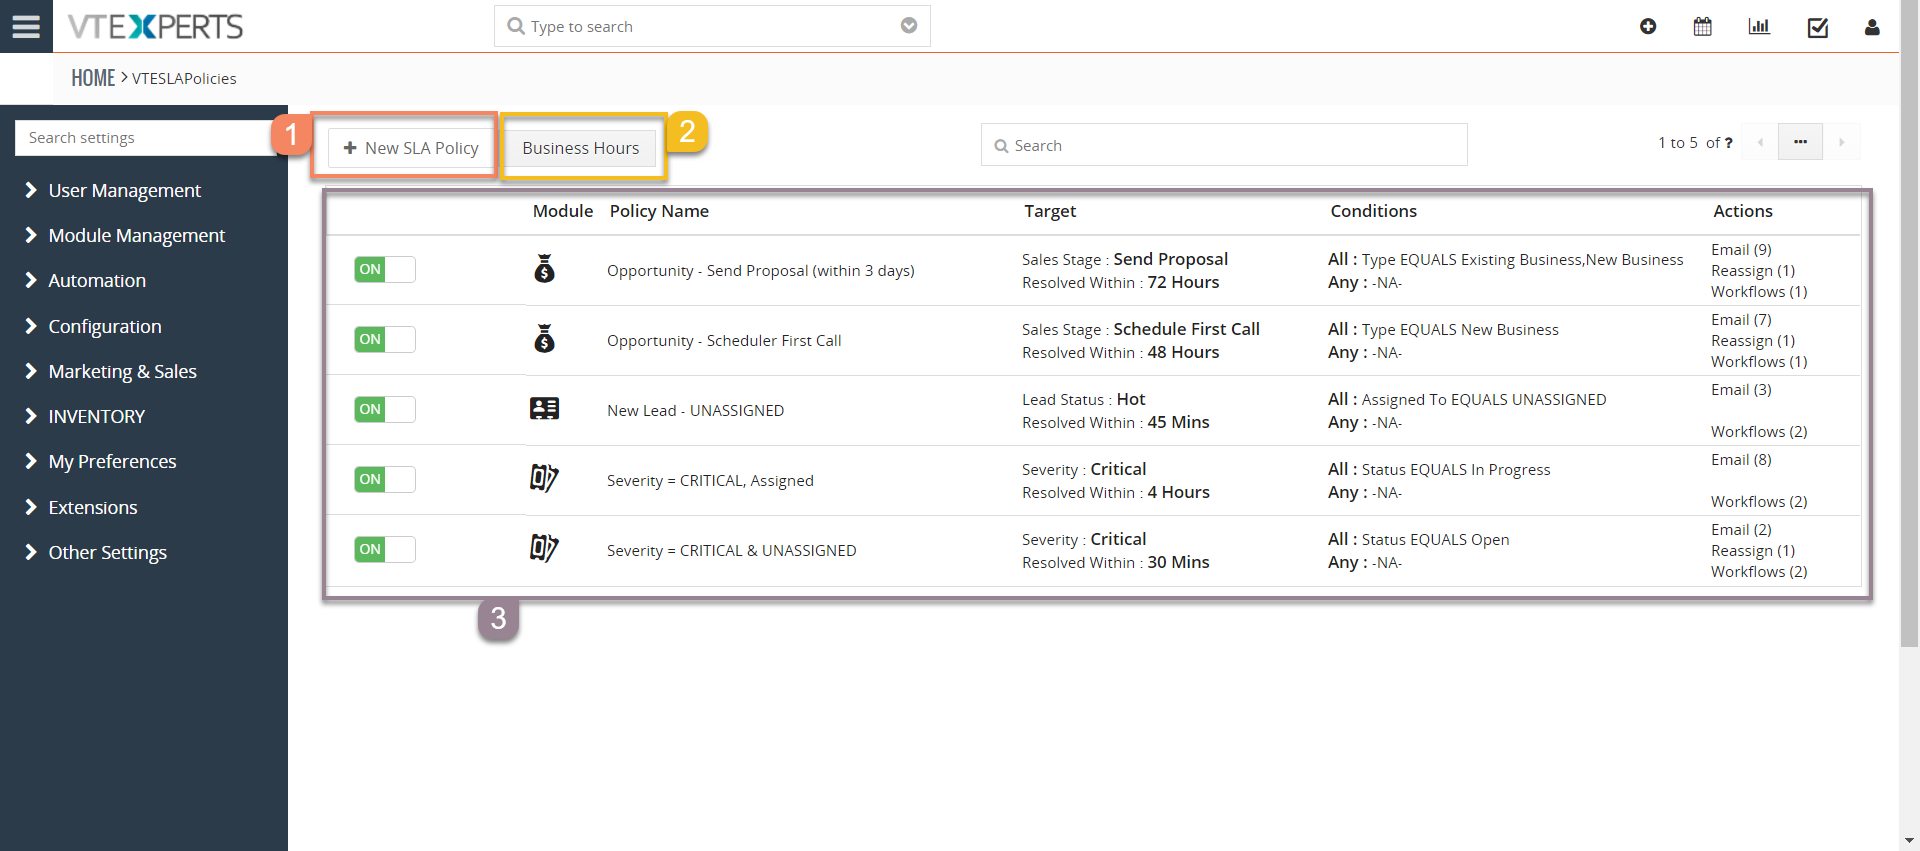
The extension can be configured by going into CRM Settings > Extension Pack > SLA Policies.
New SLA Policy: To create an SLA policy
Business Hours: This block is where you can configure the Business hours for your organization as well as the vacations per year
SLA Policy List: Here is the list of all the policies we have created. In this list you can see all the policies created and sorted by Policy Name, Module, Target, Conditions and Actions that will be executed for that policy.
New SLA Policy
Creating a new SLA Policy is a 5 step process, while the 5th step can be ignored if your organization do not use business hours
1. SLA Policy Details
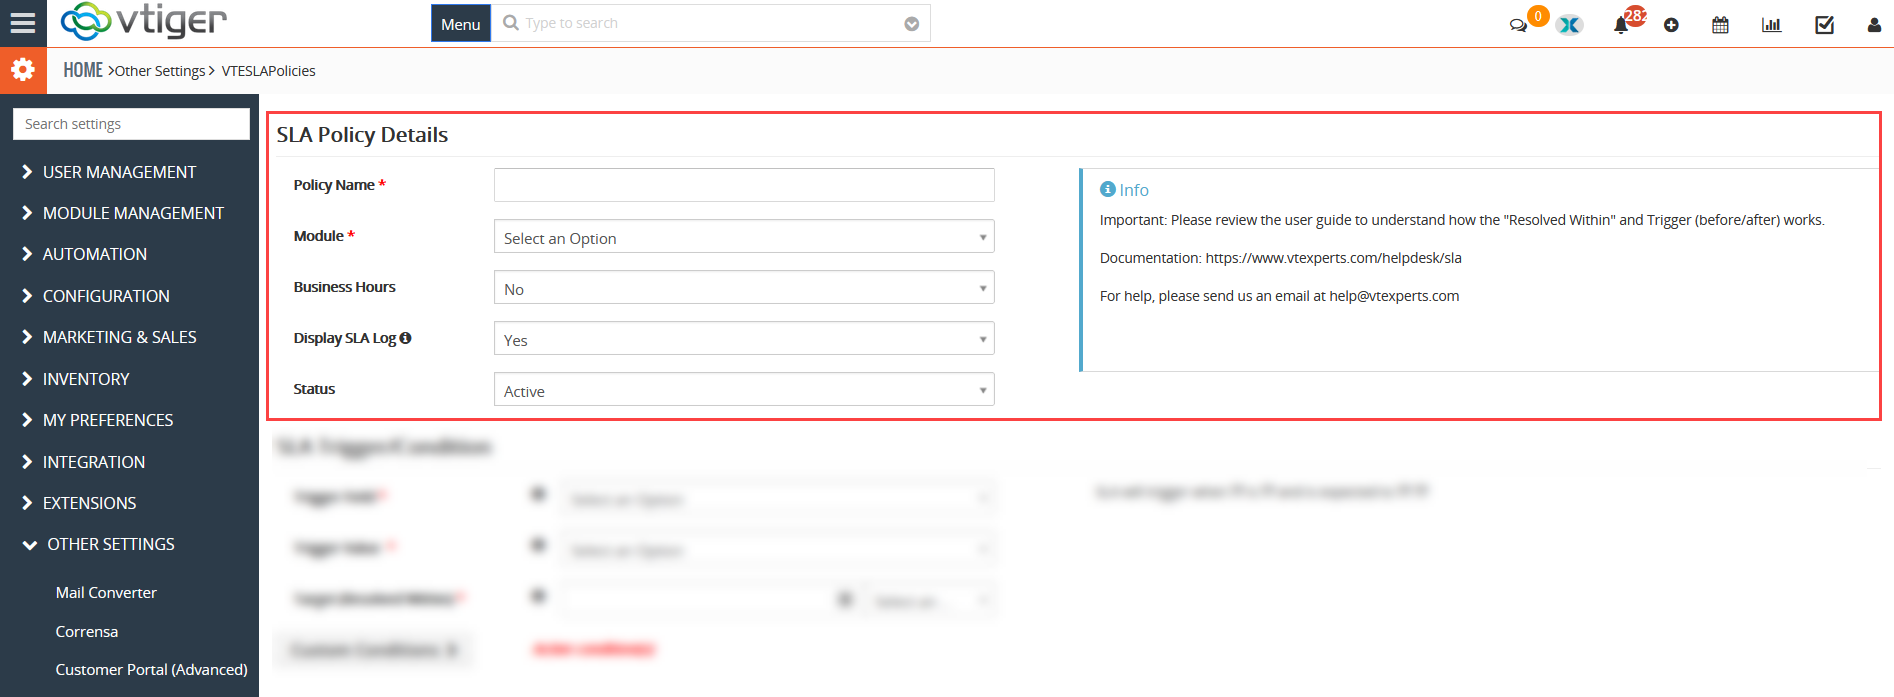
Policy Name: Name for the new policy.
Module: Select the module you want to apply this policy to.
Business Hours: Business Hours, if set to “Yes”, are observed. SLA responses are only triggered during the set Business Hours and ignored otherwise. “Business Hours” are explained in details later in the guide.
Display SLA Logs: Enable this option to display the SLA logs in records. See “SLA Policy Log” later in the guide for more information.
Status: Set the current SLA policy to active or inactive
2. SLA Trigger/Condition Details
In this section the user will identify the instances which will trigger the SLA.
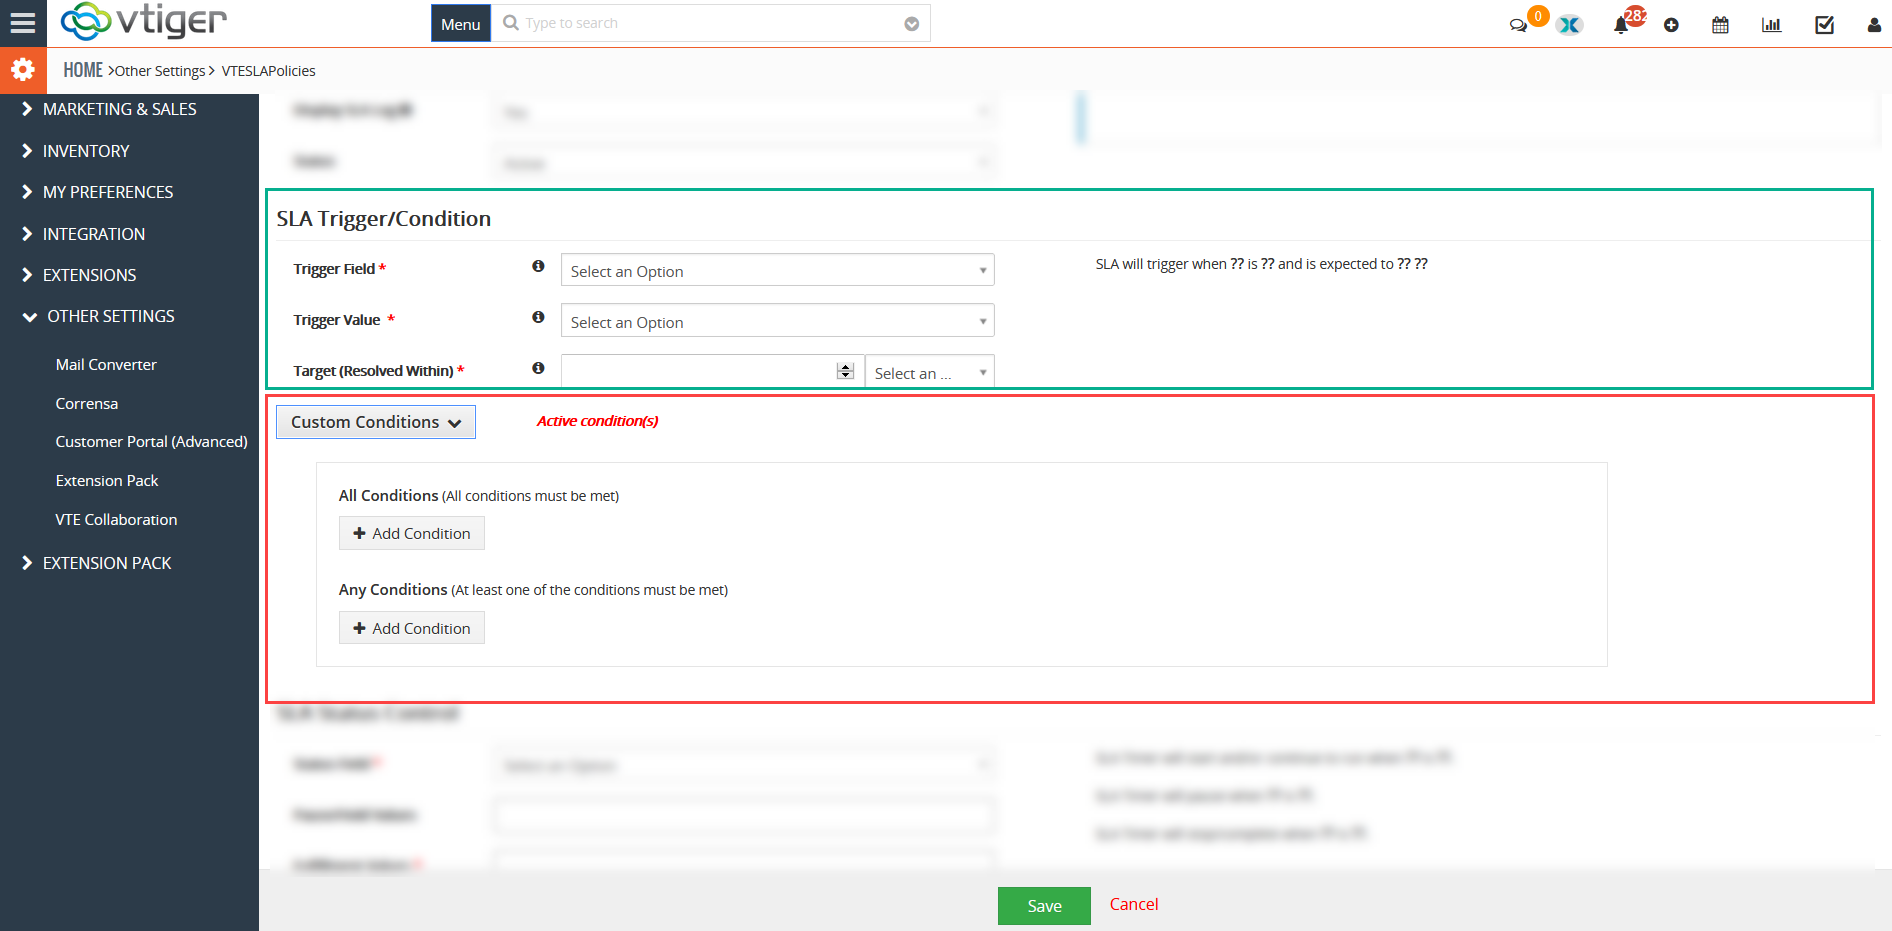
Trigger Field: Select the field which will trigger the SLA
Trigger Value: Select the value of the field which will trigger the SLA
Target (Resolve within): Determine the number of minutes/hours in which you want the issue to be resolved
Use‘s can also add custom conditions or additional conditions that should be met in order for a record (ticket in our example) to be SLA eligible. For example (If Status = Open, that means the ticket status should be set to open and it cannot be marked an SLA unless this condition is met).
3. SLA Status Control
User identifies the SLA control in this section
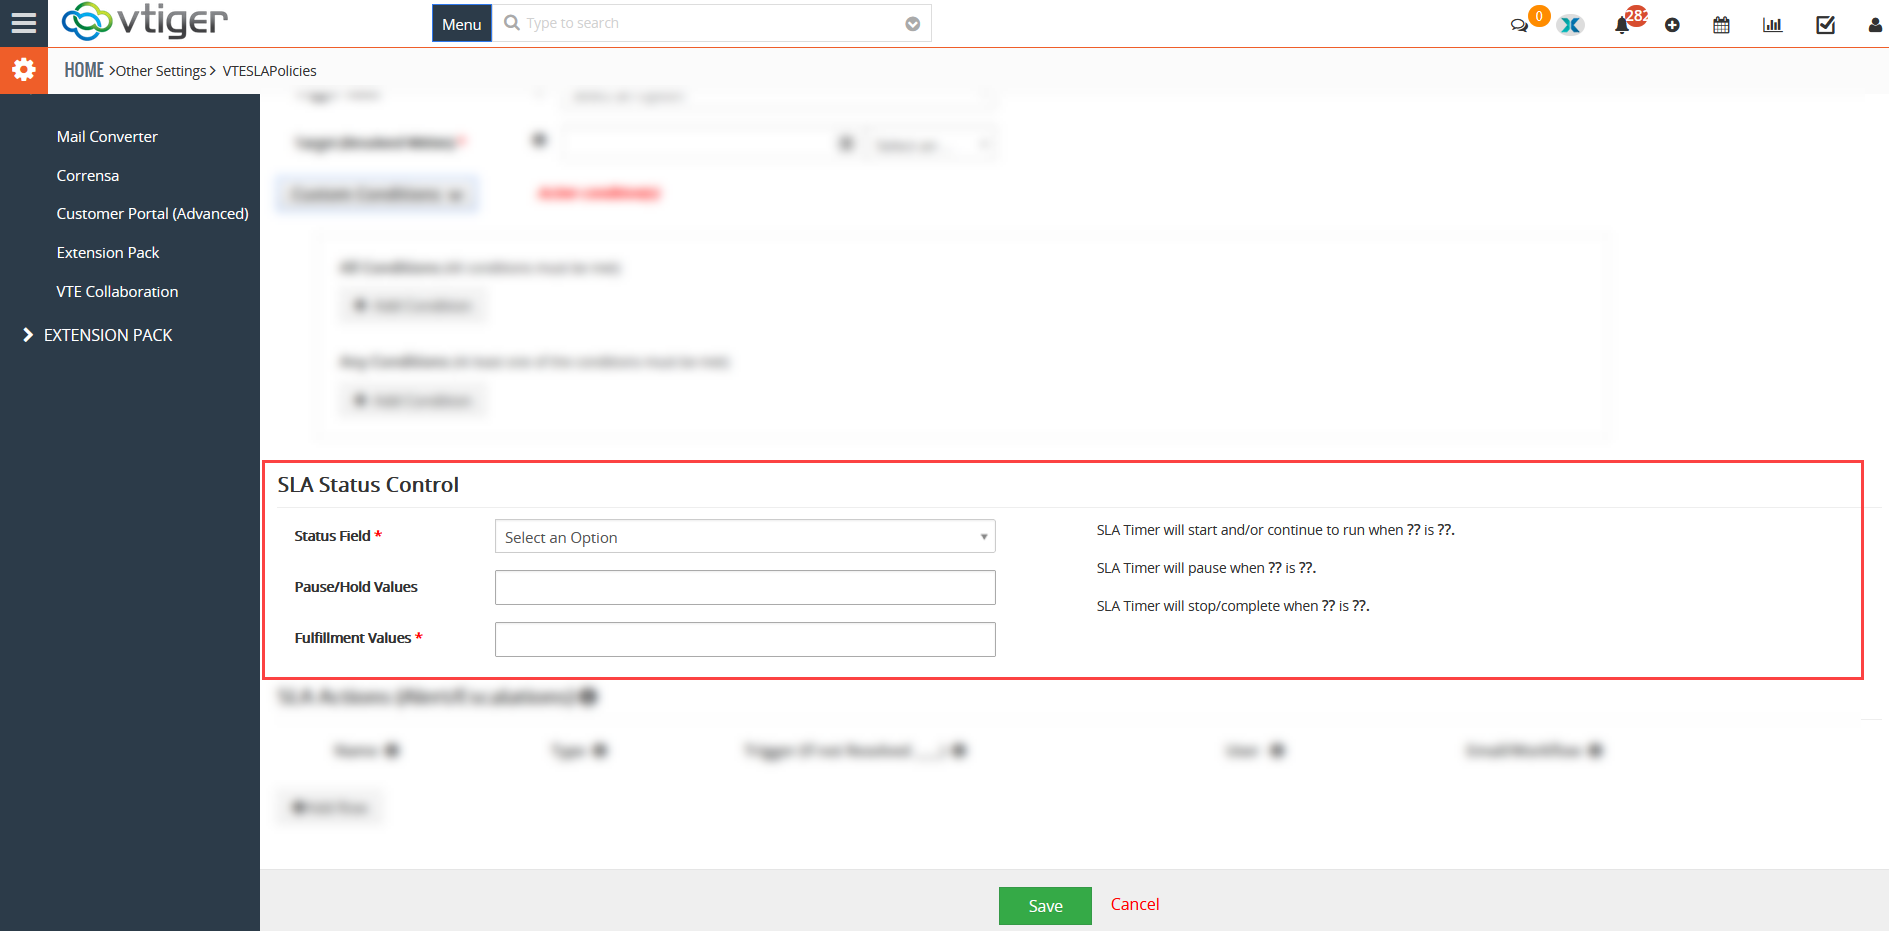
Status Field: Provide the field which will run or continue running the SLA
Pause/Hold Values: Provide the field value on which the SLA will be put on hold.
Fulfillment Values: Provide the status field value on which you want the SLA to be stopped.
4. SLA Actions (Alerts/Escalations)
In this block, you can setup the actions you need to be implemented on the SLA record. You can add as many actions as required. Use the “Add Row” button to add a new action.
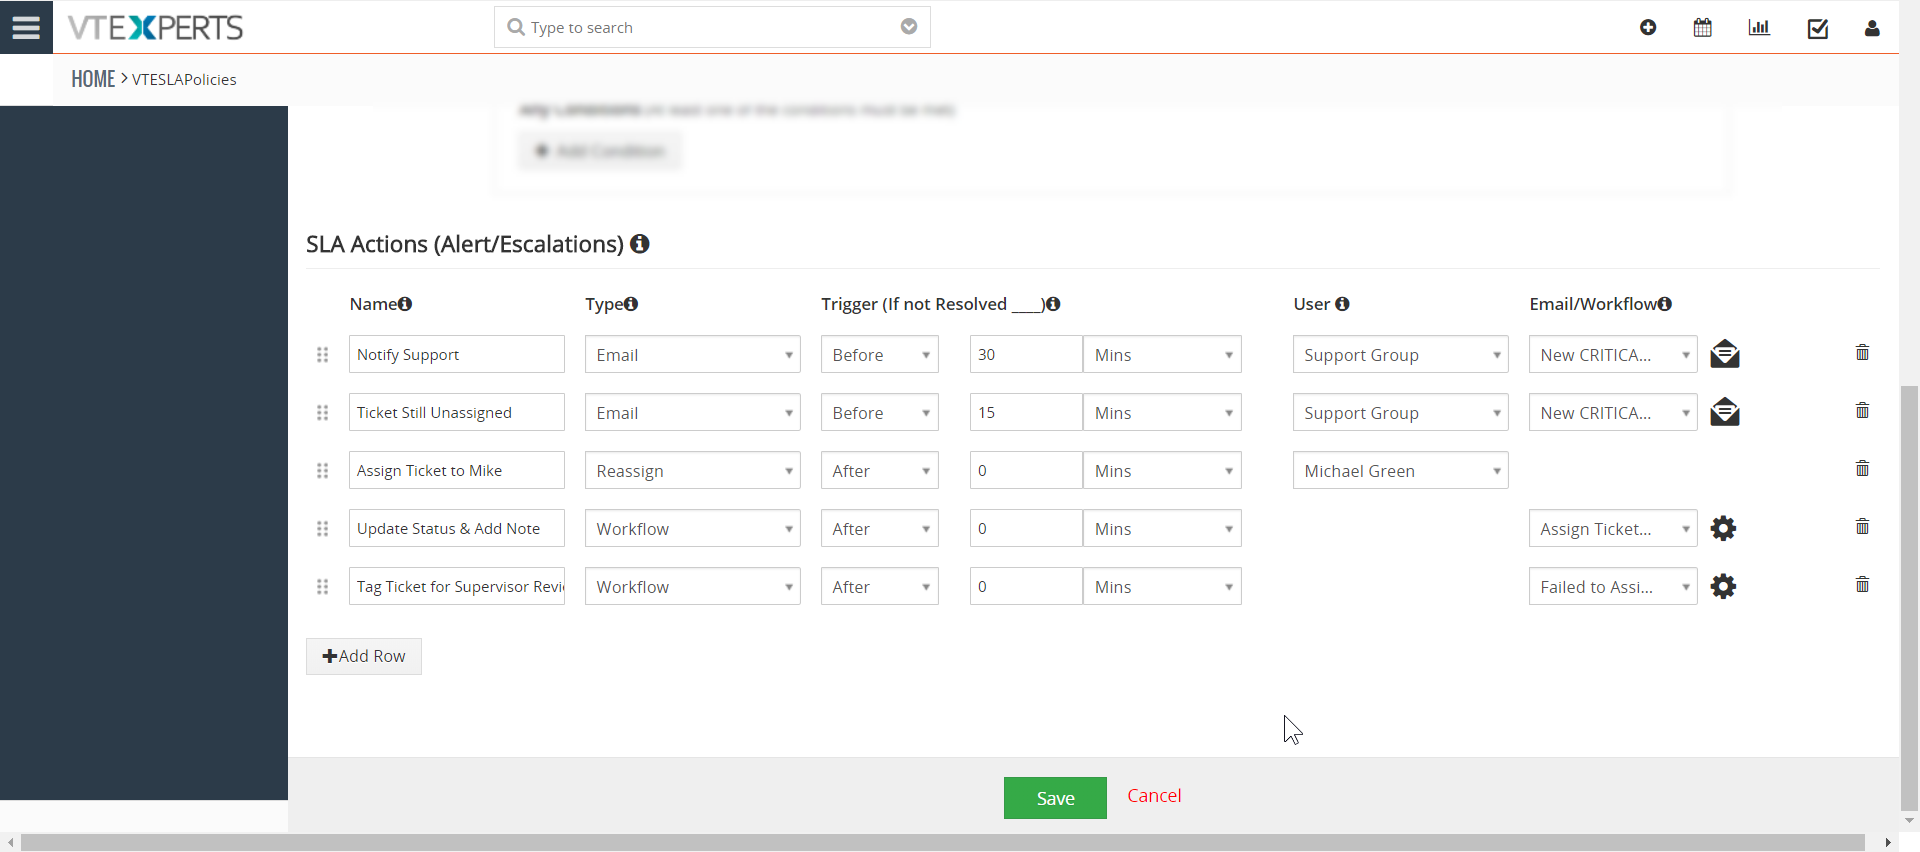
Add Row: This is a new SLA action. It has several options for the action to be implemented correctly.
Name: This is a text field – any name can be assigned for future consultation
Type: The type of action that’s needed to be implemented. There are 3 types of actions:
i. Email – send email to the concerned user(s)
ii. Reassign – change the “assigned to” value from either “Unassigned” to a specific user or group
iii. Workflow – trigger a workflow that will further implement multiple actions and changes
Trigger (If not resolve____): You can trigger an SLA action before or after the SLA has been breached using this picklist. It allows you to specify a time before or after.
User: If “Type” is set to “Email”, this will send an email to the user or group. The user or group who will be supposed to receive the email, can be selected in this “User” picklist.
If “Type” is set to “Reassign”, selecting a user from this picklist will assign the record to him/her/them once the conditions and triggers are met.
Email/Workflow: You can send an email to the select user/group or trigger a workflow to execute specific actions.
If “Type” is set to “Email”, the picklist will allow you to choose an email template from VTiger and send it to the select user/group once all the conditions, triggers, and specifications are met on the given time. This can also be configured by using the “Email” icon next to the Email/Workflow picklist.
If “Type” is set to “Workflow”, you can choose a workflow from the already configured ones, and execute the actions for the SLA response accordingly. Once the conditions, triggers, and specifications are met on the given time, the select workflow will run and execute further actions.
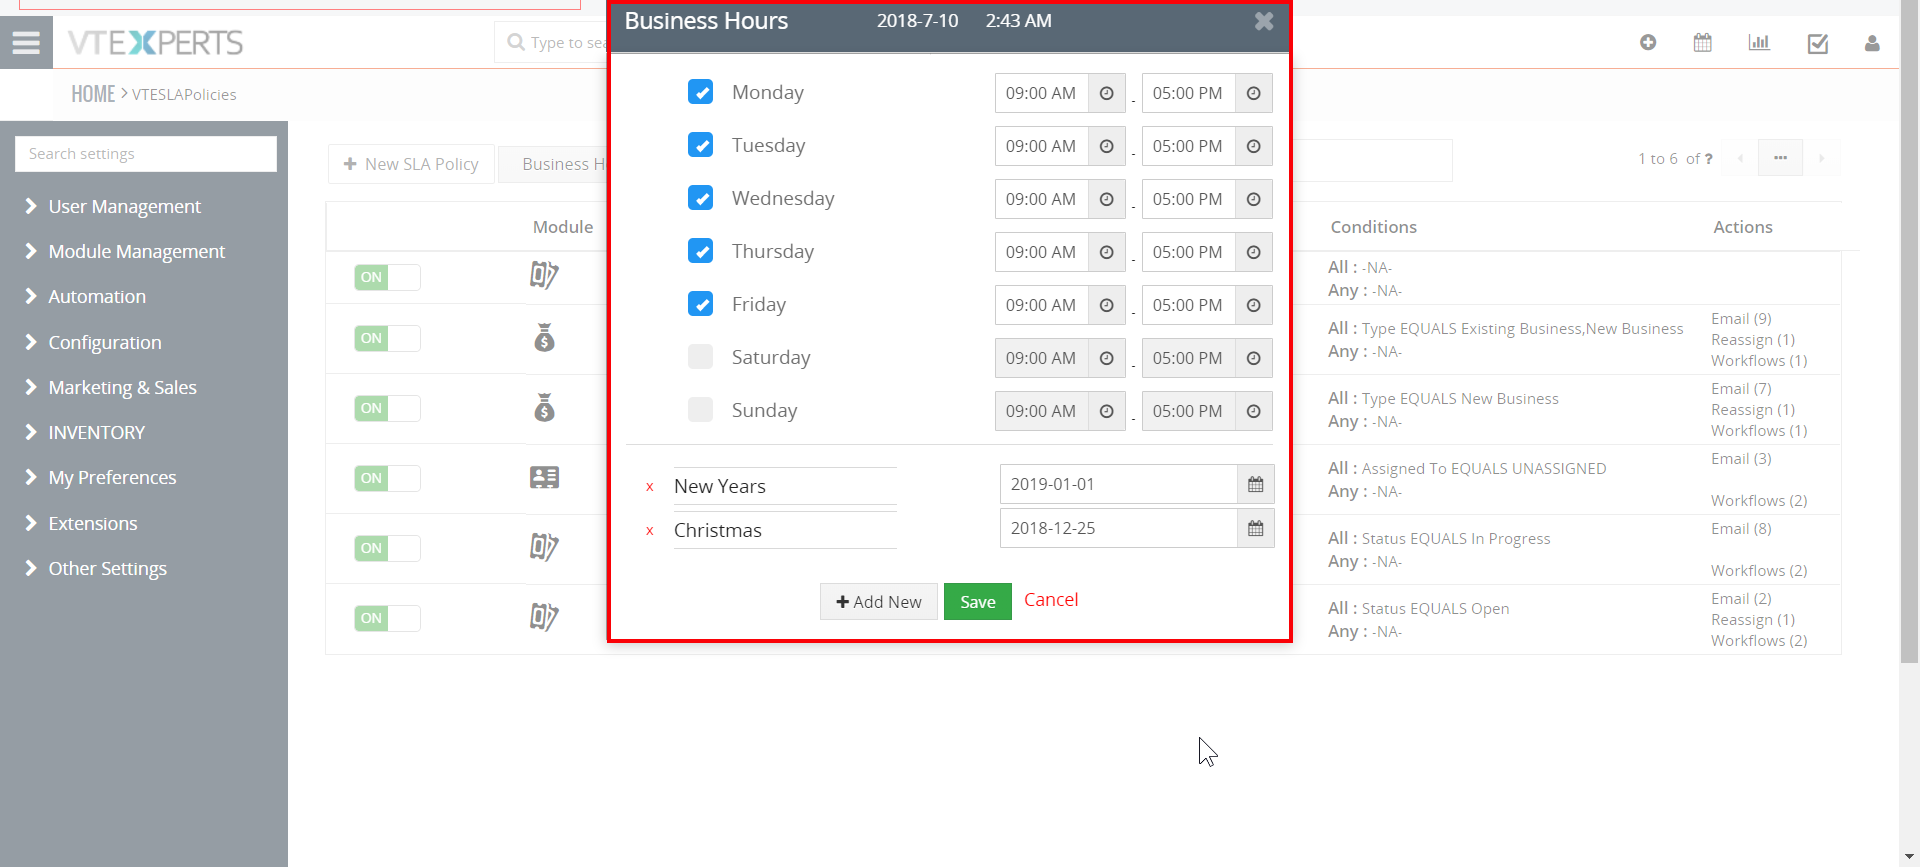
5. Business Hours
“Business hours” is the block where you can set the working day and time for your organization. Out of that time, the SLA response won’t be triggered. Also, only the business hours will be counted as SLA response time. For example, if you have SLA response time of 5 hours. Now, if you set Business Hours from 09:00 AM to 05:00 PM, and you receive a ticket at 03:00 PM, that means you need to fix the issue by 12:00 PM next day. Basically, when you setup business hours, the hours outside that are not counted towards SLA.
You can select the days, configure start-end timing of the days, and add annual vacations to be followed yearly.
Examples
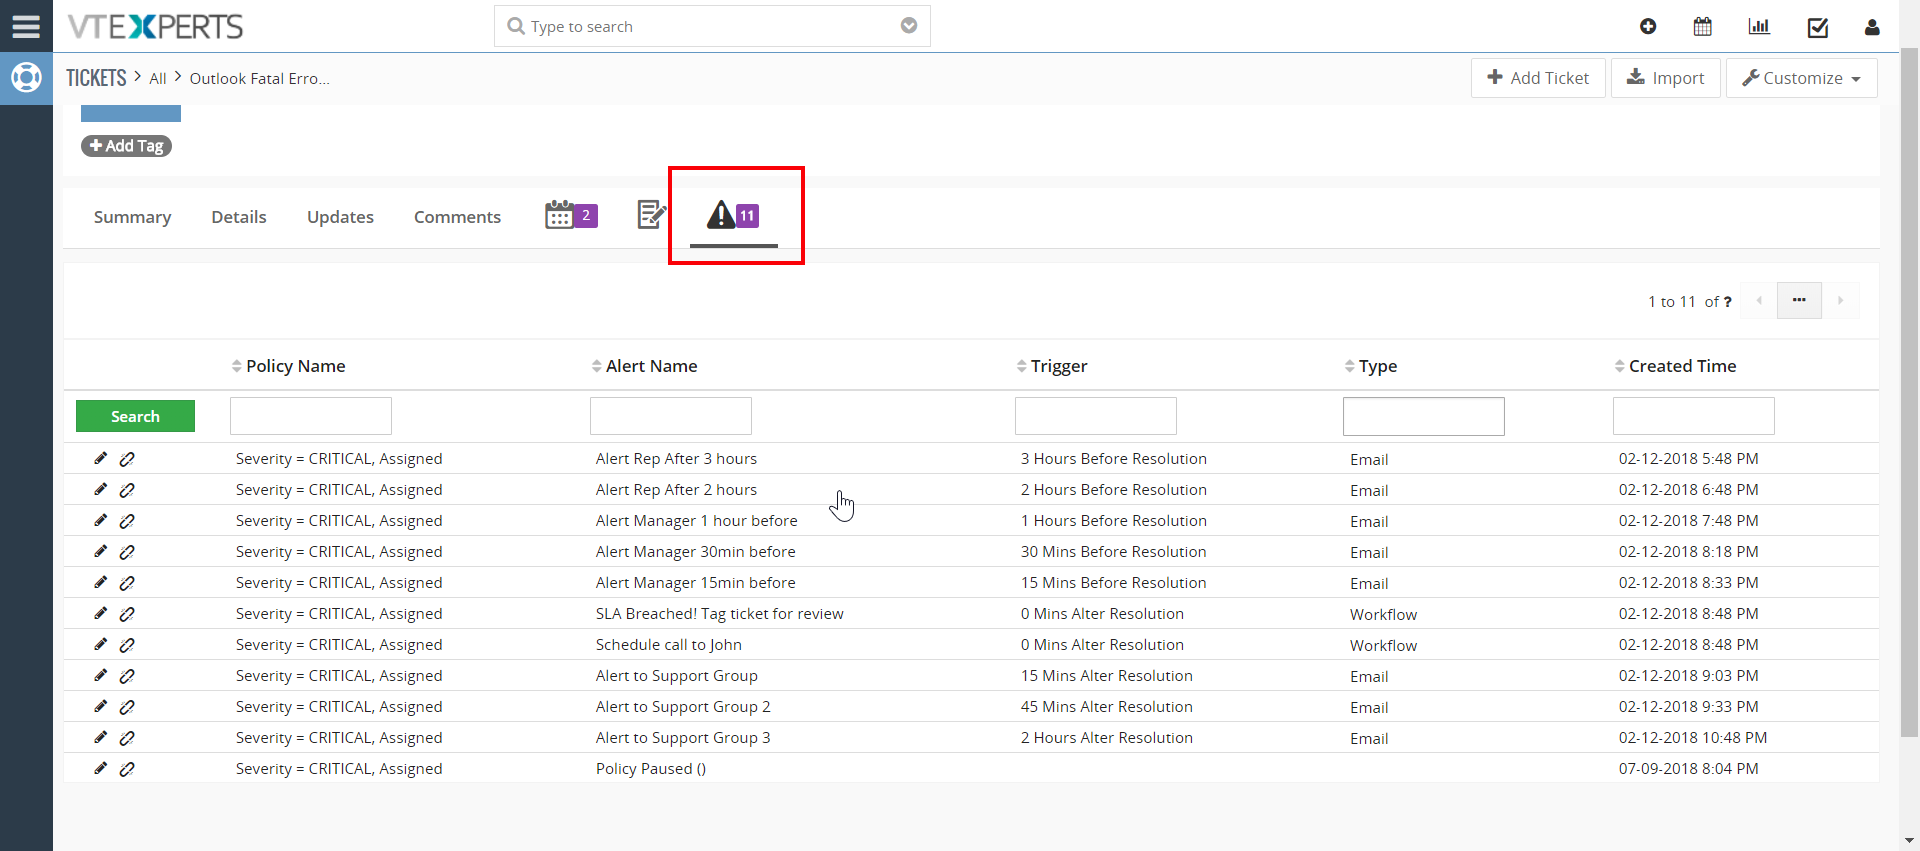
Here are some cases where SLA are shown to be set using multiple actions and alerts, once SLA is breached::
- If a ticket is created as critical and not assigned for a while.
To: Notify Support (via) Email > Before = 30 Minutes (send the email to) Support Group/Individual (you can) Select Email Template.
If: Ticket still unassigned (then send) Email (considering its) Before > 15 Minutes (send another email to) Support Group/Individual (you can) Select Email Template
If still not assigned: Assign ticket (by automated assigning workflow using) Reassign (if no rep has picked it) After = 0 Minutes (select the) Support Group/Individual
Now we also need to update the status by executing a workflow for example
Update status > Workflow > After > 0 Minutes > Select Workflow
- New HOT Lead comes in, if after 10 minutes the lead is still unassigned, you can automatically assign it to a sales rep or notify users/managers + trigger any workflow.
- Invoice has been opened (unpaid) for more than 14 days, you can create a policy that will notify you/accounting that the invoice has not been yet paid + you can trigger automated emails to the customer, account rep.
SLA Details Block
We added this SLA Details block for the module for which the SLAs are configured. It contains following fields:
SLA Name: This is the name of the SLA that is implemented on the Current Record
SLA Time Remaining: The time left in the SLA duration completion
SLA Time Remaining (hours): This is the time left in the SLA calculated in hours
SLA Status: The status of the SLA i.e. time left, in progress, fulfilled etc
SLA Time Elapsed: The SLA time that has been spent on the current record
SLA Time Elapsed (hours): The SLA time that has been spent – calculated in hours.

SLA Status
SLA status shows the progress and current status of the SLA response. So if a project is being worked upon, the status will be set to the timeleft. Completion is marked as Fulfilled and so on. The SLA statuses are as follow:
<SLA Statuses and what do they mean. Coming soon>