Extension designed to enforce proper security standards in VTiger. Our tool allows system administrators to force users to change their passwords every xx days, and implements secure password rules (one lower/upper case, number, special character).This extension provides a complete package to enhance your VTiger CRM security. To make your VTiger CRM even more protected we added a new feature in Secure Login extension, specifically we strengthen the 2FA by adding a SMS compatibility with it, in addition to Email. Following are some details regarding it
In addition, it tracks successful and failed logins, and locks users after number of incorrect logins. It has built in capabilities to restrict user logins to one IP address, only allowing to login on one device.
Configuration
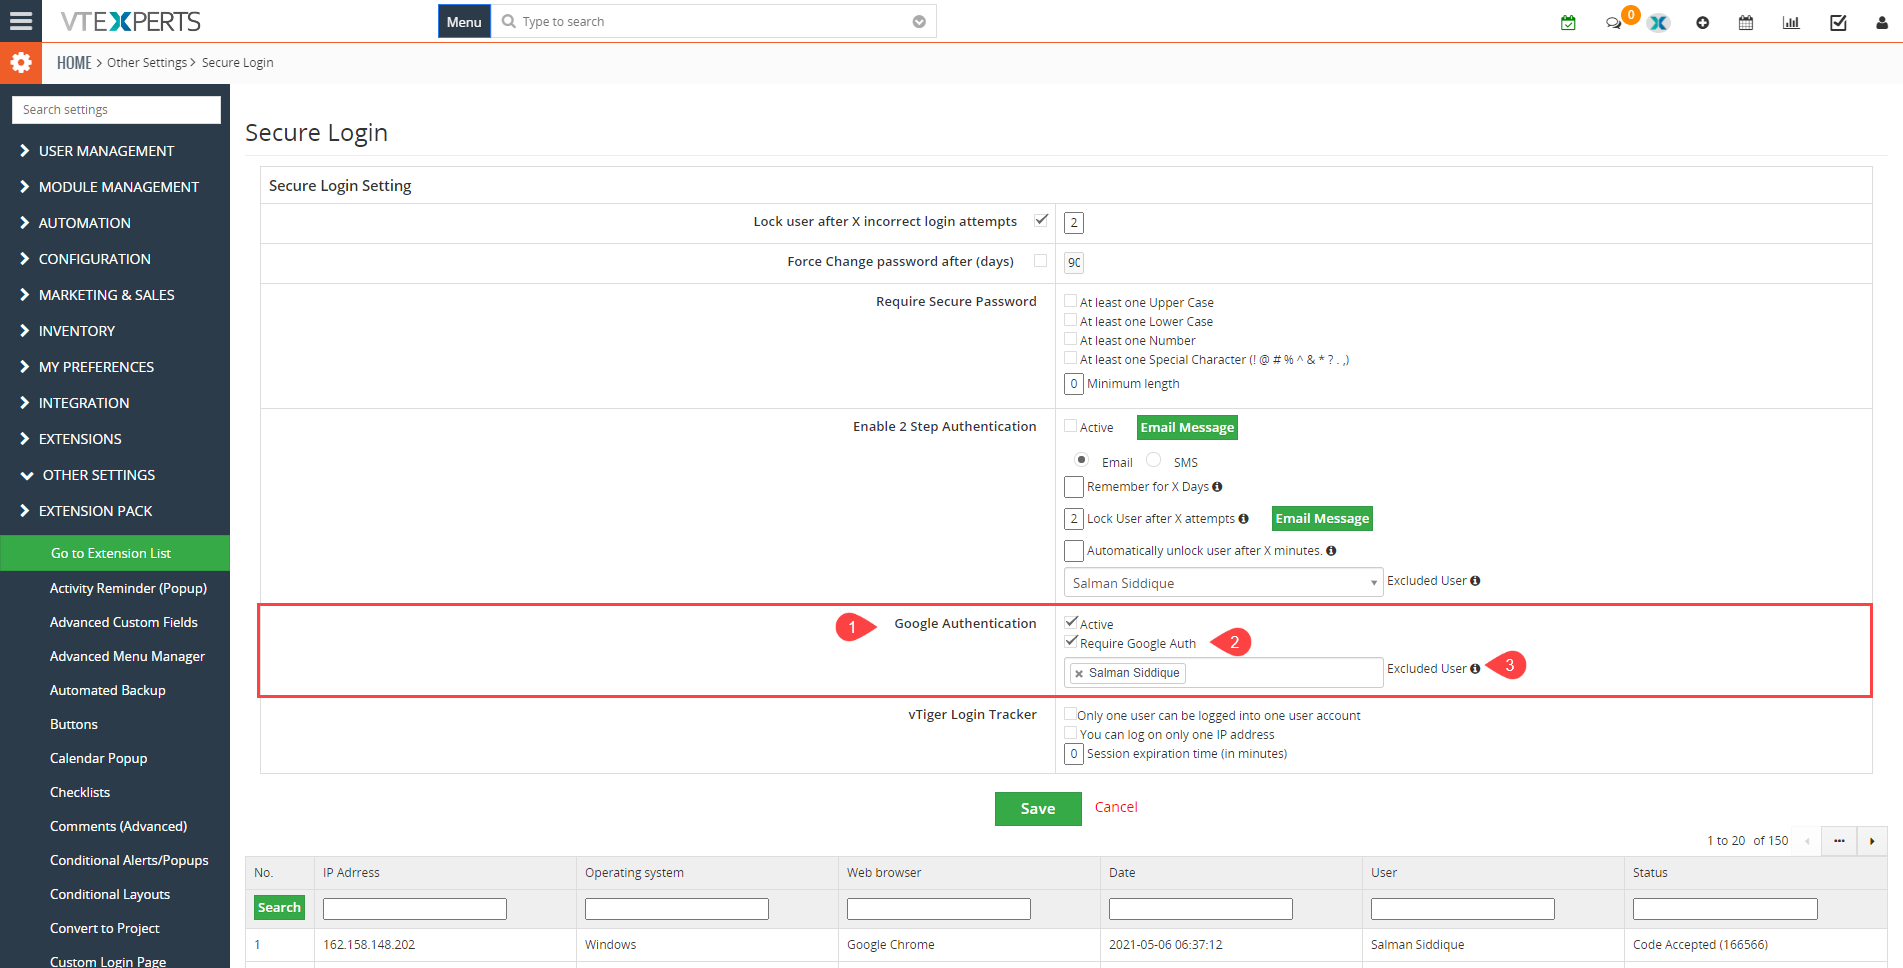
The Secure Login can be configured by going to the CRM Settings > Other Settings > Enhance Security.
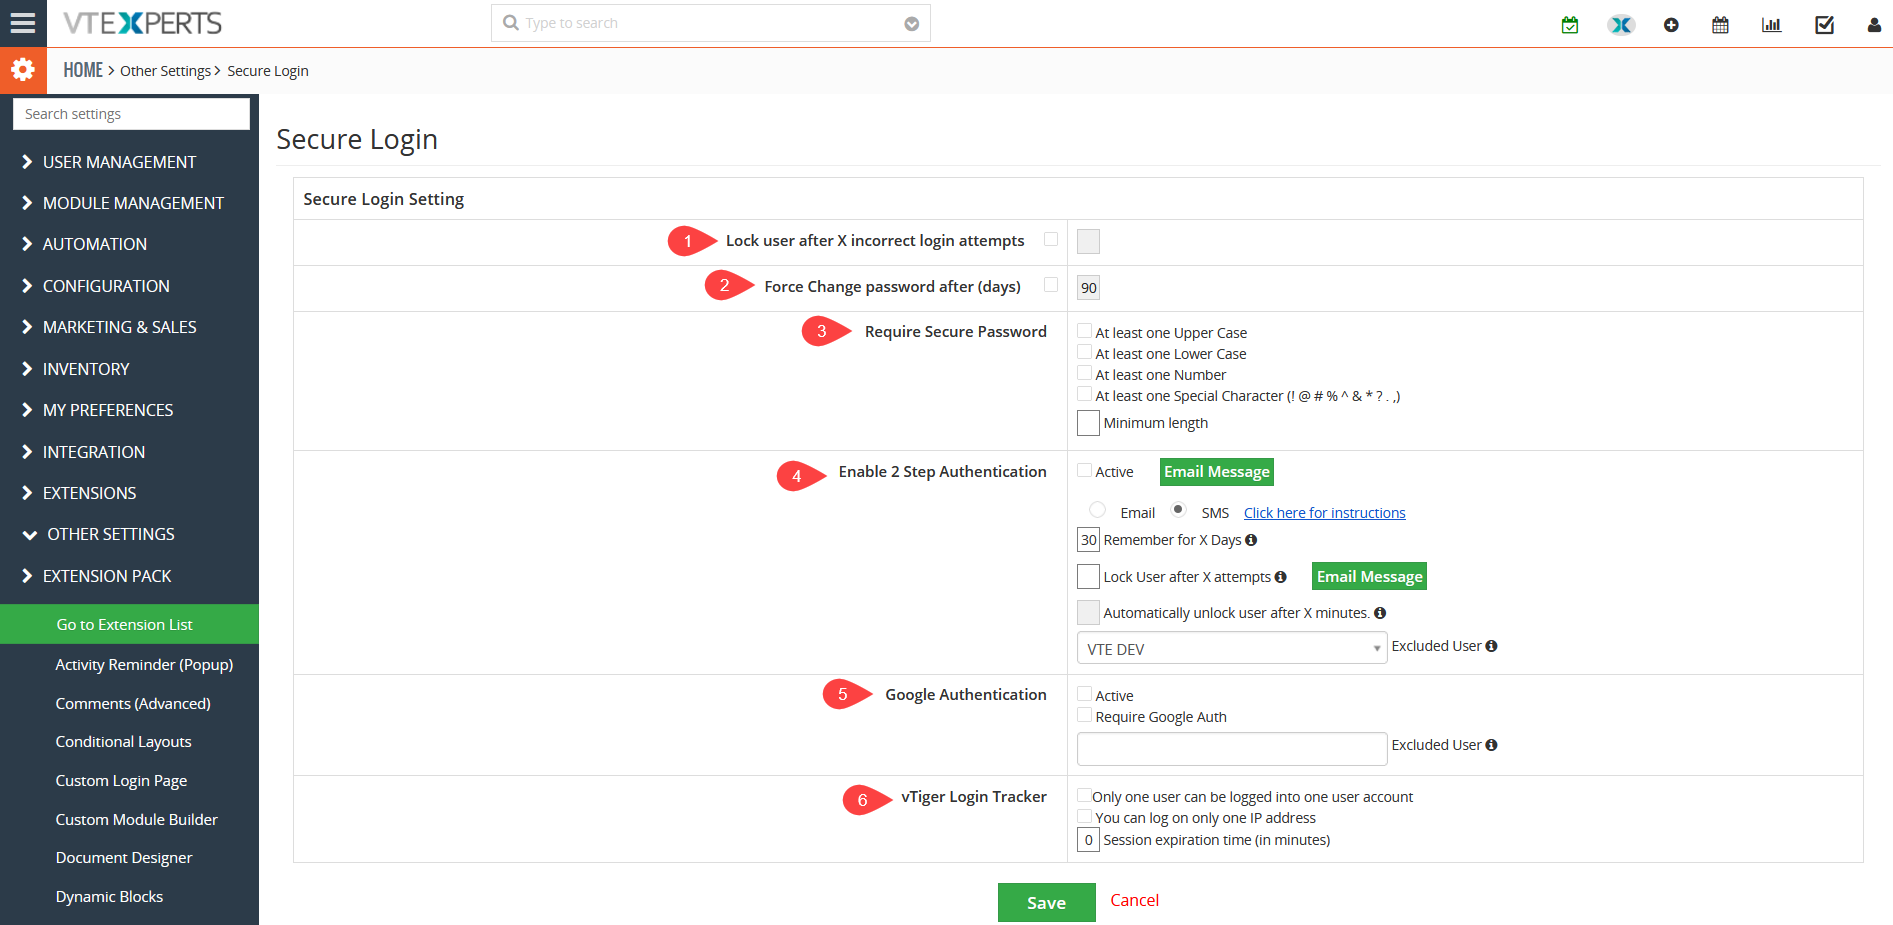
The Secure Login can be configured by going to the CRM Settings > Other Settings > Enhance Security.
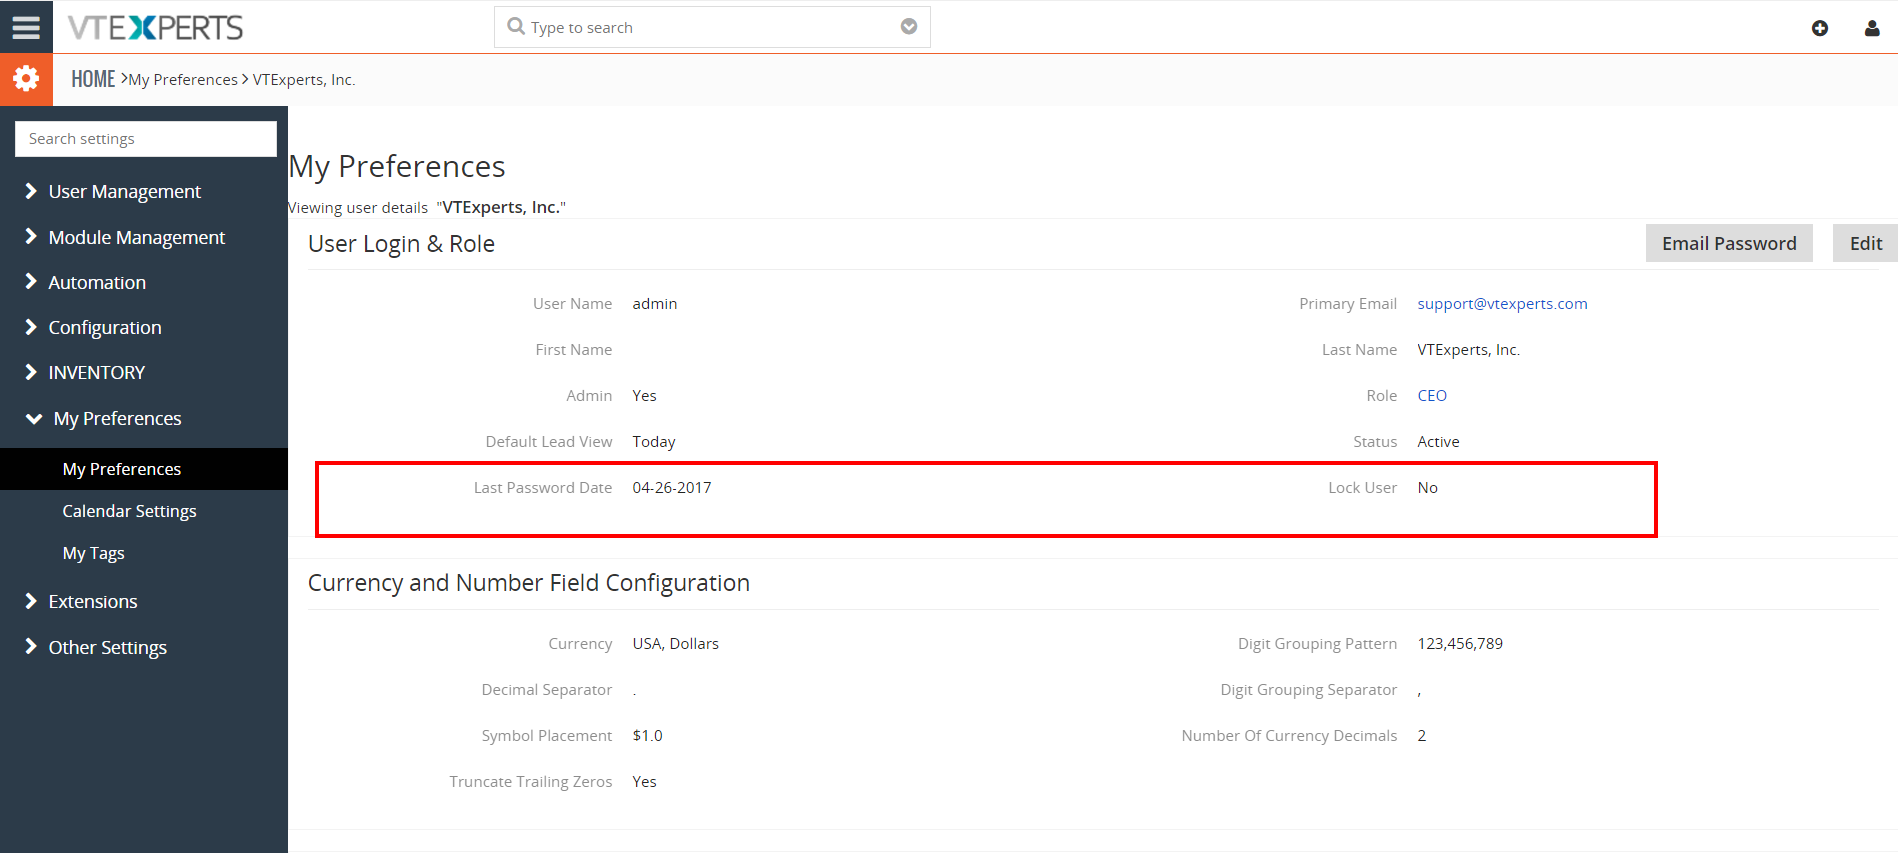
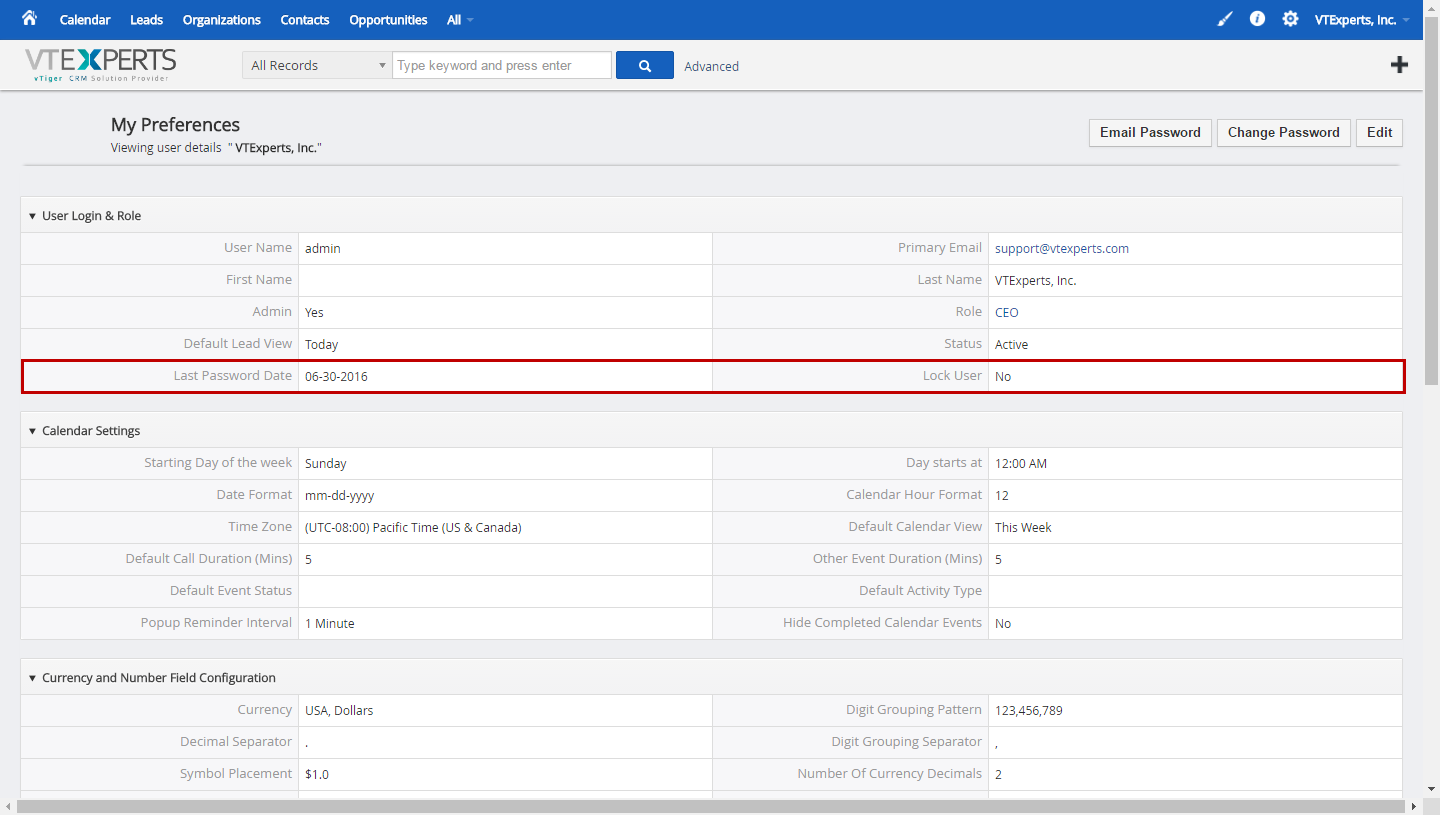
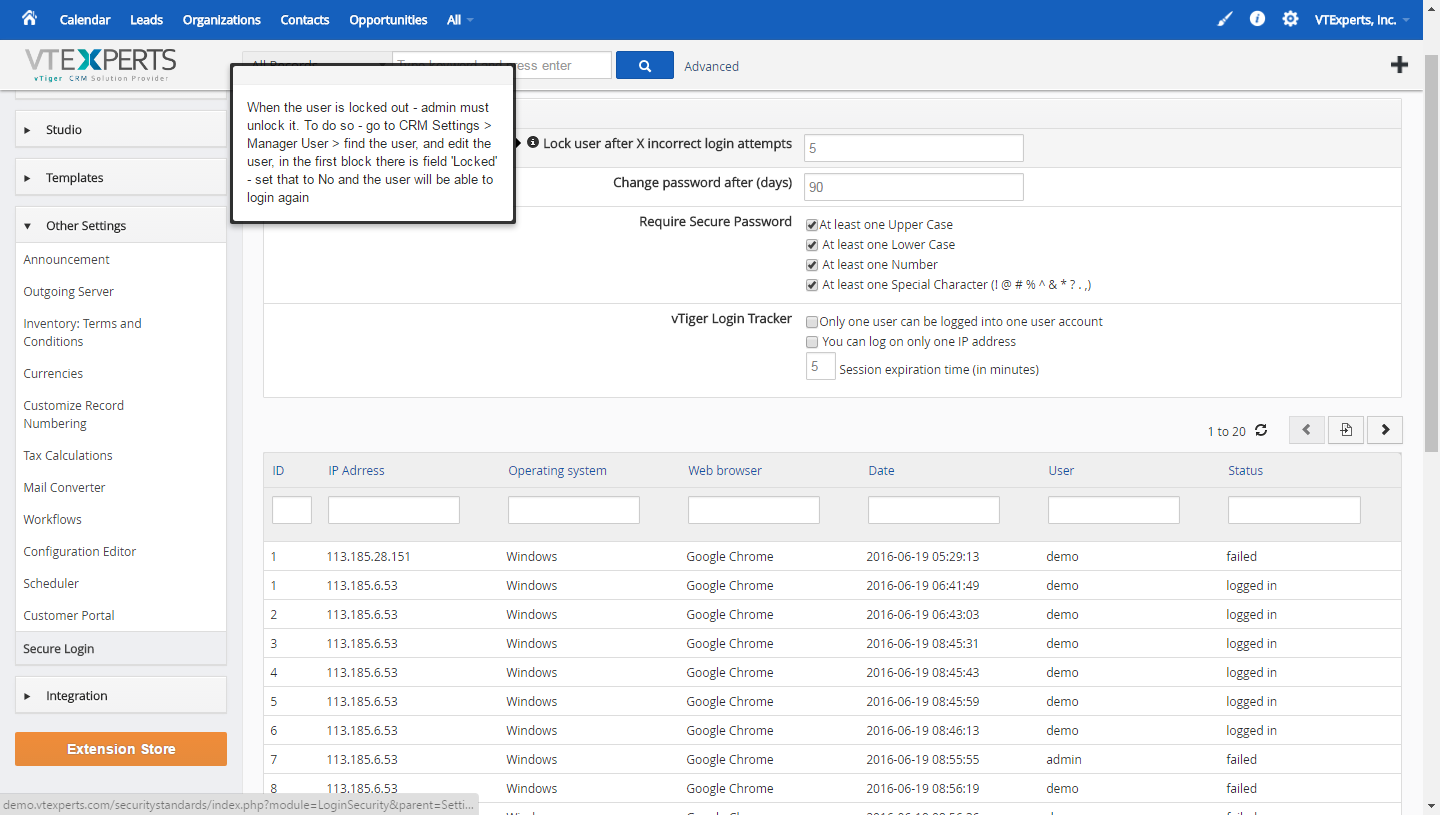
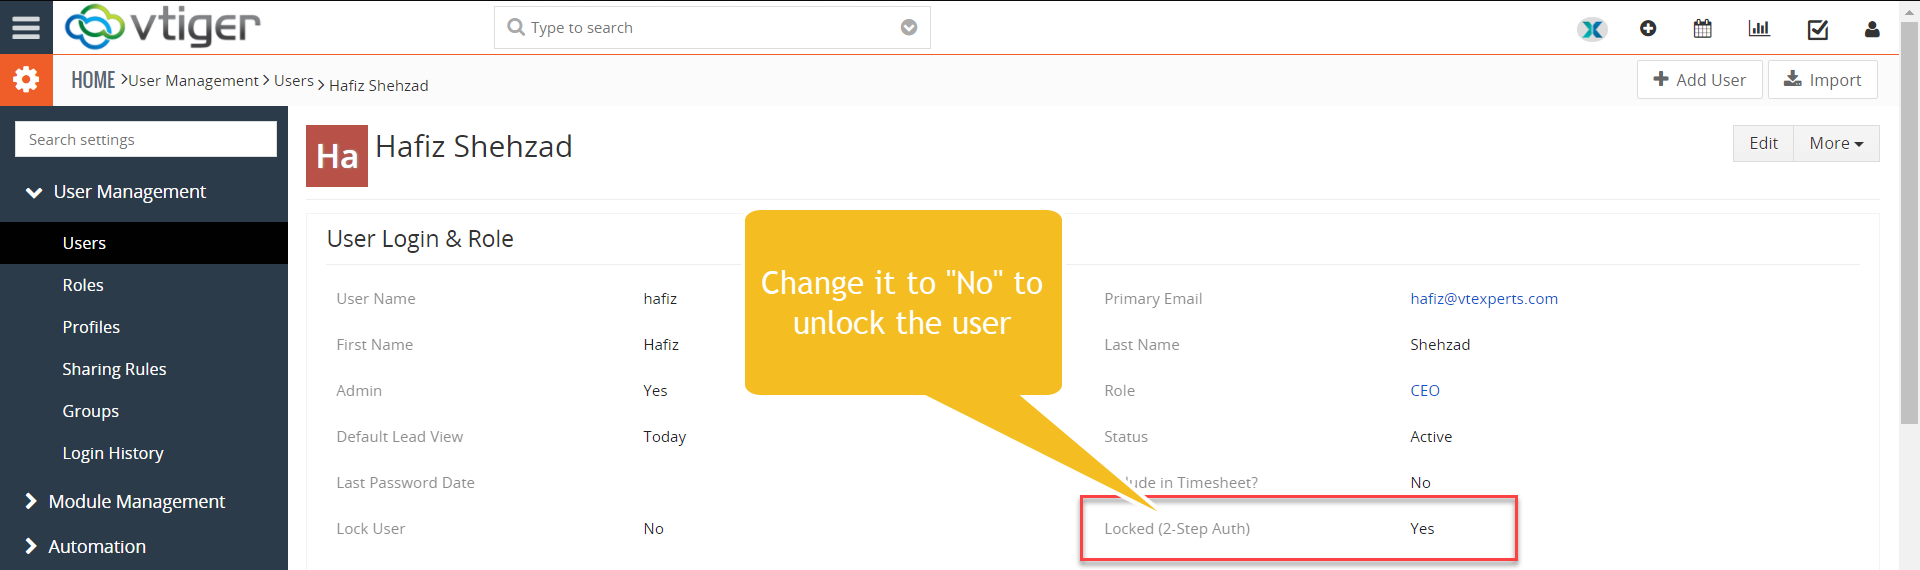
1. Lock user after X incorrect login attempts: Specify the number of failed login attempts, after which the login will be inaccessible/locked. (When the user is locked – a field in user “My Preferences” is set to Locked = Yes. To unlock the user – system admin would have to uncheck that field for locked user).
2. Force Change password after (days): User is forced to reset his password after the specified number of days, every time.
3. Require Secure Password: Secure password must have; (At least one Upper and lower Case, At least one Number, At least one Special Character (! @ # % ^ & * ? . ,), if all options are enabled.
4. Enable 2 Step Authentication: allows system admins to add an extra layer of security for the CRM. This is explained in details later in the section “2 – Step Authentication”
5. Google Authentication: Enhanced User Security also features google authentication now. To activate this feature just check the box with label Active and Require Google Auth. If you want to exclude any user from the google authentication then just simply mention that user in Excluded user bar.
6. VTiger Login Tracker: To restrict users’ login activities. Following options are available that can be enabled/disabled according to the requirements:
* Only one user can be logged into one user account – restricts to 1 session of the user at a time.
* You can log on only one IP address – locks the user to be able to login from only 1 IP address.
* Session expiration time (in minutes) – user gets logged out after the specific time.
Configuration of 2 – Step Authentication
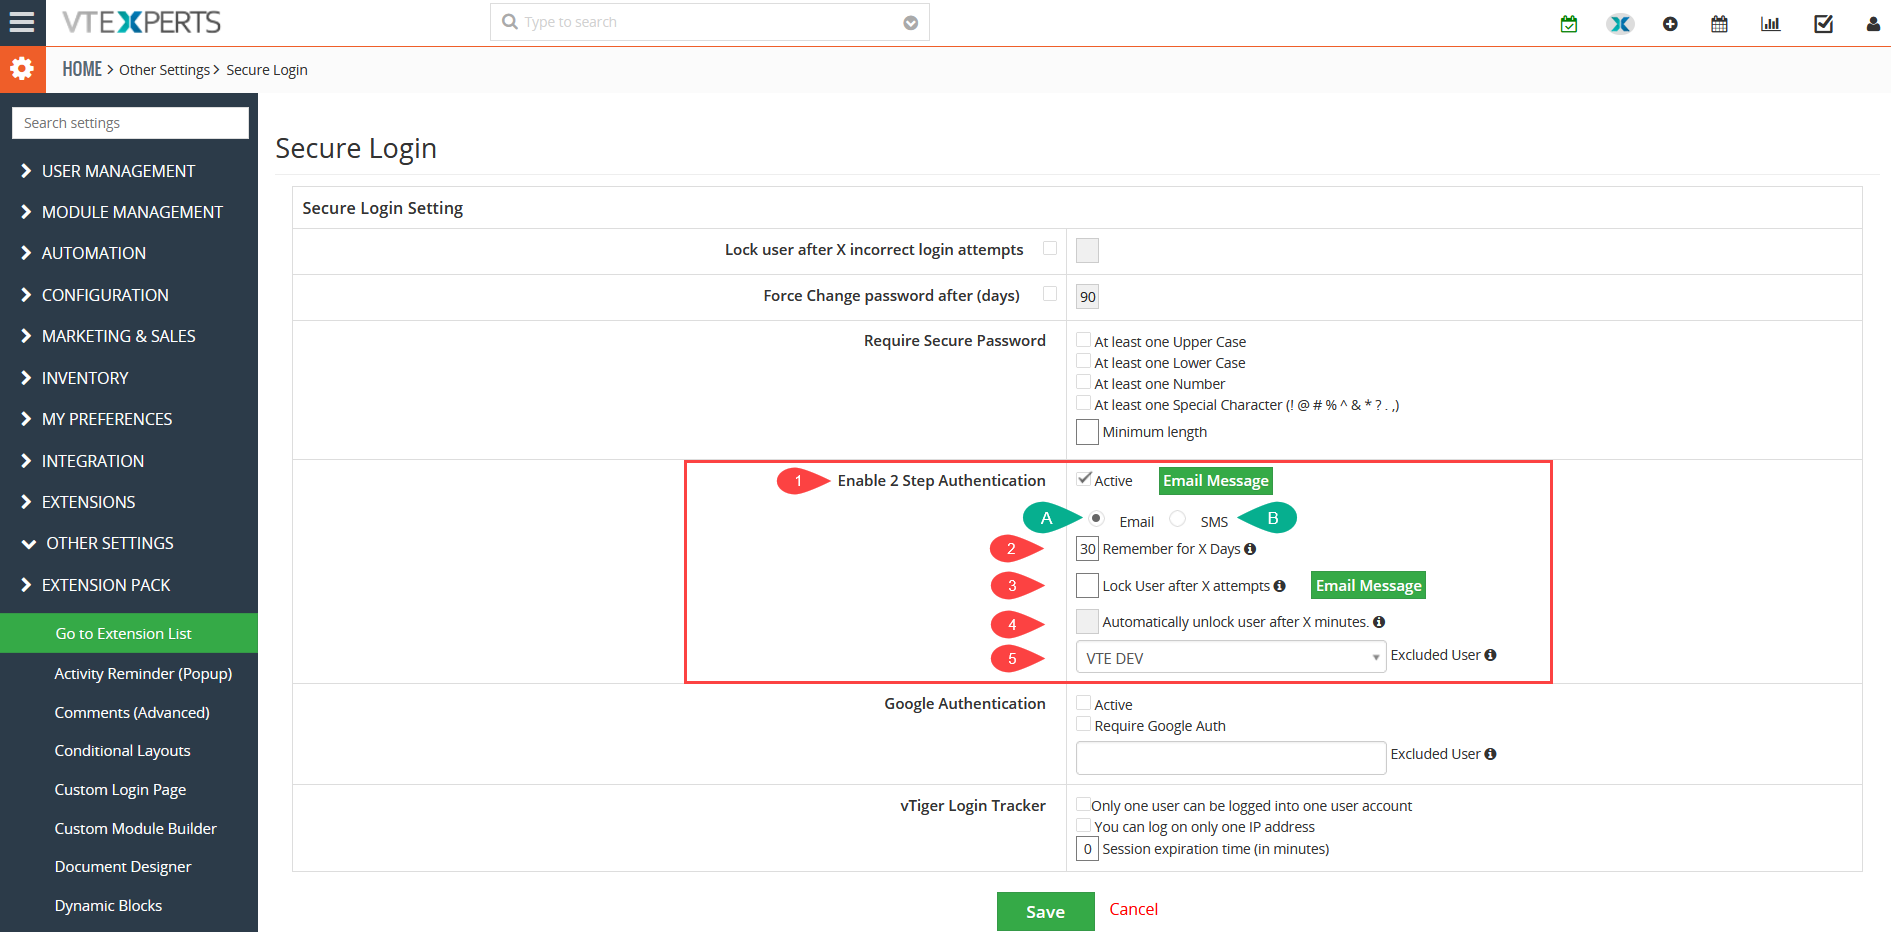
1. Active: Enable or disable the 2 – factor authentication for VTiger users upon login
VTiger provides two modes for implementing 2-Step Authentication
A. Email: Email is the most common mode used for 2-Step Authentication. An auto generated code is sent to the user email to login to CRM
- Email Message for Activating 2-Step Authentication : Set the text of the email which will be sent with the code. Include the command $authentication_code$ that will be converted to random code per email
- Email Message for Locked users: This email template will be created to be sent when a user is locked. An Email will be sent to admin and user that the account is locked due to excessive number of failed attempts to login
B. SMS: Recently another option in 2 Factor Authentication is added. Now, users can use it through the SMS as well. For enabling the 2-factor authentication via SMS. When user fills his/her credentials and try to login a message will be shown to the user that a verification code is sent to you via SMS. On the other hand of the same process an Email to SMS service is used (e.g. Messagebird.com). When the action is executed and email code is generated and sent to ABC@messagebird.com. The email message contains the code that will be sent to the user as a SMS. Then services like message bird picks that code and put it in a SMS body and sent it to the required phone number
On receiving the code through message user will fill out the verification code field and the system will log in
2. Remember for X Days: this is the number of days for which you allow users to login without the need of 2 – step authentication code. Set it to ‘0’ – so every time a user logs in, he/she will require the code to be entered
3. Email Message for Locked users: This email template will be created to be sent when a user is locked. An Email will be sent to admin and user that the account is locked due to excessive number of failed attempts to login
4. Automatically unlock user after X minutes: Set the time in minutes after which the locked users will be unlocked automatically and won’t need admins to unlock them
5. Excluded User: This is the fail-safe passage in case your email stops working. The user selected here will be excluded from the 2 – factor authentication restriction and will unlock other users, given they are locked and emails are not working. Note that only users with admin privileges can be selected here – as they will need to access the settings of the “Secure Login” extension
Working of 2 – Step Authentication
Once you’ve configured the 2 – factor authentication for users, they will be asked for the code upon the first time they will login. The code will be sent to the email address registered for that user. Standard Outgoing server needs to be working for the emails to be sent. If its not working for some reason, the “Excluded user” can always login and disable the 2 – step authentication.
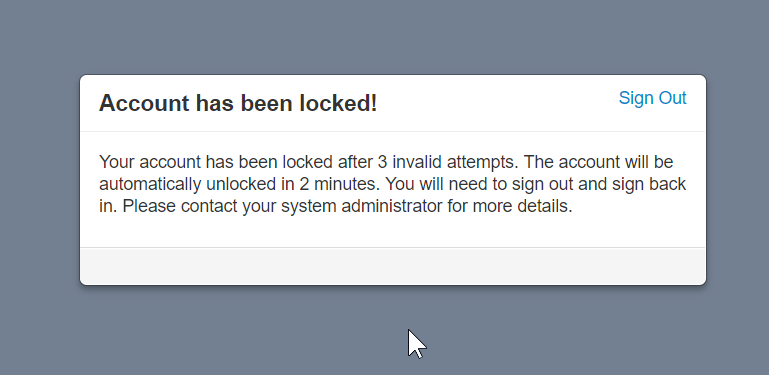
If a user enters wrong code for more than the allowed attempts, the user gets locked. After that, either an admin user can unlock the locked user from the settings of Secure login extension, or the user has to wait for the time (if configured) to be allowed again to try and login with the correct code.
To unlock the user
Google Authenticator
Enhanced security extension supports google authenticator app feature as well
- Active: This option is used to enabel or disable the feature
- Required Authentication: This feature is used to ask for authentication on login
- Excluded user: Mention the user who is excluded from the authetication process
Working of Google Authenticator
Once you activate the google authenticator, on next login you will see the following window
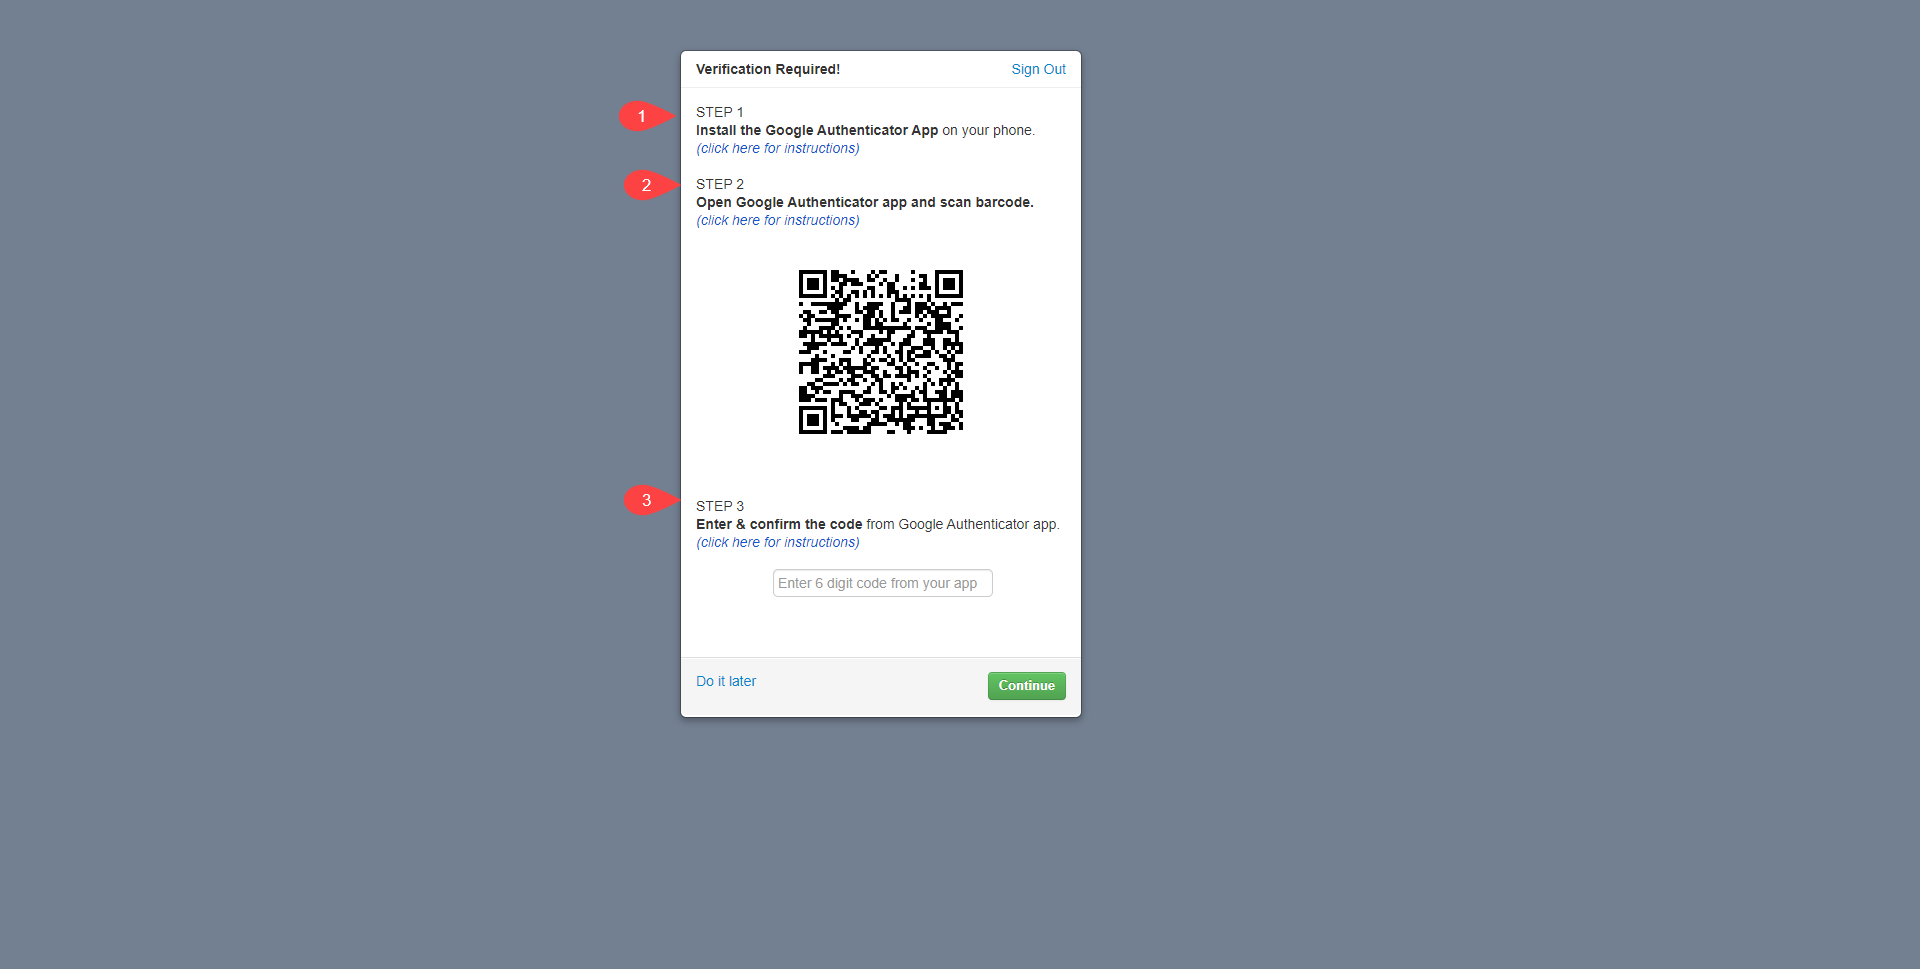
For the first time after activating google authenticator, follow the below mentioned process
- Install the google authenticator app on the mobile phone
- Scan the QR code displayed on your CRM screen through your mobile phone camers
- Once the QR code is scanned on your mobile device, it will show a numeric code. Fill in that code in the code confimation field on your CRM screen
After that everytime user will log into the CRM, google authenticator will require a code. The followin screen will appear
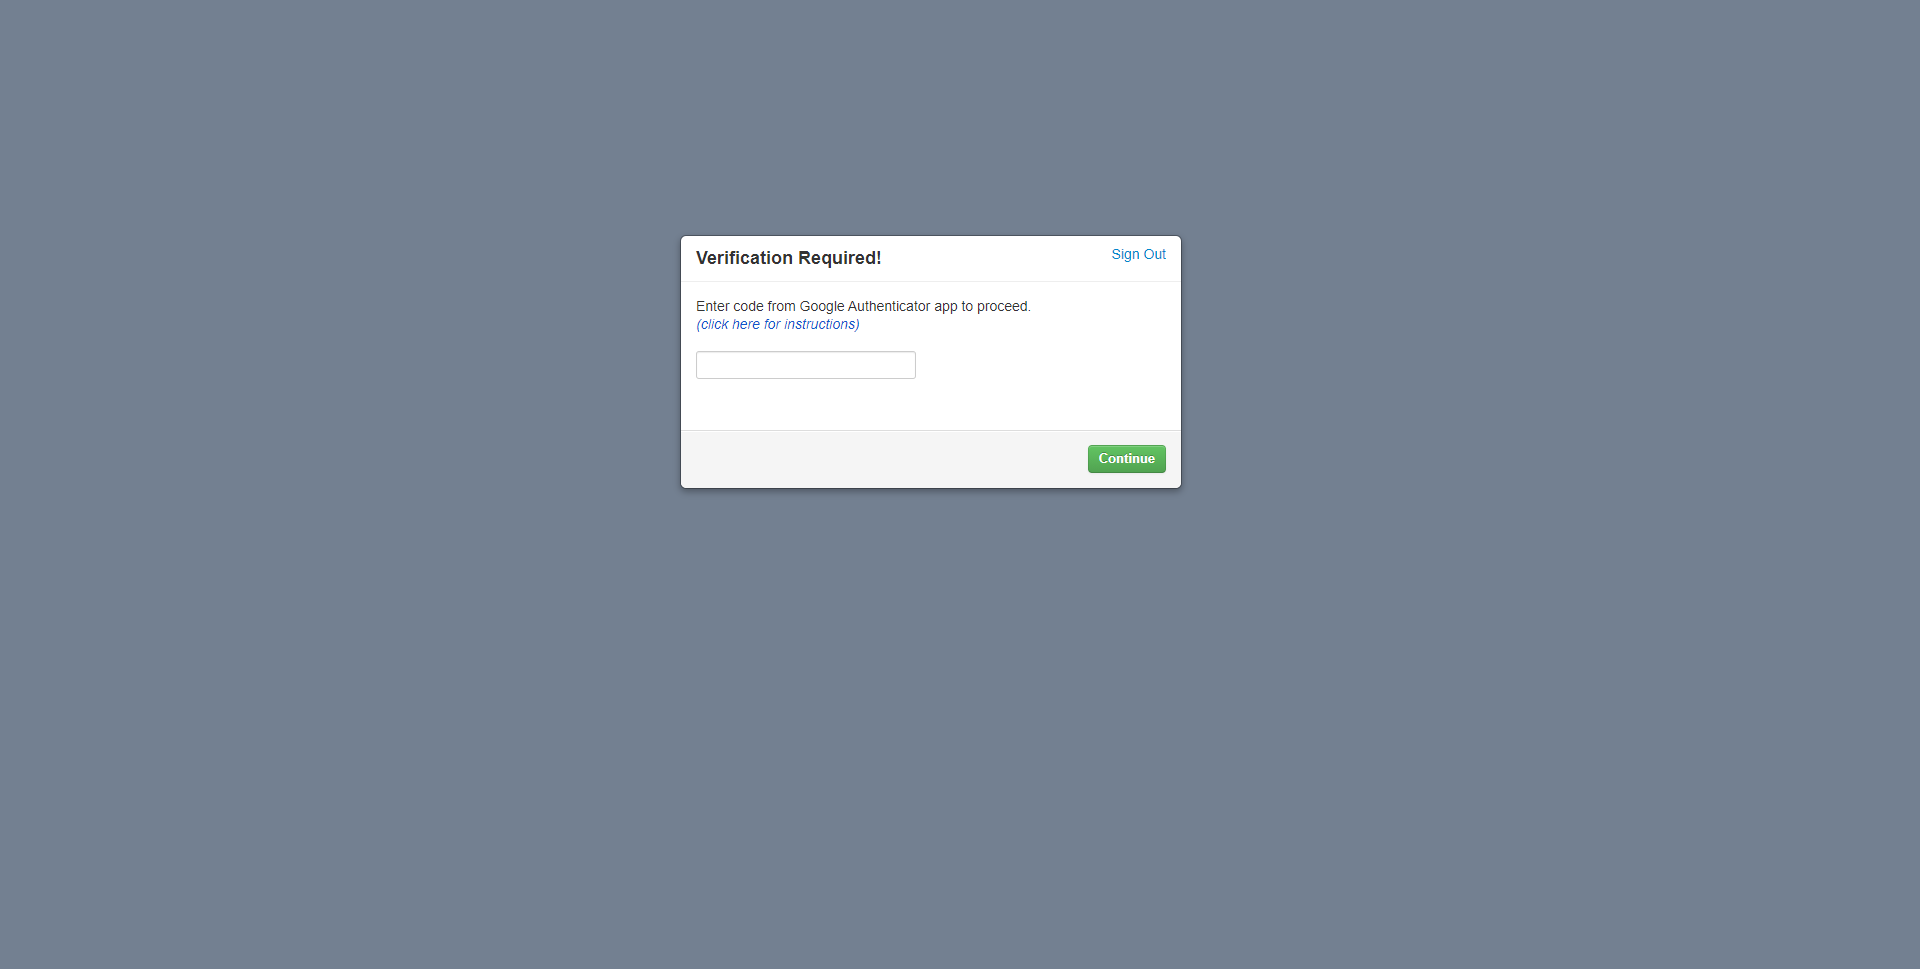
Use the google authenticator mobile app and fill in the code every time you want to log into your CRM system
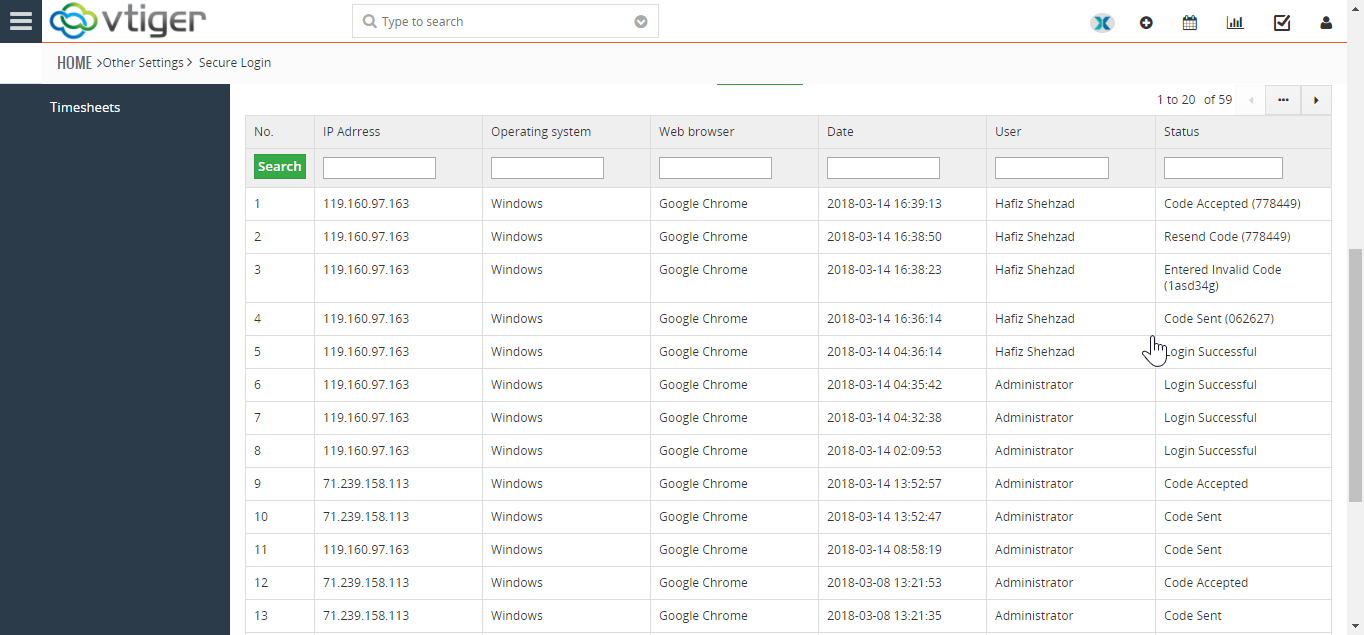
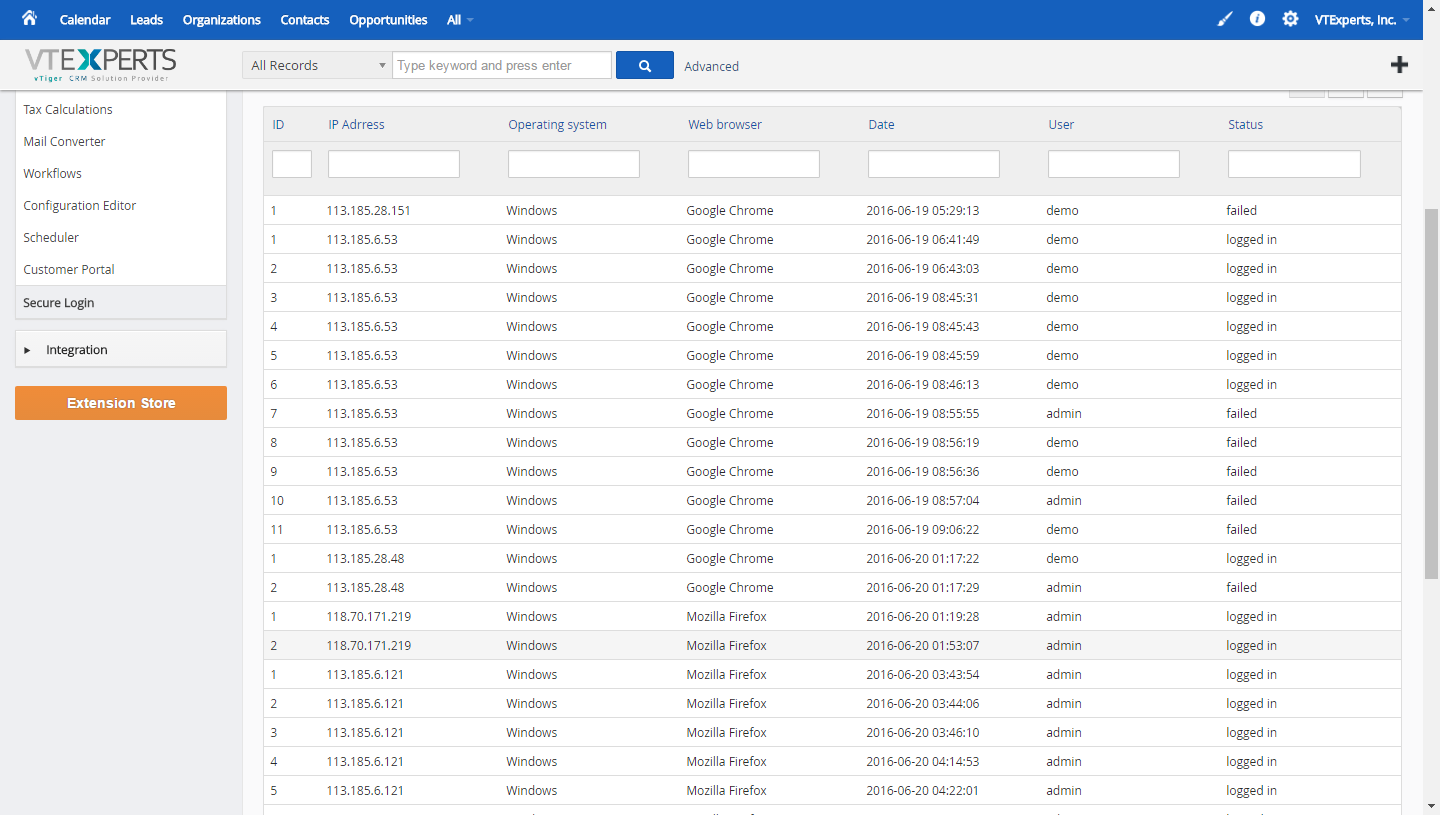
List of All Login Attempts (successful/unsuccessful)
Under the Secure Login Settings is the list of all the login attempts that had been made on the said account. It shows the details of the signed in user such as:
IP address of the attempter
Operating system on the PC from which the try was made
Internet browser being used
Date & time of the login attempt
User on which the operation was executed
Status of the attempt whether it was a successful attempt or a failed one.
Once a login attempt is made, the code that’s sent to user’s email is shown here. It also shows successful or failed codes entered while logging in – i.e. either the code was accepted or rejected.