

VTiger Extensions (Tips)
Change Calendar Colors Based On Activity Status/Type In VTiger 7
January 17, 2018

Article
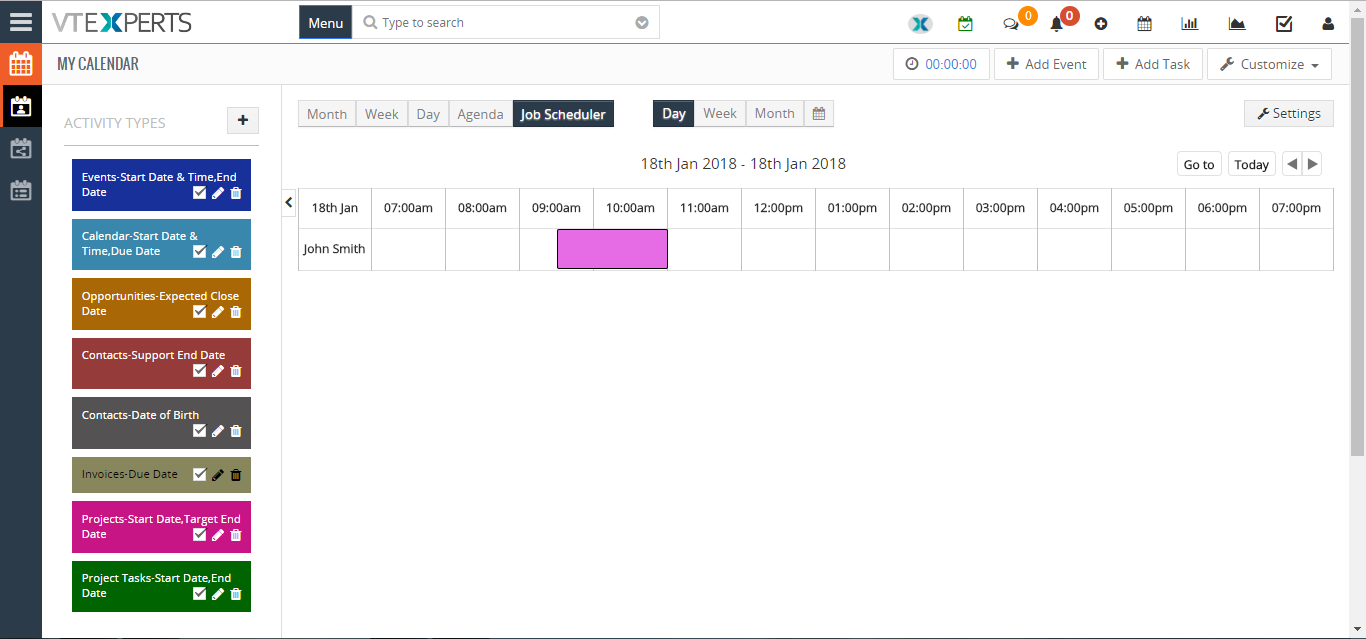
In Vtiger 7, User can change Calendar colors based on the Activity status by using our VTiger Job Scheduler/Calendar extension which is a must-have for organizations that rely on calendar. How to Change Calendar Colors Based on Activity Status/Type Click on the “Calendar” icon on the top right corner of the screen. Click on the “Settings” button. Select “Yes” in the “Use Status Colors” option. Go to the “Picklists Values“. Select “Module” and click on the “Edit” icon. Than select the “Color” for picklist. Click on the “+ Add Value” button to add a status value. Add “Item Value” and select the “Color“. Create Event and select a “Status“. Here it will show the “status color“. For further help, contact us on help@vtexperts.com. We’ll glad to be of service.
Add New Columns/Fields To Items Details Section In Quotes Or Invoices In VTiger 7
January 16, 2018
Article
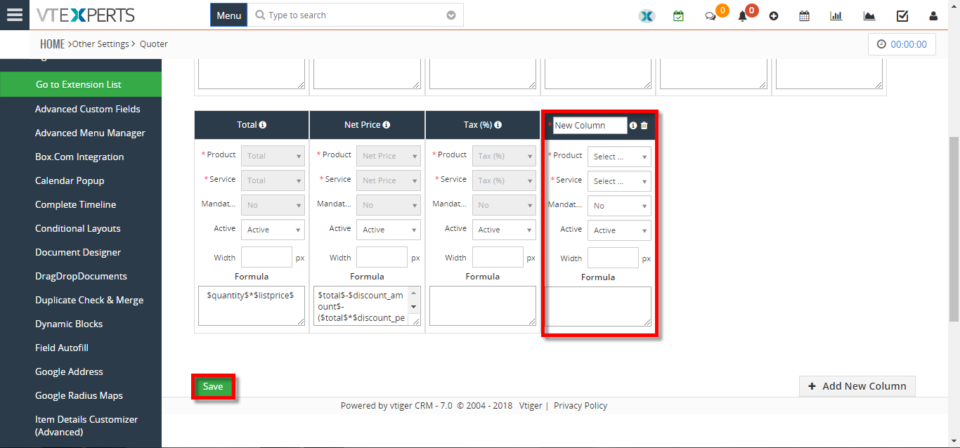
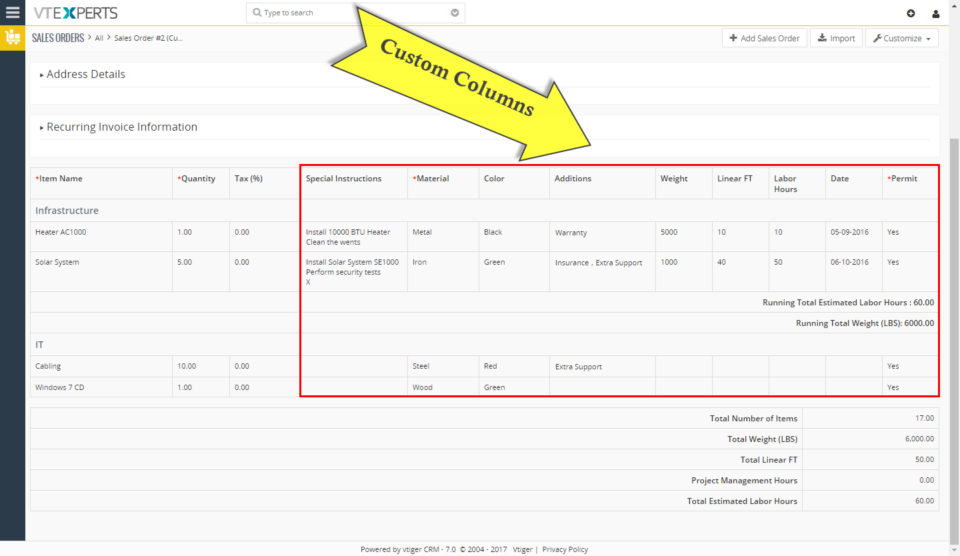
VTiger Item Details Customizer (Advanced) allows users to customize Item Details (Product/Services) for Quotes, Invoices, Sales & Purchase Orders. It is completely flexible and allows multiple layouts of item details section for Quotes, Invoices, Sales & Purchase Orders. How to Add New Columns/Fields to Items Details Section Go to the “Menu” and select “CRM Settings“. Under the “Other Settings” select “Item Detail Customizer (Advance)“. Then click on the “+ Add New Column” button to add a new column. Add the Name of the new column and configure it according to your requirement. Click on the “Save” button to save the changes. Click on the “+ Add Product” button to add a field in the “Item Details Section“. For further help, contact us on help@vtexperts.com. We’ll be glad to be of service.
Make Fields Mandatory/Required Based On Other Field Conditions In VTiger 7
January 13, 2018
Article
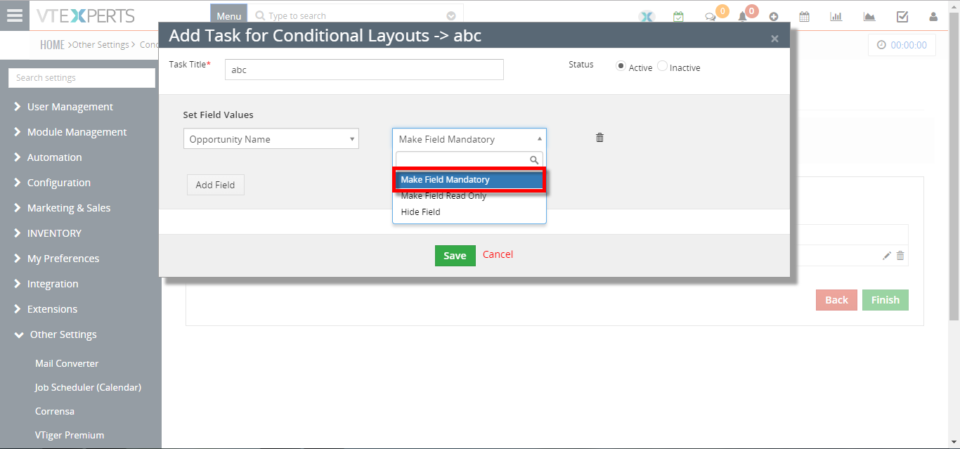
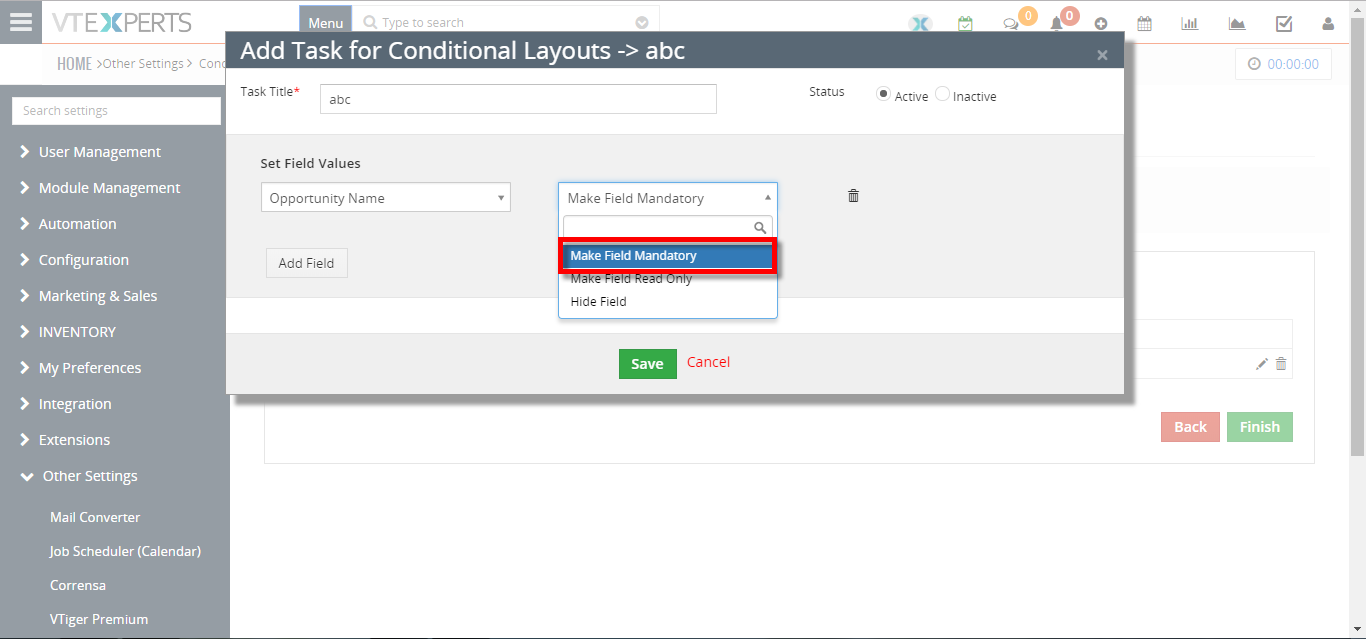
Admin can configure unique layouts for different types of records by using VTiger Conditional Layouts. It allows the system administrator to systematize what fields/blocks to show based on other field values. How to Make Fields Mandatory/Required Go to the “Menu” and select “CRM Settings“ Under “VTiger Premium” select “Conditional Layouts“ Click on the “+ New Conditional Layouts” button or you can edit an old one. On the 3rd tab click on the “Add Task” button to add a new field in the Conditional Layout. Then select the “Field Value” and set it to “Make Field Mandatory“. Summary It has an intuitive interface to configure conditions as well as fields to be shown, hidden and made mandatory. Having this ability to dynamically Show, Hide & Make Fields Mandatory will greatly improve data accuracy. For further help, contact us on help@vtexperts.com. We’ll be glad to be of
Make Fields Read Only/Not Editable Based On Other Field Conditions In VTiger 7
January 11, 2018
Article
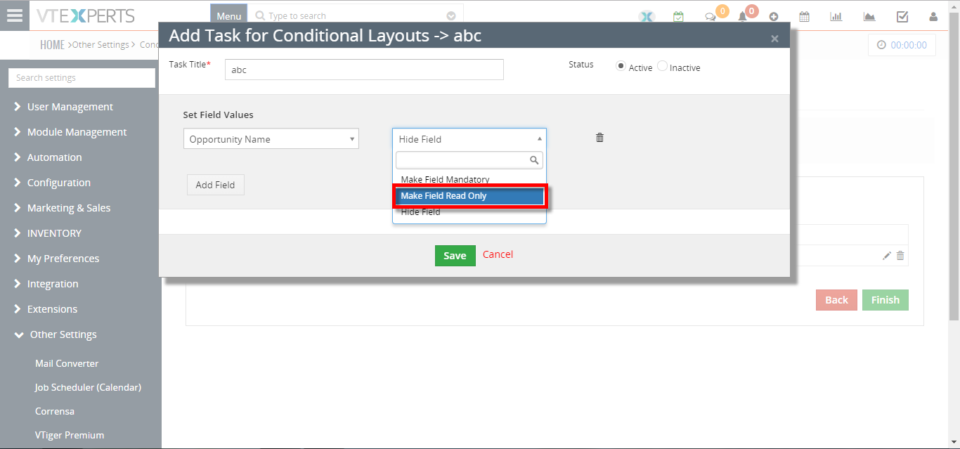
Admin can configure unique layouts for different types of records by using VTiger Conditional Layouts. It allows the system administrator to systematize what fields/blocks to show based on other field values. How to make Fields Read Only Go to the “Menu” and select “CRM Settings“ Under “VTiger Premium” select “Conditional Layouts“ Click on the “+ New Conditional Layouts” button or you can edit an old one. On the 3rd tab click on the “Add Task” button to add a new field in the Conditional Layout. Then select the “Field Value” and set it to “Make Field Read Only“. Summary: It has an intuitive interface to configure conditions as well as fields to be shown, hidden and made mandatory. Having this ability to dynamically Show, Hide & Make Fields Mandatory will greatly improve data accuracy. For further help, contact us on help@vtexperts.com. We’ll be
Document Designer New Feature: Create NEW Records Utilizing Forms
December 30, 2017
Article
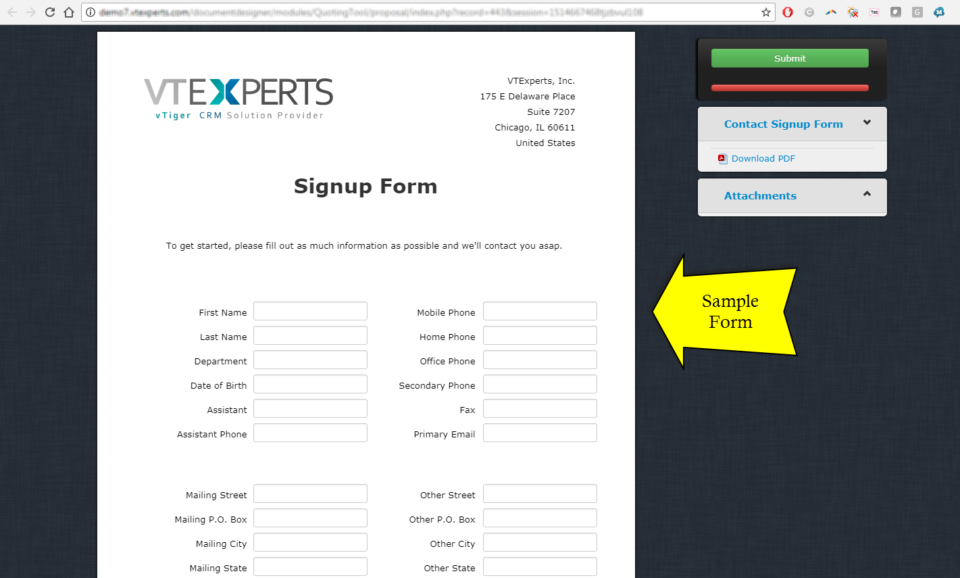
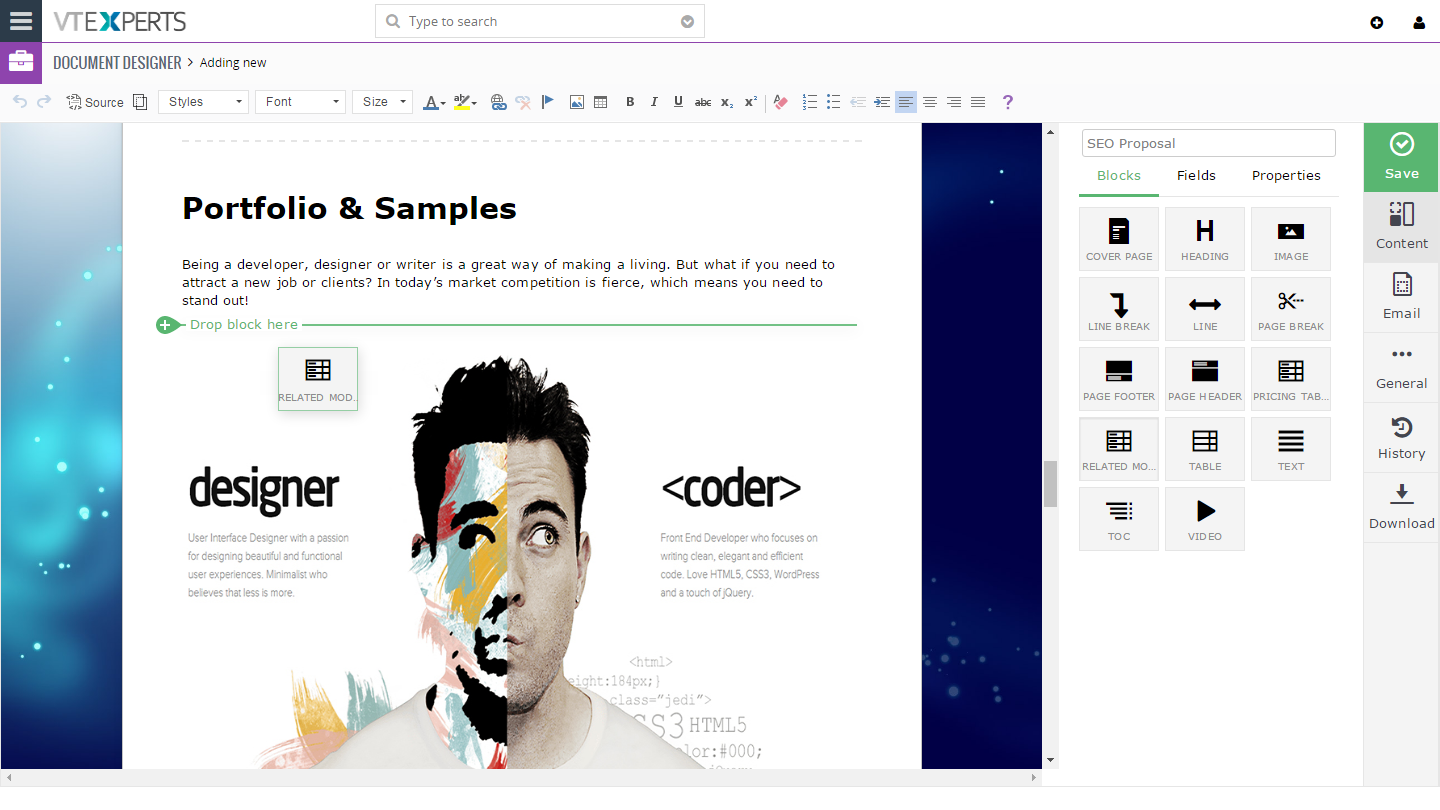
We’ve recently added new feature to our document designer, which allows to create new records in VTiger. It’s very similar to how our update functionality works (If you are familiar). The idea is that user will create a document/form that can be sent to a customer or any other email or even placed online i.e your website and when the form gets filled out – the record will get automatically created in VTiger. It’s similar to webform functionality, however it’s more powerful that that, because it supports all standard and custom modules as well as links back new record to parent record e.g organization (if configured/sent properly). Simple Example: create custom form and place it on your website for new signups (lead/contact information will flow directly into VTiger). Advanced Example: create custom form that you can send to your customers for tickets/support requests, data gathering. The form can be created
Change The Widget Order On Summary View In VTiger 7
December 28, 2017
Article
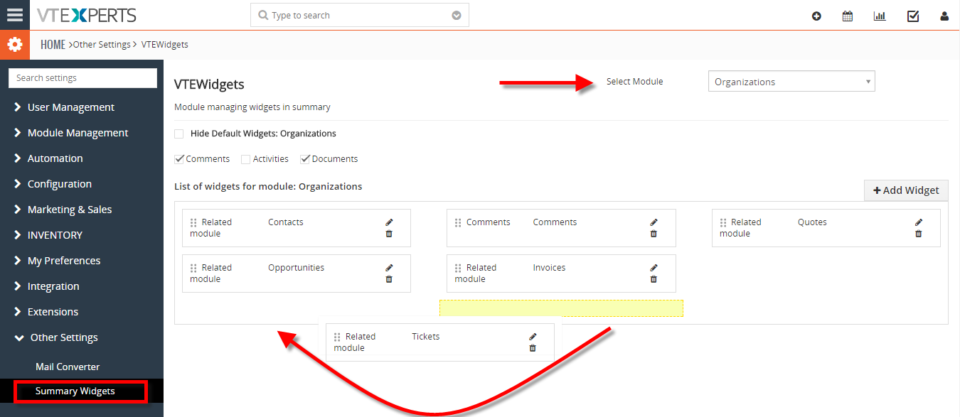
Want to change the Order of the Widgets in the Summary View you can do it by using VTiger Summary Widgets Extension. This feature allow users to set the desired order of the widgets in the summary view. How to Change the Widget Order Go to the “Menu” and select “CRM Settings“. Under “Other Settings” select “Summary Widgets“. Then select the “Module” and by using drag and drop change the order of the widgets (For this example we’ll be shifting “Tickets Widgets” from center column to the left column) As you can see the “Ticket Widget” is showing on the left side of the screen in the summary view. Summary: If you want to change the order of the widgets in summary view you will need “VTiger Summary Widgets“. It works on 6.x and 7.x VTiger Open Source/community editions. This extension also supports few other actions such as create custom widgets and
Hide Existing Widgets (Documents, Activities, Updates) On Summary View In VTiger 7
December 27, 2017

Article
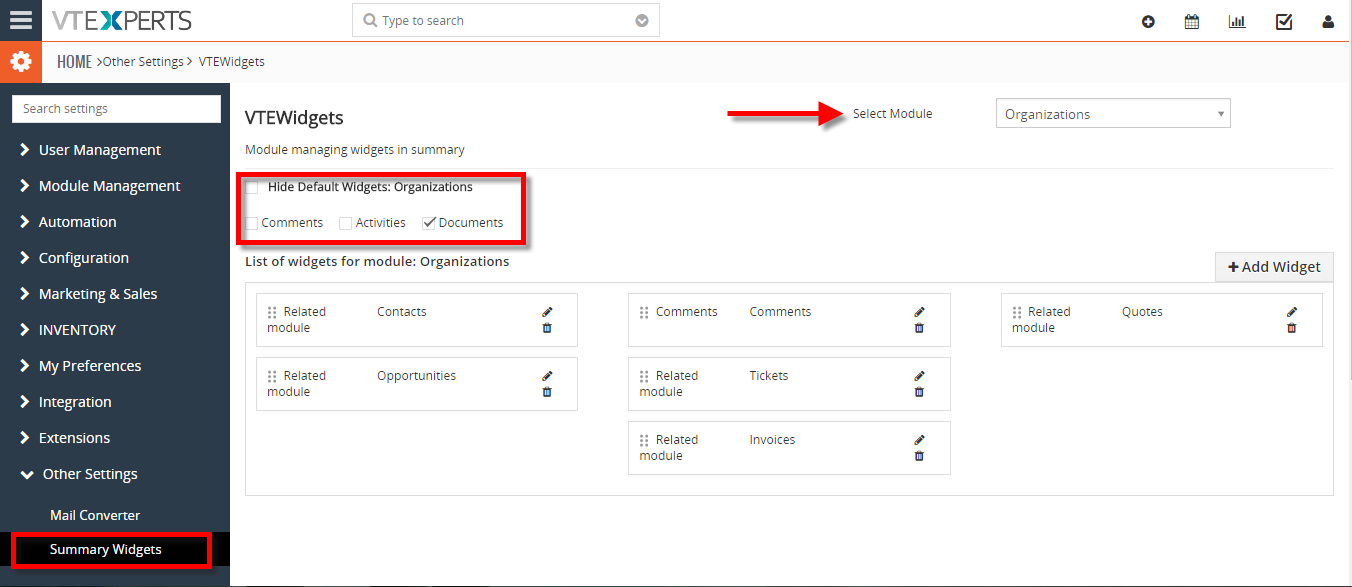
If you are looking to hide existing default widgets in VTiger 7 e.g “Documents, Activities, Updates” you can do it by using VTiger Summary Widgets Extension. How to Hide Existing Widgets Go to the “Menu” and select “CRM Setting“. Under “Other Settings” select “Summary Widgets“. Then select the “Module” and “Check box” the default Summary Widgets you want to hide. For this example I have hide the “Comments and Activities” widgets from “Organization Module“. Summary In order to hide unwanted default existing widgets you will need “VTiger Summary Widgets“. It works on 6.x and 7.x VTiger Open Source/community editions. This extension also supports few other actions such as create custom widgets and specify things like name of the widget, columns/fields to display, limit records (if needed) & enable or disable ability to create new records from within the widget. For further help, contact us on help@vtexperts.com. We’ll be glad to be
Create New Summary Widget In VTiger 7
December 23, 2017

Article
In Vtiger 7, User can quickly and easily create custom Summary Widgets by using our extension. It also has the ability to include field level filter e.g “Show me open tickets“, or “Show me closed tickets“. How to Create New Summary Widget Go to the “Menu” and select “CRM Settings“. Under the “Other Settings” drop down menu select “Summary Widgets“. From here click on the “Select Module” button to select the module you want to add the widget and click on the “+Add Widget” button to create a new widget. Select the Type of the widget. Add the “Label“, Select the “Related Module” and add the “Columns” you want to show in the widget and click on the “Save” button. For further help contact us on help@vtexperts.com we’ll be glad to be of service.
Assign A Record To Multiple Users Or Groups In VTiger 7
December 19, 2017
Article
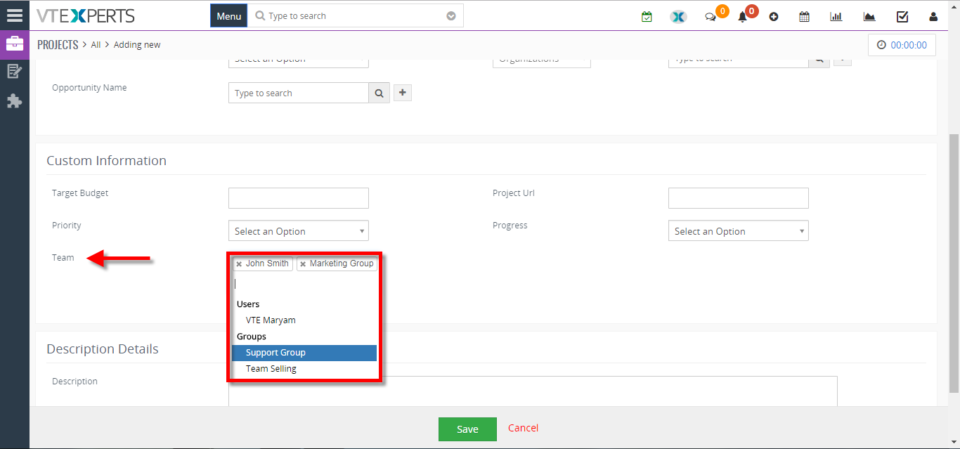
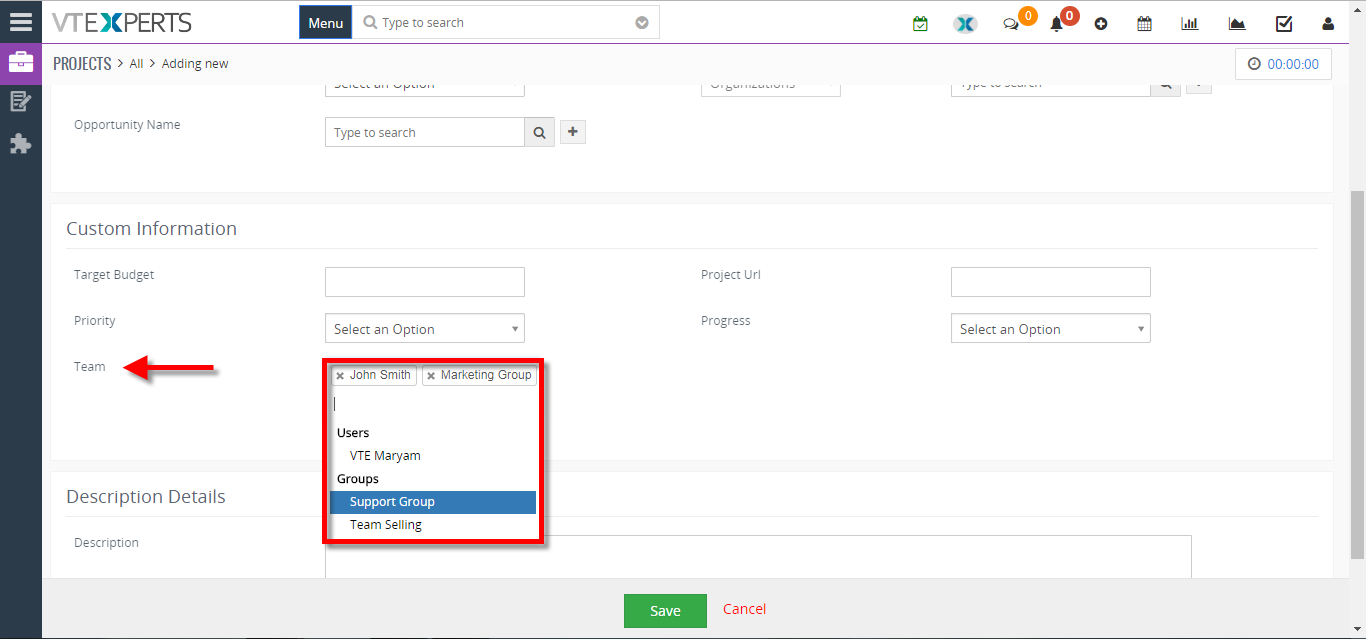
In VTiger 7, User can assign multiple user of groups to a record by using our Multi User Assignment extension. The extension includes a special field which has a list of all the users. As you select the users, it starts gathering a group and assigns it to the record. How to Assign a Record to Multiple Users or Groups Go to the “Menu” and select “CRM Settings“. Select “Multi User Assignment” under the “Other Settings” drop down menu. From here select the module you want to assign multiple user and click on the “Save” button. Go to the selected module (For this example we use Projects) and click on the “Add Project” button. From here you can assign multi user to the project by adding the user’s in “Team Field“. For further help contact us on help@vtexperts.com. We’ll be glad to be of service.
Track Time Spent On Tickets, Projects Or Contacts In VTiger 7
December 19, 2017
Article
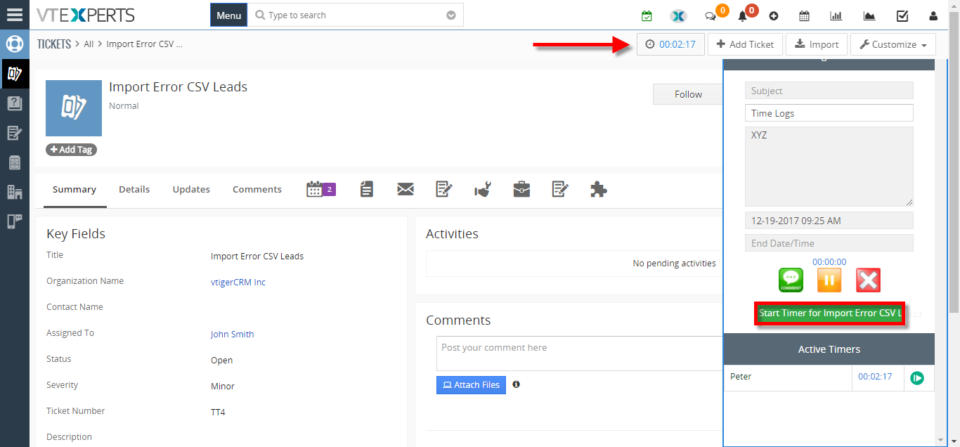
In VTiger 7, User can easily track the time spent while working on a task by using our Time Tracker extension. It’s unique design allows to show and hide the timer within a single click without leaving the page. It also includes the ability to run multiple timers & switch between them. Custom fields, comments, & manual time tracking are also supported. How to Track Time Click on the “Menu” button and select “Contacts“. Select a contact you want to start tracking the time for. Click on the “Timer Icon” to open the Time Tracker popup window and start the timer. Go to the “Tickets Module” and select a ticket you want to track time for. Click on the “Timer Icon” and then click on the “Start timer for the (Module Name)” button in the Time Tracker popup window. For further help contact us on help@vtexperts.com we’ll be glad to be of
Enforce/Require Users To Change Password Every 90 Days In VTiger 7
December 16, 2017
Article
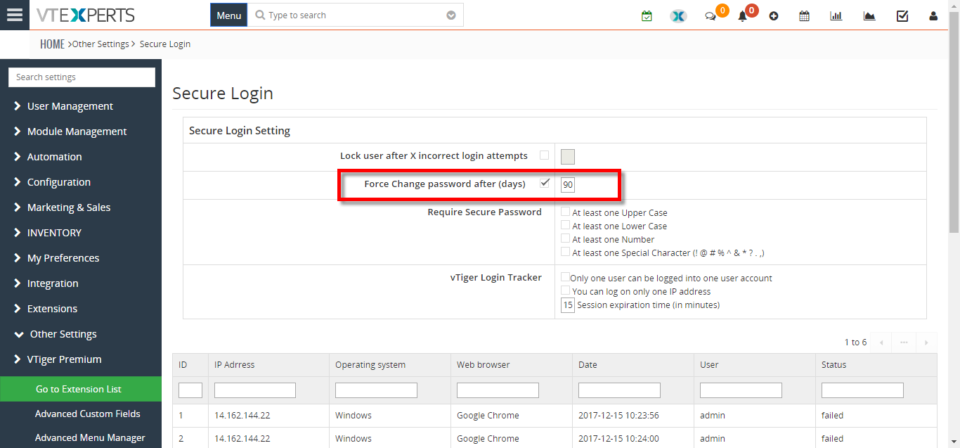
In VTiger 7, User can enforce proper security by using VTiger Enhanced Security extension. Our tool allows system administrators to force users to change their passwords every xx days, and implements secure password rules (one lower/upper case, number, special character). How to Enforce/Require Users to Change Password Every 90 Days Go to the “MENU” and click on the “Settings” button and select “CRM Settings“. Under “VTiger Premium” drop down menu select “Enhanced User Security“. To configure the force change password requirement “Check Box” the options and set the value “90” in the given space. For further help contact us on help@vtexperts.com. We’ll be glad to be of service.
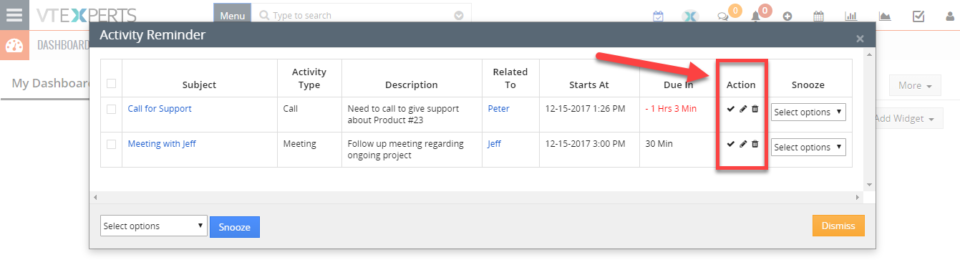
New – “Actions” Button Column On Activity Reminder / Calendar Popup For VTiger 7
December 15, 2017
Article
There’s a productivity centered extension Activity Reminder (Popup) for VTiger that gives reminders similar to Outlook. The reminder popup shows up automatically when the activity is due and displays current day’s activities with basic details such as subject, description, related to (contact, lead, organization, etc..) as well as Due In. We recently gave it a major upgrade and added the “Actions” button as a column to the reminder popup. Previously, those actions buttons were only accessible when you go to calendar > specific activity > and hover your mouse over it. With the Activity Reminder (popup) extension, now users can edit, mark as done, and delete any activities without the need to visit the actual activity in the Calendar. When you open the reminder popup (extension button at the top right – needs the extension to be installed), you will see this new column named “Action”. The action buttons
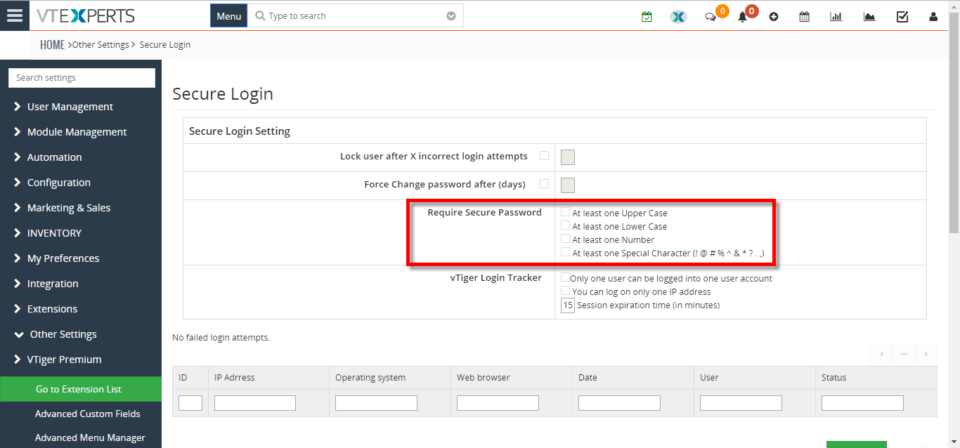
Enforce/Require Strong Password For Users In VTiger 7
December 15, 2017
Article
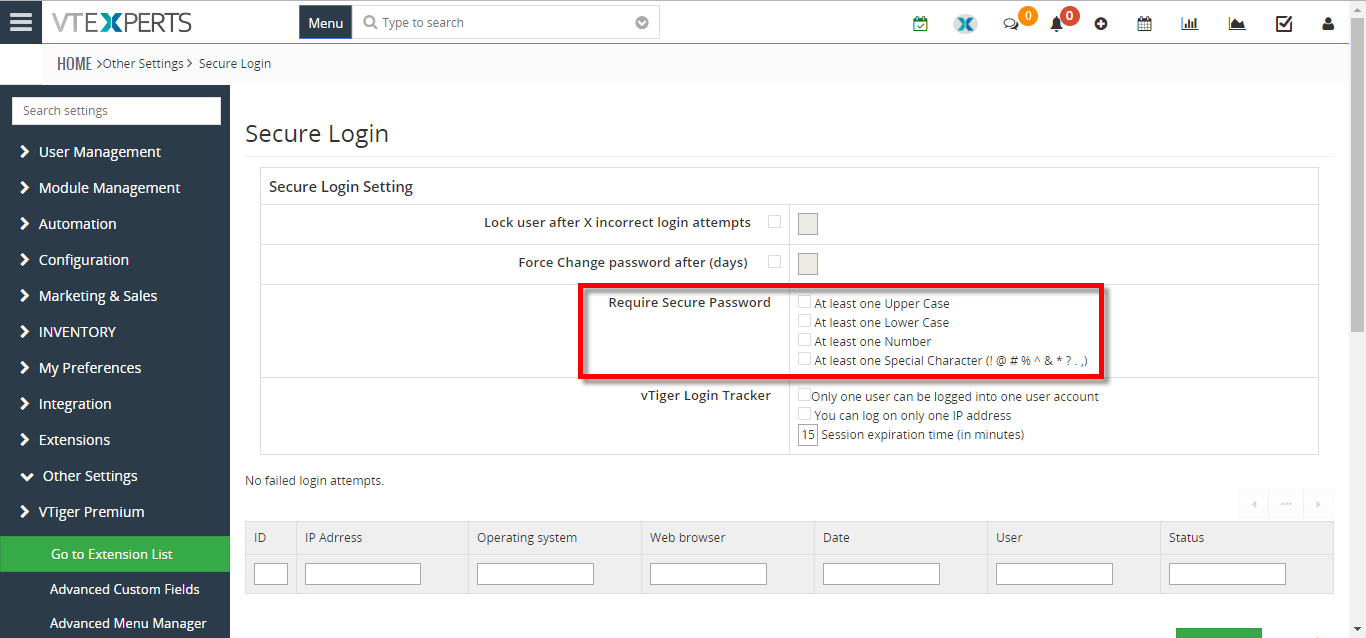
By default, there is no restriction in VTiger 7 on how secure a user’s password is. That results in CRM users ending up setting very less secure passwords and leaving the CRM and confidential data for several vulnerabilities. However, you can overcome this loophole in VTiger 7 by using VTiger Enhanced Security extension. The extension is designed to enforce proper security standards in VTiger. Our tool allows system administrators to implements secure password rules (one lower/upper case, number, special character etc whatever you want to configure). How to Enforce/Require Strong Password Go to the “MENU” and click on the “Settings” button and select “CRM Settings“. Under “VTiger Premium” drop down menu select “Enhanced User Security“. To configure the password requirements, “Check Box” the options you want to add in the requirements. Once setup, users will need to setup more secure passwords. In addition, the extension also have several more features. Take a
Setup Colored Picklists In VTiger 7
December 9, 2017
Article
For a while, VTiger users have been craving to get the options in picklists colored so they don’t have to read the options each time they open the list. The option is finally here. In VTiger 7, admins can setup colors for Picklists fields menu. It is extremely helpful to quickly identify the option you’re looking for. How to Setup Colored Picklists Go to the “Menu” and click on the “Settings” button and select “CRM Settings“. Under the “Configuration” drop down menu select “Picklist Field Value“. From here you can add a New Value or Edit an old one. Select a color for the Picklist Field Value and click on the “save” button. After configuring the Picklist Field Color you can see the color on the item name. For further information contact us on help@vtexperts.com. We’ll be glad to be of service.
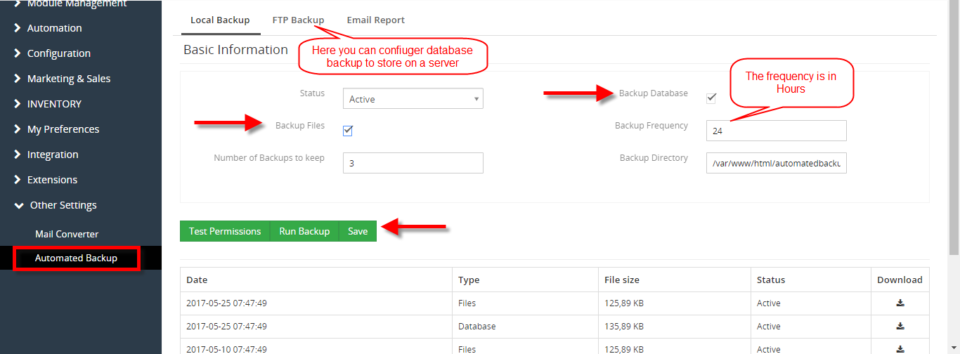
Properly Backup In VTiger 7
November 30, 2017
Article
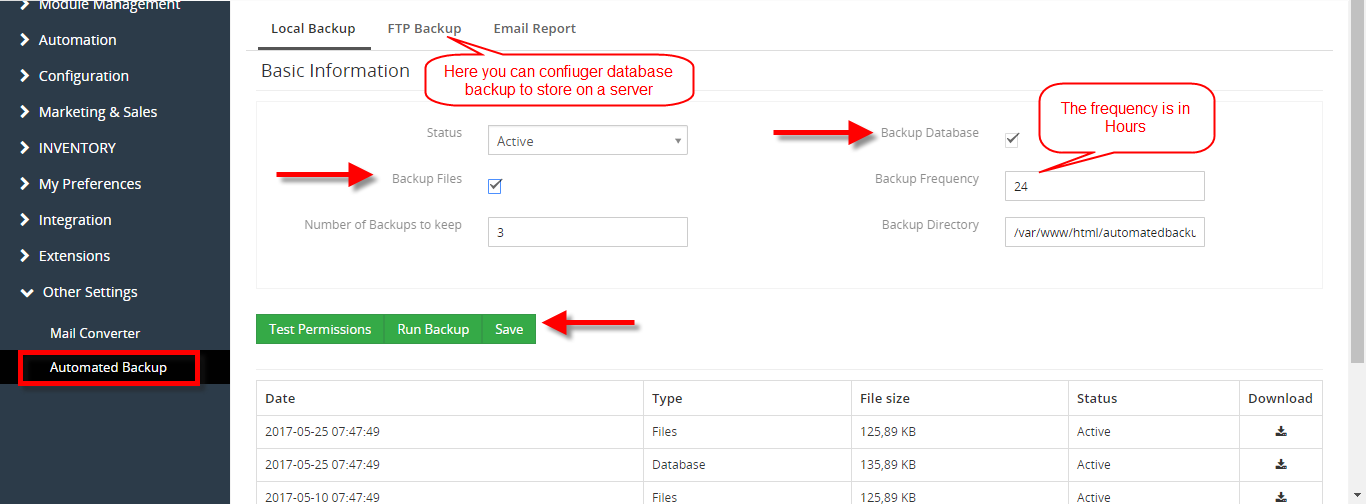
Current options to backup VTiger are very limited. We, at VTExperts.com, addressed this issue and came up with a very advanced yet easy to apply solution. We developed an extension Automated Backup that allows system administrators to setup their backups and forget about them. This extension allow system administrators to easily backup VTiger Files & Database to a local folder or an off-site FTP. How to Properly Backup VTiger Go to the “Menu” and click on the “Settings” button and select “CRM Settings“. Under the “Other Settings” drop down menu select “Automated Backup“. From here you can configure the automated backups You can Backup Database and Backup Files. Click on the “Save” button to schedule the automated backup according to your configured Backup Frequency. For further help contact us on help@vtexperts.com. We’ll be glad to be of service.
Customize VTiger Login Page In VTiger 7
November 29, 2017
Article
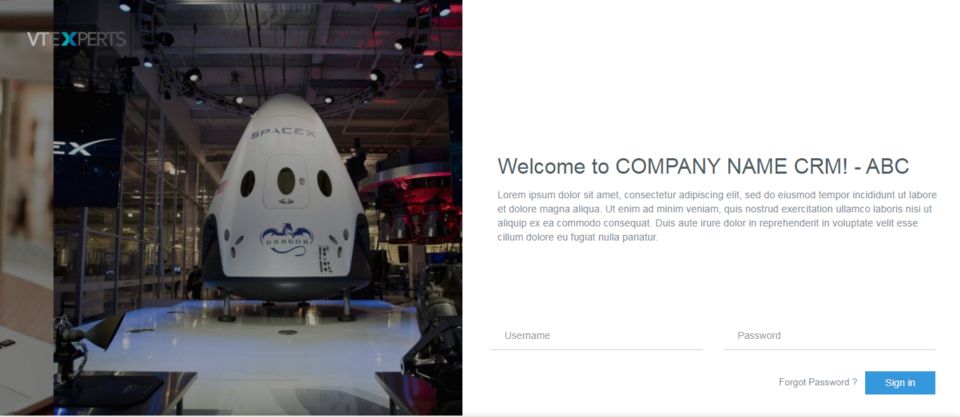
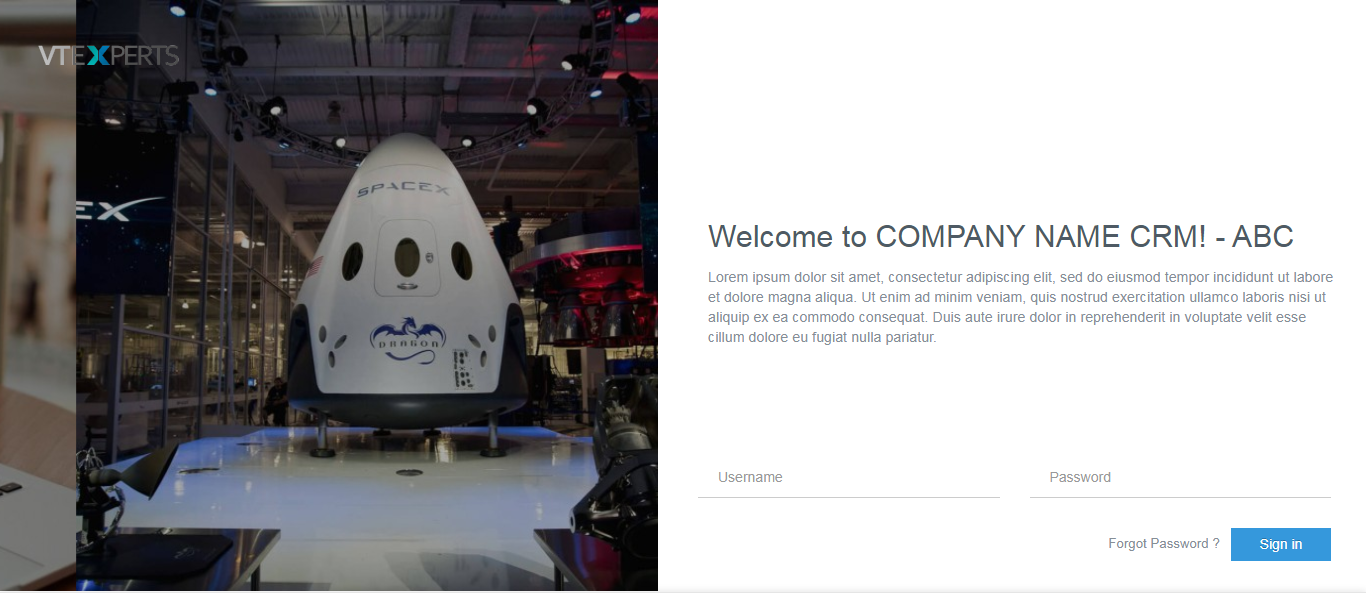
In VTiger 7, User can create a Custom User Login Page by using our extension. User can completely customize the login page, Meaning that the system administrator can update the logo, sliding images, customize the text, footer & more! The ads and all VTiger references are also removed. How to Customize VTiger Login Page Go to the “Menu” and click on the “Settings” button and select “CRM Settings“. Under the “Other Settings” drop down menu select “VTE Custom User Login Page“. From here click on the add button to create a custom login page. Add the Login page details in the given space and also upload the logo. You can add more than one image on the login page and also display your Social media site’s link’s. Click on the save button on the top right corner of the page. Here it is what its look like once you’re
See Who And When Logged Into VTiger 7
November 22, 2017
Article
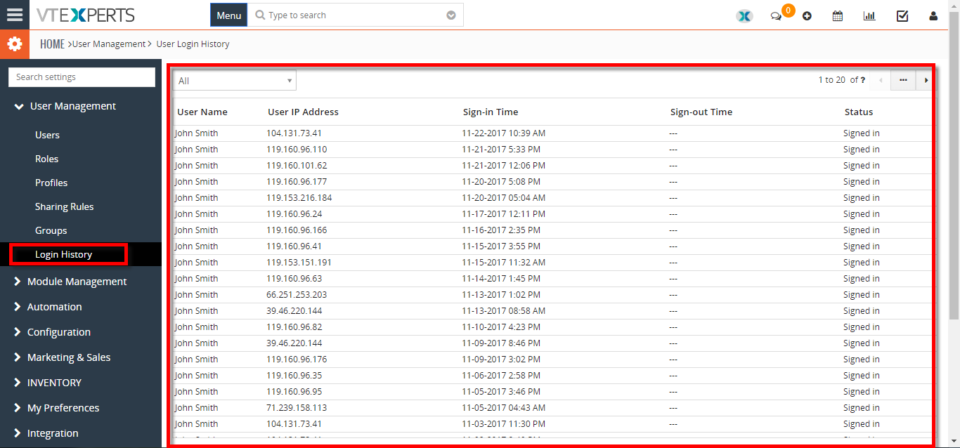
In VTiger 7 user can see the login history. This feature help’s the user to keep track of other user’s logins timings. User can Enhance Security by using our extension, Designed to enforce proper security standards in VTiger. Our tool allows system administrators to force users to change their passwords every xx days, and implements secure password rules. It tracks successful and failed logins, and locks users after number of incorrect logins. How to See Who and When Logged into VTiger Go to the “Menu” and click on the “Settings” button and select “CRM Settings“. Under the “User Management” drop down menu select “Login History“. Here you can see all the user logins detailed history.
Color Lists In VTiger 7
November 11, 2017
Article
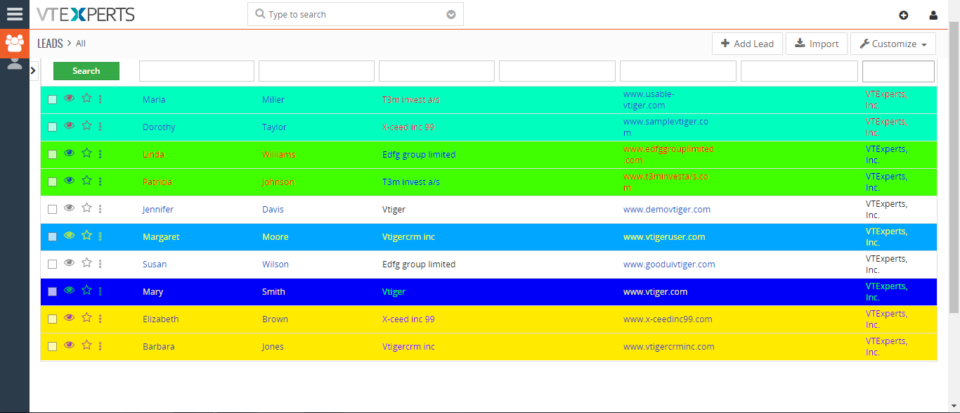
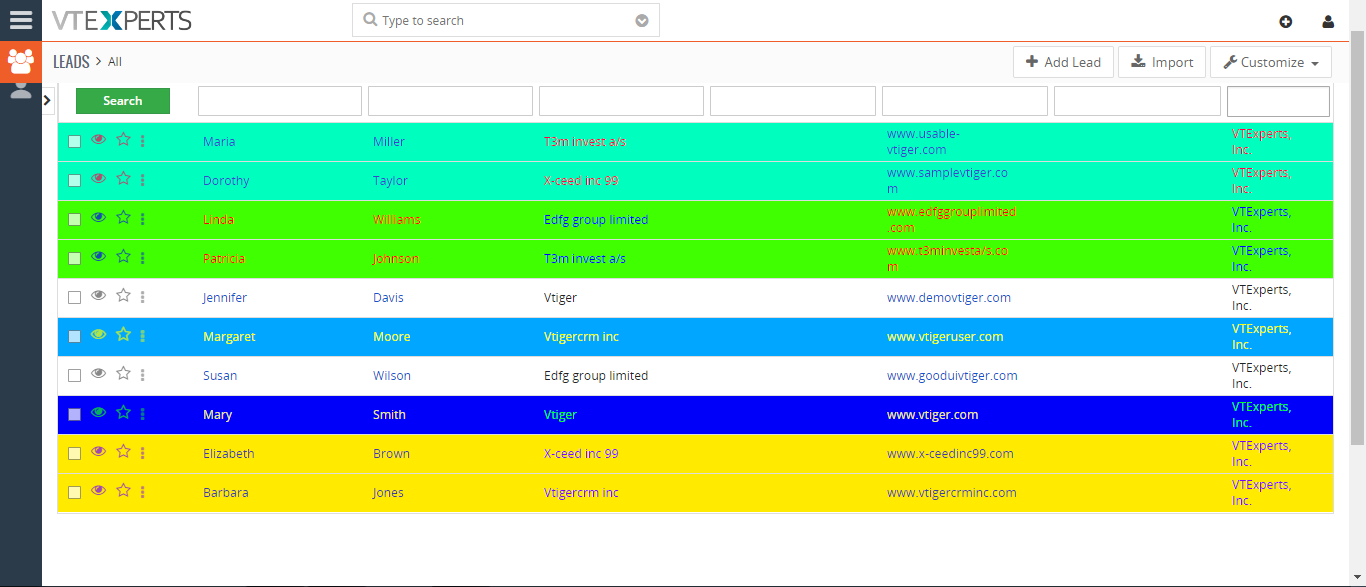
In VTiger 7, users can color the rows on the list view by using our VTiger Listview Colors extension. This extension is extremely helpful for users to quickly identify the records that need attention using predefined color codes. User can configure color codes for each module and specify color text, backgrounds and active color. How To Color Lists To add colors go the “Menu“, “Settings” , and select “CRM Settings“. Click “Other Settings” button and select “VTE List View Colors“. From here click on the “Add color” button to configure the color of the list. Select the module of the lists you want to add colors. Select the color of the text and the list as shown below. Users can add conditions to specify different colors of the list in the same module.
Show Hide Individual Comments In VTiger 7
October 31, 2017
Article
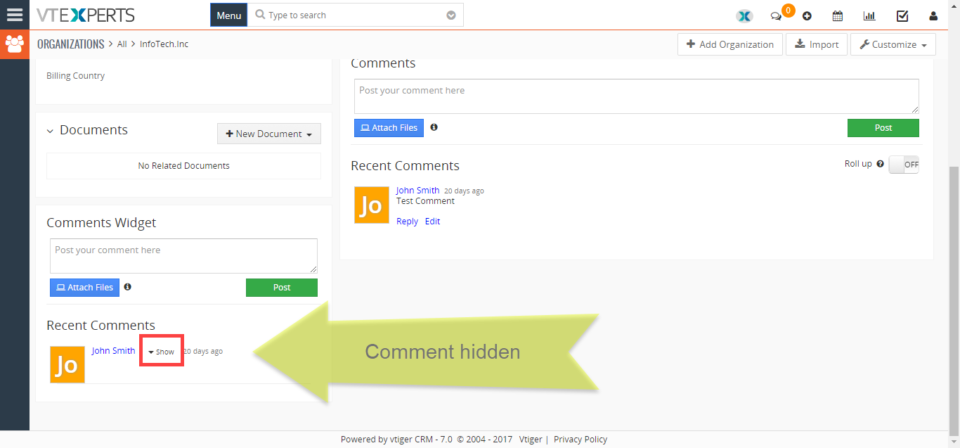
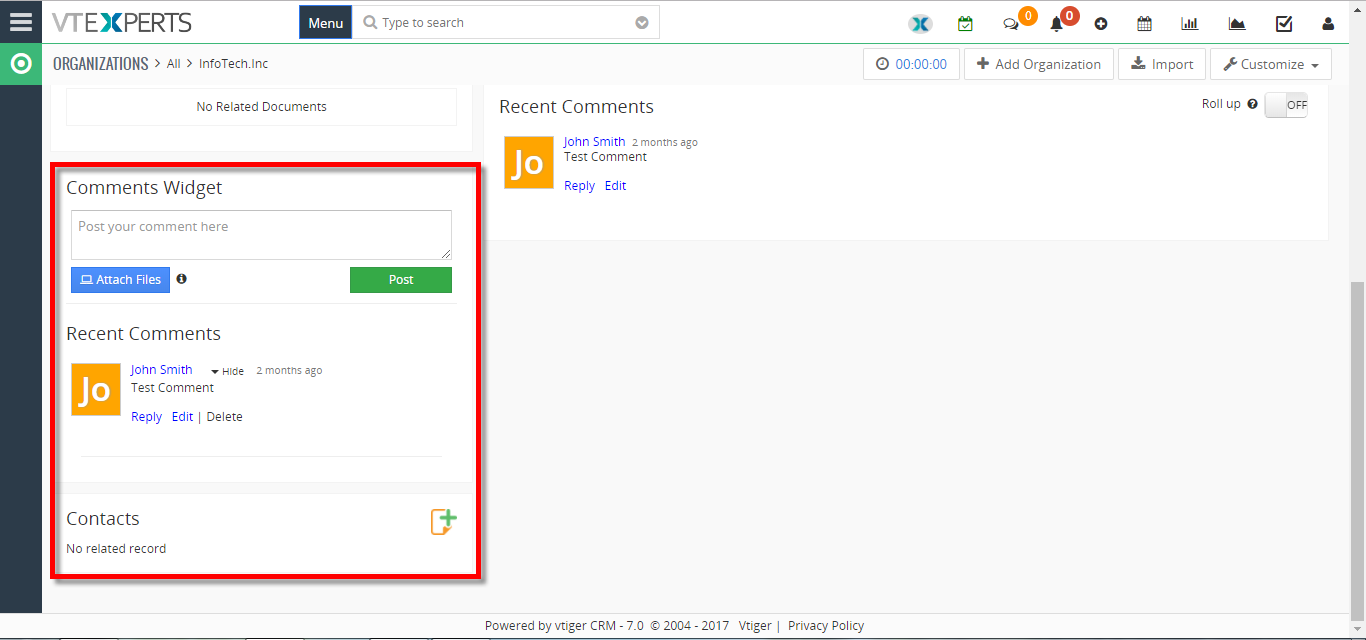
We added a simple but extremely useful feature to our Summary Widgets extension. As you can add “Comments” widgets to Summary view to the records of any modules with VTE Summary Widgets, this feature allows you to SHOW or HIDE the individual comments in VTiger 7 also supported in VTiger 6. For example, if you open a record and see a long comment in the “Comments” section (created by Summary Widgets extension) How to Show Hide Comments Click on the “Hide” button to hide the comment. The comment text will be hidden .Click on the “Show” button to show the hidden comment. For further help, contact us on help@vtexperts.com we’ll be glad to be of service.
Email Campaigns Extension for VTiger 7 Open Source – Progress Update
October 25, 2017
Article
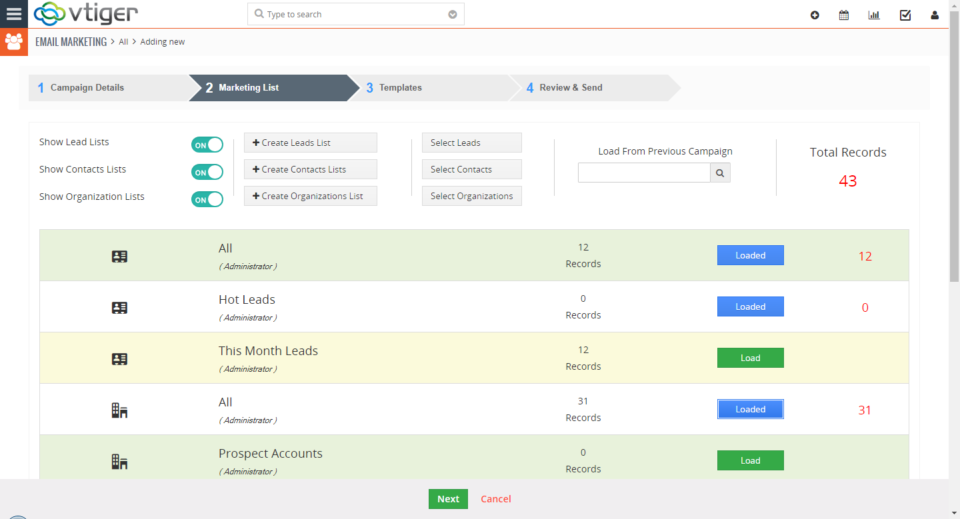
For the last few months we’ve been working on a new extension that will transform VTiger into sophisticated email marketing/campaign tool. The extension will include a step by step wizard, easy to use “marketing list” (to load contacts/leads/organizations), review & send + confirmation/summary view that will show exactly what and when is going to be sent. In addition, it will support batch sending, meaning that you can schedule emails to go out over 15, 30, 60min instead of sending them all at once. We also integrated Mosaico template builder with our campaign/marketing tool. Mosaico is an open source template builder which allows users to create amazing email templates, the functionality is very similar to mailchimp, constant contact or any other email marketing platform. We are anticipating to have this vtiger extension available in the next month and would like to share the progress we made so far. Start New
Include Phone, Email (or any other field) in VTiger 7 Search
October 18, 2017
Article
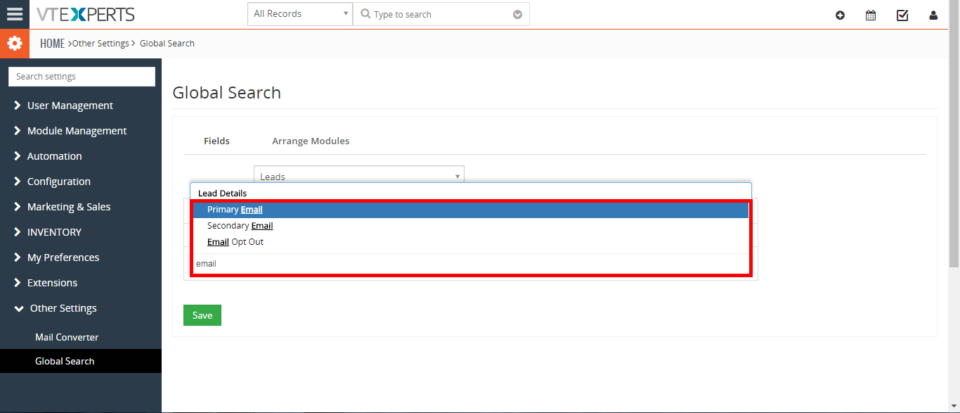
Take a look on how you can search from all the modules and records by using Global Search extension and it will show all the matching results. This feature helps you to search entire database and give you the results instead while the standard search will only search record name. How to Include Phone, Email in VTiger Search First install the extension Global Search form Extension pack for VTiger To include search fields in Global Search. Go to the “CRM Settings“. Select the “Other Settings” and click on the “Global Search“ Select a module that you want to add the search fields to and select the desired field. Add the field name on the given space to add the field. Search and select the desired field that you want to include in the Global Search. After adding the fields click on the “Save” to save the changes.
Pre-Format Phone Numbers To Your Requirement In VTiger 7
October 18, 2017
Article
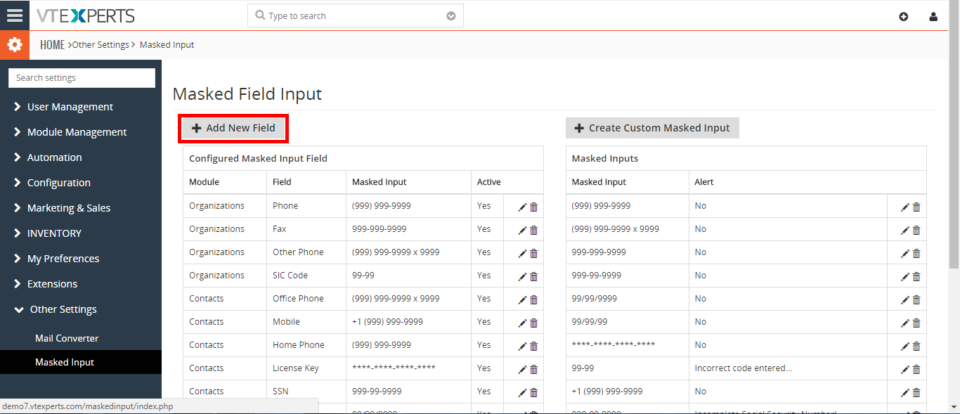
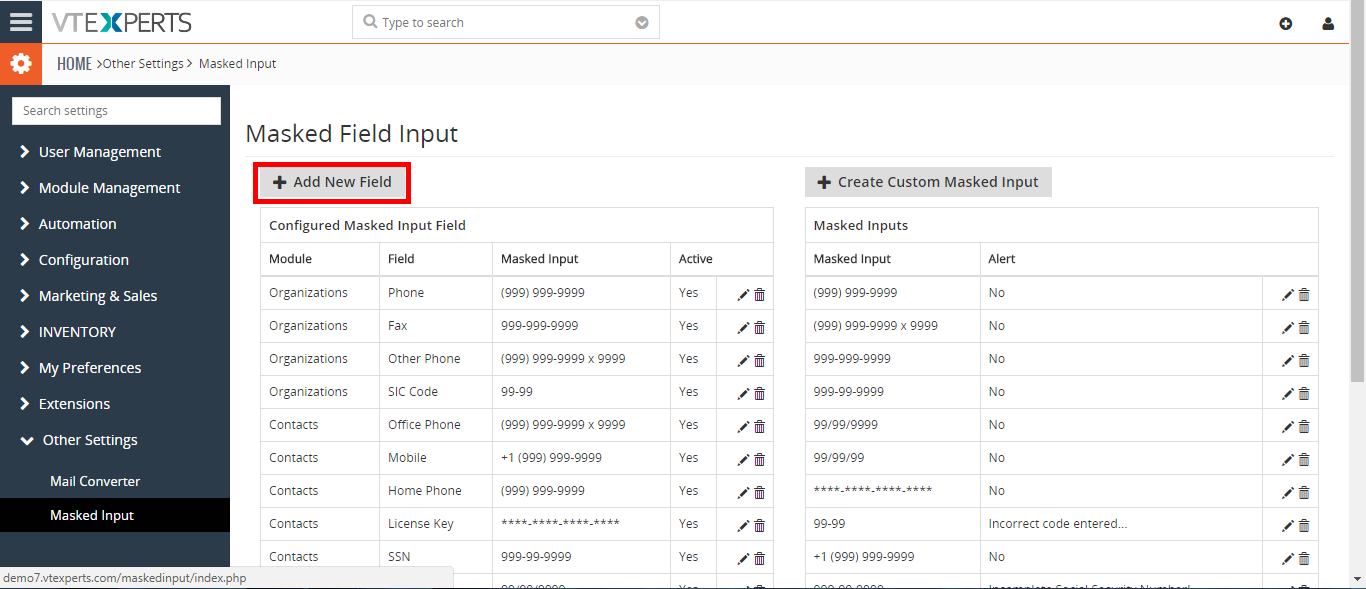
Admin can restrict users to enter fields in a certain format by using Masked Input extension. This feature allows you to configure the formats of Phone numbers and set them default in VTiger. So when users work and add data to the CRM, they will only need to enter phone numbers without the need of formatting each number for example adding “-” or space or “()”. How to Preformat Phone Number First, install the extension Masked Input extension from the Extension pack for VTiger. Then, go to the “CRM Settings” and select the “Other Settings” and click “Masked Input“. Then Click on the “Add New Field” button to create a new preformatted field. Select a Module you want to add field to. Select the field type. Select the format for the field you have selected. Click on the “Save” button to save the changes. For further help, contact us
VTiger Tip: How to hide fields based on other field conditions/values?
September 28, 2017

Article
If you are looking to hide field in VTiger based on another field value e.g “Hide Contact.Billing_Country if Contact.Type is “Local Supplier” or any other field – you can do that utilizing Conditional Layouts VTiger Extension, which helps to transform standard VTiger layouts into powerful forms. It only takes few seconds to setup such forms, here are the steps: 1. Open Conditional Layouts Area Go to Menu > Settings > Go to Extension List > Conditional Layouts 2. Hit “+New Conditional Layouts” This is where all conditional layouts that have been setup are shown. 3. Select Module Select any module and name the condition e.g “Hide XXX,AAA,BBB” 4. Add Conditions You can add as many conditions as needed, the action(hide fields), will only be triggered once conditions have been met. 5. Add Tasks This is where all your tasks are,
