

VTiger Extensions (Tips)
See Complete Record History In VTIger 7
May 10, 2018
Article
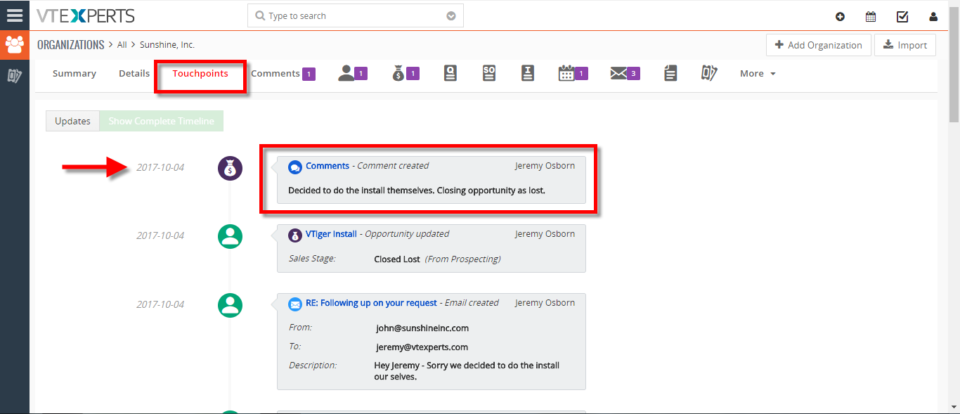
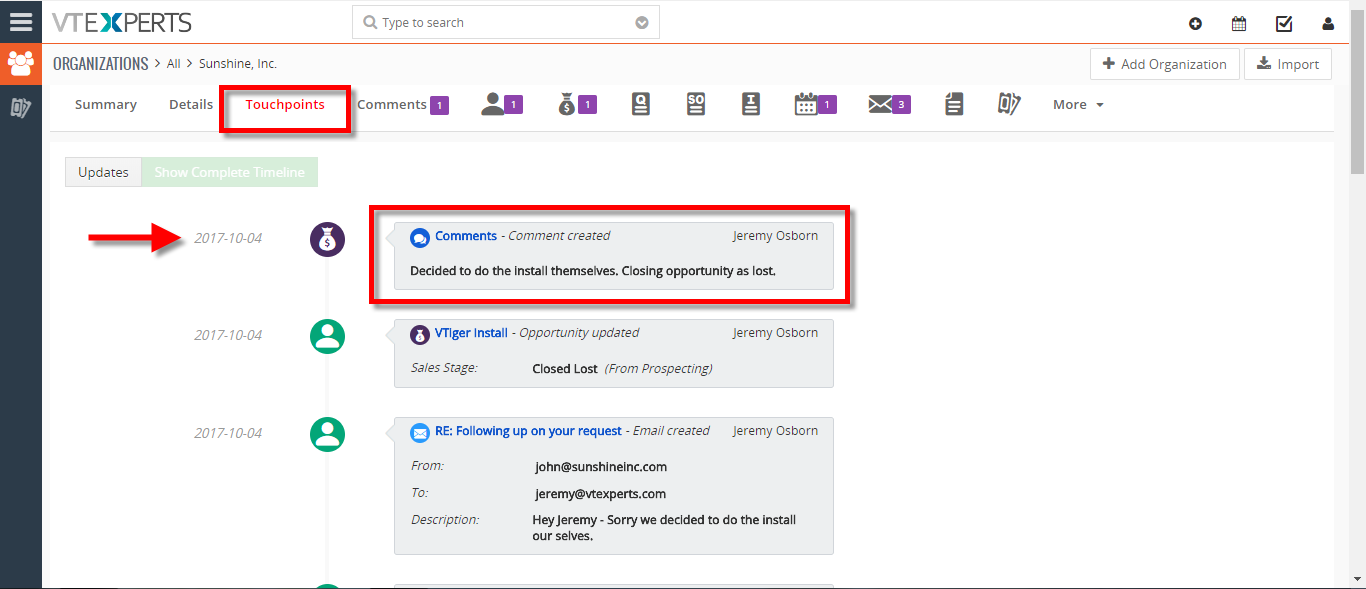
Record Timeline/Summary extension was designed to provide complete record visibility. On the timeline, the user can see any communication (emails, calls, comments) as well as record updates. It rolls up the information from 3 relationship level deeps, meaning if you are viewing organization timeline, you will see any information related to organization(emails,updates,comments) as well as any information related to organizations’ tickets/opportunities (or any other modules). How to See Complete Record History Go to Menu >> Settings >> CRM Settings >> Extension Pack >> Complete Timeline. Select the Number of Fields to show and Number of Characters to show in the description. Then select the Modules. Go to Organizations(Or any other select module) and open a record. In Touch Points Tab you can see complete Time Line with date/Time and details. It shows complete Time Line from the date record is created. For further help, contact us on help@vtexperts.com. We’ll be glad to be of service.
Create Block That Only Shows Open Tickets In VTiger 7
May 9, 2018
Article
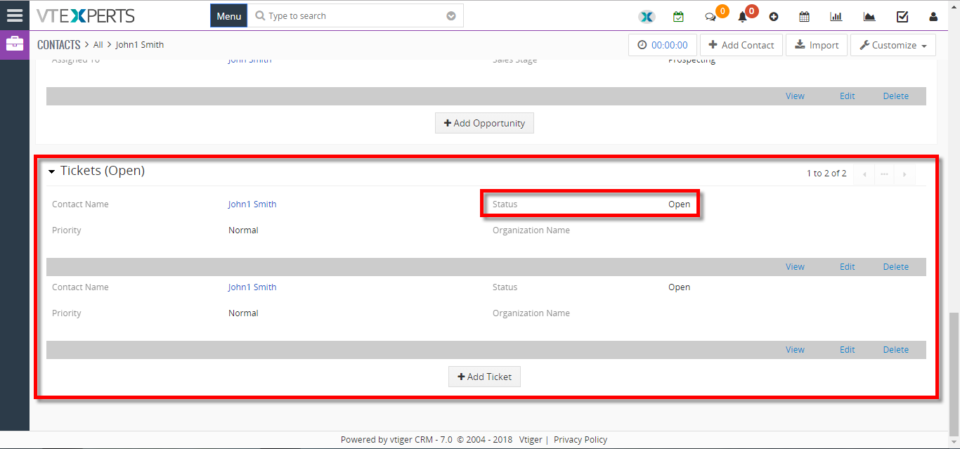
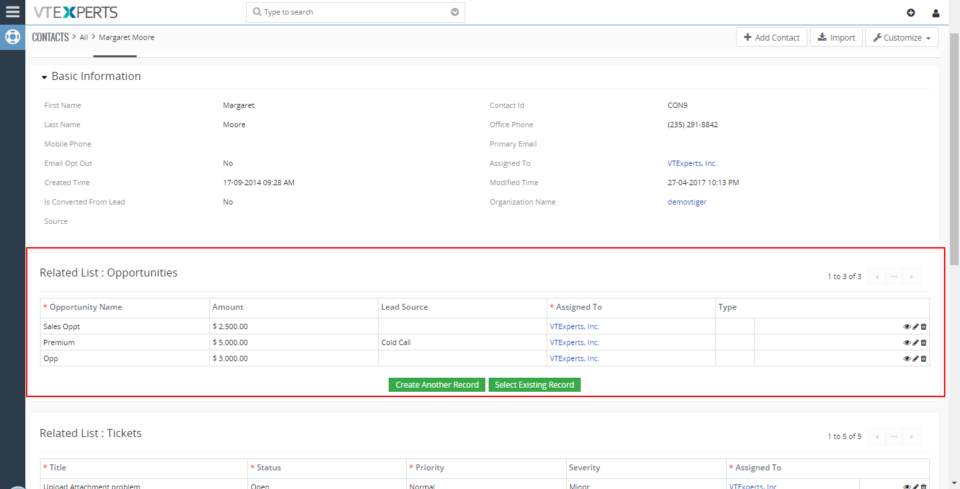
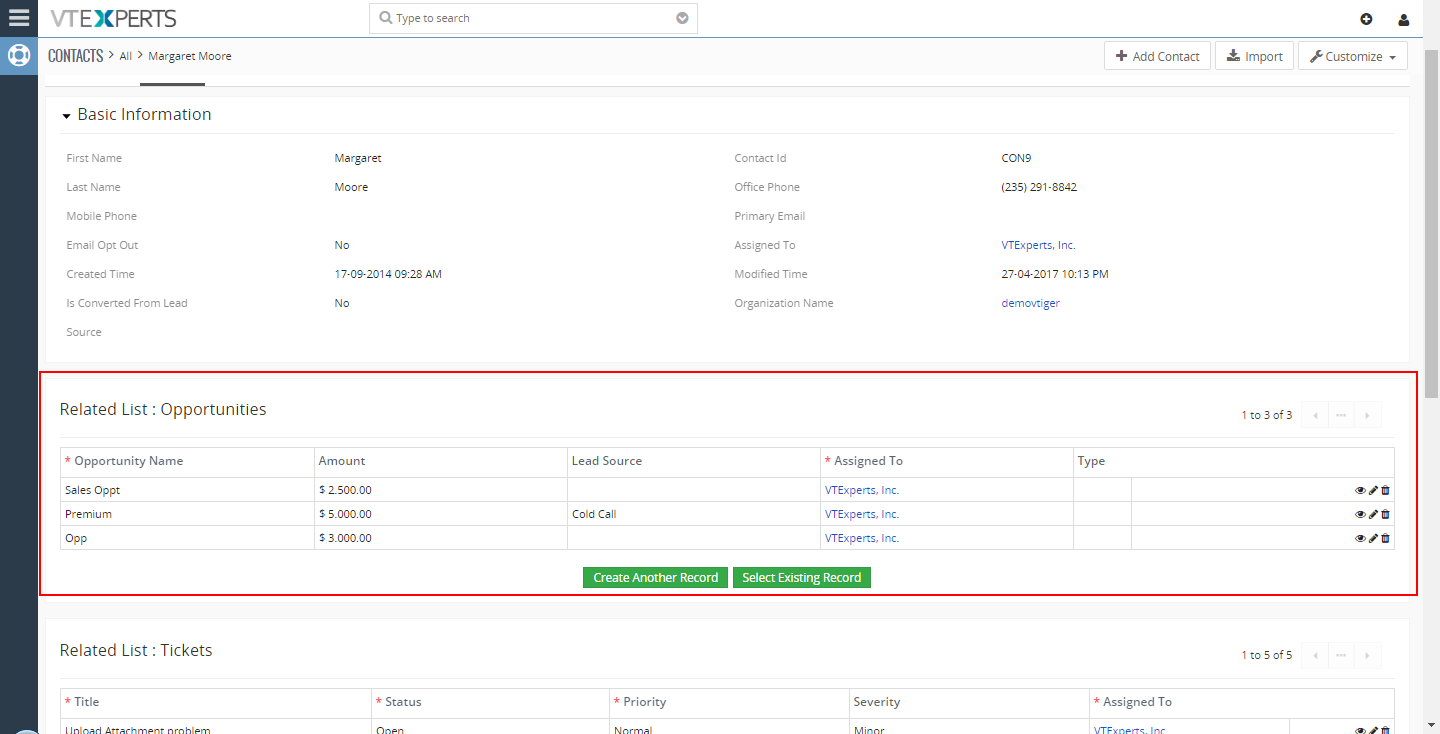
Related Blocks & Lists enabling a display of related records on the Detail, Create, and Edit Views. Intuitive configuration panel allows system administrators to configure which modules (Related Lists) will be displayed on the Detail/Edit Views. How to Create Block that Only Shows Open Tickets Go to the Menu >> Settings >> CRM Settings >> Module Management >> Module Layouts and Fields. Here Select the module and click on the “Add Related Block” button. Select the Related Module and its Fields. Select the Filter Field and its value. Here you can see the Related Block in the Contacts Detail View. You can also Add New Tickets form this Related Block. For further help, contact us on help@vtexperts.com. We’ll be glad to be of service.
Merge Duplicates In VTIger 7
May 7, 2018

Article
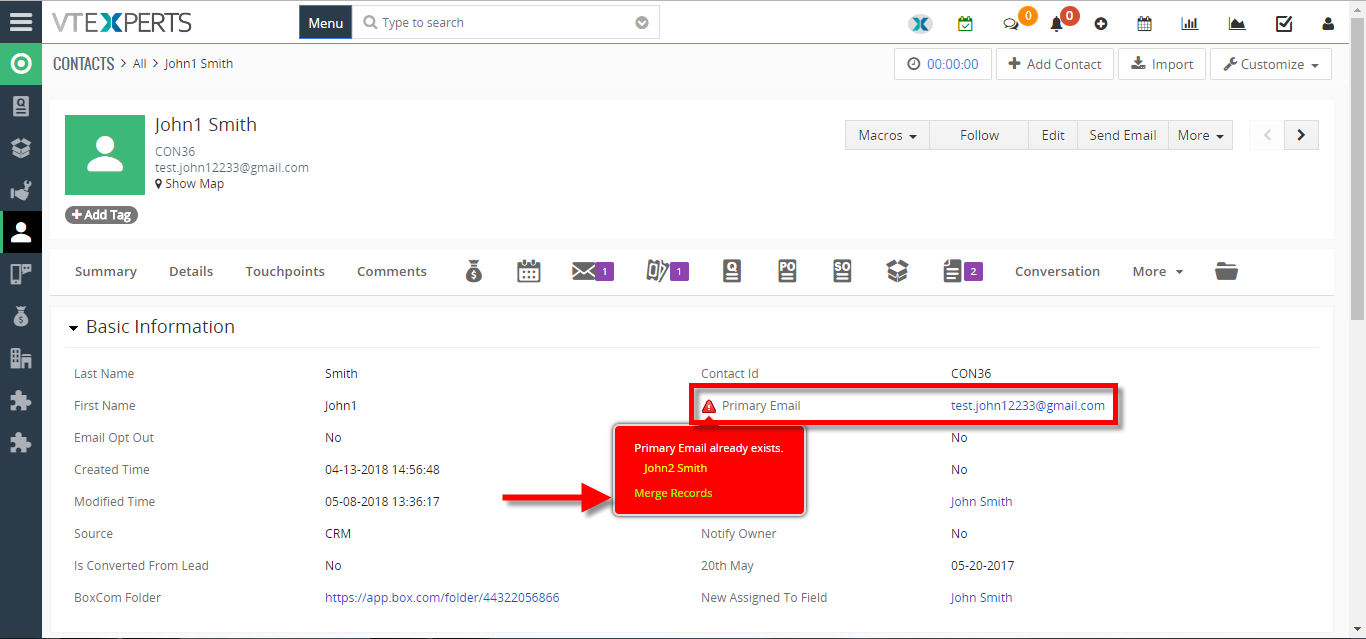
Duplicate Check & Merge is an extraordinarily useful extension for VTiger that is designed to find & merge any existing duplicate records, as well as to prevent any potential duplicates. How to Merge Duplicates Go to Contacts Details there you can see a Red Sign before records which have duplicate values. Click on the sign and click on the “Merge Record“. Click on the “Merge” button. The Primary record will be retained after the merge. You can select columns to retain values but the other records will be deleted. Click on the “Merge” button to apply the merge. For further help, contact us on help@vtexperts.com. We’ll be glad to be of service.
Field Formula Calculation/Concatenation for VTiger is available
May 7, 2018

Article
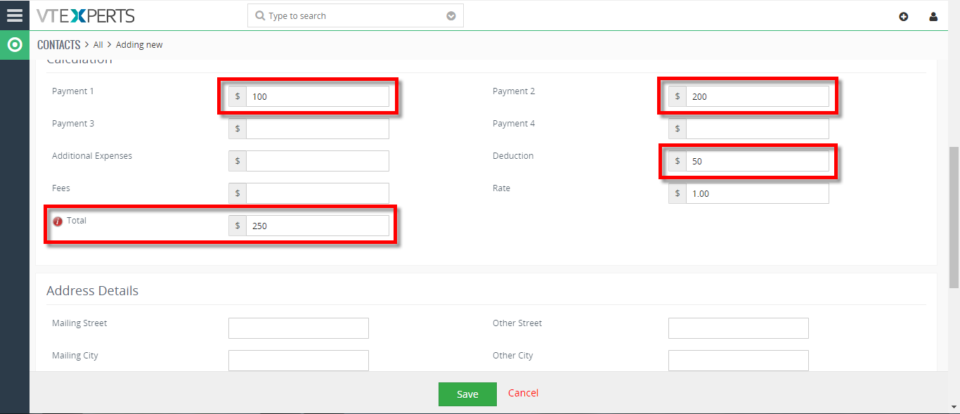
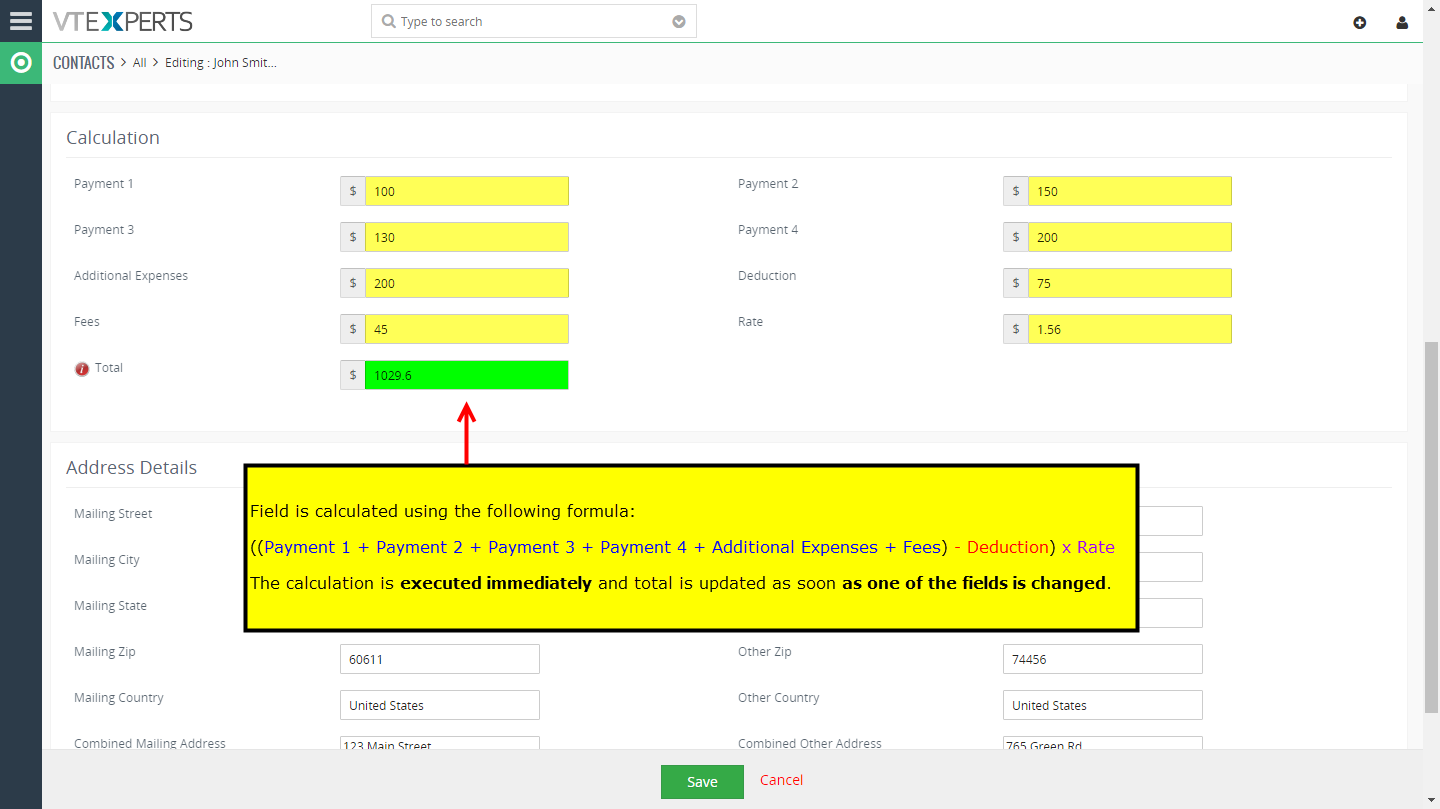
Real Time Field Formula calculation/Concatenation Extension for VTiger 7 is yet another helpful tool for automation as well as productivity. It allows various functions to be performed using standard and custom fields like addition, multiplication, subtraction division of number/amount/decimal as well as other custom functions like changing the Field X value based on the value in field Y, all in real-time. That is the best thing as you don’t have to wait for the data to be saved so you can see the SUM/Total/Combined text spot on. Another great feature of this extension is that it works with the text fields to concatenate the data. This is an addition that was not available before. Moreover, it is very user friendly and can be configured by standard VTiger Workflows in the module manager. The extension is now available for VTiger 7. Some of its most common uses are explained below: 1.
Add Custom Link To VTiger’s Menu In VTiger 7
May 3, 2018
Article
Menu Manager for VTiger is an extension, which allows system administrators to completely redesign standard VTiger menu and transform into an easy to use and intuitive menu. It displays all the modules/links on one popup, making it extremely convenient for every CRM user. How to add Custom Link to VTiger’s Menu Go to Menu >> Settings >> CRM Settings >> Extension Pack >> Advance Menu Manager. Then click on the “+ Add” button. Select “Add Link“. Enter the Label and the URL and click on the “Save” button. Here you can see the Custom Link Icon. For further help, contact us on help@vtexperts.com. We’ll be glad to be of service.
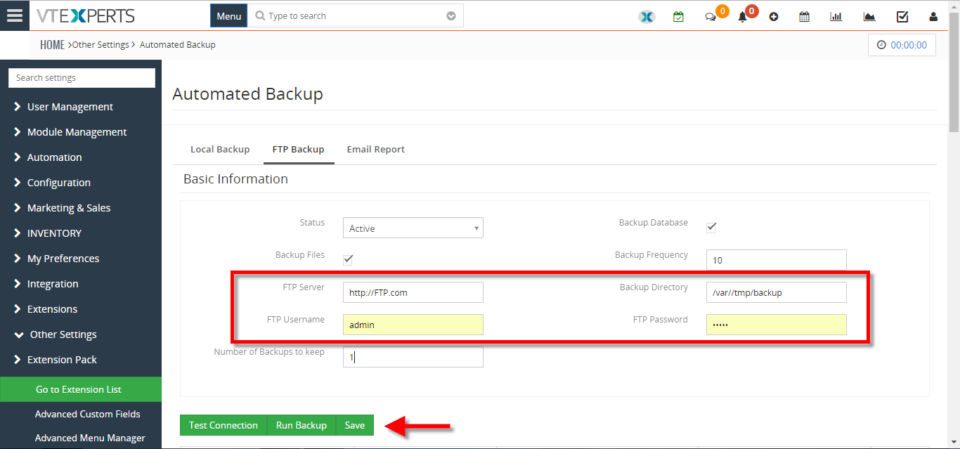
Backup VTiger Database To A FTP Server
May 2, 2018
Article
Automated Backups Extension for VTiger is designed to allow system administrators to easily backup VTiger Files & Database to a local folder or an off-site FTP. How to backup vtiger database to a FTP server Go to Menu >> Settings >> CRM Settings >> Extension Pack >> Automated Backup. Click on the “FTP Backup” tab. Add the FTP access details and click on the “Save” button. For further help, contact us on help@vtexperts.com. We’ll be glad to be of service.
Create Custom Module In VTiger 7
April 30, 2018

Article
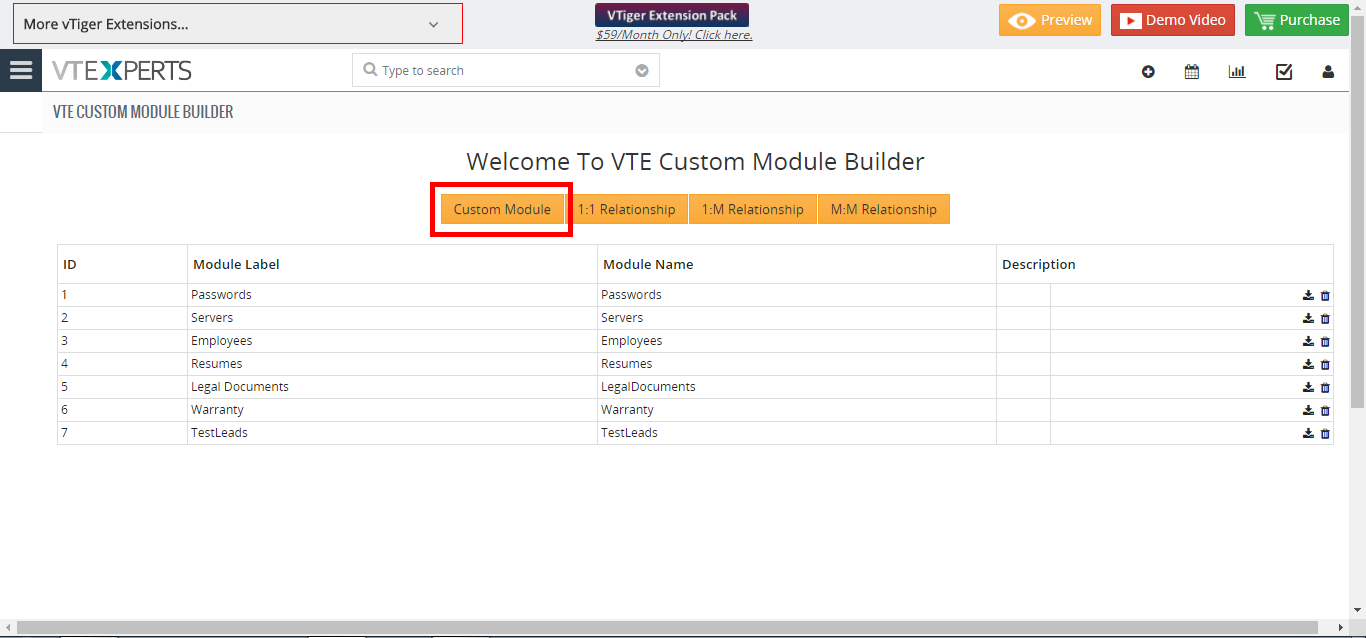
In VTiger 7 you create Custom Modules. The purpose of this extension is to help the user to create a module according to his requirements and you can relate modules with each others by using this extension. How To Create Custom Module Go to the “CRM Settings” and click on the “Other Settings” drop down menu button and select “VTE Custom Module Builder“ From here click on the “Custom Module” button to create a new module. Set the Module name and label and click on the “Save” button to create the module. For further help, contact us on help@vtexperts.com. We’ll be glad to be of service.
Attach Emails From Outlook To VTiger 7
April 27, 2018
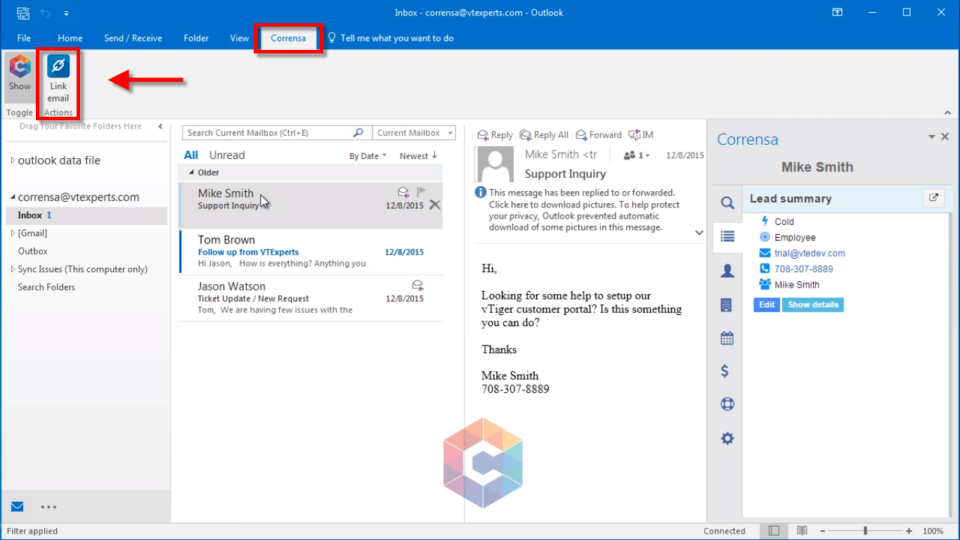
Article
Corrensa is a complete Gmail, Outlook, Office 365 Integration for VTiger. It is designed to allow users to view, edit & create Leads/Contacts, Organizations, Tickets, Opportunities, Activities & more from within the Email interface. It’s a Google Chrome Extension + Outlook Plugin that can be installed/download from Google Chrome Store – Corrensa. How to Attach Emails from Outlook Click on the “Link Email” button that will attach the email to the VTiger record. For further help, contact us on help@vtexperts.com. We’ll be glad to be of service.
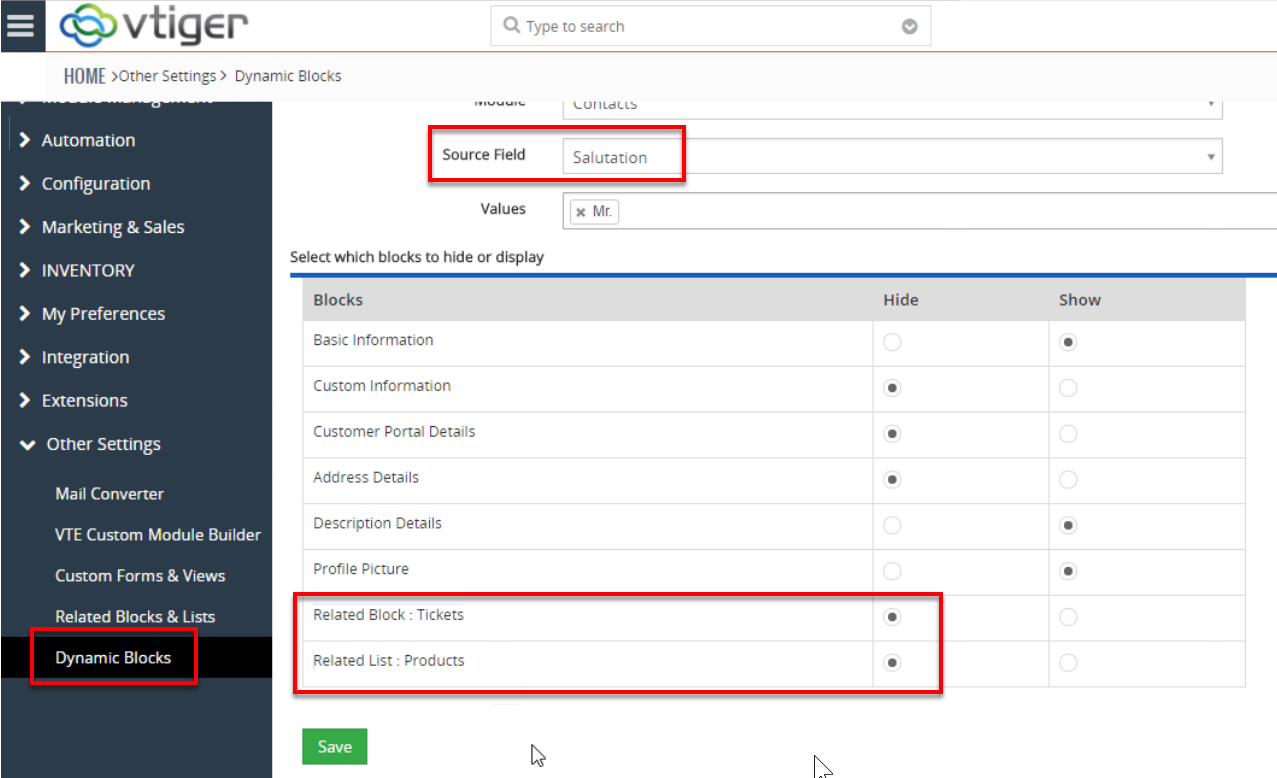
Related Blocks & Lists Extension For VTiger 7 Is Compatible With Dynamic Blocks
April 27, 2018

Article
As you must be well aware of these 2 super helpful extensions for VTiger to improve the productivity; Related Blocks & Lists and Dynamic Blocks. Related Blocks & Lists is the one that allows to add blocks and lists in one module from other related modules. While Dynamic Blocks enables to show Blocks on conditional basis; the conditions being values in any fields. The aforementioned extensions, being extremely useful themselves for record viewing, are now compatible with each other. Let me explain how does that work: Consider you have a block in “Contacts” module for related Opportunities, created with Related Blocks & Lists extension for VTiger 7. Now, when you go to the configuration panel of Dynamic Blocks for VTiger 7, you will see the option to conditionally show or hide the related block for Opportunities as you can show/hide any other standard or custom block. This compatibility feature opens
Request Customer Feedback In VTiger 7
April 27, 2018
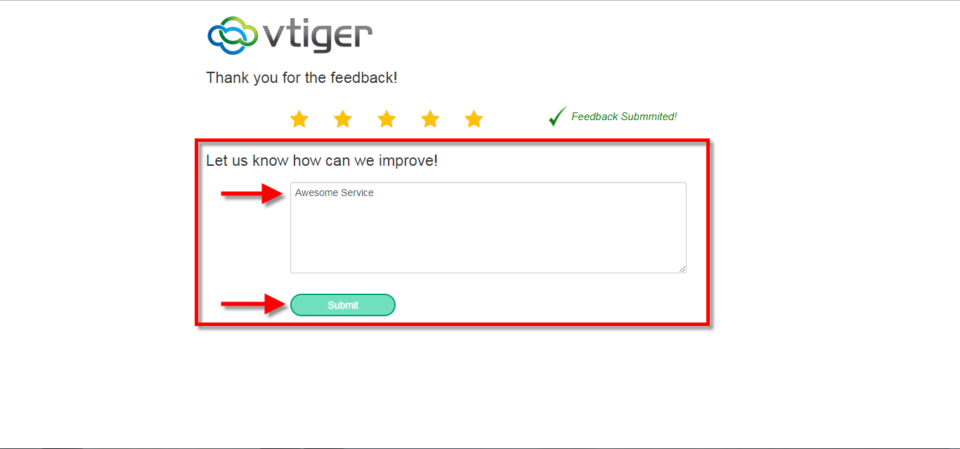
Article
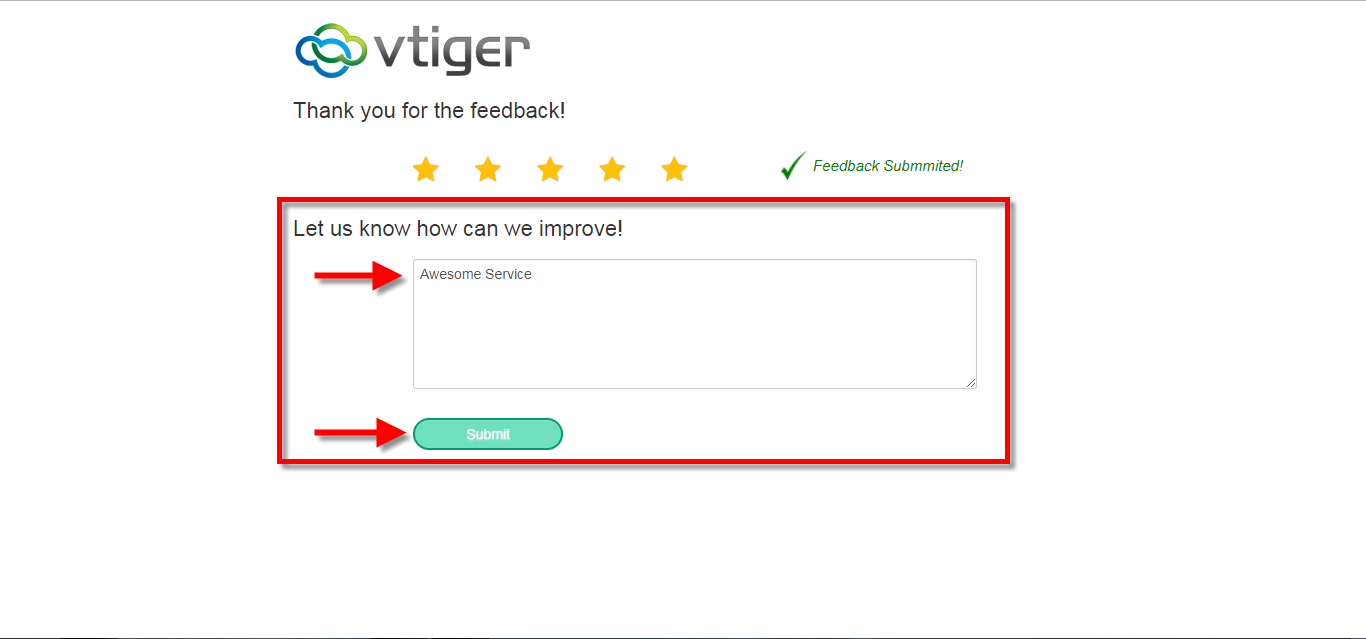
Feedback Extension was designed to simply to request customer feedback directly from VTiger. Feedback email can be triggered automatically (VTiger workflow) or manually by the user. The email itself contains standard text, which you will specify and 5 stars for the recipient to click and immediately provide feedback (feedback is logged as soon as the customer clicks on one of the stars in the email). How to Request Customer Feedback Go to Menu >> Settings >> CRM Settings >> Automation >> Workflows. Click on the “+ New Workflow” Button to create a new workflow. Enter Workflow Name and select the Target Module and the conditions of the workflow. Then click on the “Add Action”. Add action title, and select the Module for the record. Then add Fields to Update. Click on the Save Button. Click on the “+ New Workflow” Button again to create a new workflow. Enter Workflow Name and select the Target Module and the conditions of the workflow. Then click on
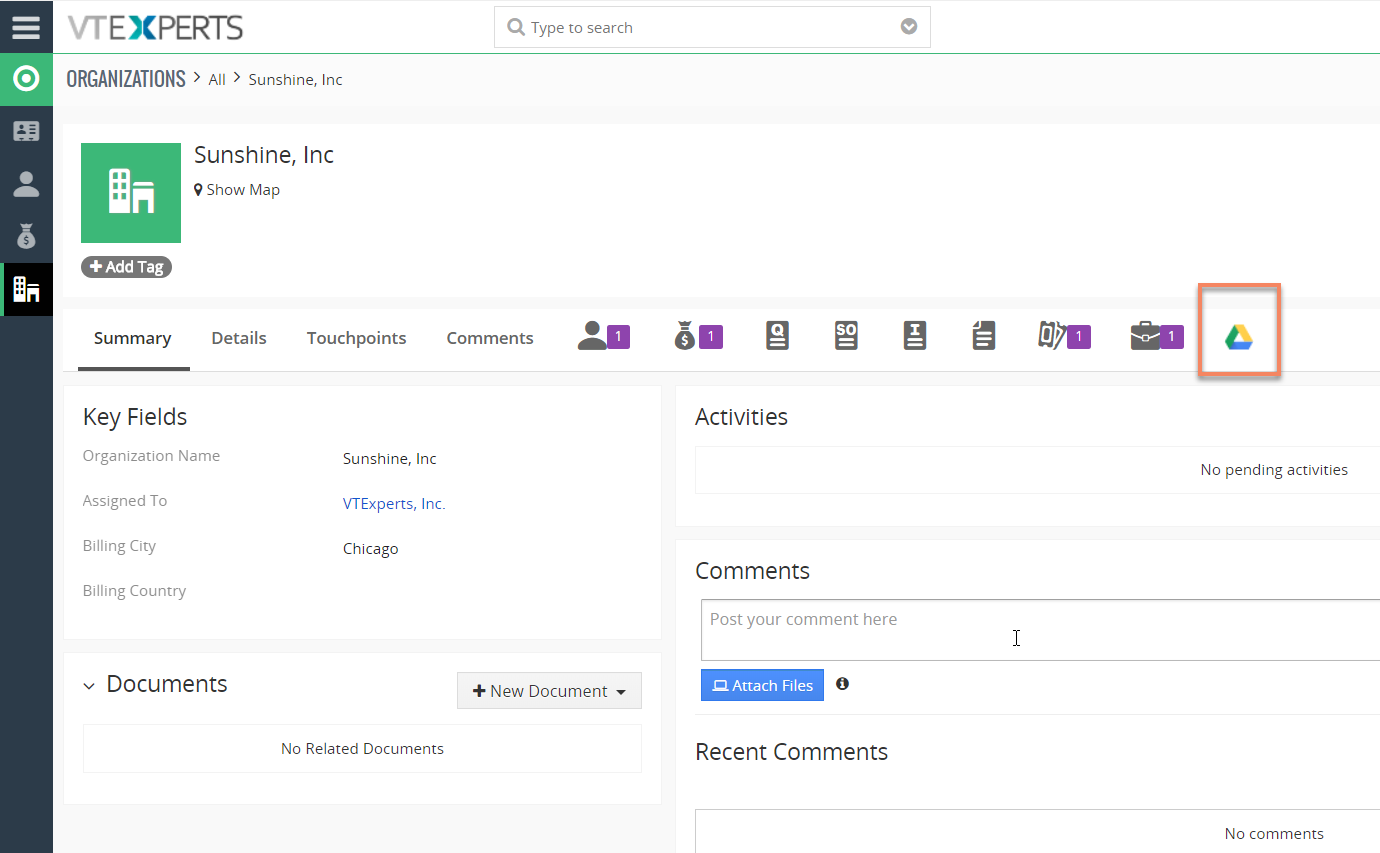
Integrate VTiger 7 With Google Drive
April 25, 2018
Article
Google Drive Integration for VTiger makes it very easy to access documents stored on Google Drive without leaving from the VTiger CRM. It fully integrates the two applications, by assigning Google Drive folders to VTiger records. How to Integrate VTiger 7 with Google Drive Links to be Used during Configuration URL: https://console.developers.google.com/apis/credentials/Authorized JavaScript origins: – your_vtiger_url — https://demo7.vtexperts.comAuthorized redirect URIs: – your_vtiger_url + google drive api link — https://demo7.vtexperts.com/modules/VTEGoogleDrive/oauth2callback.php Go to Main Menu >> Settings >> CRM Settings >> Extensions List >> Google Drive Integration. After the install and first visit, you’ll be asked to download and install the “Google Api PHP Client”. Simply hit the “Download” button and it will automatically download and place the file at the required path. Enable Google Drive Integration, Click to Enable Google Drive Integration, Upload Client Secret File. Open the google console for developers – link: https://console.developers.google.com/apis/credentials/ It will prompt to login with an
Integrate VTiger 7 With Box.com
April 25, 2018

Article
Box.com Integration for VTiger makes it very easy to manage documents from the CRM. It fully integrates the two applications, by assigning box.com folders to VTiger records. Folders are then accessible directly from VTiger. How to Integrate VTiger 7 with Box.com Note: To integrate VTiger with Box account, you need to have active SSL certification on your CRM URL. The Box.com API does not work without it. Open this URL: https://app.box.com/developers/console/ Select “Create New App” Select “Custom App” and hit “Next” Select “OAuth 2.0 (User Authentication)”. This is the login method that your CRM will be using to connect to the Box account. Click “Next” Name your newly created app, read the Terms of Service for the Box API, and click “Create App”. A confirmation will appear that your new app has been created. Hit the blue button saying “View Your App”. Under OAuth
Cascade/Update Changes From One Record To Another In VTiger 7
April 21, 2018
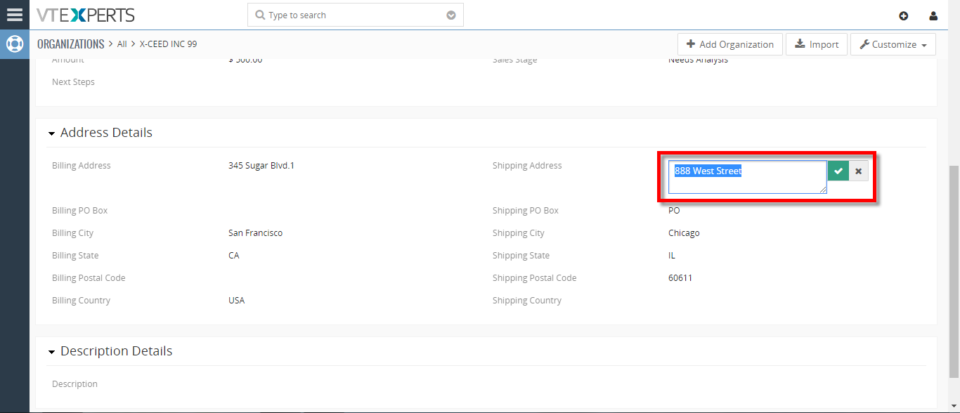
Article
Related Record Update allows to update related records using workflows. It is most commonly used where we want to update an address of organization if the linked contacts’ address has been updated. How to Cascade/Update Changes from One Record to Another Go to Menu >> Settings >> CRM Settings >> Automation >> Workflows. Click on the “+ New Workflow” Button to create a new workflow. Enter Workflow Name and select the Target Module and the conditions of the workflow. Add an action, for this example “Related Record Update“. Add action title, Then add Fields to Update. Here you can see if we Change the address in the Organization it will automatically update in the Contacts details. For further help, contact us on help@vtexperts.com. We’ll be glad to be of service.
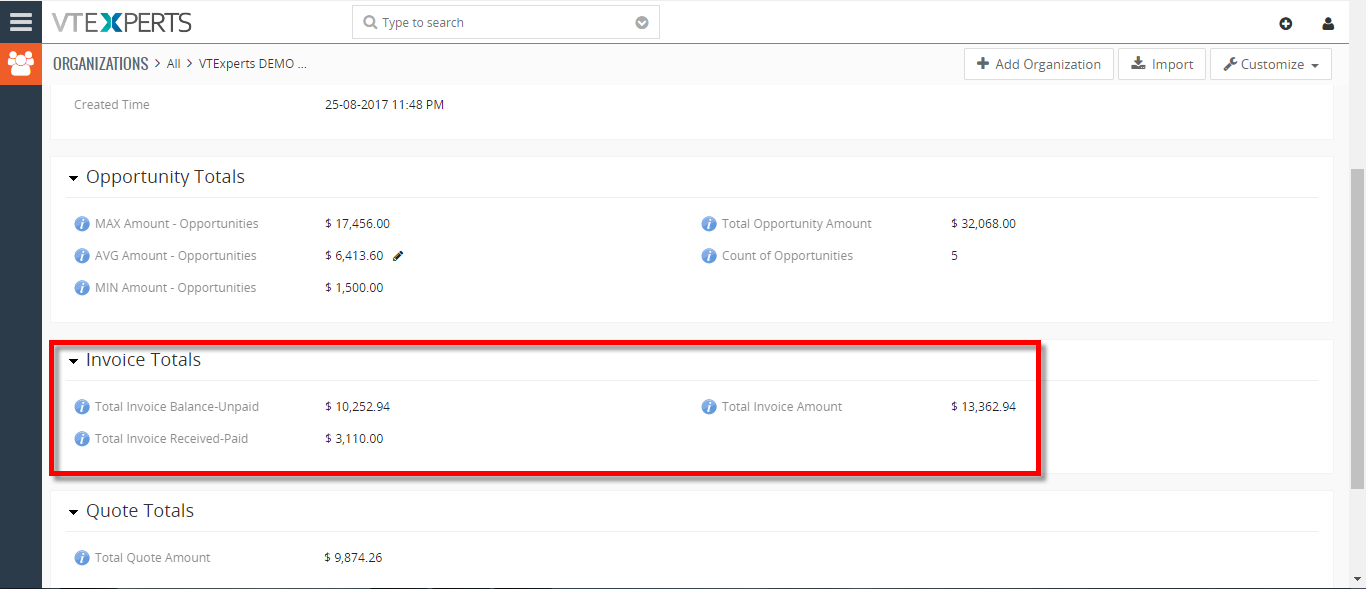
Show Total Balance Of Invoices On Organization In VTiger 7
April 19, 2018

Article
Roll-up Extension was designed to calculate/rollup fields from related to primary module. One of the most commonly used example is being able to see total amount for all the invoices on the Organization record, or better yet – total balance (unpaid invoices). This extension allows the system admin to create workflows that will roll-up the information from one module to another. How to Show Total Balance of Invoices on Organization Go to Menu >> Settings >> CRM Settings >> Automation >> Workflows. Click on the “+ New Workflow” Button to create a new workflow. Enter Workflow Name and select the Target Module. Add an action, for this “Rollup“ Add action title, Then add Fields and select the target field and the source field and the method. Here you can see the Invoice Totals in the Organization . For further help, contact us on help@vtexperts.com. We’ll be glad to
Attach Emails From Gmail To VTiger 7
April 19, 2018
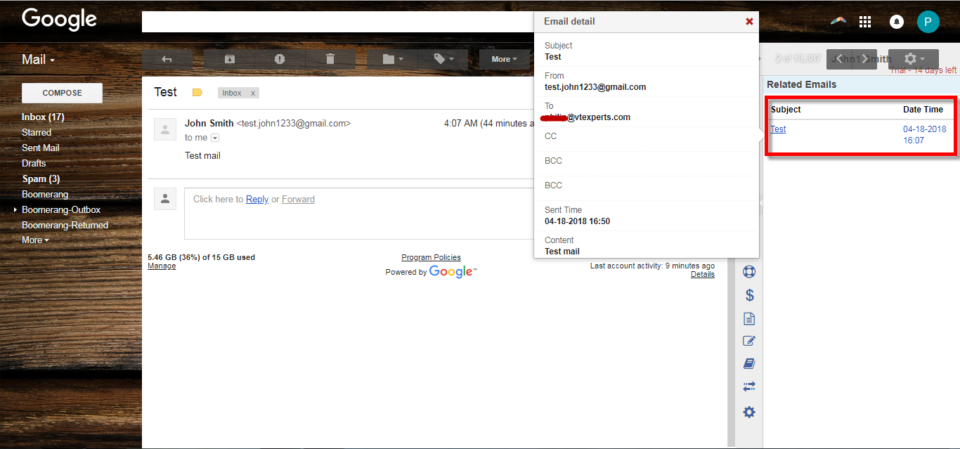
Article
Corrensa is a complete Gmail, Outlook, Office 365 Integration for VTiger. It is designed to allow users to view, edit & create Leads/Contacts, Organizations, Tickets, Opportunities, Activities & more from within the Email interface. It’s a Google Chrome Extension + Outlook Plugin that can be installed/download from Google Chrome Store – Corrensa. How to Attach Emails from Gmail Click on the “Blue Email” button that will attach the email to the VTiger record. Click on it and you can see the Email information. For further help, contact us on help@vtexperts.com. We’ll be glad to be of service.
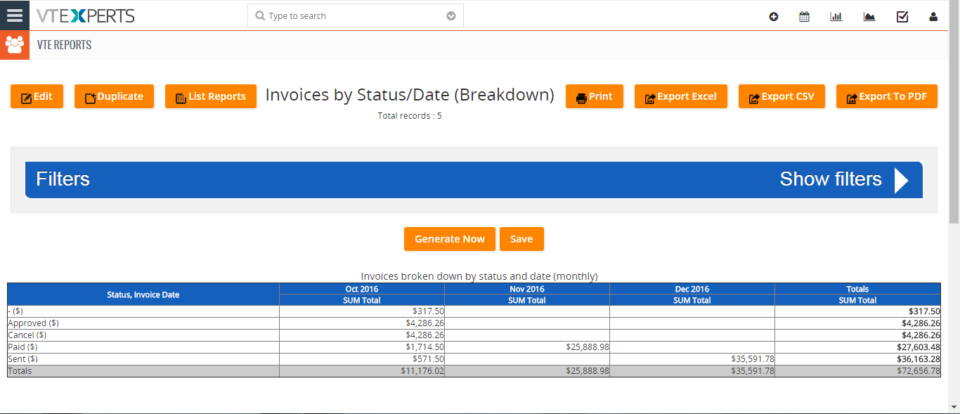
Run Pivot/Matrix Reports In VTiger 7
April 17, 2018
Article
Professional Reports is a tool built to fulfill the needs of all the businesses looking to run complicated, but easy to read reports. It includes a report builder which is capable of creating detailed, summary, pivot, chart reports. All the charts and reports can be placed on the dashboard for quick & easy access. How to Run Pivot/Matrix Reports Go to the Menu >> VTE Reports and click on the “Add Report” button. Enter the Name, Description, Module and the Folder Here we can Sum, Average, Min and Max values when working with invoices. For this example we only use Total. Here you can change the label of the Total. Here we have the ability to create Rows and Columns for Matrix Reports. Here we can filter our Reports Status. Configure Report sharing(For this example we use Public). Then we can use Frequency for schedule Reports. Here we
Related Blocks & Lists An Extension For VTiger 7 – Dozens Of New Features And Enhancements
April 16, 2018
Article
Send Email From VTiger With Different Email Account/Account In VTiger 7
April 13, 2018
Article
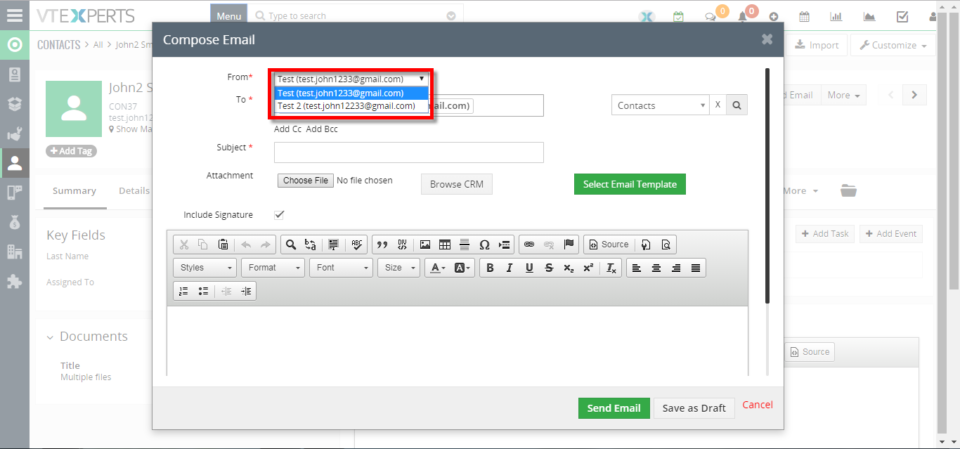
Outgoing Email Server Extension allow each user to have his/her own Outgoing Email Server(SMTP). Email server settings can be configured by admin, or each user can do it for him/herself. It supports IMAP function, meaning that every email sent will also be stored in user’s “Sent” folder on webmail/email server. How to Send Email From VTiger with Different Email Accounts Go to My Preferences and click on the “Outgoing Server” button. Click on the “Create” button and Configure the Outgoing Mail Server. Now open a contact and click on the “Send Email” button and select the Email account you want to send the mail from. Here you can see this mail is sent from VTiger Outgoing Mail Server. For further help, contact us on help@vtexperts.com. We’ll be glad to be of service.
Combine 2 Fields Into One In VTiger 7
April 13, 2018
Article
Field Calculation/Concatenation in Real time is designed to allow field calculations to be made as you type (on the spot). It displays the formula field results instantly without having to save the record in order to see the calculation result (standard VTiger workflow functionality). How to Combine 2 Fields Into One Go to Menu >> Settings >> CRM Settings >> Automation >> Workflows. Click on the “+ New Workflow” Button to create a new workflow. Enter a workflow name. Enter the conditions for this example anytime these fields are Not Empty we want to trigger the calculations then Add and an action which is Field Formula. Enter the action title. Check box the Execution on demands which means it calculates as soon as the user enters the value in the field. Then add the field and select the expression for this example we need Concat(a,b) and we add a fields and put it on the spot of a
Automatically Calculate Fields In VTiger 7
April 11, 2018
Article
Field Calculation/Concatenation in Real time is designed to allow field calculations to be made as you type (on the spot). It displays the formula field results instantly without having to save the record in order to see the calculation result (standard VTiger workflow functionality). How to Automatically Calculate Fields Go to Menu >> Settings >> CRM Settings >> Automation >> Workflows. Click on the “+ New Workflow” Button to create a new workflow. Enter a workflow name. Enter the conditions for this example anytime these fields are grater than equal to 0 we want to trigger the calculations then Add and an action which is Field Formula. Enter the action title. Check box the Execution on demands which means it calculates as soon as the user enters the value in the field. Then add the field and select the expression for this example we need to add the field and Arithmetic Function While creating
Calculate Days Between Dates In VTiger 7
April 10, 2018
Article
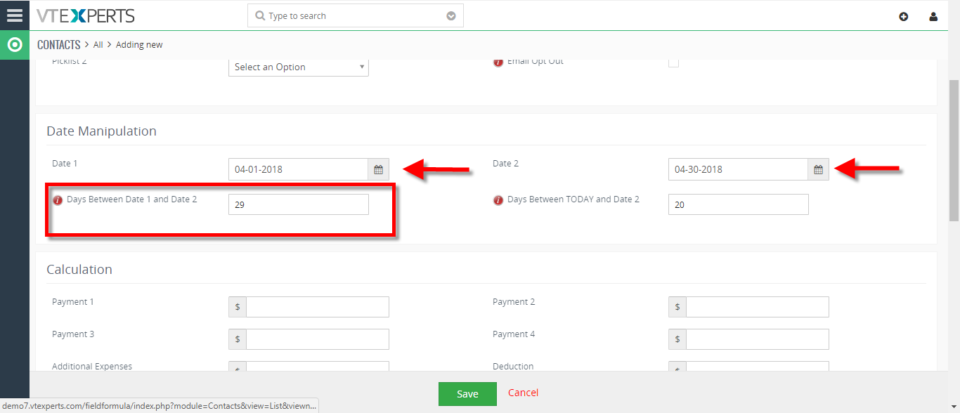
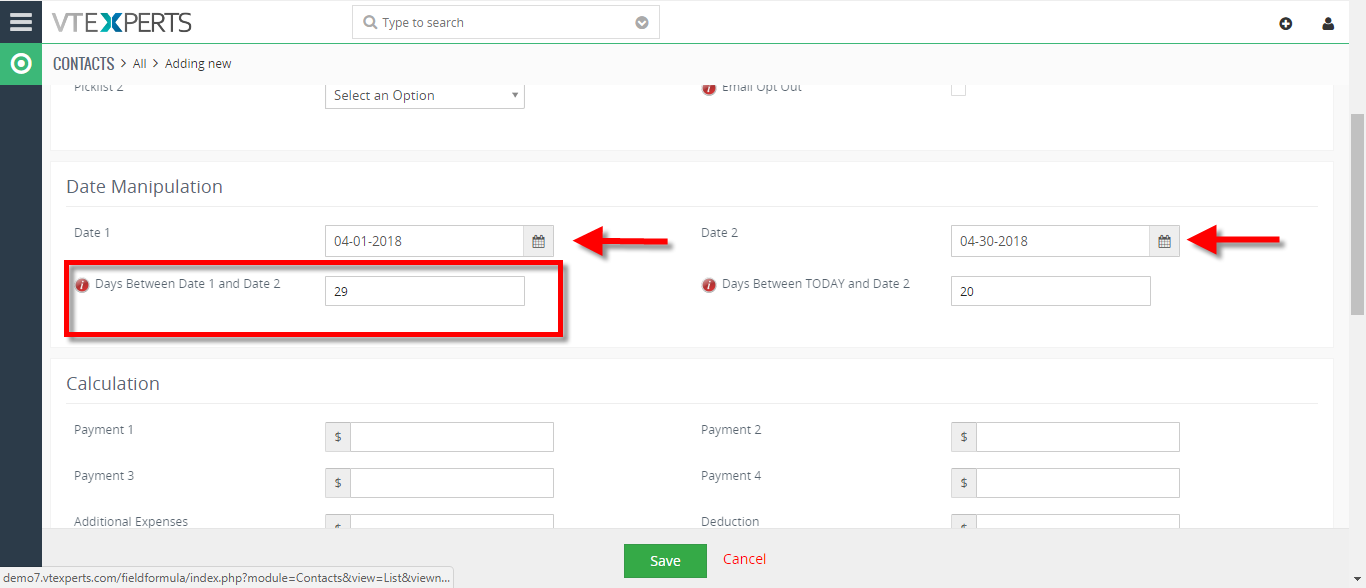
Field Calculation/Concatenation in Real time is designed to allow field calculations to be made as you type (on the spot). It displays the formula field results instantly without having to save the record in order to see the calculation result (standard VTiger workflow functionality). How to Calculate Days Between Dates Go to Menu >> Settings >> CRM Settings >> Automation >> Workflows. Click on the “+ New Workflow” Button to create a new workflow. Enter a workflow name. Enter the conditions for this example anytime these fields are not empty we want to trigger the calculations then Add and an action which is Field Formula. Enter the action title. Check box the Execution on demands which means it calculates as soon as the user enters the value in the field. Then add the field and select the expression for this example we need time_diffdays(a,b) and add the filed names on a and b. While creating a
Create Assets From Purchase Orders In VTiger 7
April 10, 2018

Article
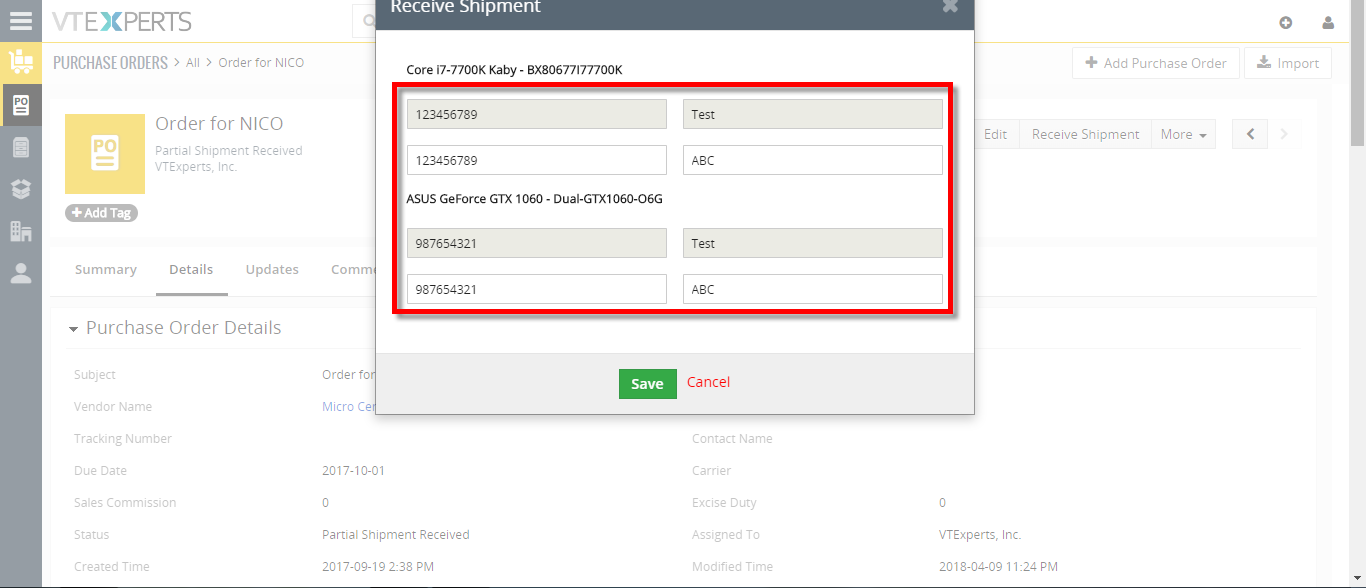
Receive/Create Asset from Purchase Order is an extension designed to efficiently create new assets based on what is being received from Purchase Order. It’s intuitive popup displays Product Number and Name and adds a row for each qty so the user can put in serial number and receiving notes for each product & qty they are receiving. In addition, it supports Partial Shipments and prevents duplicate parts to be received. How to Create Assets from Purchase Orders Open a Purchase Order and click on the “Receive Shipment” button. We’ll get a popup to enter a serial number for each quantity item that we’re receiving as well as receiving notes, Enter the serial numbers and click on the save button. It will change the status to Partial shipment Received and Assets will be automatically added. To complete this shipment click on the “Receive Shipment” button the one’s we already received are not longer editable so we can now add
Stop User From Saving Record Based On A Condition In VTiger 7
April 6, 2018

Article
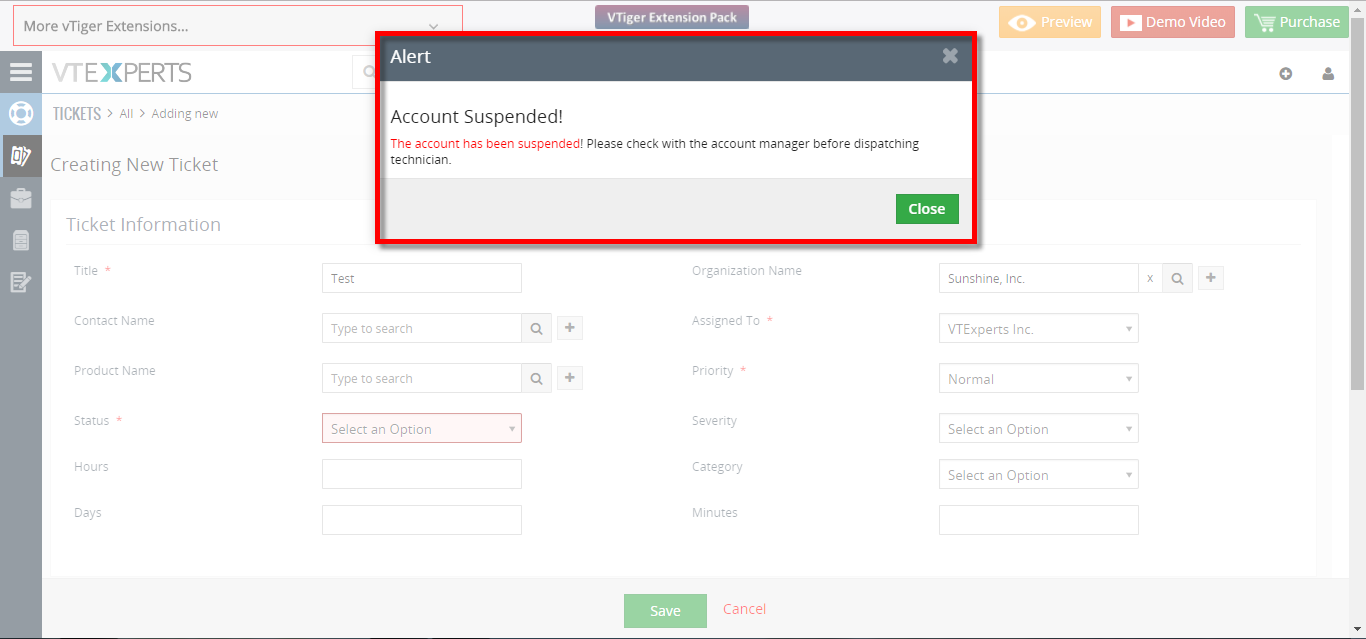
Conditional Alerts/Popups Extension is designed to trigger popups/alerts based on a certain field(s) value on the record. It supports edit/create views, meaning that as you fill in the field – you can trigger an alert/popup on the screen and prevent record from being saved. How to Stop User from Saving Record Based on a Condition Go to Menu >> Settings >> CRM Settings >> Other Settings >> Conditional Alert/Popup. Click on the “New Conditional Alert/Popup” button. Select the Module and enter the description. Add Condition for which you want to get alert of. Enter the Alert title. Enable/Disable alert opetions according to your needs. For this example we need Alert while saving the record. When you create a record it will show you an alert when the condition is true and it will not allow you to save the record. For further help, contact us on help@vtexperts.com.
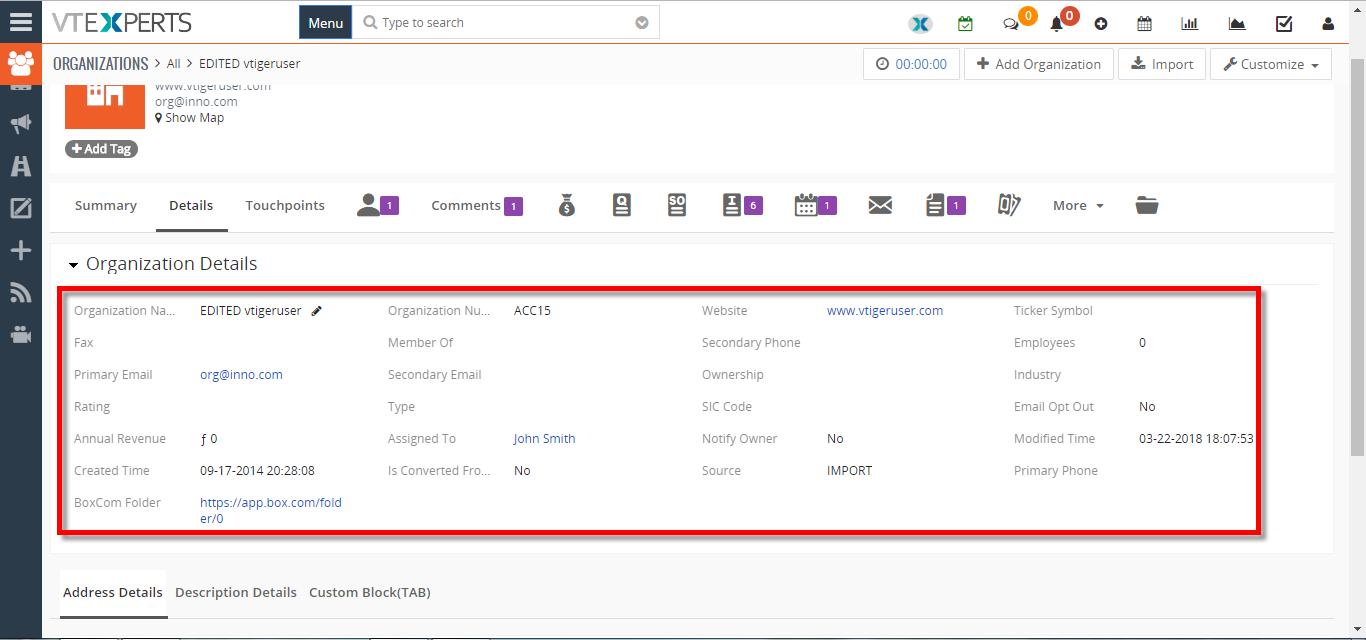
Customize Block Into 5 Columns Layout In VTiger 7
April 5, 2018
Article
Multi Column Blocks/Layouts is designed to convert standard vtiger block layout (2 column) into multi column layout (up to 10 columns). Very easy to use and configure. Columns are configured in standard “Field & Layout Editor” by simply setting number of columns and dragging and dropping fields in desired area. How to Customize Block into 4 Column Layout Go to Menu >> Settings >> CRM Settings >> Module Management >>Module Layouts and Fields. Select the module and Set the “Columns” to 5. Arrange the fields and click on the “Save” button. Here is the 5 Blocks Layout. For further help, contact us on help@vtexperts.com. We’ll be glad to be of service.
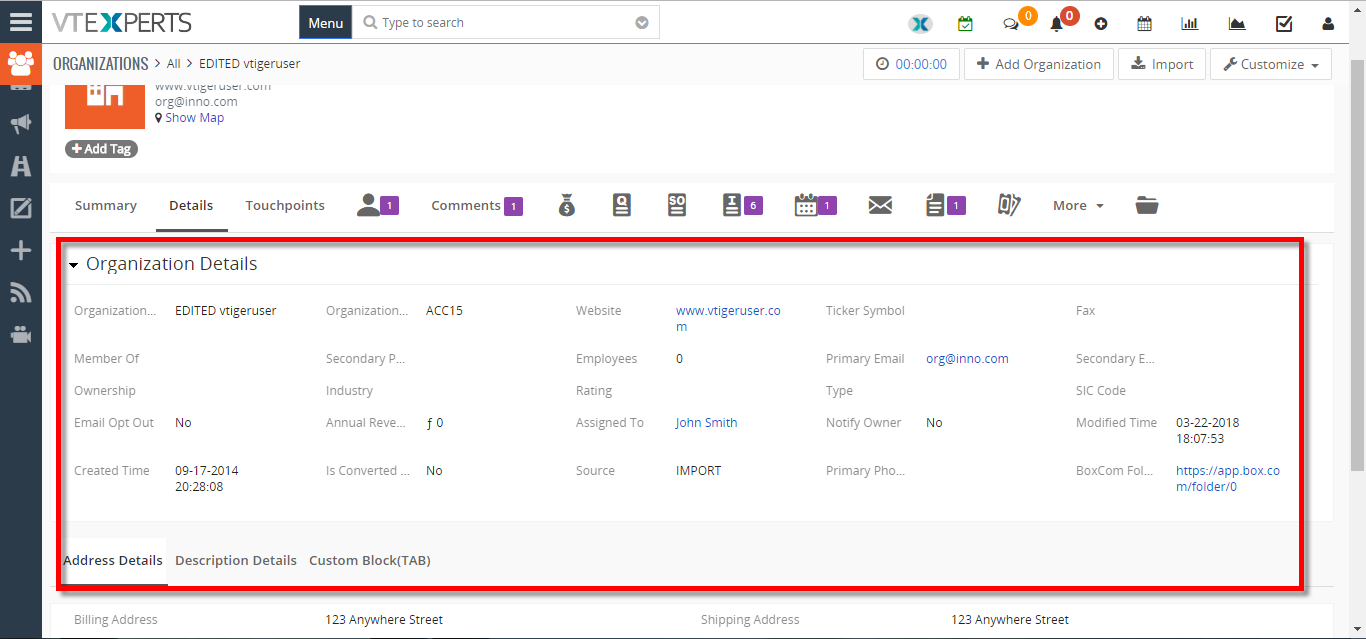
Customize Block Into 4 Column Layout In VTiger 7
April 4, 2018
Article
Multi Column Blocks/Layouts is designed to convert standard vtiger block layout (2 column) into multi column layout (up to 10 columns). Very easy to use and configure. Columns are configured in standard “Field & Layout Editor” by simply setting number of columns and dragging and dropping fields in desired area. How to Customize Block into 4 Column Layout Go to Menu >> Settings >> CRM Settings >> Module Management >>Module Layouts and Fields. Select the module and Set the “Columns” to 4. Arrange the fields and click on the “Save” button. Here is the 4 Blocks Layout. For further help, contact us on help@vtexperts.com. We’ll be glad to be of service.