

VTiger Blog – News, Common Errors & Helpful Tips
How to Change vTiger Global Search Result Columns/Fields?
August 30, 2013
Article
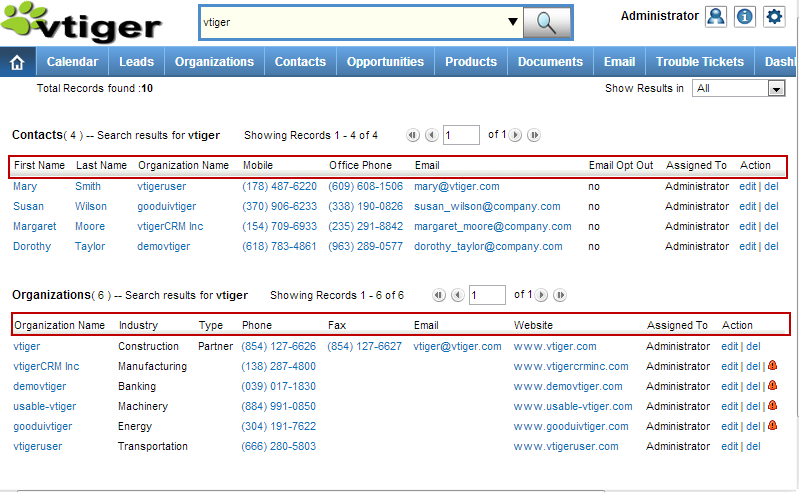
Out of the box vTiger does not have an option to change the Global Search Result Columns/Fields in the User Interface, however there’s a way around. Basically – you need to create a vTiger filter and specify the columns you want to see. Note, the filter does not have to be set as default, but has to be public. In addition, in order for it to work, you will have to create filters for all the modules you want to use in the search, in other words, the filter you create will be used to display search results, and if the filter does not exist, it will not show any results, so again each module that you want included in the search should the the filter created. The filter name should be the same for all modules. Once you have the filters created, the next step is to specify which
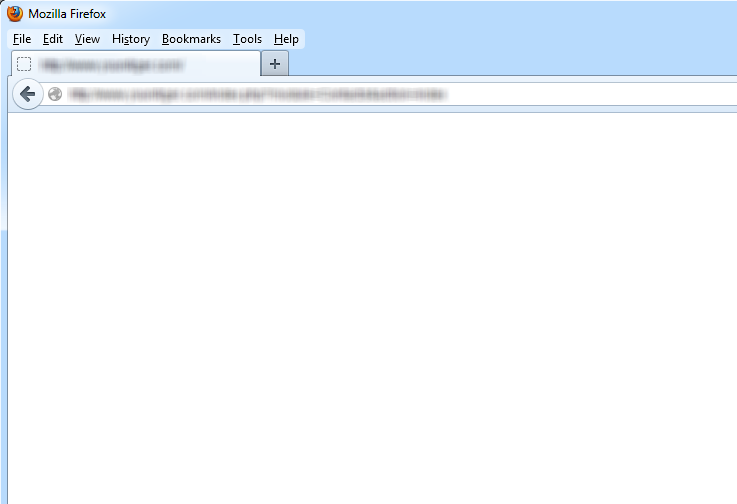
What to do If you get a Blank/White Page In vTiger?
August 30, 2013
Article
There can be multiple reason as for why you are getting Blank Page in vTiger. It can be server configuration, vTiger error, or a permissions issue. The first step you should do is enable error reporting in index.php. You can do that on the server site as well. To enable error report you will have to add an additional line to index.php. Go to “/vtigercrm/” Open index.php with your favorite text editor After <?php create a new line and add “ini_set(‘display_errors’, 1);” – (exclude double quotes). Save it Now you should be getting an vTiger error message instead of blank screen, which will help you to identify & solve the issue. If you need help trying to figure out what went wrong, feel free to contact us.
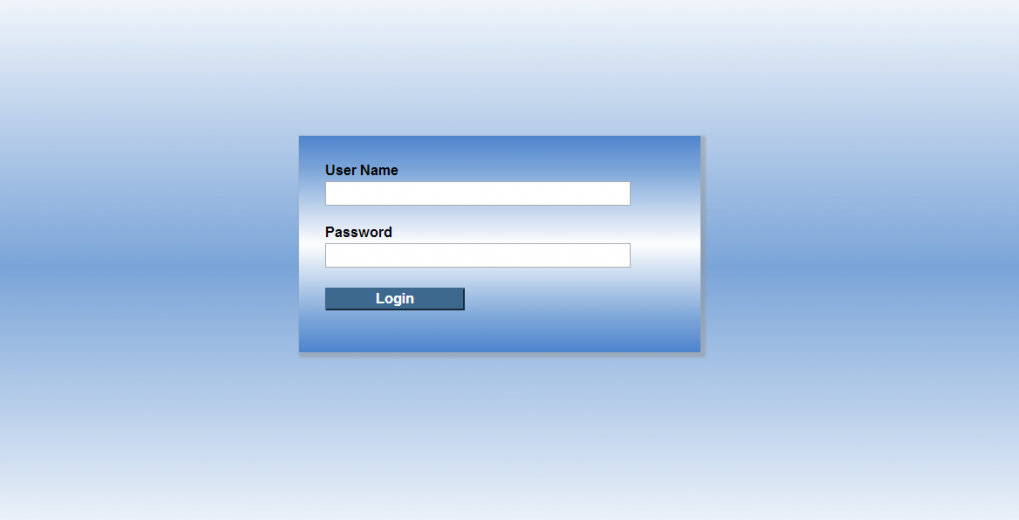
How to Clean Up vTiger Login Page
August 30, 2013

Article
Default vTiger Login Page has a lot of elements which are just advertisements or links to their website. As a business you usually would not want to see something like that. There’s an easy fix to remove all of those elements. You can either follow the instructions below and do it yourself or just download the cleaned up login page. Instructions: Go to “vtigercrm/Smarty/templates/” Open Login.tpl Go to Line 22, it should be blank, add <!– Go to Line 64, it should be blank, add –> Go to Line 67, there should be “<div>Powered by vtiger CRM – {$VTIGER_VERSION}</div>“, add <!– and –> around it: <!– <div>Powered by vtiger CRM – {$VTIGER_VERSION}</div> –> Go to Line 91, there should be “<div> class=”importantLinks”>”, add <!– in front of it: <!– <div> class=”importantLinks> Go to Line 97, there should be “<div>”, add –> at the end of it: <div> –> Go to
How to Change Listview Columns for any Module in vTiger?
August 30, 2013
Article
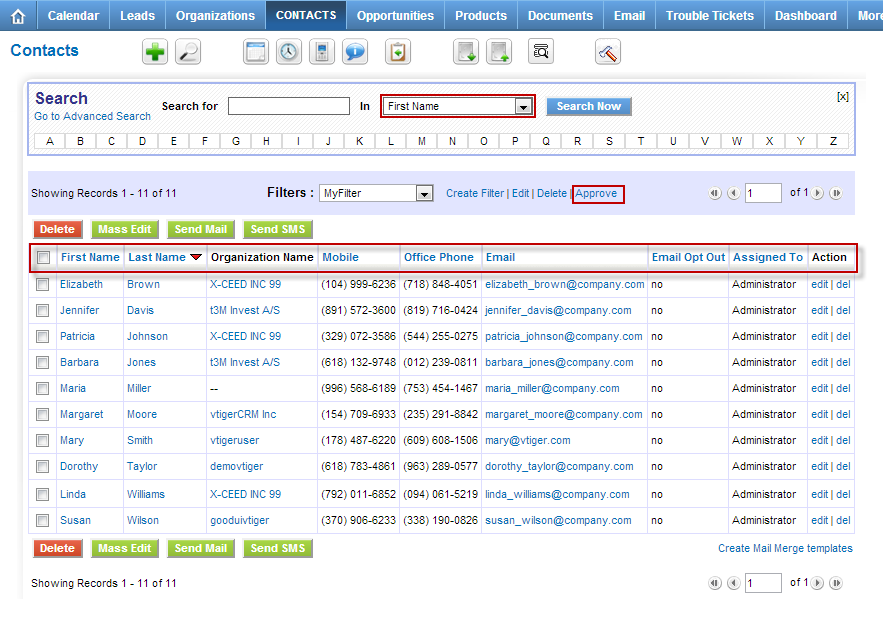
By Default vTiger has a filter “All” which contains the commonly used fields, however sometimes those fields are not enough and it would be nice to include other fields into “All” filter. Unfortunately, you can not edit “All” filter using the user interface, however there’s a work around. In order to specify the columns we always want to see, we will have to create a custom filter and set it as public & default. I will explain how to do that for Contact module – you can follow the same procedure for any standard or custom vTiger module. Go to Contact List Click “Create Filter” Enter “View Name” which is a filter name Check “Set as Default” – when checked – it will always open this filter as default Check “Set as Public” – filter will be public and other user will be able to use it as well Choose
How to Change Default Trouble Ticket Order In Listview?
August 30, 2013
Article
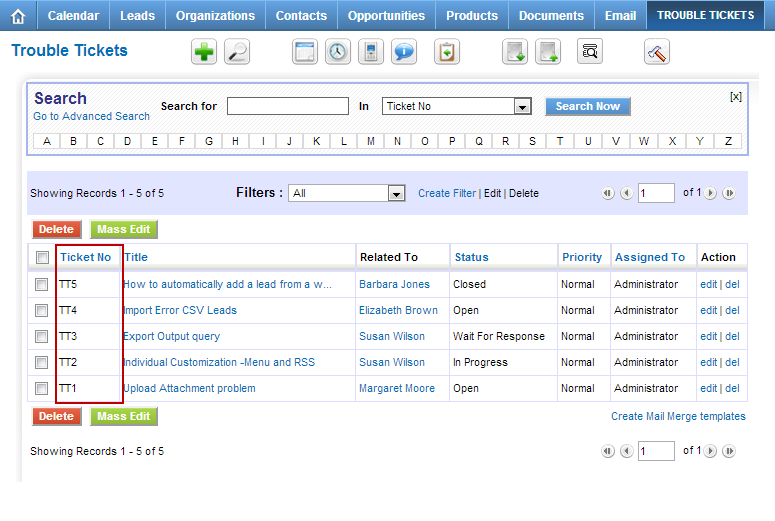
Out of the box vTiger does not have a Graphical user interface to control the default sort order for listviews. Each business is different and everyone has their own needs. In order to change the default sorting order on Trouble Tickets listview – you will have to modify few files. First, we need to set the default sorting field and order. Go to /vtigercrm/modules/HelpDesk/ Open file “HelpDesk.php” Find a line which has “var $default_order_by” and change the value to preferred sort field. Note, it should be field name and not the field label. The line below will be “var $default_sort_order” – By default it’s set to DESC (descending order), it can be changed to ASC (ascending order) if needed. Once changes are made, save the file. Second, we need to enable the default sort order. Go to /vtigercrm/ Open file “config.performance.php” Find line which as “‘LISTVIEW_DEFAULT_SORTING‘” and change it to
How to Disable Email Notifications for Trouble Tickets/Opportunities?
August 29, 2013

Article
Out of the box vTiger comes with few email notifications already enabled. The notifications are triggered when: Opportunity is created Trouble Ticket has been updated from Customer Portal Trouble Ticket has been created from Customer Portal New Comment has been added to the Trouble Ticket These notifications are triggered by vTiger workflow. To turn the notifications off, you would do: Mouse over the “gear” icon on the right upper corner Click “CRM Settings” Under “Other Settings” click “Workflow“ Click on the Workflow you want to disable Scroll down to “Tasks” section and modify the Task Once the task opens, set the “Status” to “Inactive” and save the task.
How to Send an Email using vTiger User’s Email Address?
August 29, 2013
Article
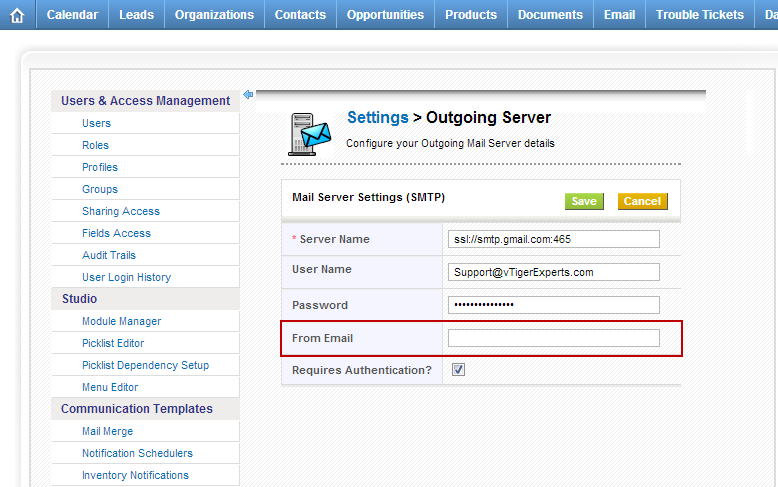
Out of the box vTiger already has ability to have Email “FROM” Address as logged in user’s email address. It’s very simple – when setting up a vTiger Outgoing Email Server you should NOT specify the “FROM” Email Address. If the “FROM” Email Address is not specified the system will use logged in user’s email address as “FROM” Address when sending an email.
How to Change Default “Related To” From Organizations to Contacts?
August 28, 2013
Article
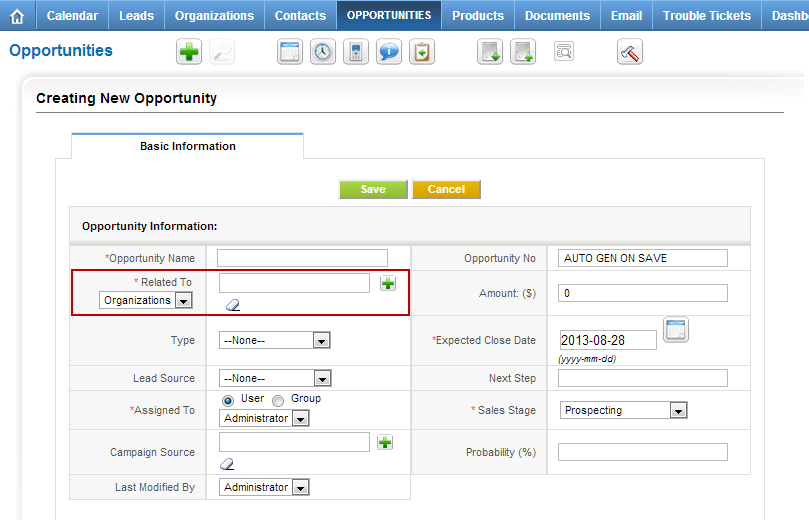
Out of the box vTiger does not support setting the default “Related To” dropdown values. The “Related To” dropdown is used in many modules such as “Trouble Tickets”, “Opportunities”, “Projects”, “Service Contracts”, etc… In order to change the default “Related To” value from Organizations to Contacts, you will have to adjust the database. Note, if you are not familiar with MySQL and the database structure, you are better off having someone else do it. We would be glad to help – Contact us. The table that needs to be modified is ‘vtiger_fieldmodulerel‘. Open the table and you will see the first 2 rows are: You need to change the “relmodule” value to switch “Accounts” with “Contacts” and “Contacts” with “Accounts“. Whenever you start a new Opportunity/Potential the default “Related To” value will be the the first one for the “module”. The end result should be: Again, if you need help
The record you are trying to view has been deleted
August 28, 2013
Article
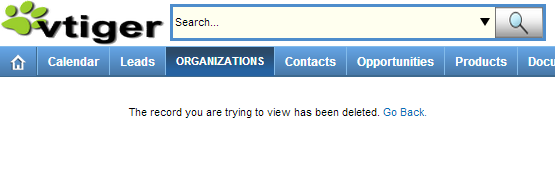
The vTiger error “The record you are trying to view has been deleted” is presented when the the record you are trying to access does not exist. It does not necessary mean that the record has been deleted, the reason for that is, if you were modifying the code or the database you might have changed the function which loads the appropriate recordid or when the record is not created properly but the system still thinks it was and opens the record using the ‘new id’ which does not exist. It’s almost impossible to determine why it happens without looking at the code. If you would like us to look at it – feel free to contact us.
How to Change Field Labels in vTiger?
August 28, 2013

Article
Unfortunately vTiger does not have an option to change the field labels using the user interface. However, there are few ways to do it. Let’s say we want to modify the field label for Account field “Rating”. The first and the easiest method is to modify the vTiger language file and replace the existing field labels with new ones. Go to “/vtigercrm/modules/Accounts/language/“ Open “en_us.lang.php” with your favorite text editor Find the word “Rating” and replace it with the new label. Save the file and refresh the Contact screen – the new label should show up. The second method requires knowledge of MySQL database structure, so if you are not familiar with tables and field, you are better of going with method one or three. Connect to your vTiger database Find table ‘vtiger_field‘ Run the query ‘select * from vtiger_field where fieldlabel=’Rating’;‘ Edit the row and change the fieldlabel value to
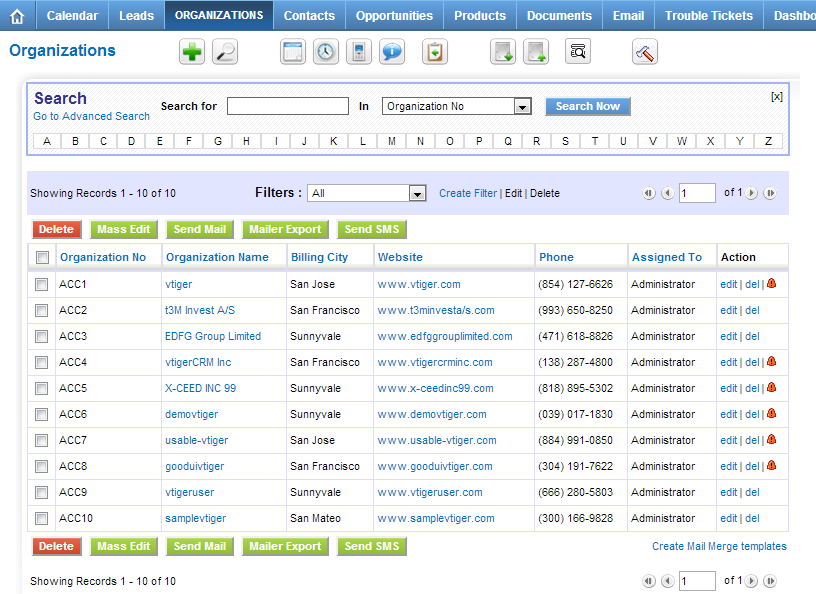
Why does the Orange Icon with Exclamation Point Show up in Listview?
August 28, 2013
Article
The Orange icon with exclamation point inside indicates that the record has been modified by the user who is not the record owner(Assigned To). If you find this Icon Annoying you can easily remove it by replacing the file “important1.gif” in “vtigercrm/themes/images/” with a one pixel .gif image.
How to Change Document Maximum Upload Size in vTiger?
August 28, 2013
Article
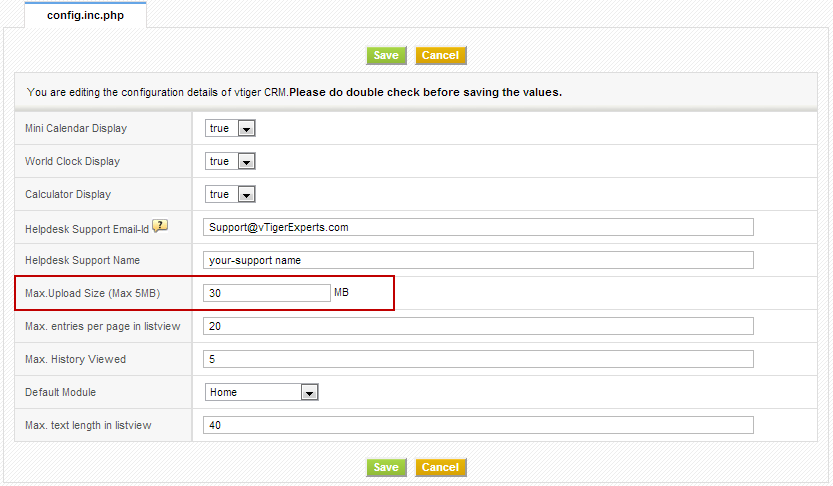
Out of the box vTiger has a limit of 3MB for the file upload when creating and uploading an external document to vTiger. In order to increase the file limit, you have to set it in vTiger Configuration Editor as well as in you servers’ php.ini file. vTiger Configuration Editor: Mouse over the “gear” icon on the right upper corner Click “CRM Settings” Under “Other Settings” section, hit “Configuration Editor” Find “Max. Upload Size (Max XMB)” and set it to 30MB(you can set it to higher number if needed). Save the Configuration Editor by clicking “Save”. Server Configuration – php.ini. If you are on shared hosting, most likely you will not have access to php.ini – you should contact your hosting provider to adjust the values. However, if you do have access, follow the instructions below: Open php.ini with your favorite text editor Find “post_max_size = XXMB” and change it
Migration Incompleted. Please contact your system administrator.
August 28, 2013
Article
The vTiger error “Migration Incompleted. Please contact your system administrator.” is usually caused by vTiger not being able to connect to the MySQL database. Possible causes: MySQL Server is not available/down MySQL Server host has changed MySQL Username/Password is not correct/has changed MySQL Database name has changed In order to adjust the MySQL credentials, first you have to verify them with your host provider and adjust them in config.inc.php. Go to your vTigerCRM directory Open “config.inc.php” with your favorite text editor Go to line 47 – verify that the $dbconfig[‘db_server’] has the correct MySQL Host Name Go to line 48 – verify that the $dbconfig[‘db_port’] has the correct MySQL Port Go to line 49 – verify that the $dbconfig[‘db_username’] has the correct MySQL Username Go to line 50 – verify that the $dbconfig[‘db_password’] has the correct MySQL Password Go to line 51 – verify that the $dbconfig[‘db_name’] has the correct MySQL Database Name Hope that helps!
Sorry! Attempt to access restricted file.
August 28, 2013
Article
The most likely cause for the vTiger error “Sorry! Attempt to access restricted file.” is the $root_directory value in the ‘config.inc.php’ is incorrect or misspelled. In order to correct it follow the steps below: Go to your vTigerCRM directory Open “config.inc.php” with your favorite text editor Go to line 86 and adjust $root_directory value to correct vTiger directory. Note, that the directory must end with /. It should look something like this – $root_directory = ‘/var/www/vtigercrm/’; Hope that helps!
How to Organize Navigation Bar in vTiger?
August 26, 2013
Article
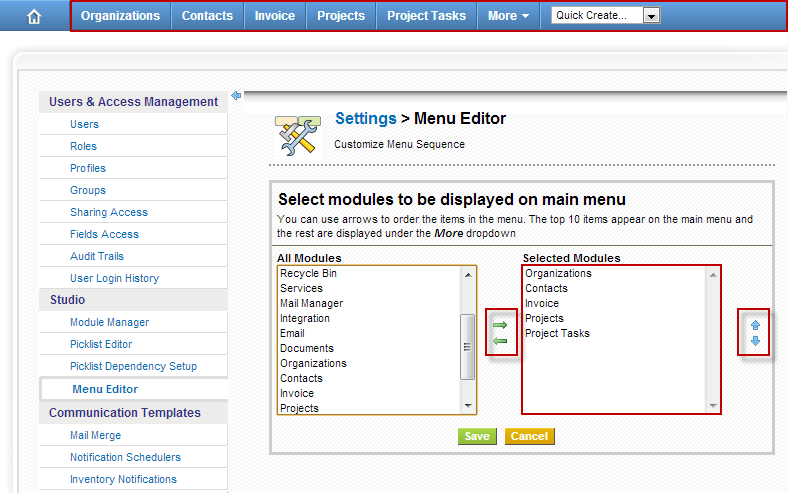
vTigerCRM has a nice feature which allows users to arrange the navigation bar menu items. It’s helpful when you have many modules enabled, but not all of them are used on a daily basis. To add or remove menu items from the vTiger navigation bar follow the instructions below: Mouse over the “gear” icon on the right upper corner Click “CRM Settings” Under “Studio” section, hit “vTiger Menu Editor” “Selected Modules” are the modules which will show up on the main navigation bar. Use the arrows to add,remove and order the modules.
How To Disable Modules In vTiger?
August 26, 2013
Article
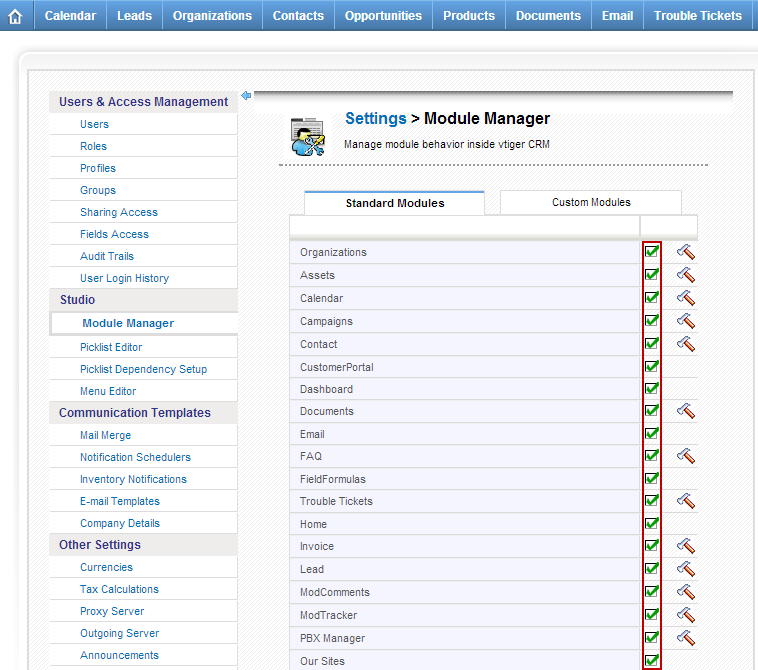
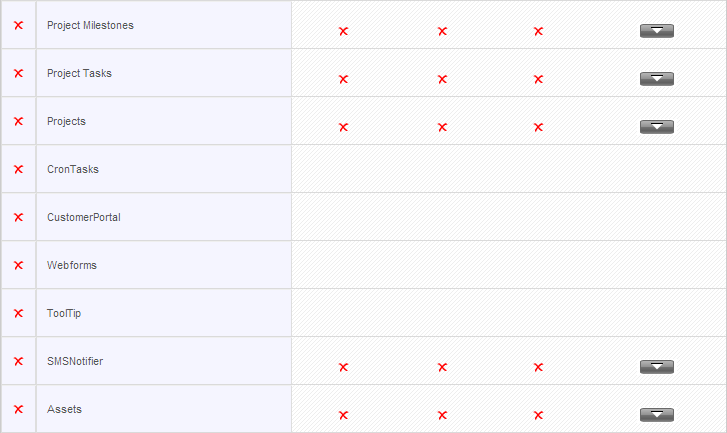
Out of the box vTiger comes with a lot of enabled modules. In most cases you will not be using all the modules and those can take up a valuable space on your screen. You can either use the “vTiger Menu Editor” and remove them from the navigation bar, or if you are certain that you do not need them – just follow the instructions below and disable the unnecessary vTiger modules. Note, the modules can be re-enabled at any time. Mouse over the “gear” icon on the right upper corner Click “CRM Settings” Under “Studio” section, hit “Module Manager” Mouse over the check-box – it will say “Disable Module” Click on the check-box and it will change to red X.
How To Change The Order Of Related Lists In vTigerCRM
August 26, 2013
Article
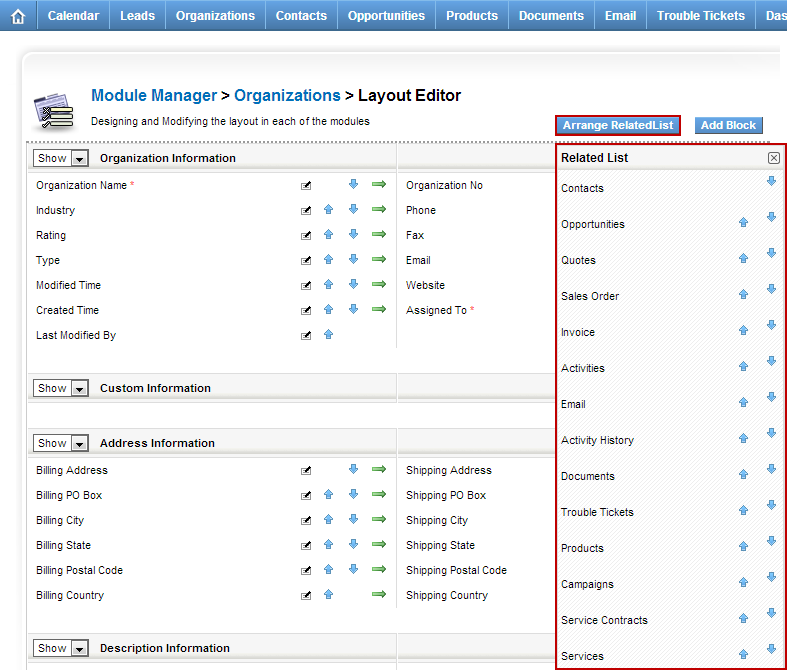
In order to quickly and efficiently see the information that you need, you can rearrange the vTiger Related Lists to fit your needs. To do so: Mouse over the “gear” icon on the right upper corner Click “CRM Settings” Under “Studio” section, hit “Module Manager” Click on the wrench(far right side) next to the module you want to order the Related Lists. Click “Layout Editor” Click on “Arrange Related List” button Once list is open, you can easily move them up or down. By default vTiger comes with many enabled modules which take up a lot of space on the screen and has no value to you – see how you can disable modules in vTiger and optimize your screen space.
vTiger Profile/Permissions does not save the “Modules To Be Shown” properly?
August 7, 2013
Article
You might come across an issue related to saving “Profile Privileges” for each module. It’s a known issue, however it’s not a vTiger bug – it’s a server limitation. If you are a server admin and have access to php.ini, you should check the value of “max_input_vars” and increase it to 1500-2000. By default it’s set to 1000 which is not enough to save vTiger Profile Permissions. If you are not the server admin or are you using shared hosting, you should contact your vTiger hosting provider and ask them to do the same. Hope that helps!
Mail could not be sent to the admin user. Please check the admin emailid/Server settings
August 7, 2013
Article
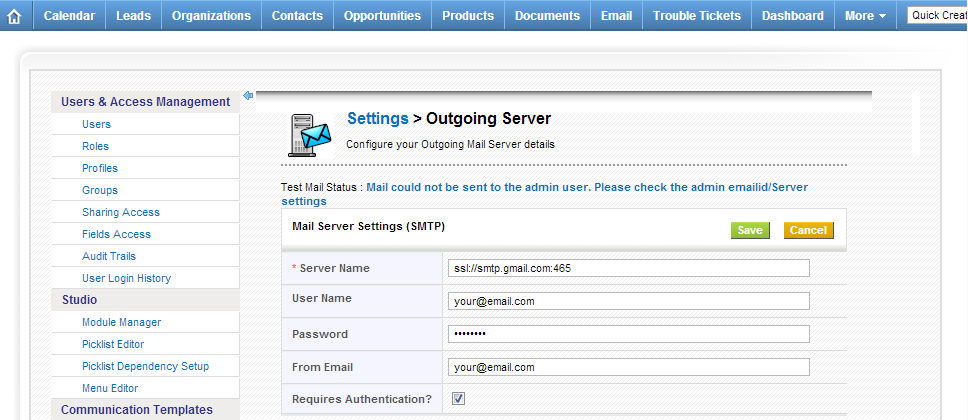
There are a lot of things that can go wrong when setting up the vTiger Outgoing Email Server – it can be as simple as mistype or as complected as firewall blocking the connection or missing PHP extension. Hopefully the steps below will point you to the right direction while troubleshooting the error you are getting. If you are using GMail as your Outgoing Server – follow the guide “Setting up vTiger Outgoing Email Server With GMail“ Make sure that the username/password and the Server Name is correct. Check your email settings or contact your email provider to verify the email server. Verify that your email server does not require SSL connection or any specific port – if it does, add the ssl:// tag or the port using the “GMail as an Outgoing Email Server in vTiger” example. If you are using ssl:// tag – make sure SSL PHP Extension
Setting up vTiger Outgoing Email Server With GMail
August 7, 2013

Article
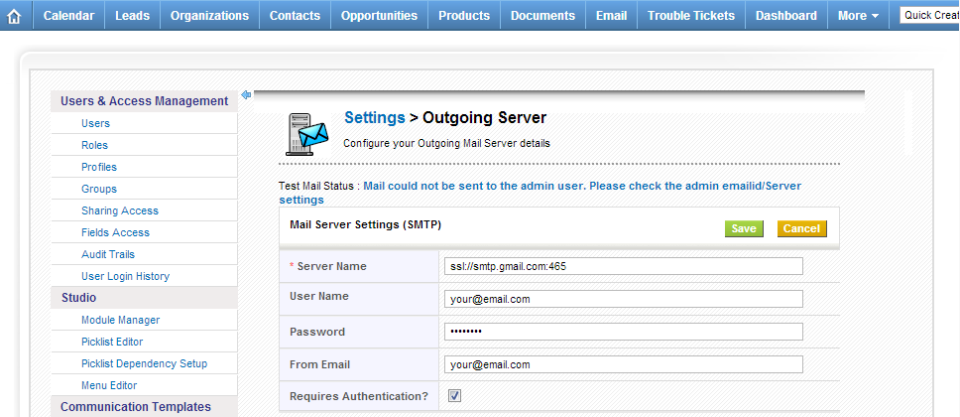
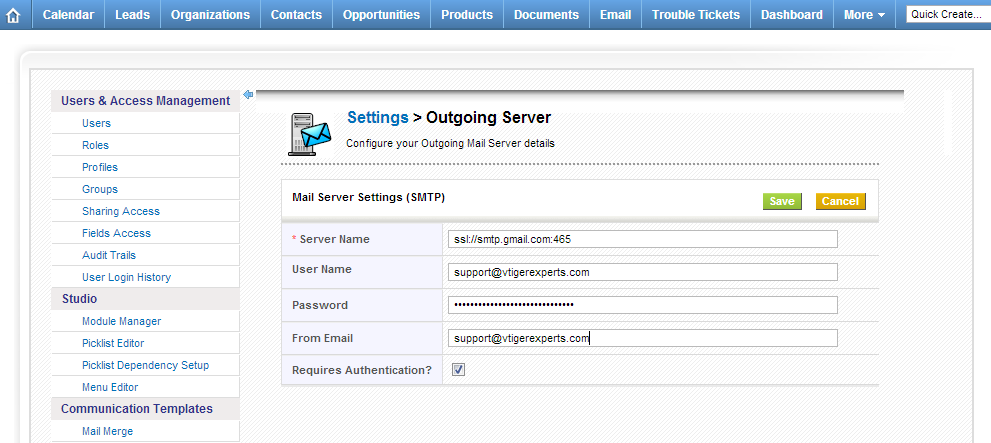
Setting up vTiger Outgoing Email Server is easy – if you know how to the details required. Most of the Outgoing Email servers do not require SSL connection or any specific port, however GMail does. In order to setup GMail as an Outgoing Email Server for vTiger – you have to specify the PORT and that it’s authenticating using secure certificate. Here’s the syntax: Server Name: ssl://smtp.gmail.com:465 Username: Your@email.com Password: Your Email Password Requires Authentication: Yes From Email: Your@email.com Note, that it does work the same for GMail and Google Apps Accounts. If you are getting a message “Mail could not be sent to the admin user. Please check the admin emailid/Server settings” – use the troubleshooting steps in this article.
How to set default value for vTiger field?
July 26, 2013
Article
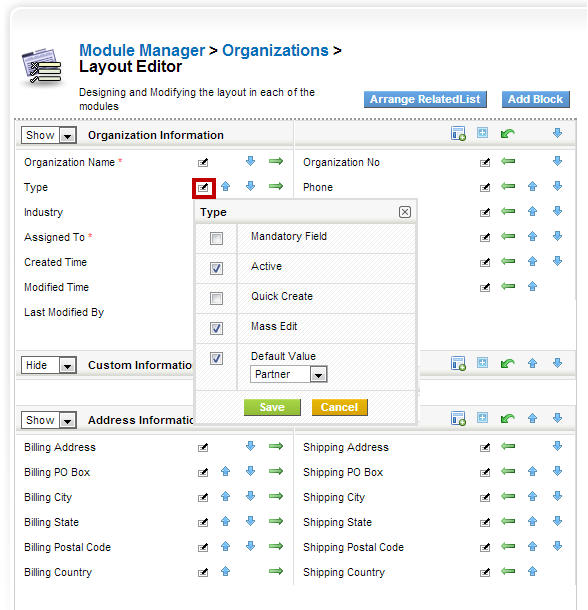
vTiger 5.4 introduced an option to select the default value for most of the fields. To do so, do: Mouse over the “gear” icon on the right upper corner Click “CRM Settings” Under “Studio” section, hit “Module Manager” Click on the wrench(far right side) next to the module you want to add custom field. Click “Layout Editor” Find the field you want to set default value for, click on “Note with a Pen” next to the field. Select the Default value, hit save. Now every time you create a record, it will default to the value selected. If you are on vTiger 5.3 or lower you will not be able to set default values using this method.
Invoice/Quote/Sales Order Default to Service instead of Product.
July 18, 2013
Article
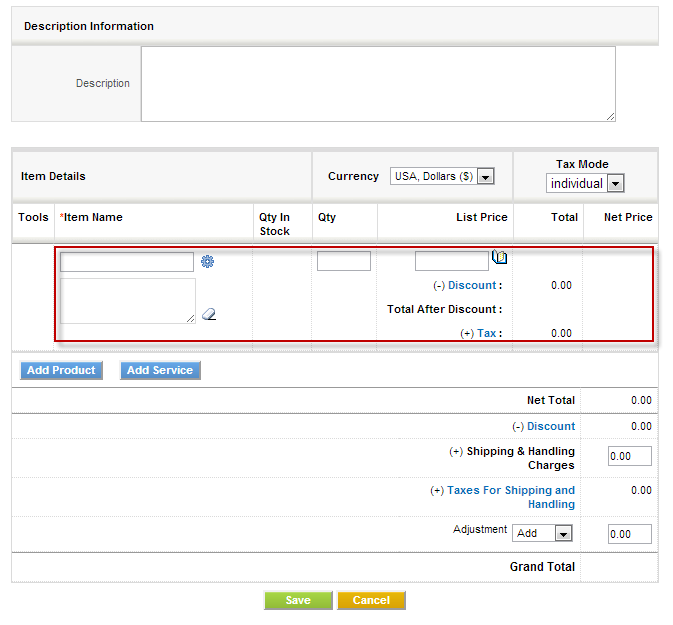
By default when you start Invoice, Quote or Sales Order the item defaults to products. This is not convenient for businesses who are oriented towards services, however there’s a quick tip how to change the first line item to services. We strongly recommend to backup vTiger files and database before doing any changes to code/database. Navigate to “vtigercrm/Smarty/templates/Inventory/ProductDetails.tpl” Go to line 172, the line should be: <img id=”searchIcon1″ title=”Products” src=”{‘products.gif‘|@vtiger_imageurl:$THEME}” style=”cursor: pointer;” align=”absmiddle” onclick=”productPickList(this,’{$MODULE}’,1)” /> Change it to: <img id=”searchIcon1″ title=”Services” src=”{‘services.gif‘|@vtiger_imageurl:$THEME}” style=”cursor: pointer;” align=”absmiddle” onclick=”servicePickList(this,’{$MODULE}’,1)” /> Save files and you are set.
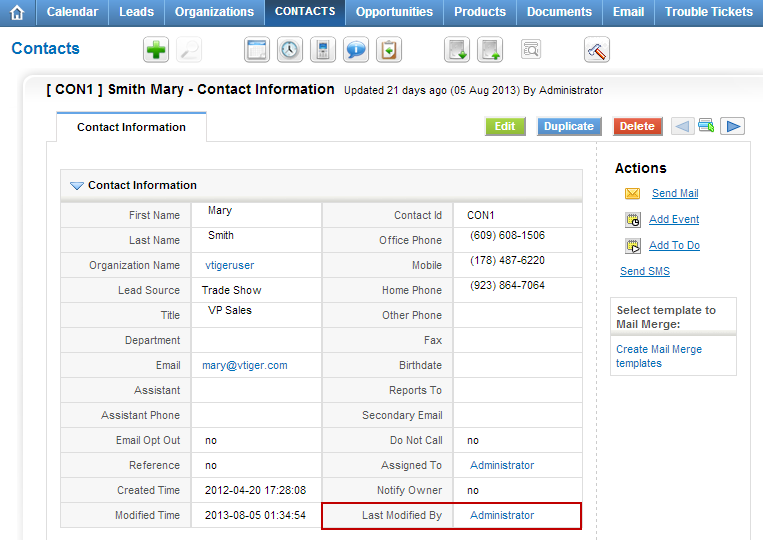
Add “Last Modified By” Field
July 18, 2013
Article
By default the “Last Modified By” field is hidden in vTiger, however all the functionality and the actual field is there. In order to unhide it you will have modify the database. We strongly recommend to backup vTiger files and database before doing any changes to code/database. You will need to run the query below: UPDATE vtiger_field SET presence=’0′, displaytype=’1′ WHERE fieldlabel=’Last Modified By’ AND columnname=’modifiedby’ AND tablename=’vtiger_crmentity’; Note, this query will enable Last Modified By field for ALL the modules, if you wan’t to enable it for just one module you will have to add “AND tabid=’Tab ID goes here’”; You will have to lookup tabid for the specific module in vtiger_tab.
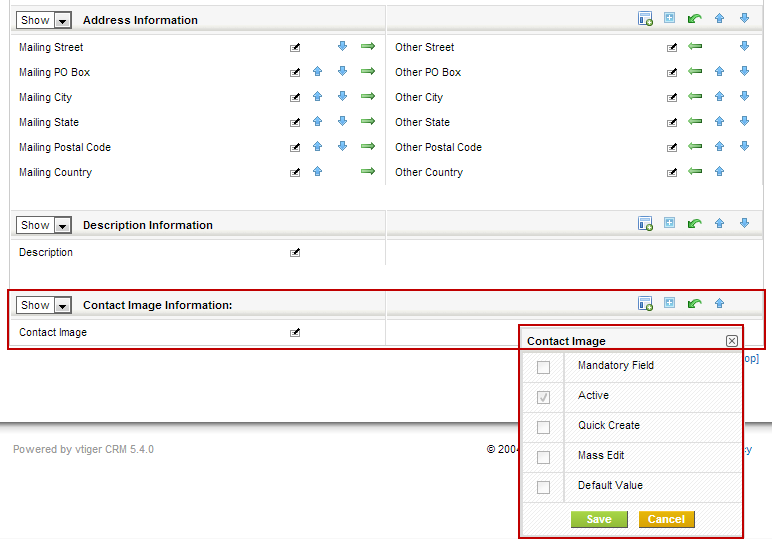
Activate or Deactivate Comments Section/Block in VTigerCRM