

vTiger 7
Only Show Active Organizations When Creating A Ticket In VTiger 7
November 21, 2018

Article
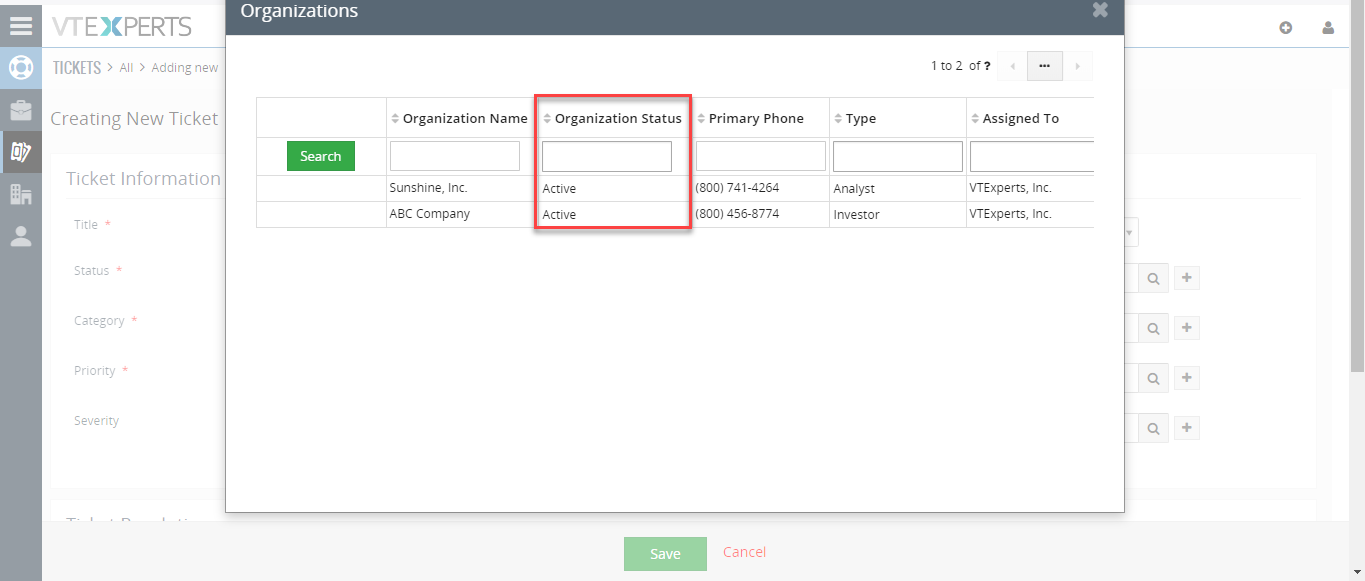
This extension was designed to apply filter (or condition) that will limit the results user will see when selecting a record (any) from a lookup/select/search popup in VTiger. How to Show Active Organizations Go to Menu > Settings > CRM Settings > Extension Pack > Search Popup Filter. Click on “New Search Popup Filter”. Add module. Select the related field. Add a condition according to your requirement. While creating a new ticket it will only search for Active Organizations. For further help, contact us on help@vtexperts.com. We’ll be glad to be of service.
Email Conversation/Preview Extension For VTiger 7 – New Release
November 12, 2018

Article
The standard view of emails in VTiger is quite uneasy to use. Every single email gets showed up in the related emails section. Information regarding emails is displayed in columns. If you need to view an email – you click it and it pops up, so far so good. But next email requires closing the current one and opening it which is quite irritating. But you know that already, right? What’s new in the market is the Email Preview/Conversation extension for VTiger 7 open source, which transforms “simple” email list into conversation view. The view is very easy to read and includes email message on the list, meaning that you don’t need to open email to see the response. In addition, it differentiates emails from customers versus VTiger users by highlighting the background and adding divider borders. The plugin is configurable, where you can define how many characters
Email Marketing/Campaign Extension For VTiger Supports Resubscribe Contacts
November 9, 2018
Article
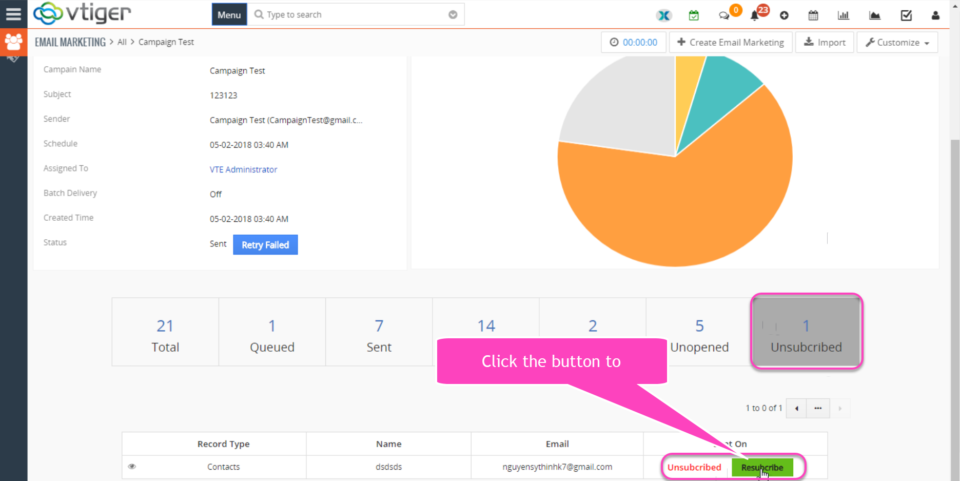
Email Marketing Automation/Campaign is an extension for VTiger 7 that transforms VTiger into sophisticated email marketing/campaign tool. It includes a step by step wizard, easy to use “marketing list” (to load contacts/leads/organizations), review & send + confirmation/summary view that shows exactly what and when is going to be sent. In addition, it supports batch sending, meaning that you can schedule emails to go out over 15, 30, 60min instead of sending them all at once. The tool comes with #1 open source email builder to design modern campaigns. As the extension allows the receivers to unsubscribe from the email lists, according to the latest user right laws and GDPR restrictions, the tool is no less than any modern and fancy email marketing tools. Now we have added the ability for system admins to Re-subscribe the unsubscribed users. This helps for the addresses where you see client being interested
Progress Bar – New Extension
November 6, 2018

Article
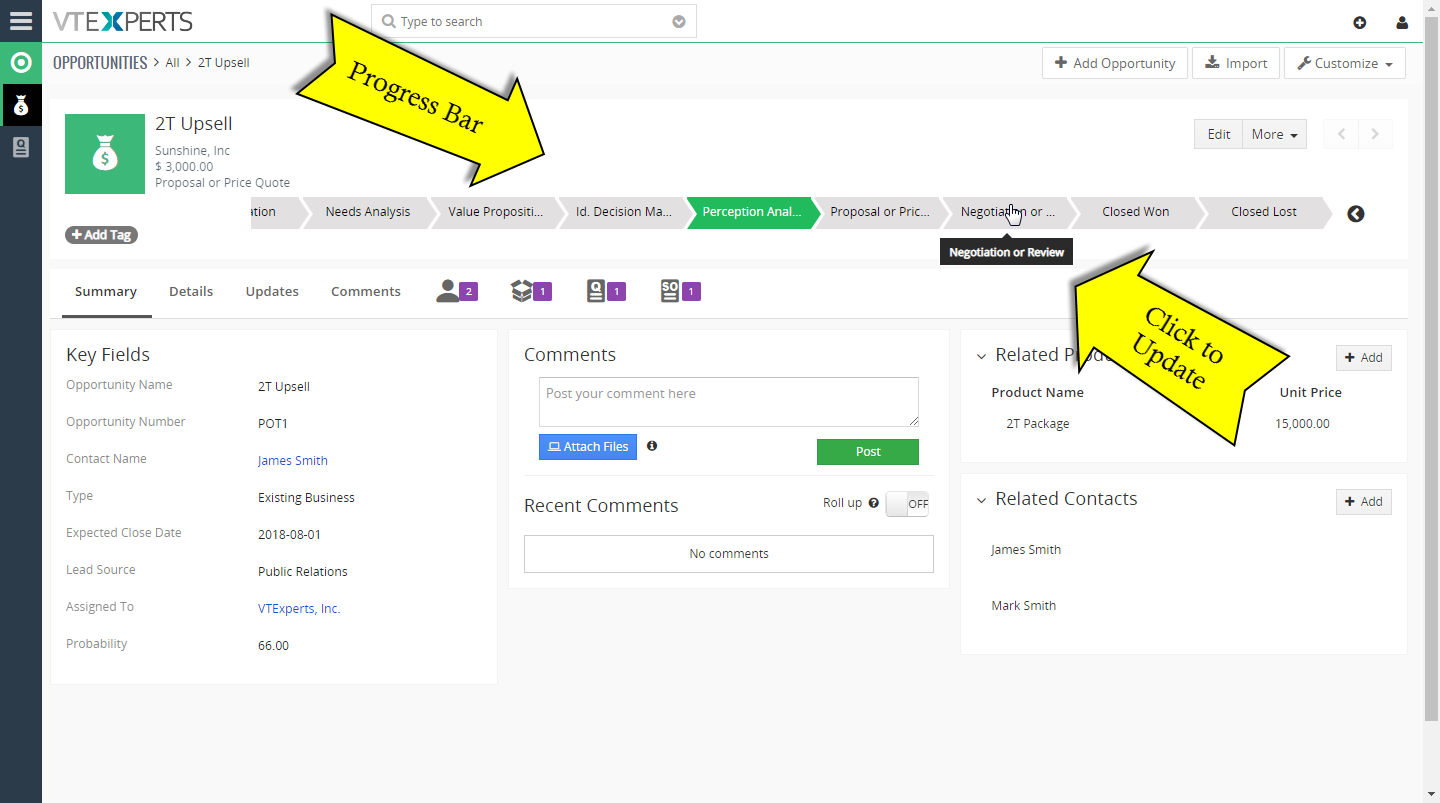
There’s barely anything this visual, easy, and practical in VTiger summary and detail views, as Progress Bar. It is designed to add more visibility and allow instant updates for the configured “progress” (stage/status) field. Progress bar for VTiger 7 is displayed in the header of each record. The bar displays all values from a selected picklist as well as the current value for specific record. The values/stages are also clickable – where clicking a stage/status changes the picklist value – just like that. The record gets updated when user clicks on progress bar value. Progress Bar for VTiger 7 can be configured on any module (as long as it has picklist field). The simplistic design allows users to easily see the stage the record is in and update with a single click. Adding a Progress Bar to any module is pretty easy. You can simply go to
Synchronize My QuickBooks Customers To/From VTiger 7
November 4, 2018
Article
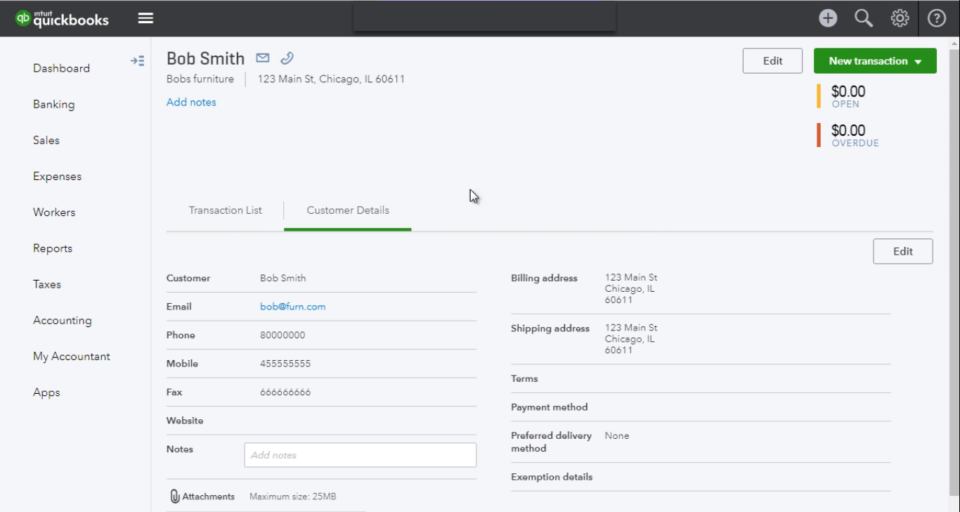
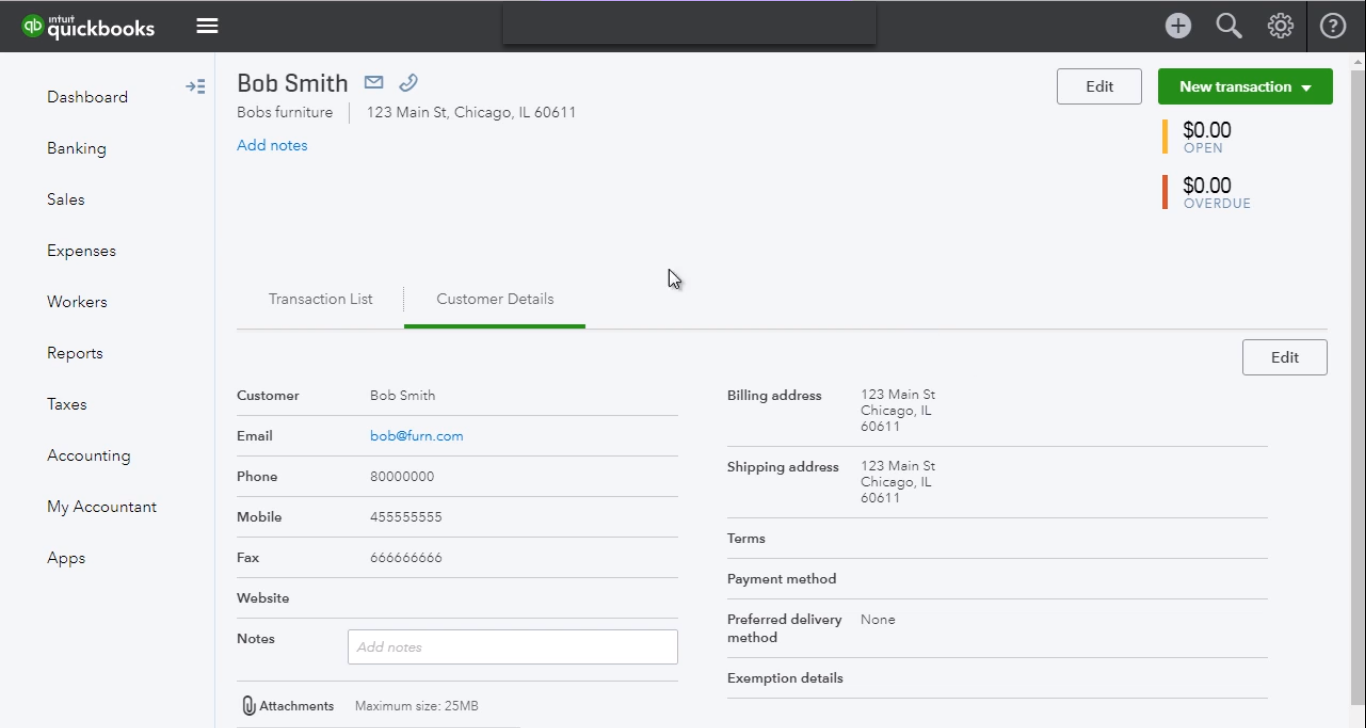
Quickbooks Online Integration with VTiger is an extension connecting VTiger to QuickBooks and enabling bidirectional synchronization of Customers (Organizations/Contacts), Invoices, Payments, Quotes (Estimates), Sales Orders (Sales Receipts), Purchase Orders, Vendors as well as Items (Services & Products). An easy to trigger option to synchronize data manually or on the schedule. It supports custom fields on the invoice as well as customer (flexible mapping). How to Synchronize Contacts Go to Menu > Settings > CRM Settings > Extension Pack > Quickbooks Online. In Customer Tab you can map fields into Quickbooks. Create a contact. You need to check box “Sync to Quickbooks” and that will automatically add this record to the queue to be synced with Quickbooks. Here is the synced Contact/Customer from the VTiger. For further help, contact us on help@vtexperts.com. We’ll be glad to be of service.
Synchronize My QuickBooks Items (Products/Services) To/From VTiger 7
November 4, 2018

Article
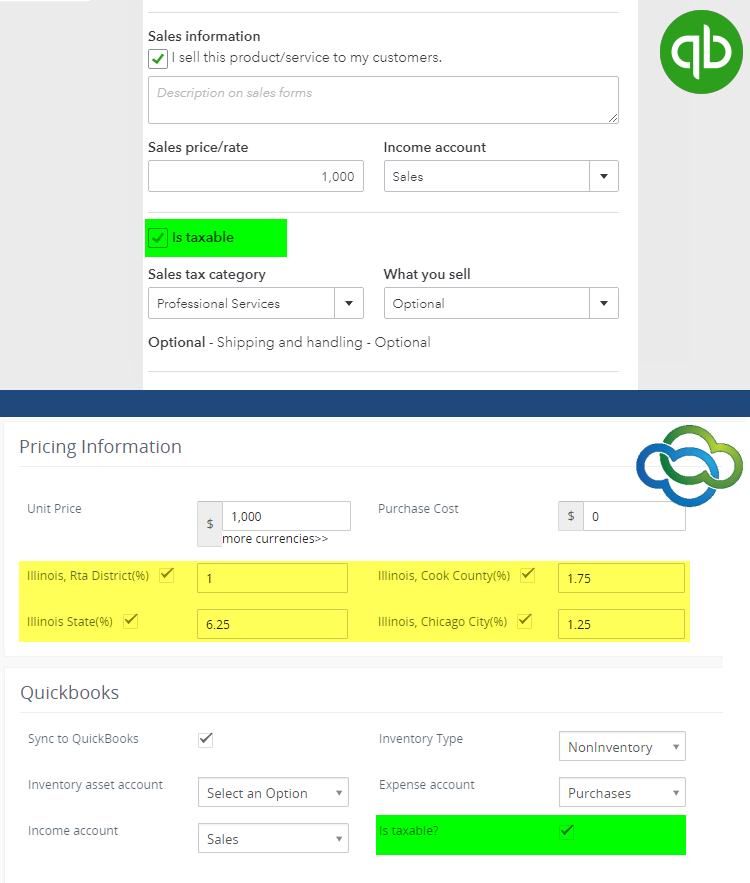
Quickbooks Online Integration with VTiger is an extension connecting VTiger to QuickBooks and enabling bidirectional synchronization of Customers (Organizations/Contacts), Invoices, Payments, Quotes (Estimates), Sales Orders (Sales Receipts), Purchase Orders, Vendors as well as Items (Services & Products). An easy to trigger option to synchronize data manually or on the schedule. It supports custom fields on the invoice as well as customer (flexible mapping). How to Synchronize My Items Go to Menu > Settings > CRM Settings > Extension Pack > Quickbooks Online. In Product & Service Tab you can map fields into Quickbooks. Create a Product. You need to check box “Sync to Quickbooks” and that will automatically add this record to the queue to be synced with Quickbooks. The integration supports tax sync. Here is the synced Items from the VTiger. For further help, contact us on help@vtexperts.com. We’ll be glad to be of service.
Synchronize My QuickBooks Payments To/From VTiger 7
November 4, 2018

Article
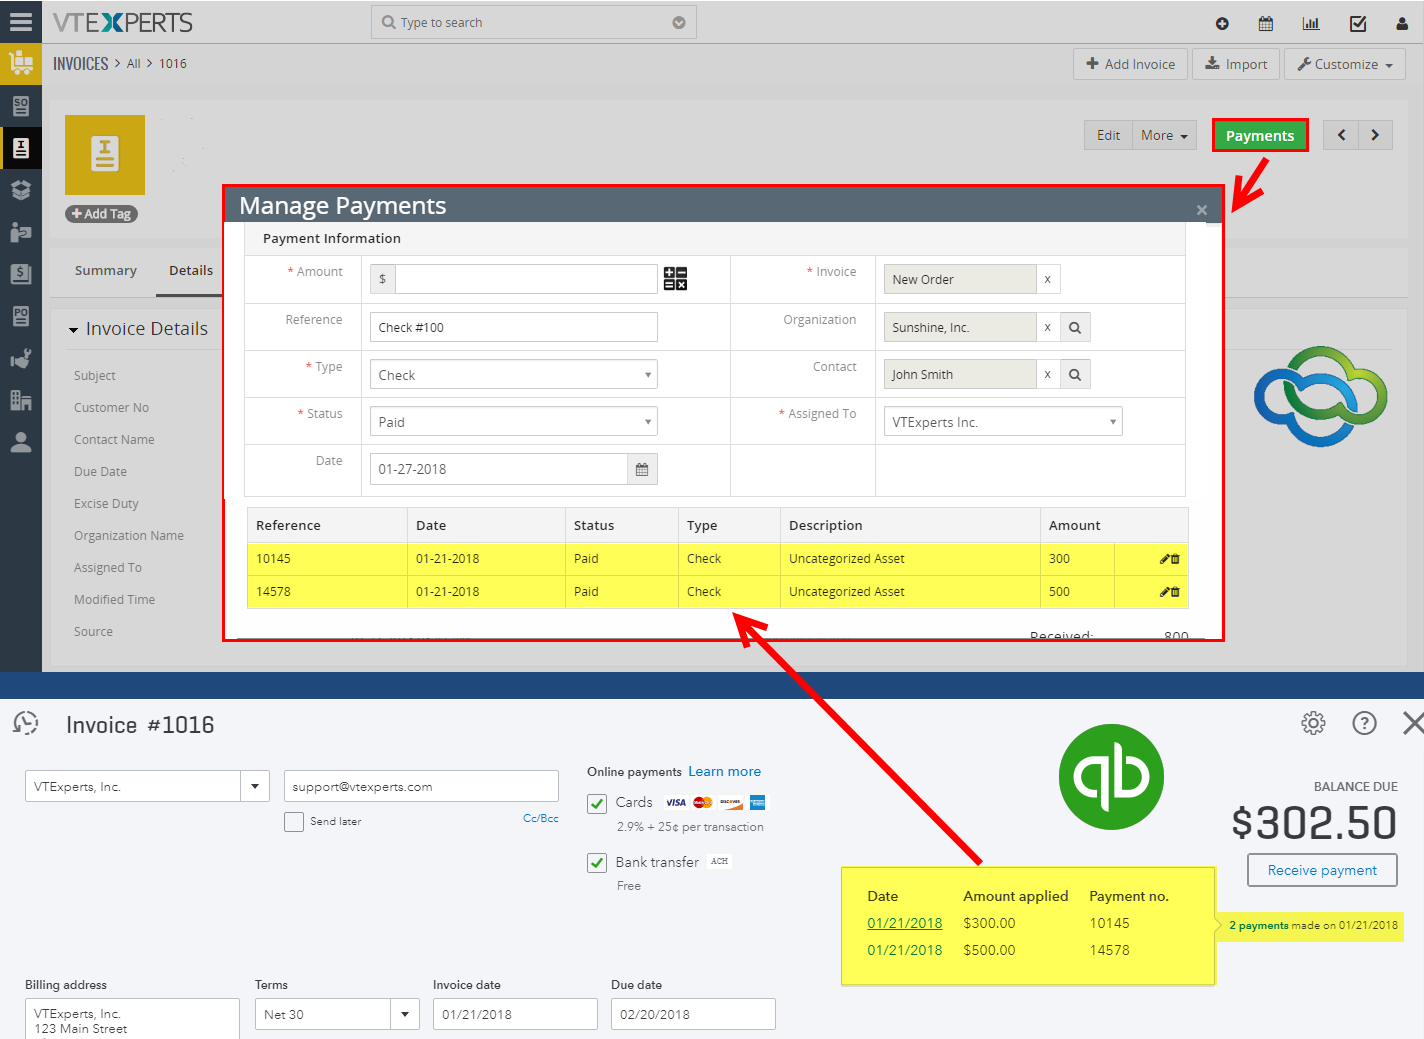
Quickbooks Online Integration with VTiger is an extension connecting VTiger to QuickBooks and enabling bidirectional synchronization of Customers (Organizations/Contacts), Invoices, Payments, Quotes (Estimates), Sales Orders (Sales Receipts), Purchase Orders, Vendors as well as Items (Services & Products). An easy to trigger option to synchronize data manually or on the schedule. It supports custom fields on the invoice as well as customer (flexible mapping). How to Synchronize Payments Go to Menu > Settings > CRM Settings > Extension Pack > Quickbooks Online. In Payments Tab these predefined fields are not editable. Create an Invoice and add a product and service. You need to check box “Sync to Quickbooks” and that will automatically add this record to the queue to be synced with Quickbooks. In invoice records. Click on the payments and “Record a Payment” The payment automatically will be synced with Quickbooks. For further help, contact us on help@vtexperts.com. We’ll be glad to be of service.
Synchronize My QuickBooks Invoices To/From VTiger 7
November 4, 2018

Article
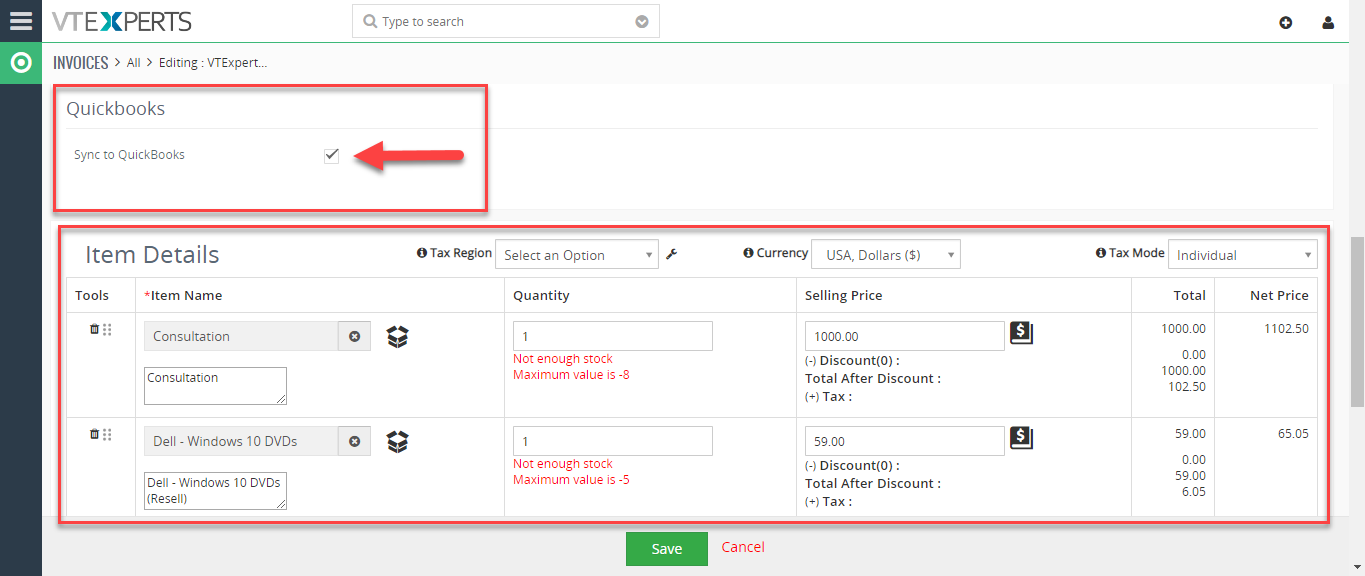
Quickbooks Online Integration with VTiger is an extension connecting VTiger to QuickBooks and enabling bidirectional synchronization of Customers (Organizations/Contacts), Invoices, Payments, Quotes (Estimates), Sales Orders (Sales Receipts), Purchase Orders, Vendors as well as Items (Services & Products). An easy to trigger option to synchronize data manually or on the schedule. It supports custom fields on the invoice as well as customer (flexible mapping). How to Synchronize Invoices Go to Menu > Settings > CRM Settings > Extension Pack > Quickbooks Online. In Invoice Tab you can map invoice fields into Quickbooks. It also supports custom fields. Create an Invoice and add a product and service. You need to check box “Sync to Quickbooks” and that will automatically add this record to the queue to be synced with Quickbooks. Here is the synced invoice from the VTiger. For further help, contact us on help@vtexperts.com. We’ll be glad to be of service.
Change/Rename Field Labels In VTiger 7
November 4, 2018

Article
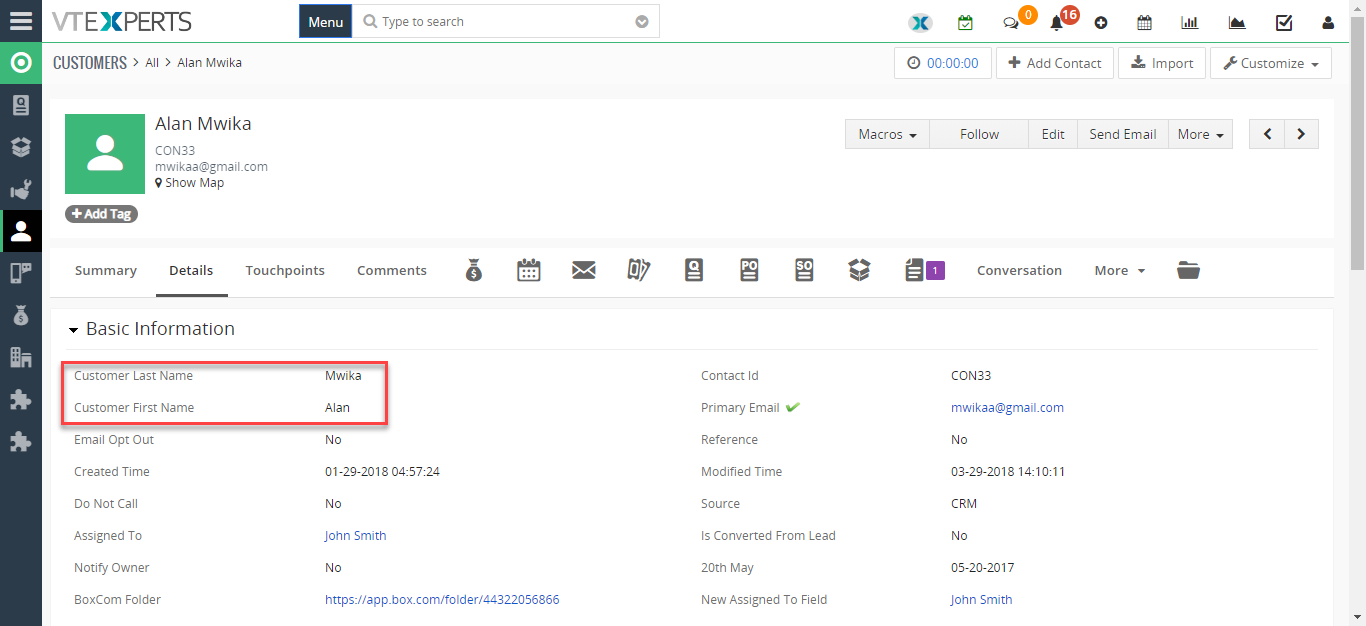
Label Editor for VTiger was designed to change any label/element in VTiger. It supports fields, modules, buttons, menu items, lists and much more! Very easy to use interface (pick language, module, search and edit labels). It has a built-in search to locate any labels that are not as obvious. How to Change/Rename Field labels Go to Menu > Settings > CRM Settings > Extension Pack > Label Editor. Select your input language. Select Module file you want to put changes in. It will show all the Variables and from there you can change the Labels. Click on “Edit” button and enter the new Label. The First/Last Name field labels are changed to Customer First/Last Name. For further help, contact us on help@vtexperts.com. We’ll be glad to be of service.
Change Menu Name In VTiger 7
November 4, 2018
Article
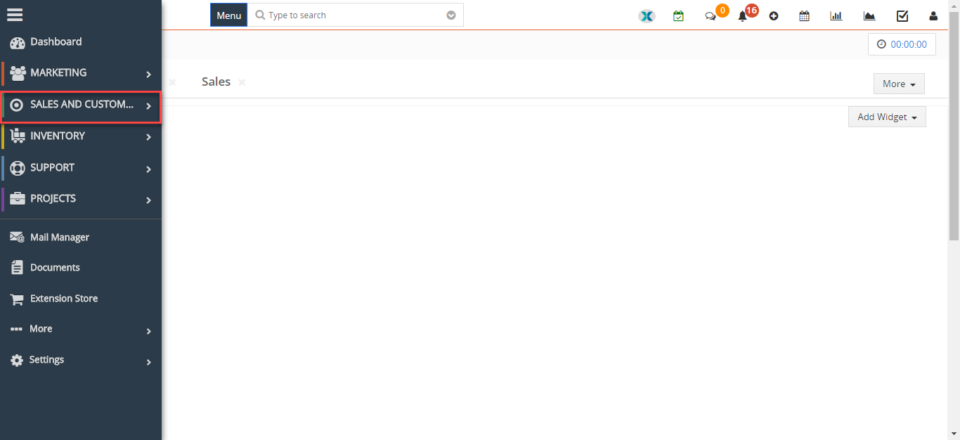
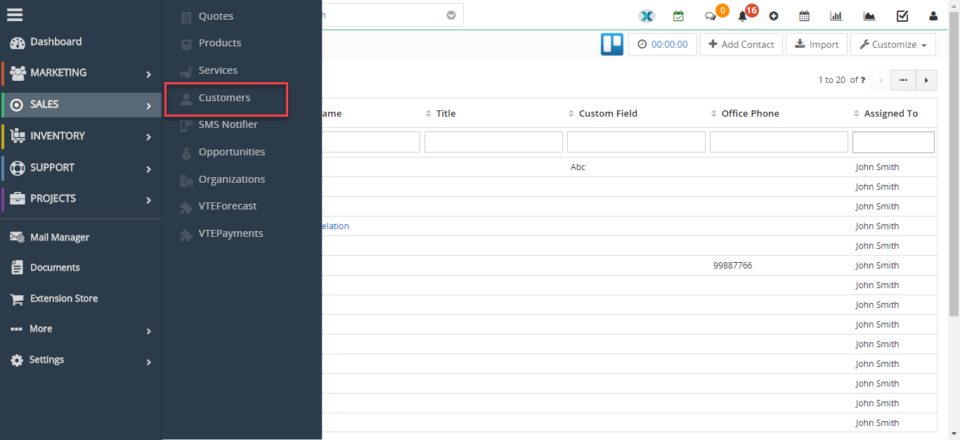
Label Editor for VTiger was designed to change any label/element in VTiger. It supports fields, modules, buttons, menu items, lists and much more! Very easy to use interface (pick language, module, search and edit labels). It has a built-in search to locate any labels that are not as obvious. How to Change Menu Name Go to Menu > Settings > CRM Settings > Extension Pack > Label Editor. Select your input language. Select Module file you want to put changes in. It will show all the Variables and from there you can change the Labels. Click on “Edit” button and enter the new Label. The Sales menu label has been changed to Sales and Customers. For further help, contact us on help@vtexperts.com. We’ll be glad to be of service.
Set Default Tax Mode In VTiger 7
November 1, 2018
Article
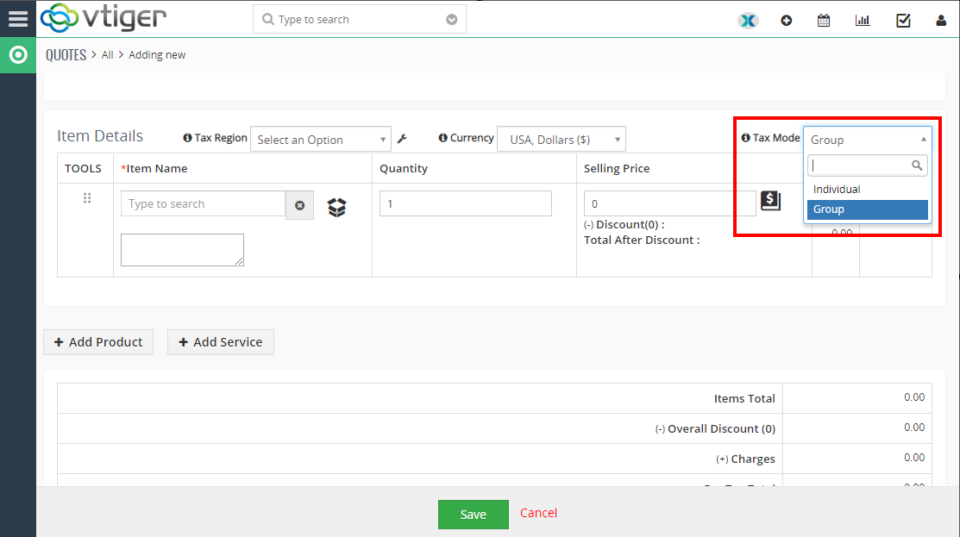
Pretty much every business has the needs of calculating taxes on the go while generating quotes, invoice, sales orders and/or purchase orders. The taxation in VTiger is quite up to the mark. Admins can set individual as well as group taxes on line items. However, there’s a very tiny limitation which does not allow to change the default tax mode. The default tax mode in VTiger is “Group Tax”. A huge number of companies use “Individual” tax mostly. This default setting of Tax mode in VTiger makes it annoying for those companies to change the mode manually each time they need to add an invoice, quote, SO or PO. It even become a problem if an organization needs to generate hundreds of such records every day. We did a customization for one of our client, where we simply switched the default tax mode from Group to Individual. So, when they
Easy Item Lookup Extension For VTiger 7 – New Release
November 1, 2018
Article
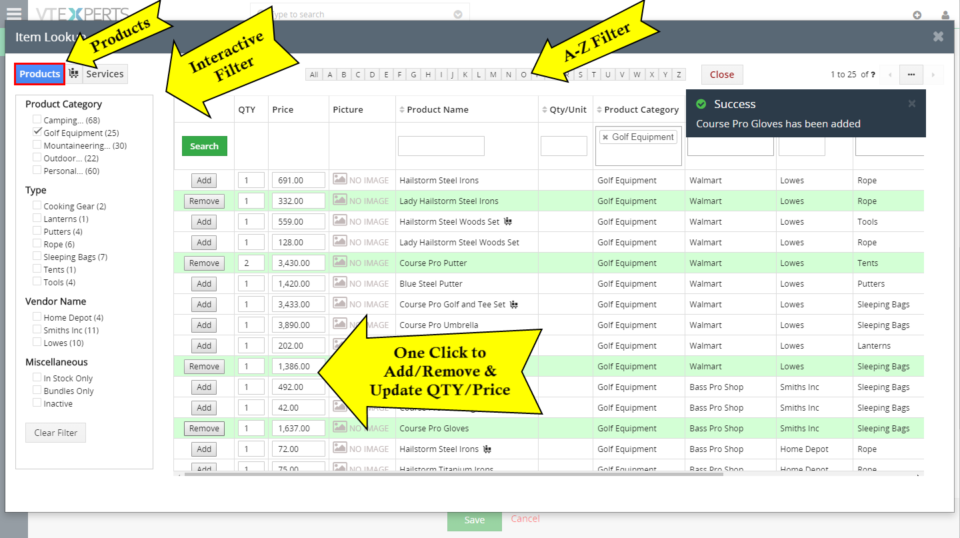
The standard product selection process of VTiger 7 is not very user friendly, when adding products to Quotes, Invoices, Sales Orders, and Purchase Orders. There’s no easy way of filtering the Products, Services, and Product Bundles in any way except for searching for them manually. It does not allow to find a product visually with the image. The in-active products cannot be accessed or filtered. Once a product is added and users go back to re add some more products, there’s no way to see which products have already been added to the list except for closing the item selection popup and remembering the list manually. We can go on about the limitations of standard product selection. Or we have a better thing to write about. A new extension for VTiger has been introduced that addresses all the above mentioned limitations as well as do more. Easy Item
Rename Module In VTiger 7
October 25, 2018
Article
Label Editor for VTiger was designed to change any label/element in VTiger. It supports fields, modules, buttons, menu items, lists and much more! Very easy to use interface (pick language, module, search and edit labels). It has a built-in search to locate any labels that are not as obvious. How to Rename Modules Go to Menu > Settings > CRM Settings > Extension Pack > Label Editor. Select your input language. Select Module file you want to put changes in. It will show all the Variables and from there you can change the Labels. Click on “Edit” button and enter the new Label. The Contacts module label has been changed to Customers. For further help, contact us on help@vtexperts.com. We’ll be glad to be of service.
Display Emails Widget On Record Summary View In VTiger 7
October 24, 2018
Article
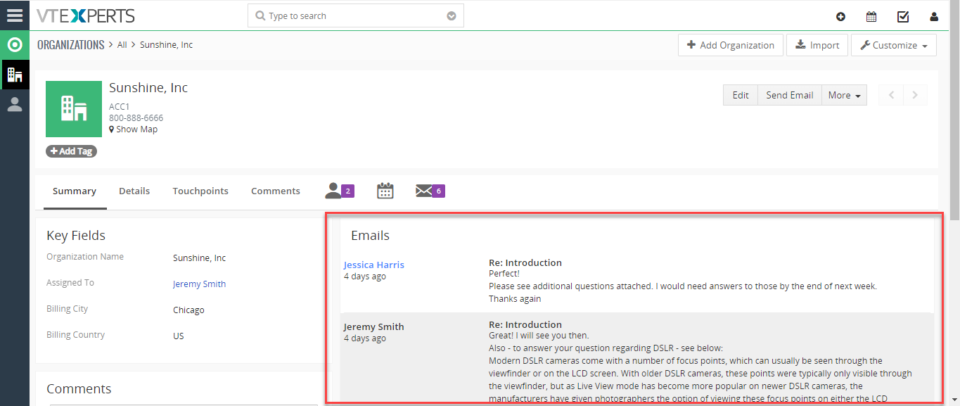
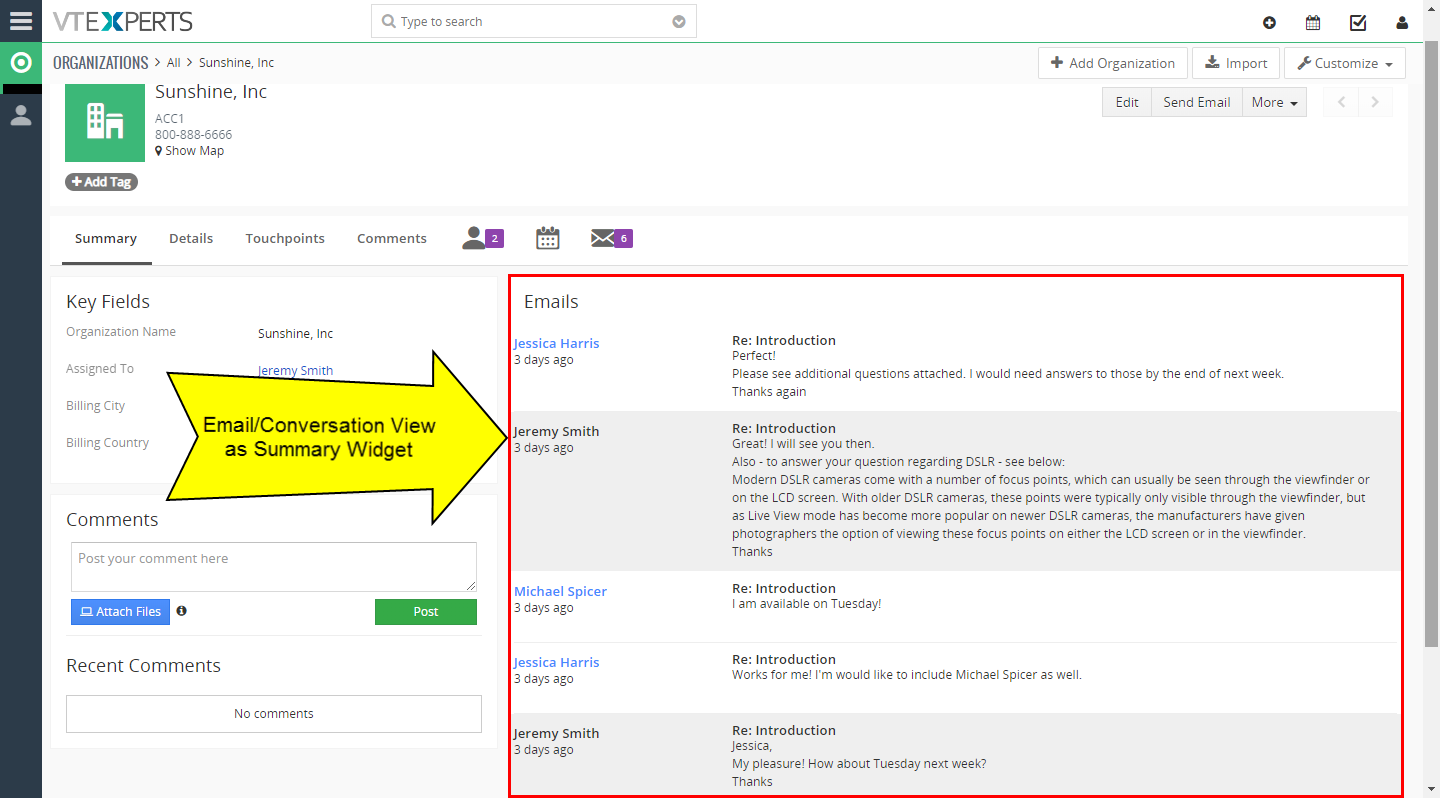
Email/Conversation view extension for VTiger transforms “simple” email list into conversation view. The view is very easy to read and includes email message on the list, meaning that you don’t need to open email to see the response. In addition, it differentiates emails from customers versus vtiger users by highlighting the background and adding divider borders. How to Display Emails Widget Go to Menu > Settings > CRM Settings > Extension Pack > Email Preview. Click “Enable Email Preview” to enable the extension. Enable the extension for desired module’s (Custom Modules also). You can Select the number of characters you want to see in the email preview. You can click the Email to expand and it will show additional text in the email. You can see the conversation view of emails in the summary view of the organization. For further help, contact us on help@vtexperts.com. We’ll be glad to be of service.
Schedule/Map Routes In VTiger 7
October 23, 2018
Article
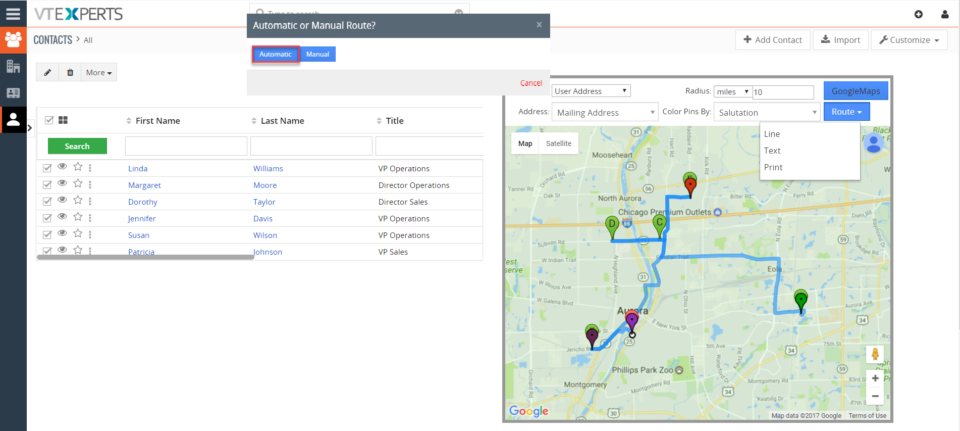
Google Maps & Route Integration for VTiger was built to give your staff the convenience to quickly see the customers (or any other module with an address) on the map as a pin. It is also capable of creating different types of routes (Walk, Drive) as well as printing them as “directions” with an option to include the map (Identical to Google Maps). In addition, the routes can be generated either automatically or manually. Hot to Schedule/Map Routes Go to Menu > Settings > CRM Settings > Extension Pack > Google Map Scheduler. Check box to Enable the extension. Select the center of the location from where the radius will be calculated and the radius area to be covered. Select the modules for the extension. In Contacts module click on “More” and select “Google Maps Scheduler“. Select the contacts and click on routes. Click on Automatic and it will generate a route. For further
New Release – Gallery/Slideshow View Extension For VTiger
October 23, 2018
Article
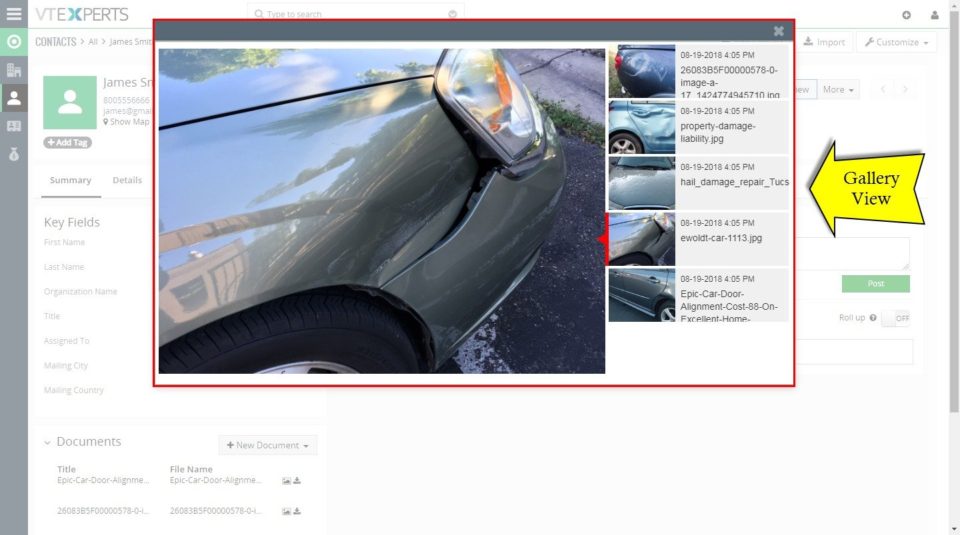
Gallery/Slideshow view Extension for VTiger might be among the most searched extension. It is simply a plugin which allows to preview any documents (images/pictures) attached to VTiger record. Slideshow lists the thumbnails (files) on the right with the date created & document title with ability to scroll through all of them in just few seconds. In addition, it can be configured to only retrieve images/pictures from certain folder (done in configuration area). With Gallery/Slideshow view enabled, a button gets added to each record that shows the linked images for that record. Clicking the button will open a slideshow of the images allowing to go through all of the related ones. The user interface is very intuitive and easy to scroll through the images. The extension is already included in the Extension Pack. You can find all of the information about the extension on its Product Page. We also
Google Address Lookup Is Now Available In Quick Create
October 22, 2018
Article
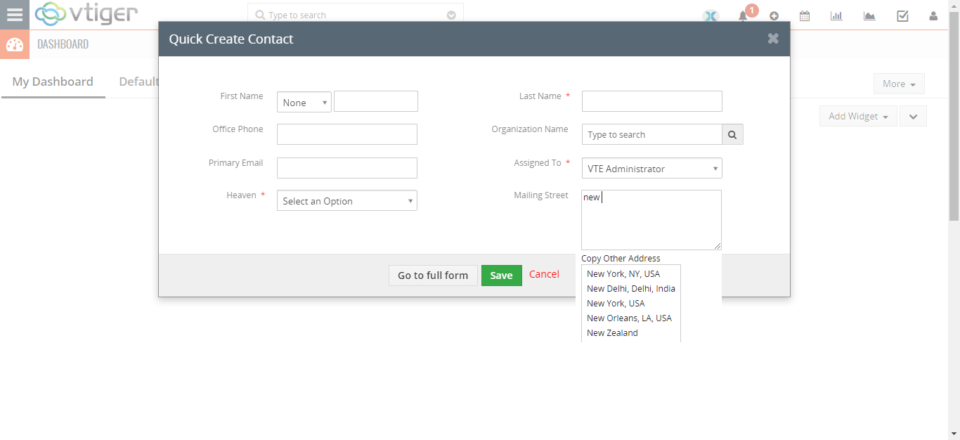
Google Address Lookup for VTiger, Is now available in quick create modal popup. User can now efficiently and accurately enter the address in quick create modal popup by using Google Maps services. As you start typing the address, it will show all possible matches closest to your location. How to add Google Address in Quick Create Note: Please Upgrade the extension if you don’t see the button. Go to Menu > Settings > CRM Settings > Extension Pack > Google Address. Click “Allow on Quick Create” to enable the extension in quick create modal popup. Now it will lookup for locations in quick create modal popup too. For further help, contact us on help@vtexperts.com. We’ll be glad to be of service.
Add Fields To Quick Create Modal Popup In VTiger 7
October 19, 2018
Article
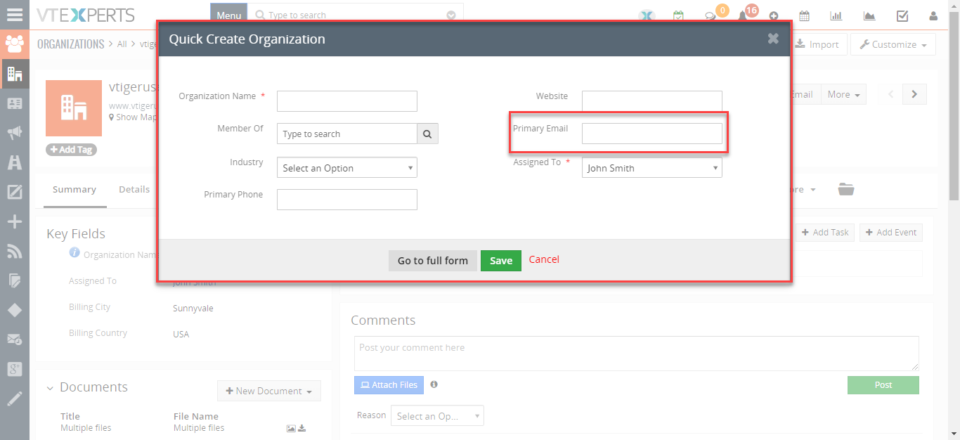
In Vtiger 7, User can add fields in the quick create modal popup. They can add/delete the fields in the modal popup according to their needs and it will save their time. How to Add Fields in Quick Create Go to Menu > Settings > CRM Settings > Module Management > Module Layouts & Fields. Select the Module. Click “Quick Create” button to add it in modal popup. Now this field will show in quick create modal popup. For further help, contact us on help@vtexperts.com. We’ll be glad to be of service.
Create Custom Layouts/Forms In VTiger 7
October 18, 2018

Article
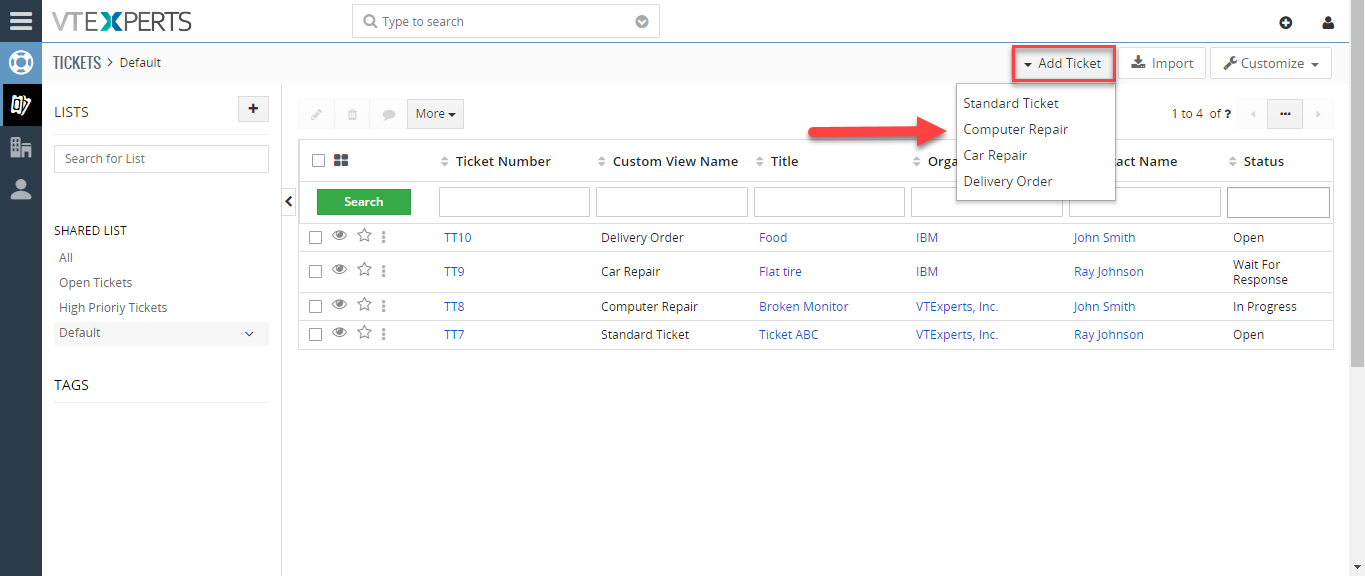
Custom Views & Forms for VTiger is designed for system administrators. You can configure different views/layouts for any module with the help of this extension. It is capable of configuring multiple views for trouble tickets, e.g “Repair Ticket” & “Support Ticket” and for both views, you can specify different sets of fields and only display the fields that apply to each type of ticket. It Supports all modules. How to Create Custom Layouts/Forms Go to Menu > Settings > CRM Settings > Extension Pack > Custom Forms & Views. Click “Add Custom Forms & View” button. Select the module. Add a name for the form. You can assign profile’s. Drag and Drop fields from available fields. Dropped in field will be shown in the form which we are creating. While creating a new record you can select the related custom form. This is a custom form view which we just have created. For further help, contact us
Save Sent Messages (From VTiger) In Your Outlook/Gmail In VTiger 7
October 17, 2018

Article
Outgoing Email Server Extension allow each user to have his/her own Outgoing Email Server(SMTP). Email server settings can be configured by admin, or each user can do it for him/herself. It supports IMAP function, meaning that every email sent will also be stored in user’s “Sent” folder on webmail/email server. How to Save Sent Messages Go to My Preferences and click on the “Outgoing Server” button. Click on the “Create” button and Configure the Outgoing Mail Server. Check box “Save Emails to Sent Folder” For further help, contact us on help@vtexperts.com. We’ll be glad to be of service.
Associate Chat/Conversation To Customer In VTiger 7
October 16, 2018

Article
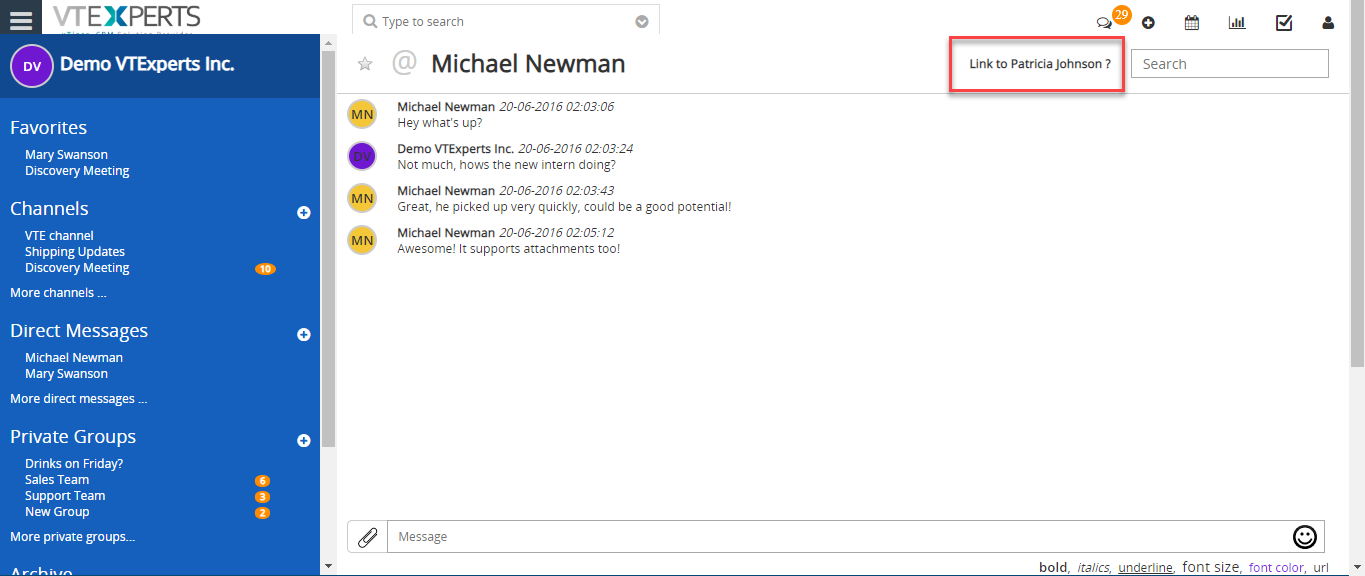
Collaboration Board/Chat tool integrated within VTiger allows users to send direct & private group messages, create public channels/chat rooms and keep track of all the communication within VTiger. It’s a great tool for a team looking to collaborate within VTiger. How to Associate Chats/Conversations Open a customer record (you must be in customer record). Click on the “Chat” icon. It will give an option to link this chat to the opened record (Contact/Organization). Click on that option to link the chat. It has now been linked. You can then see the chat in the record as well. For further help, contact us on help@vtexperts.com. We’ll be glad to be off service.
Customize Notifications In VTiger 7
October 15, 2018
Article
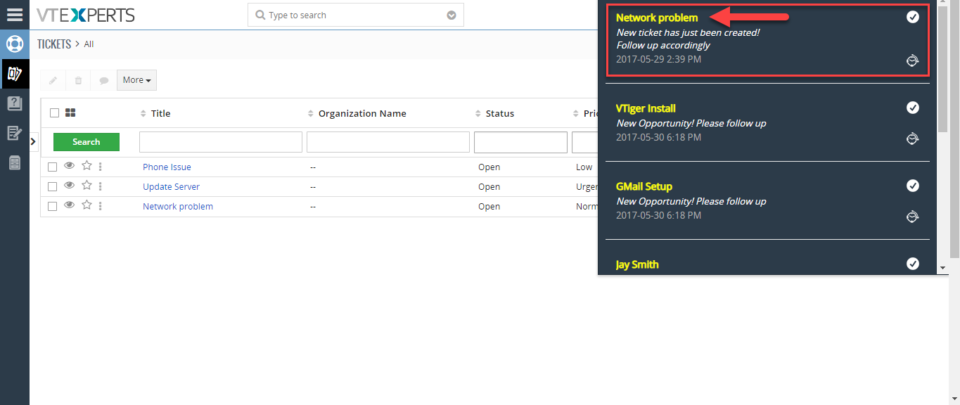
Notifications/Reminders for VTiger, is an extension allowing users to trigger a simple notification using standard workflows & display it in the menu header, which can be easily accessed within a single click. The extension integrates with VTiger workflows, which makes it very powerful for any type of notifications/alerts. Ideally used for reminders and notifications for upcoming activities, open/closed tickets as well as immediate notifications for urgent matters. How to Customize Notifications Click on “Bell” icon. Click on the Notification to customize it. In Notification tab. Click on the “Edit” icon. You can customize the description and the status of the notification. For further help, contact us on help@vtexperts.com. We’ll be glad to be of service.
Convert Purchase Order To Project In VTiger 7
October 12, 2018

Article
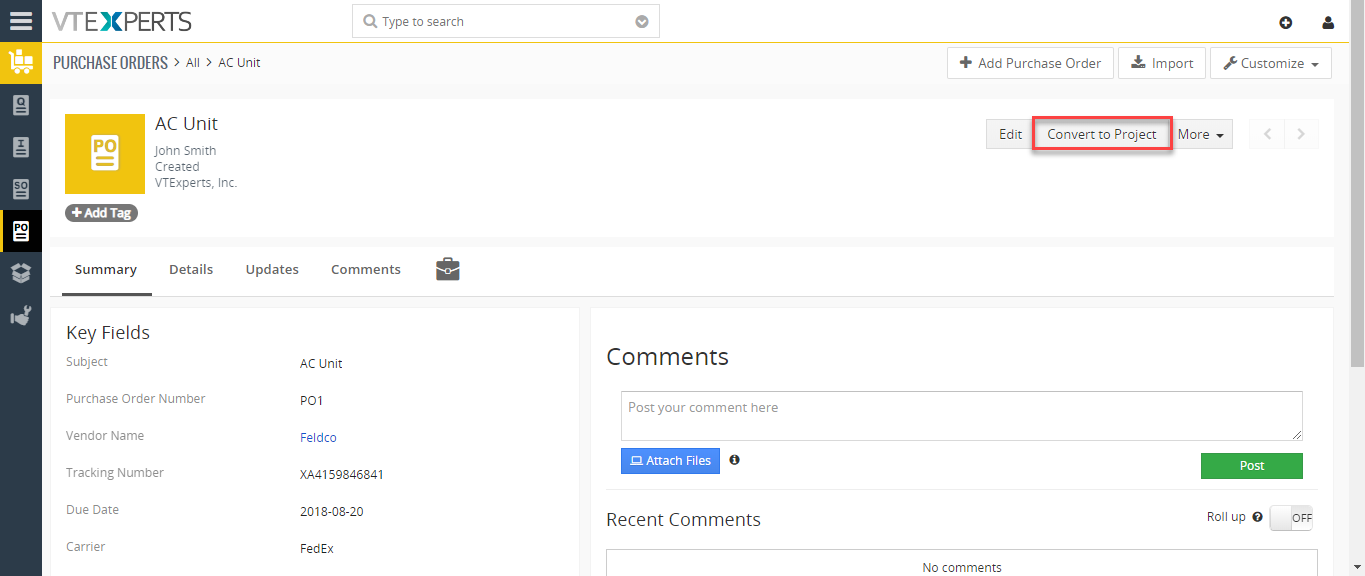
Extension for VTiger designed to convert Quote/Invoice/Order to Project. It comes with intuitive conversion wizard/popup includes: Pre-filled Project Name (with subject), Option to select Project Start/End Date, Option to exclude products/services (by default, all products/services get automatically checked/included), Option to set Project Task Start/End Date When the project gets created, it will automatically create project tasks as well. Each project task will get associated with appropriate service/product. Project will get associated with quote/invoice/order from which it was created. How to Convert Purchase In purchase order, click “Convert Project” button. The project name will be pre filled. You can add the start date. Add Products and Services. Project will be automatically created. You can see the project is associated with the purchase order. For further help, contact us on help@vtexperts.com. We’ll be glad to be of service.
View Contact/Organization Data From The Calendar View In VTiger 7
October 10, 2018

Article
Calendar Popup/Preview for VTiger, is a highly customized extension with several useful features. It allows you to quickly preview the Event information without leaving the Calendar. Easy to use tabbed popup will display linked record such as Contact, Organization, Lead, Ticket, & Custom module’s information and lets you update, delete, create, or link the existing records to Calendar Events. How to View Contact/Organization Data Go to Menu > Settings > CRM Settings > Extension Pack > Calendar Popup. Select modules to include as tabs in the popup. In calendar, click on any of the activity. Switch to tabs to see activity related module data. You can also update records form here. For further help, contact us on help@vtexperts.com. We’ll be glad to be of service.
Only Show Custom Buttons If They Meet Certain Criteria In VTiger 7
October 9, 2018

Article
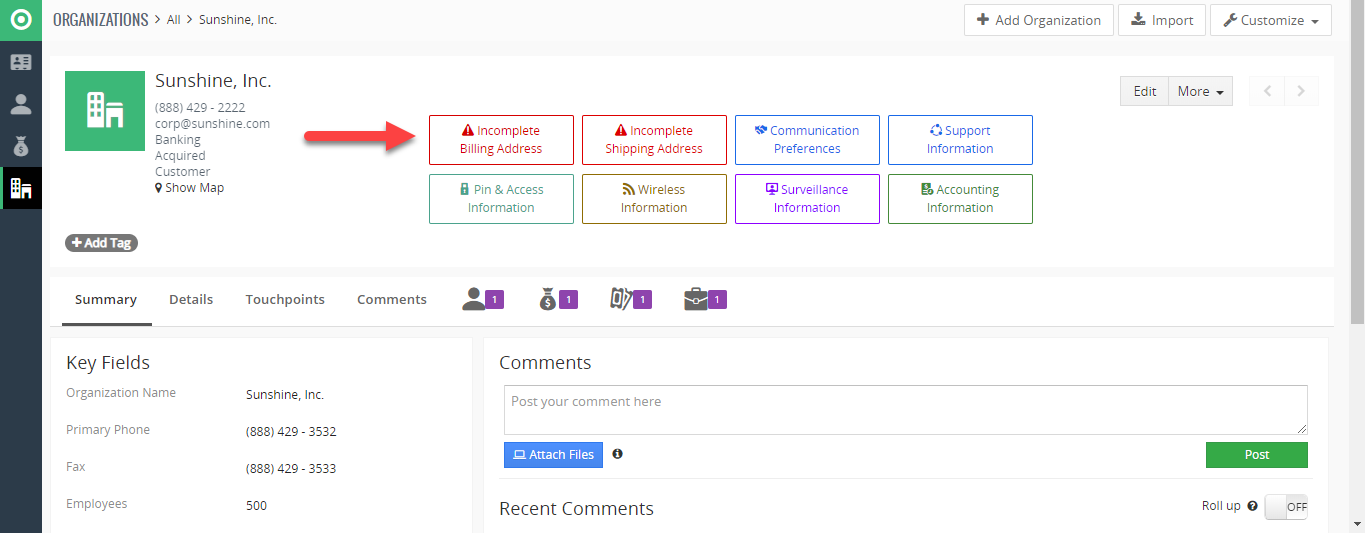
Custom Buttons Extension for VTiger was designed to improve efficiency when updating records. Buttons can be configured to show modal popup with selected fields. For example, you can add a button to “Update Address” which will only show address fields when clicked. This is very primitive example, however it can be used for so much more. How to Show Custom Buttons if They Meet Certain Criteria Go to Menu > Settings > CRM Settings > Extension Pack > Custom Buttons. Click on the “New Button”. Select the module. Add button Title. Select the button icon and its color. You can select the sequence of the button and its status. Select the fields to be shown when the button is clicked. Specify conditions when the button should be shown. Here you can see the button. By clicking it will show modal pop and you can update fields. You can see the record