

December
Document Designer New Feature: Create NEW Records Utilizing Forms
December 30, 2017
Article
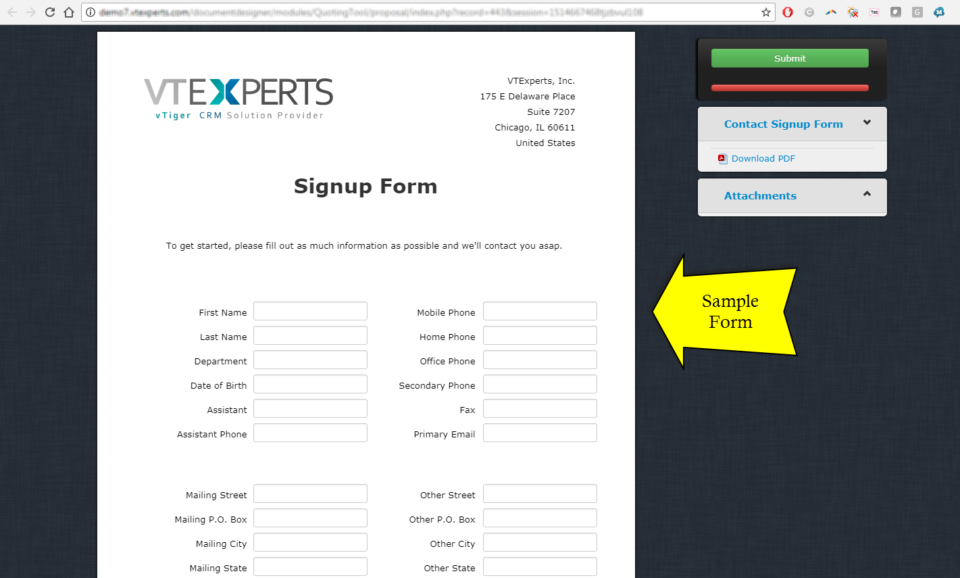
We’ve recently added new feature to our document designer, which allows to create new records in VTiger. It’s very similar to how our update functionality works (If you are familiar). The idea is that user will create a document/form that can be sent to a customer or any other email or even placed online i.e your website and when the form gets filled out – the record will get automatically created in VTiger. It’s similar to webform functionality, however it’s more powerful that that, because it supports all standard and custom modules as well as links back new record to parent record e.g organization (if configured/sent properly). Simple Example: create custom form and place it on your website for new signups (lead/contact information will flow directly into VTiger). Advanced Example: create custom form that you can send to your customers for tickets/support requests, data gathering. The form can be created
Change Column Order On Related Modules In VTiger 7
December 30, 2017

Article
Take a look on how to tailor your module layout by using the “Module Layouts & Fields” settings. Vtiger 7 now provides a variety of ways to change the column order. How to Change Column Order Contacts field columns are set in the same order as shown on “Layout Editor” settings page. Header Fields take precedence over Key Fields and are listed first in the columns field. Summary: The “Header” section and “Key Fields” section are mutually exclusive (the same field detail cannot appear in both sections of the same record) Modules without a summary view don’t have a “Key Fields” section but still use the key field details in the module’s related list For example, the “Assets” module does not have a summary view, so it does not have a “Key Fields” section, but when it appears in a related list, the field details are shown in the column fields
Vtiger 7.1 Release Schedule
December 28, 2017
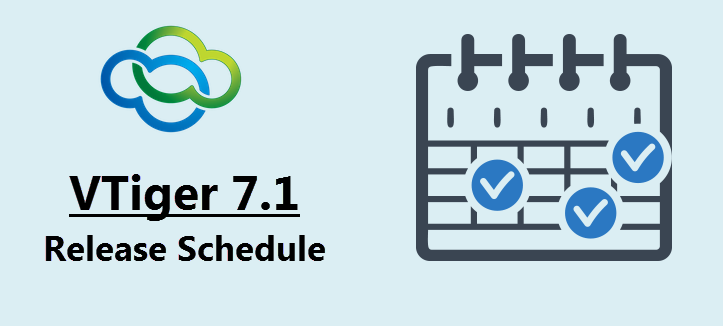
Article
VTiger rep Satish just announced release schedule for VTiger 7.1, here’s the announcement: We are happy to announce that we are going to release the Vtiger community edition version 7.1 in January. We would like to appreciate your valuable contributions and validation towards this release. Following are the expected release schedule for the V7.1. RCA – 1st week of Jan GA – 4th week of Jan FYI V7.1 Features and fixes : Features : Follow A Record (Click on Star icon to follow a record. By following any record, you get updates on it as other users of your organization modify the record. these updates are notified to you via emails. Deselect the Star icon to unfollow the record.) Duplicate Record Prevention (Prevent duplicate records in Vtiger from all sources by enabling the duplicate check) Webform Attachments (Allow user to attach files to web forms) Import Users Using .CSV file (Supports importing User data using .csv file) Supporting Mysql V5.7
Change The Widget Order On Summary View In VTiger 7
December 28, 2017
Article
Want to change the Order of the Widgets in the Summary View you can do it by using VTiger Summary Widgets Extension. This feature allow users to set the desired order of the widgets in the summary view. How to Change the Widget Order Go to the “Menu” and select “CRM Settings“. Under “Other Settings” select “Summary Widgets“. Then select the “Module” and by using drag and drop change the order of the widgets (For this example we’ll be shifting “Tickets Widgets” from center column to the left column) As you can see the “Ticket Widget” is showing on the left side of the screen in the summary view. Summary: If you want to change the order of the widgets in summary view you will need “VTiger Summary Widgets“. It works on 6.x and 7.x VTiger Open Source/community editions. This extension also supports few other actions such as create custom widgets and
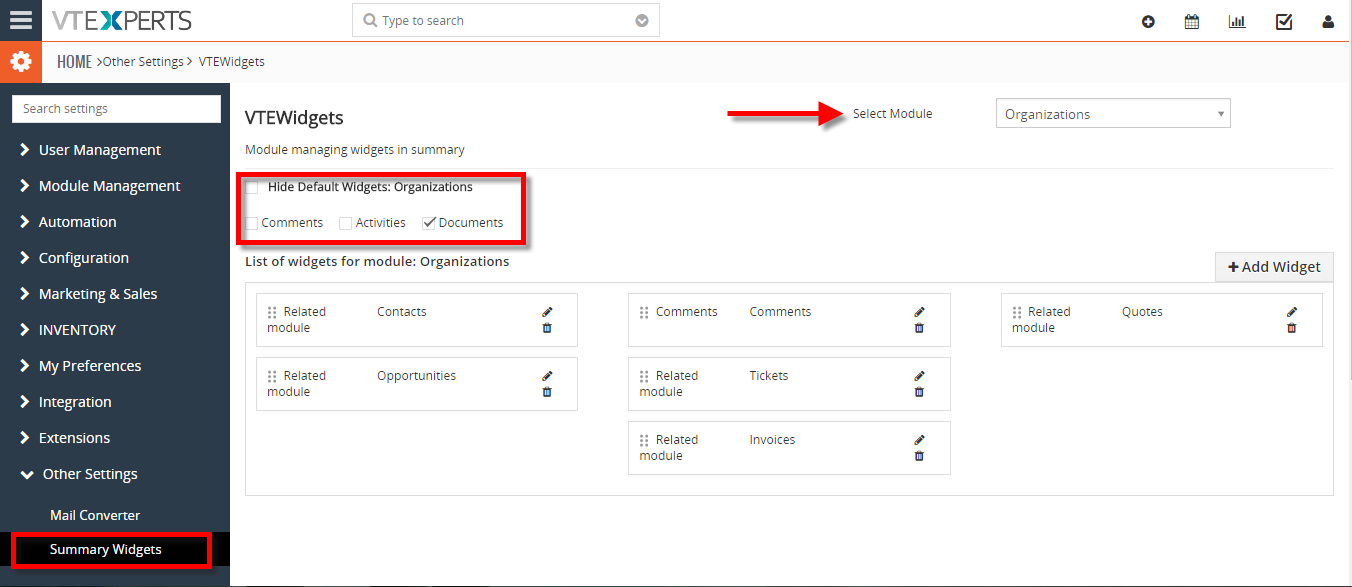
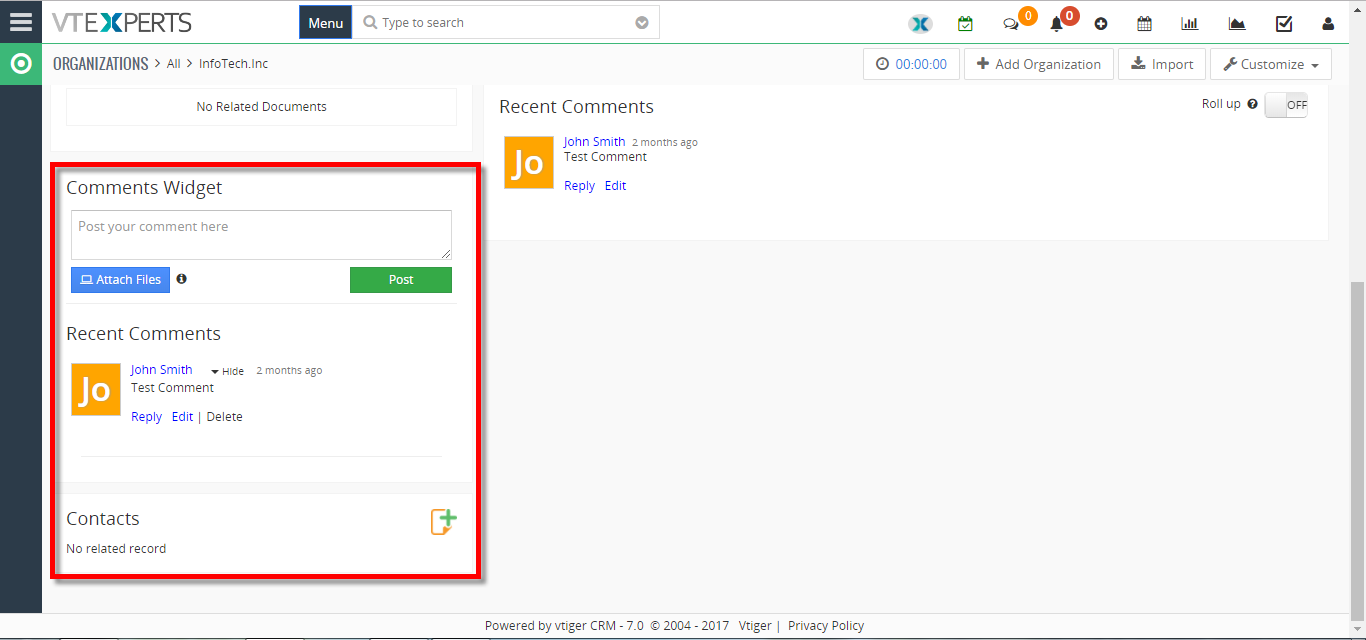
Hide Existing Widgets (Documents, Activities, Updates) On Summary View In VTiger 7
December 27, 2017

Article
If you are looking to hide existing default widgets in VTiger 7 e.g “Documents, Activities, Updates” you can do it by using VTiger Summary Widgets Extension. How to Hide Existing Widgets Go to the “Menu” and select “CRM Setting“. Under “Other Settings” select “Summary Widgets“. Then select the “Module” and “Check box” the default Summary Widgets you want to hide. For this example I have hide the “Comments and Activities” widgets from “Organization Module“. Summary In order to hide unwanted default existing widgets you will need “VTiger Summary Widgets“. It works on 6.x and 7.x VTiger Open Source/community editions. This extension also supports few other actions such as create custom widgets and specify things like name of the widget, columns/fields to display, limit records (if needed) & enable or disable ability to create new records from within the widget. For further help, contact us on help@vtexperts.com. We’ll be glad to be
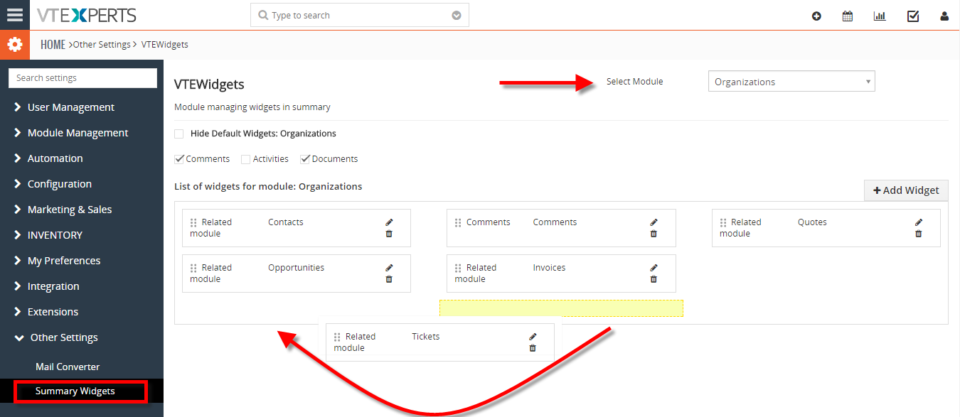
Create New Summary Widget In VTiger 7
December 23, 2017

Article
In Vtiger 7, User can quickly and easily create custom Summary Widgets by using our extension. It also has the ability to include field level filter e.g “Show me open tickets“, or “Show me closed tickets“. How to Create New Summary Widget Go to the “Menu” and select “CRM Settings“. Under the “Other Settings” drop down menu select “Summary Widgets“. From here click on the “Select Module” button to select the module you want to add the widget and click on the “+Add Widget” button to create a new widget. Select the Type of the widget. Add the “Label“, Select the “Related Module” and add the “Columns” you want to show in the widget and click on the “Save” button. For further help contact us on help@vtexperts.com we’ll be glad to be of service.
Assign A Record To Multiple Users Or Groups In VTiger 7
December 19, 2017
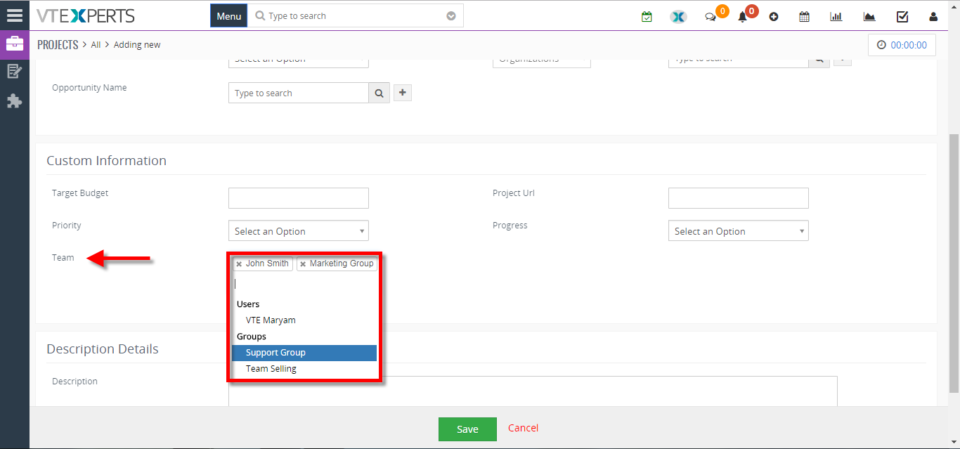
Article
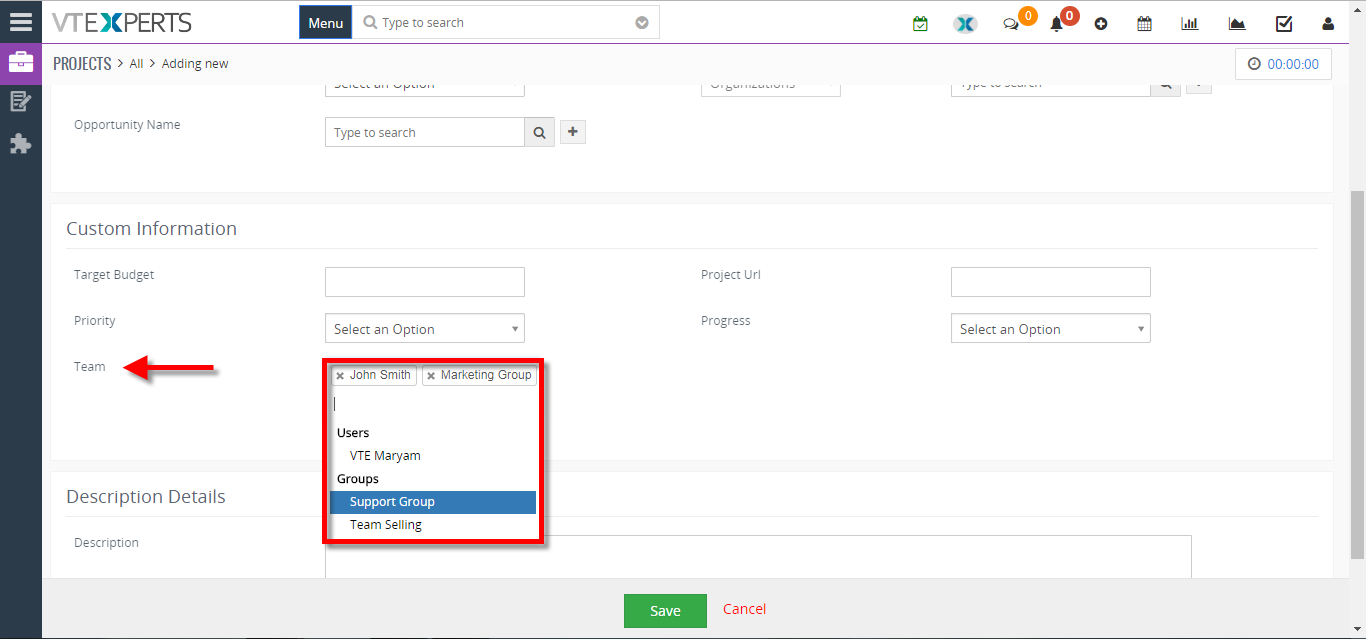
In VTiger 7, User can assign multiple user of groups to a record by using our Multi User Assignment extension. The extension includes a special field which has a list of all the users. As you select the users, it starts gathering a group and assigns it to the record. How to Assign a Record to Multiple Users or Groups Go to the “Menu” and select “CRM Settings“. Select “Multi User Assignment” under the “Other Settings” drop down menu. From here select the module you want to assign multiple user and click on the “Save” button. Go to the selected module (For this example we use Projects) and click on the “Add Project” button. From here you can assign multi user to the project by adding the user’s in “Team Field“. For further help contact us on help@vtexperts.com. We’ll be glad to be of service.
How to enable php-imagick (ImageMagick)
December 19, 2017
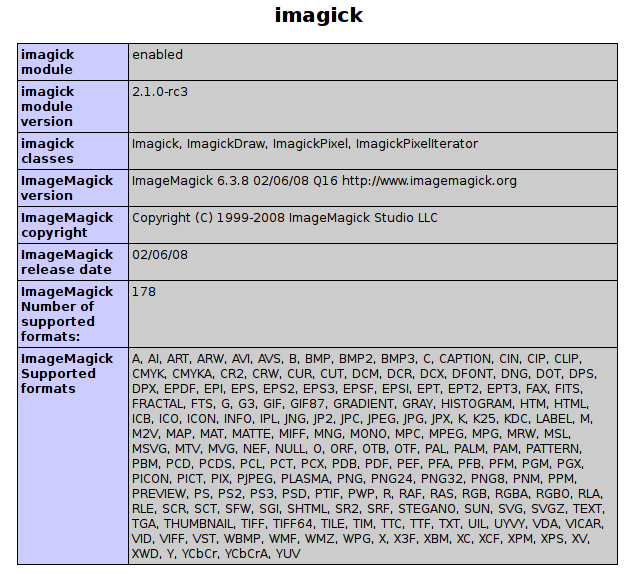
Article
php-imagick (ImageMagick) is a php extension that is required to use our Email Marketing plugin for VTiger. In most cases, it will be pre-installed on your server/hosting, however if you spot warning message when creating email templates – you then need to enable/install php-imagick. Dedicated Unix Server If you are server administrator, you will need to log into terminal (SSH) using putty and install imagick. Ubuntu: Run “apt-get install php-imagick” and restart your webserver. Debian: Run “apt-get install php-imagick and restart your webserver. Centos: Run “yum install php-imagick” and restart your webserver. If none of those work – please try google and see what you can come with. Every server is unique and it’s hard to explain in a tutorial that applies to all. Shared Server (Hosting) If your VTiger is hosted at hostgator, godaddy, deamhost, siteground, etc.. shared plan – it is your best bet to either contact
Track Time Spent On Tickets, Projects Or Contacts In VTiger 7
December 19, 2017
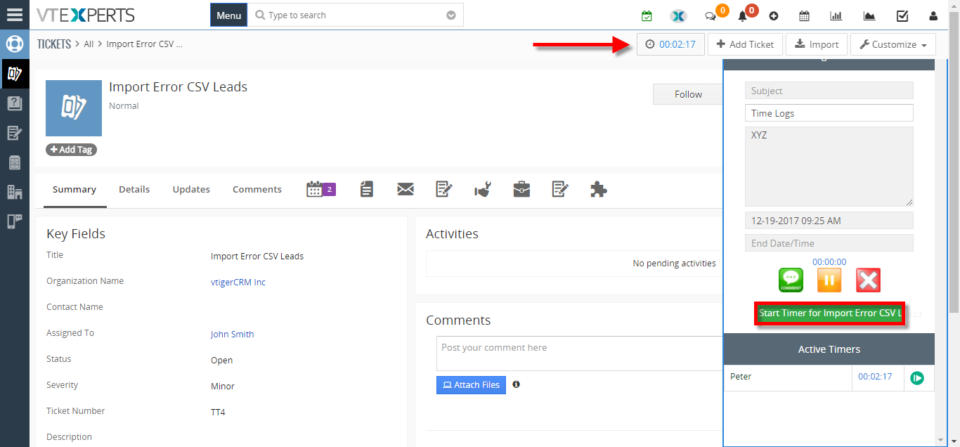
Article
In VTiger 7, User can easily track the time spent while working on a task by using our Time Tracker extension. It’s unique design allows to show and hide the timer within a single click without leaving the page. It also includes the ability to run multiple timers & switch between them. Custom fields, comments, & manual time tracking are also supported. How to Track Time Click on the “Menu” button and select “Contacts“. Select a contact you want to start tracking the time for. Click on the “Timer Icon” to open the Time Tracker popup window and start the timer. Go to the “Tickets Module” and select a ticket you want to track time for. Click on the “Timer Icon” and then click on the “Start timer for the (Module Name)” button in the Time Tracker popup window. For further help contact us on help@vtexperts.com we’ll be glad to be of
Enforce/Require Users To Change Password Every 90 Days In VTiger 7
December 16, 2017
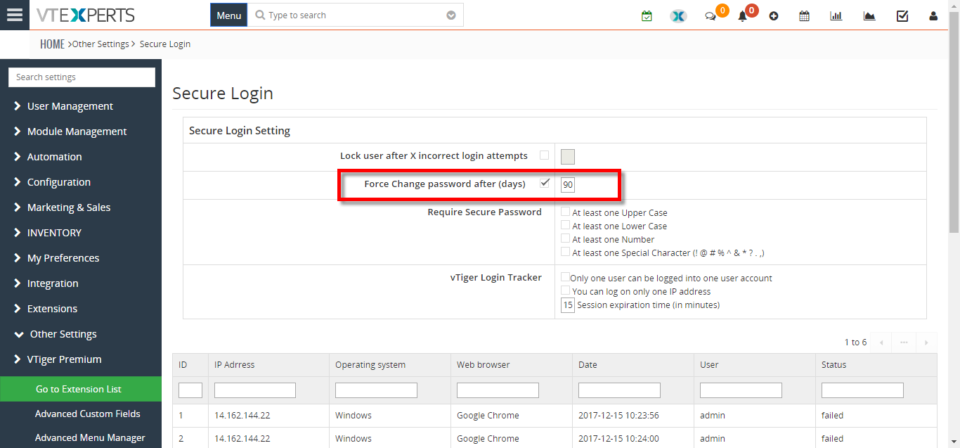
Article
In VTiger 7, User can enforce proper security by using VTiger Enhanced Security extension. Our tool allows system administrators to force users to change their passwords every xx days, and implements secure password rules (one lower/upper case, number, special character). How to Enforce/Require Users to Change Password Every 90 Days Go to the “MENU” and click on the “Settings” button and select “CRM Settings“. Under “VTiger Premium” drop down menu select “Enhanced User Security“. To configure the force change password requirement “Check Box” the options and set the value “90” in the given space. For further help contact us on help@vtexperts.com. We’ll be glad to be of service.
New – “Actions” Button Column On Activity Reminder / Calendar Popup For VTiger 7
December 15, 2017
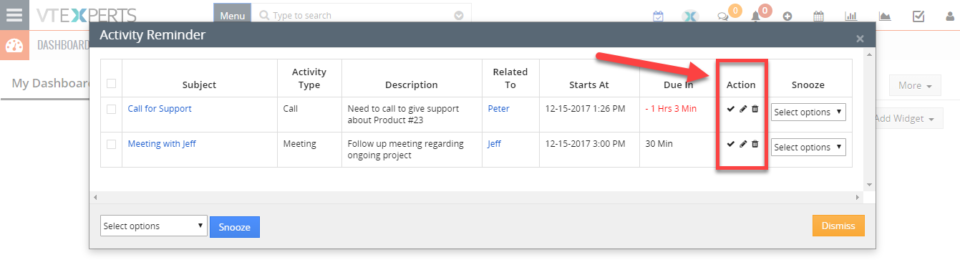
Article
There’s a productivity centered extension Activity Reminder (Popup) for VTiger that gives reminders similar to Outlook. The reminder popup shows up automatically when the activity is due and displays current day’s activities with basic details such as subject, description, related to (contact, lead, organization, etc..) as well as Due In. We recently gave it a major upgrade and added the “Actions” button as a column to the reminder popup. Previously, those actions buttons were only accessible when you go to calendar > specific activity > and hover your mouse over it. With the Activity Reminder (popup) extension, now users can edit, mark as done, and delete any activities without the need to visit the actual activity in the Calendar. When you open the reminder popup (extension button at the top right – needs the extension to be installed), you will see this new column named “Action”. The action buttons
Enforce/Require Strong Password For Users In VTiger 7
December 15, 2017
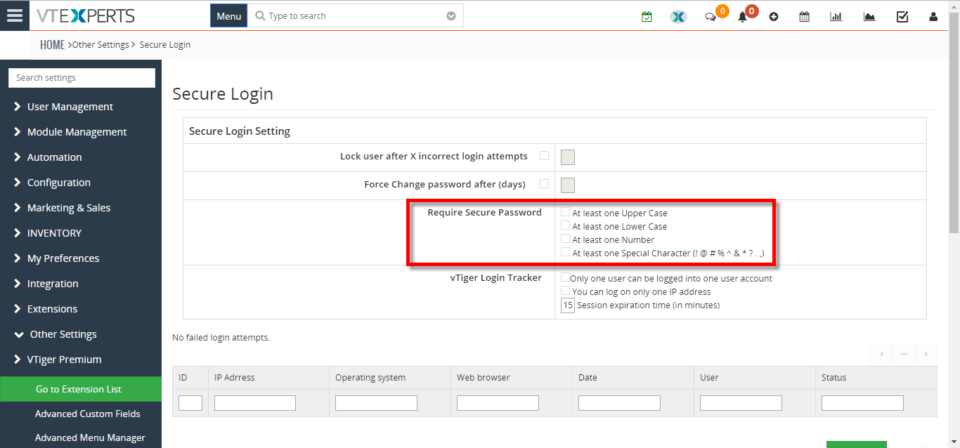
Article
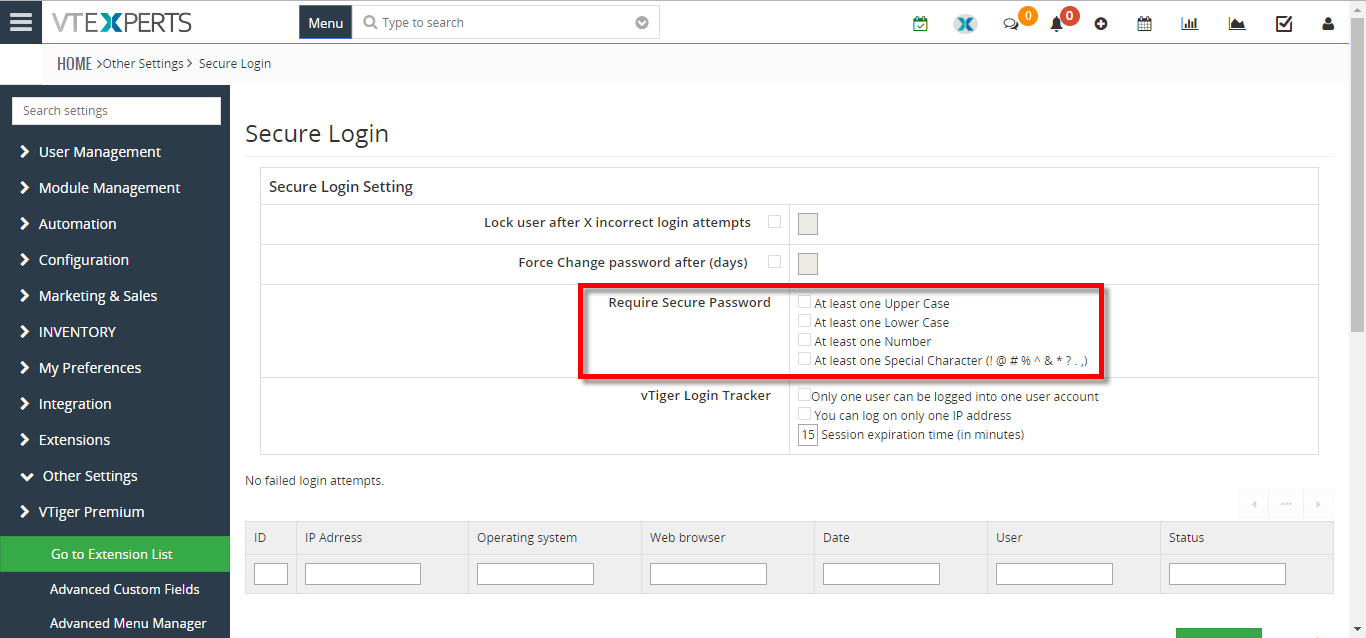
By default, there is no restriction in VTiger 7 on how secure a user’s password is. That results in CRM users ending up setting very less secure passwords and leaving the CRM and confidential data for several vulnerabilities. However, you can overcome this loophole in VTiger 7 by using VTiger Enhanced Security extension. The extension is designed to enforce proper security standards in VTiger. Our tool allows system administrators to implements secure password rules (one lower/upper case, number, special character etc whatever you want to configure). How to Enforce/Require Strong Password Go to the “MENU” and click on the “Settings” button and select “CRM Settings“. Under “VTiger Premium” drop down menu select “Enhanced User Security“. To configure the password requirements, “Check Box” the options you want to add in the requirements. Once setup, users will need to setup more secure passwords. In addition, the extension also have several more features. Take a
Setup Colored Picklists In VTiger 7
December 9, 2017
Article
For a while, VTiger users have been craving to get the options in picklists colored so they don’t have to read the options each time they open the list. The option is finally here. In VTiger 7, admins can setup colors for Picklists fields menu. It is extremely helpful to quickly identify the option you’re looking for. How to Setup Colored Picklists Go to the “Menu” and click on the “Settings” button and select “CRM Settings“. Under the “Configuration” drop down menu select “Picklist Field Value“. From here you can add a New Value or Edit an old one. Select a color for the Picklist Field Value and click on the “save” button. After configuring the Picklist Field Color you can see the color on the item name. For further information contact us on help@vtexperts.com. We’ll be glad to be of service.
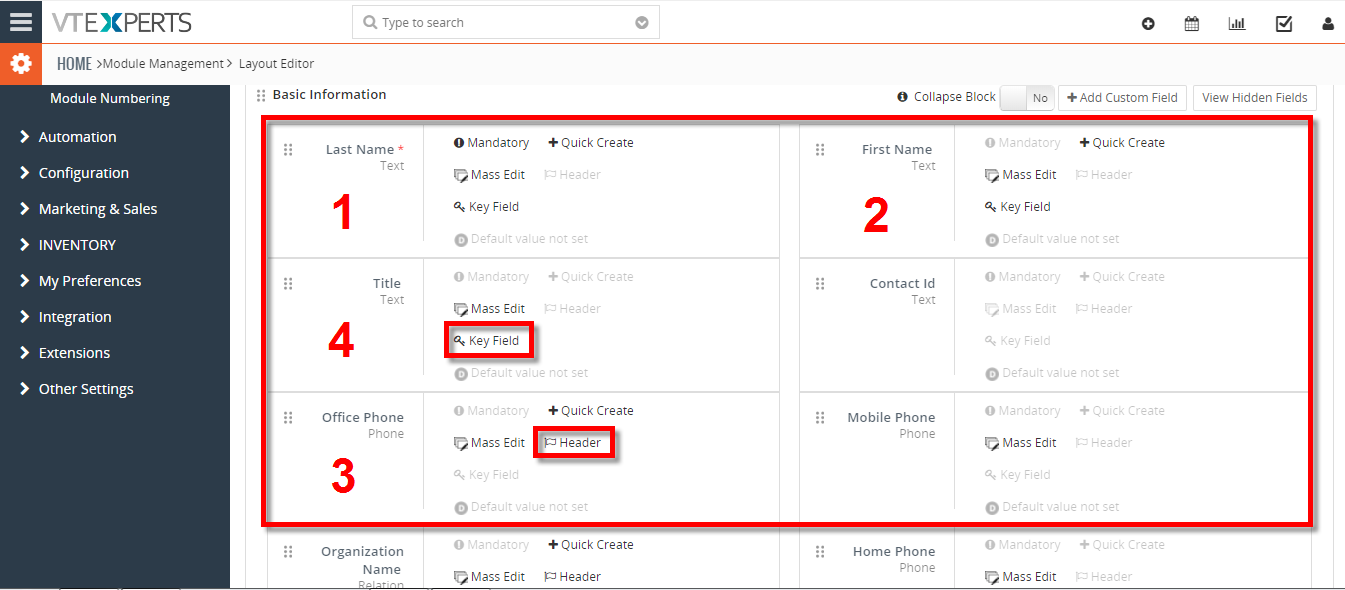
What Are Key Fields And How To Set Them Up In VTiger 7
December 6, 2017

Article
In VTiger 7, Key Fields are shown in the summary view in most module records. This includes the records in Contacts, Organizations, Leads, Opportunities, Quotes, Sales Orders, and more. How to Set Key Fields Go to the “Menu” and click on the “Settings” button and select “CRM Settings“. Under the “Module Management” drop down menu select “Module Layouts & Fields“. From here select the module. Click on the “Key Field” button to Show/Hide them in key field view. For further help contact us on Help@vtexperts.com. We’ll be glad to be of service.