

Perform Promising Actions On Dropdown Field Menus Wielding VTiger Picklist Editor
Picklist Field Values are found all over the CRM in modules. Say it is Lead, Opportunity, Contact, or wherever a drop-down is. As important as the Picklist Field Values are, as dozens of other features of Vtiger 7, Picklist Field Values are customizable. From adding a new Picklist field to rearranging and deleting a field value, Picklist editor provides countless options.
It is worth mentioning that picklist field values are not same for all the roles and differ according to the permission that his/her role has. You can read about Roles in details in this document.
![]()
Insert New Picklist Field Values to Lists
With Vtiger 7, Picklist field values can be added to existing ones in the lists. The whole purpose is to enhance the versatility of the CRM. After the custom picklist value(s) is created, they will be available for selection in respective module.
This is the text book protocol to add new picklist value:
- In a module, click on the Customize button
- Then select Picklist Field Values
- On this screen press the +Add Value icon
- A popup will appear, where basic information about the picklist value will be populated
- In the first field provide an Item Value(New Picklist Value)
- Then grant access to specific roles in Assign to Rolevalue (who can access these values based on roles).

- You can optionally designate a color for your picklist value that will be used in list view of your module
- Click Save to create a new value.
The Picklist name will be visible in the All Values tab.
Refer: Adding a picklist field in a module
Picklist Fields’s Extensive Functionality
Picklist fields are available with wide range of customizations. With Picklist editor, we can:
- Adding new values to existing picklist fields
- Modify fields
- Rearranging existing values of picklist fields
- Delete a field
- Assign roles on selected picklist values.
To perform any of the mentioned actions:
- Go to the Menu and click Settings
- In Configuration, click Picklist Field Values
Read this article to learn about Picklist Dependency.
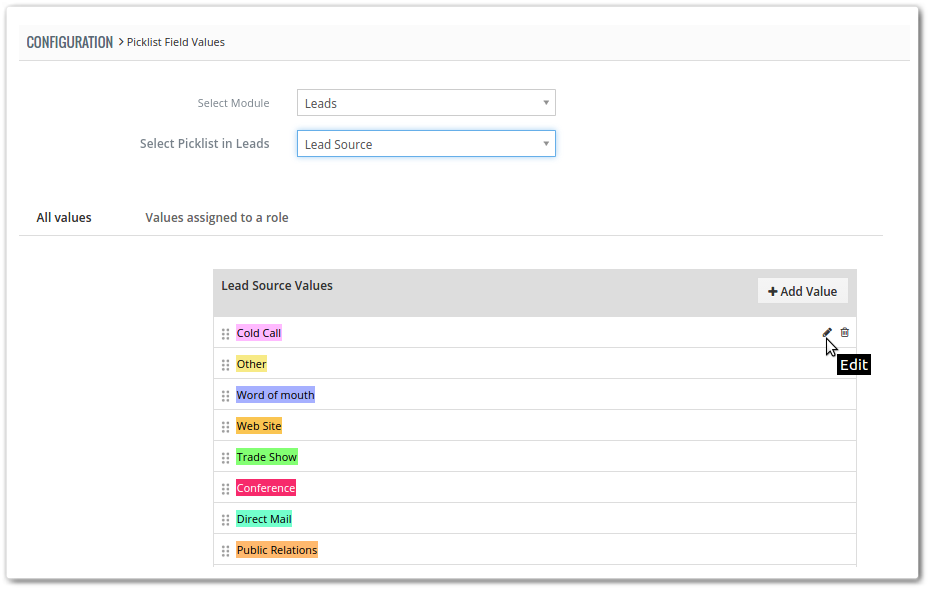
Editing Existing Picklist
To do changes to a current picklist’s fields:
- Choose the module you want to work upon by Select Moduledropdown (e.g.: Leads, Contacts, etc.)
- Then use the Select Picklist in [Module]dropdown to open up the available picklist fields for the current module.
- With this drop-down, you can handpick the desired picklist field to perform global actions.


Organize Picklist Values
With this tool, you can rearrange the positions of picklist values in any module’s list. Here how you can accomplish the purpose:
- First of all take a module and desired picklist field
- Simply drag and drop desired values
- When the repositioning of all values is done, press the Savebutton to apply the changes.
Rename Field Values in Drop-downs
You can simply assign a new title to any picklist field value. For this motive:
- Go to the picklist field of the module which you want to modify
- There is that Edit button in the All Values List

- Click on the button and assign a new name
- Then Save to apply the changes.
Removing Existing Values
A value may stop serving a purpose. You can always delete a picklist value in any module in Vtiger 7 with these steps:
- In the module, choose the picklist field
- Then go to the All Values List
- Click Trash Button


- It will open up a popup. Press the Delete button on the screen
Assigning Values to Selected Role(s)
Follow few simple steps to add the picklist to new roles
- First of all navigate to the Values assigned to a role tab
- In the tab, click on the Role name dropdown menu and select a role
- Click in the box and select the role
- Finally Save and exit.

Note! Once the new item value is added to the Role, only the users granted access can reach and use the picklist values.

VTExperts Advanced Custom Fields: Second Assigned To Field Filter in vTiger